Redis学习——高级篇⑥
Redis学习——高级篇⑥
-
- = = = = Redis7高级之简单实现布隆过滤器BloomFilter (七) = = = =
- 7 布隆过滤器
-
- 1. 是什么
- 2.能干嘛
- 3.实现原理和数据结构
- 4.使用三步骤
- 5.尝试手写简单的布隆过滤器,结合bitmap
-
- 1.整体架构
- 2.步骤设计
- 3 springboot + redis + mybatis+布隆过滤器 整合
- 6.布隆过滤器优缺点

= = = = Redis7高级之简单实现布隆过滤器BloomFilter (七) = = = =
7 布隆过滤器

1. 是什么
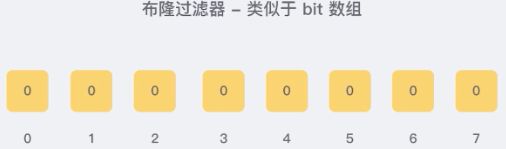
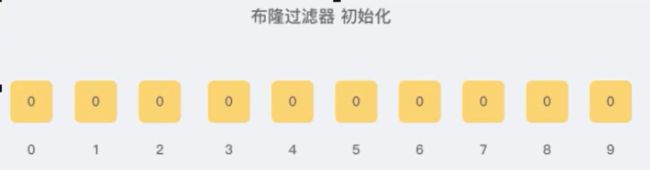
由一个初值都为零的bit数组和多个哈希函数构成,用来快速判断集合中是否存在某个元素
布隆过滤器的初始状态

目的
- 减少内存占用
方式
- 不保存数据信息,只是在内存中做一个是否存在的标记flag
本质
- 判断具体数据是否村在于一个大的集合中
布隆过滤器是一种类似 set 的数据结构,只是统计结果在巨量数据下有点小瑕疵,不够完美
- 它实际上是一个很长的二进制数组(00000000)+一系列随机hash算法映射函数,主要用于判断一个元素是否在集合中。 + 通常我们会遇到很多要判断一个元素是否在某个集合中的业务场景,一般想到的是将集合中所有元素保存起来,然后通过比较确定。
- 链表、树、哈希表等等数据结构都是这种思路。但是随着集合中元素的增加,我们需要的存储空间也会呈现线性增长,最终达到瓶颈。同时检索速度也越来越慢,上述三种结构的检索时间复杂度分别为 O ( n ) O(n) O(n), O ( l o g n ) O(logn) O(logn), O ( 1 ) O(1) O(1)。这个时候,布隆过滤器(Bloom Filter)就应运而生
2.能干嘛
高效地插入和查询,占用空间少,返回地结果是不确定性 + 不完美性
- 一个元素如果判断结果:存在时,元素不一定存在,不存在时,元素一定不存在
布隆过滤器可以添加元素,但是不能删除元素
- 涉及到hashcode判断依据,删掉元素会导致误判率增加
- 为什么不能删掉?
- 因为他是有多个 hash 函数,对一个值进行多次 hash 运算,将获得的每个值,在对应位置存 1 ,容易导致这个 1 也代表别的值,一旦删除,另一个值也无法通过
3.实现原理和数据结构
布隆过滤器(Bloom Filter) 是一种专门用来解决去重问题的高级数据结构。
实质就是一个大型位数组和几个不同的无偏hash函数(无偏表示分布均匀)。由一个初值为零地bit数组和多个哈希函数构成,用来快速判断某个数据是否存在。但是跟HyperLogLog一样,他也有一点不精确,存在一定的误判概率
-
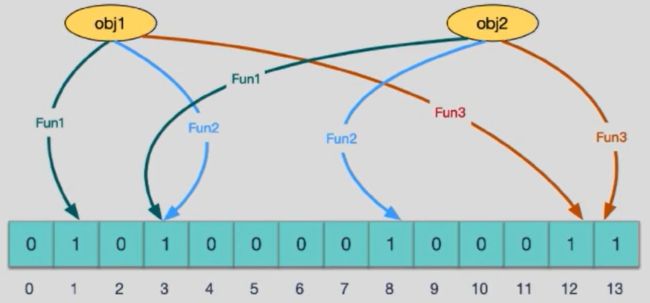
添加 key 时
- 使用多个 hash 函数对key进行hash运算得到一个整数索引值,对位数组长度进行取模运算得到一个位置
- 每个 hash 函数都会得到一个不同的位置,将这几个位置都置 1 就完成了 add 操作
-
查询 key 时
- 只要有其中一位是零就表示这个key不存在,但如果都是1,则不一定存在对应的key
-
结论
- 有,可能有
- 无,肯定无
-
hash 冲突导致数据不精准1
- 查询的时候看看这几个点是不是 1 ,就可以大概率直到集合中有没有它了,如果这些点,有任何一个为零则被查询变量一定不在,如果都是 1,则被查询变量很可能存在
- 正是基于布隆过滤器的快速检测特性,我们可以在把数据写入数据库时,使用布隆过滤器做个标记,当缓存缺失后,应用查询数据库时,可以通过查询布隆过滤器快速判断数据是否存在,如果不存在,就不用再去数据库中查询了。这样一来,即使发生了缓存穿透了,大量请求只会查询Redis和布隆过滤器,而不会积压到数据库,也就不会影响数据库的正常运行。布隆过滤器可以使用redis实现,本身就能承担较大的并发访问压力
-
hash 冲突导致数据不精准2
-
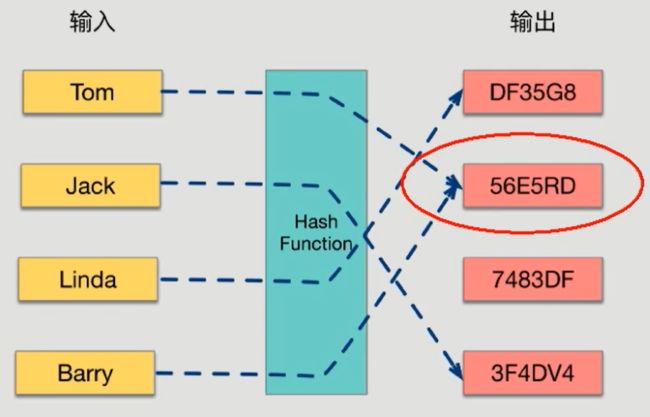
哈希函数的概念是:将任意大小的输入数据转换成特定大小的输出数据的函数,转换后的数据称为哈希值或哈希编码,也叫散列值
-
如果两个散列值是不相同的(根据同一函数)那么这两个散列值的原始输入也是不相同的。
-
这个特性是散列函数具有确定性的结果,具有这种性质的散列函数称为单向散列函数。
-
散列函数的输入和输出不是唯一对应关系的,如果两个散列值相同,两个输入值很可能是相同的,但也可能不同,这种情况称为“散列碰撞(collision)”
-
用 hash表存储大数据量时,空间效率还是很低,当只有一个 hash 函数时,还很容易发生哈希碰撞。
-
4.使用三步骤
- 本质上 是由长度为 m 的位向量或位列表(仅包含 0 或 1 位值的列表)组成,最初所有的值均设置为 0
- 添加数据,为了尽量地址不冲突,使用多个hash函数对key进行运算,算得一个下标索引值,然后对数据长度进行取模运算得到一个位置,每个 hash 函数都会算得一个不同的位置。再把位数组的这几个位置都置为 1 就完成了 add 操作。
对字符串进行多次hash(key) → 取模运行→ 得到坑位

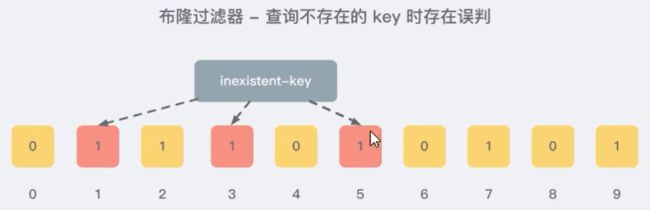
- 向布隆过滤器查询某个key是否存在时,先把这个 key 通过相同的多个 hash 函数进行运算,查看对应的位置是否都为 1,只要有一个位为零,那么说明布隆过滤器中这个 key 不存在;如果这几个位置全都是 1,那么说明极有可能存在;
- 总结
- 是否存在
- 有,可能有
- 无,肯定无
- 使用是最好不要让实际元素数量远大于初始化数量,一次给够避免扩容
- 当实际元素数量超过初始化数量,应该对布隆过滤器进行重建,重新分配一个size 更大的过滤器,再将所有的历史元素批量add
- 是否存在
5.尝试手写简单的布隆过滤器,结合bitmap
1.整体架构
缓存穿透是什么
一般情况下,先查询缓存redis是否有该条数据,缓存中没有时,再查询数据库。
当数据库也不存在该条数据时,每次查询都要访问数据库,这就是缓存穿透。
缓存透带来的问题是,当有大量请求查询数据库不存在的数据时,就会给数据库带来压力,甚至会拖垮数据库。
可以使用布隆过滤器解决缓存穿透的问题;
把已存在数据的key存在布隆过滤器中,相当于redis前面挡着一个布隆过滤器。
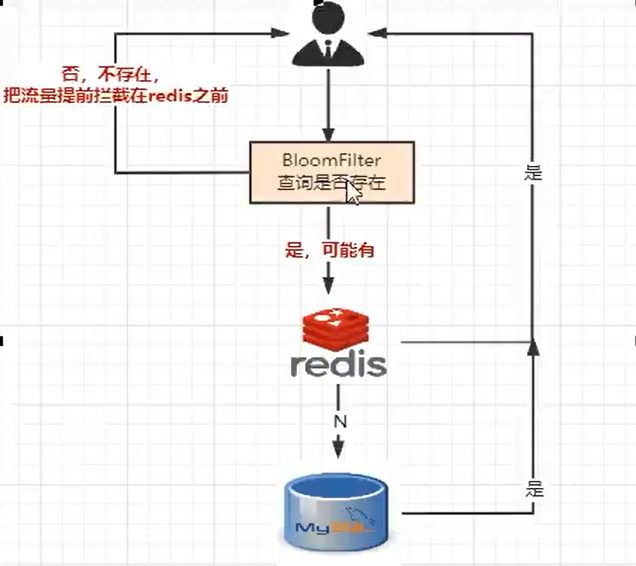
当有新的请求时,先到布隆过滤器中查询是否存在:
如果布隆过滤器中不存在该条数据则直接返回; 如果布隆过滤器中已存在,才去查询缓存redis,如果redis里没查询到则再查询Mysq|数据库
2.步骤设计
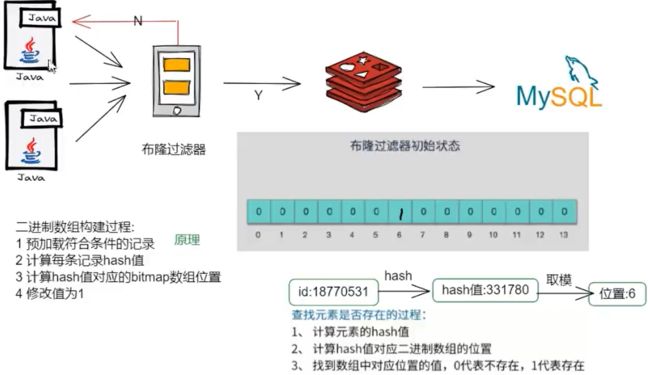
- setBit的构建过程
@PostConstruct初始化白名单数据- 计算元素hash值
- 得到hash值算出对应的二进制数组的坑位
- 将对应坑位的值修改为数字1,表示存在
getBit查询是否存在- 计算元素hash值
- 得到hash值算出对应的二进制数组的坑位
- 返回对应坑位的值,0表示无,1表示存在
3 springboot + redis + mybatis+布隆过滤器 整合
-
使用Mapper4自动生成
- 先创建 mybatis-generator 工程
建表sql
CREATE TABLE `t_customer` (

  `id` int(20) NOT NULL AUTO_INCREMENT,

  `cname` varchar(50) NOT NULL,

  `age` int(10) NOT NULL,

  `phone` varchar(20) NOT NULL,

  `sex` tinyint(4) NOT NULL,

  `birth` timestamp NOT NULL DEFAULT CURRENT_TIMESTAMP ON UPDATE CURRENT_TIMESTAMP,

  PRIMARY KEY (`id`),

  KEY `idx_cname` (`cname`)

) ENGINE=InnoDB AUTO_INCREMENT=10 DEFAULT CHARSET=utf8mb4
pom
<?xml version="1.0" encoding="UTF-8"?>
<project xmlns="http://maven.apache.org/POM/4.0.0"
         xmlns:xsi="http://www.w3.org/2001/XMLSchema-instance"
         xsi:schemaLocation="http://maven.apache.org/POM/4.0.0 http://maven.apache.org/xsd/maven-4.0.0.xsd">
    <modelVersion>4.0.0</modelVersion>

    <groupId>com.xfcy</groupId>
    <artifactId>mybatis_generator</artifactId>
    <version>1.0-SNAPSHOT</version>

    <parent>
        <groupId>org.springframework.boot</groupId>
        <artifactId>spring-boot-starter-parent</artifactId>
        <version>2.6.10</version>
        <relativePath/>
    </parent>


    <properties>
        <!--  依赖版本号 -->
        <project.build.sourceEncoding>UTF-8</project.build.sourceEncoding>
        <maven.compiler.source>1.8</maven.compiler.source>
        <maven.compiler.target>1.8</maven.compiler.target>
        <java.version>1.8</java.version>
        <hutool.version>5.5.8</hutool.version>
        <druid.version>1.1.18</druid.version>
        <mapper.version>4.1.5</mapper.version>
        <pagehelper.version>5.1.4</pagehelper.version>
        <mysql.version>5.1.39</mysql.version>
        <swagger2.version>2.9.2</swagger2.version>
        <swagger-ui.version>2.9.2</swagger-ui.version>
        <mybatis.spring.version>2.1.3</mybatis.spring.version>
    </properties>


    <dependencies>
        <dependency>
            <groupId>org.springframework.boot</groupId>
            <artifactId>spring-boot-starter-web</artifactId>
        </dependency>

        <!--Mybatis 通用mapper tk单独使用,自己带着版本号-->
        <dependency>
            <groupId>org.mybatis</groupId>
            <artifactId>mybatis</artifactId>
            <version>3.4.6</version>
        </dependency>
        <!--mybatis-spring-->
        <dependency>
            <groupId>org.mybatis.spring.boot</groupId>
            <artifactId>mybatis-spring-boot-starter</artifactId>
            <version>${mybatis.spring.version}</version>
        </dependency>
        <!-- Mybatis Generator -->
        <dependency>
            <groupId>org.mybatis.generator</groupId>
            <artifactId>mybatis-generator-core</artifactId>
            <version>1.4.0</version>
            <scope>compile</scope>
            <optional>true</optional>
        </dependency>
        <!--通用Mapper-->
        <dependency>
            <groupId>tk.mybatis</groupId>
            <artifactId>mapper</artifactId>
            <version>${mapper.version}</version>
        </dependency>
        <!--persistence-->
        <dependency>
            <groupId>javax.persistence</groupId>
            <artifactId>persistence-api</artifactId>
            <version>1.0.2</version>
        </dependency>

        <dependency>
            <groupId>org.projectlombok</groupId>
            <artifactId>lombok</artifactId>
            <optional>true</optional>
        </dependency>
        <dependency>
            <groupId>org.springframework.boot</groupId>
            <artifactId>spring-boot-starter-test</artifactId>
            <scope>test</scope>
            <exclusions>
                <exclusion>
                    <groupId>org.junit.vintage</groupId>
                    <artifactId>junit-vintage-engine</artifactId>
                </exclusion>
            </exclusions>
        </dependency>
    </dependencies>

    <build>
        <resources>
            <resource>
                <directory>${basedir}/src/main/java</directory>
                <includes>
                    <include>**/*.xml


                ${basedir}/src/main/resources


                org.springframework.boot
                spring-boot-maven-plugin


                            org.projectlombok
                            lombok


                org.mybatis.generator
                mybatis-generator-maven-plugin
                1.3.6

                    ${basedir}/src/main/resources/generatorConfig.xml
                    true
                    true


                        mysql
                        mysql-connector-java
                        ${mysql.version}


                        tk.mybatis
                        mapper
                        ${mapper.version}
src/main/resources
- 新建 config.properties
#t_customer表包名
#com.xfcy 输自己用的包名 要不然不能直接cv到自己用的工程里
package.name=com.xfcy

jdbc.driverClass = com.mysql.jdbc.Driver
jdbc.url = jdbc:mysql://localhost:3306/db_boot
jdbc.user = root
jdbc.password =123456
- 新建 generatorConfig.xml
DOCTYPE generatorConfiguration
        PUBLIC "-//mybatis.org//DTD MyBatis Generator Configuration 1.0//EN"
        "http://mybatis.org/dtd/mybatis-generator-config_1_0.dtd">

<generatorConfiguration>
    <properties resource="config.properties"/>

    <context id="Mysql" targetRuntime="MyBatis3Simple" defaultModelType="flat">
        <property name="beginningDelimiter" value="`"/>
        <property name="endingDelimiter" value="`"/>

        <plugin type="tk.mybatis.mapper.generator.MapperPlugin">
            <property name="mappers" value="tk.mybatis.mapper.common.Mapper"/>
            <property name="caseSensitive" value="true"/>
        plugin>

        <jdbcConnection driverClass="${jdbc.driverClass}"
                        connectionURL="${jdbc.url}"
                        userId="${jdbc.user}"
                        password="${jdbc.password}">
        jdbcConnection>

        <javaModelGenerator targetPackage="${package.name}.entities" targetProject="src/main/java"/>

        <sqlMapGenerator targetPackage="${package.name}.mapper" targetProject="src/main/java"/>

        <javaClientGenerator targetPackage="${package.name}.mapper" targetProject="src/main/java" type="XMLMAPPER"/>


        <table tableName="t_customer" domainObjectName="Customer">
            <generatedKey column="id" sqlStatement="JDBC"/>
        table>
    context>
generatorConfiguration>
- 一键生成
ps:生成这两个即可
-
整合redis
- 新建工程
- POM
   <parent>
       <groupId>org.springframework.boot</groupId>
       <artifactId>spring-boot-starter-parent</artifactId>
       <version>2.6.10</version>
       <relativePath/>
   </parent>

   <properties>
       <project.build.sourceEncoding>UTF-8</project.build.sourceEncoding>
       <maven.compiler.source>1.8</maven.compiler.source>
       <maven.compiler.target>1.8</maven.compiler.target>
       <junit.version>4.12</junit.version>
       <log4j.version>1.2.17</log4j.version>
       <lombok.version>1.16.18</lombok.version>
   </properties>

   <dependencies>
       <!--SpringBoot通用依赖模块-->
       <dependency>
           <groupId>org.springframework.boot</groupId>
           <artifactId>spring-boot-starter-web</artifactId>
       </dependency>
       <!--jedis-->
       <dependency>
           <groupId>redis.clients</groupId>
           <artifactId>jedis</artifactId>
           <version>4.3.1</version>
       </dependency>
       <!--lettuce-->
       <!--<dependency>
           <groupId>io.lettuce</groupId>
           <artifactId>lettuce-core</artifactId>
           <version>6.2.1.RELEASE</version>
       </dependency>-->
       <!--SpringBoot与Redis整合依赖-->
       <dependency>
           <groupId>org.springframework.boot</groupId>
           <artifactId>spring-boot-starter-data-redis</artifactId>
       </dependency>
       <dependency>
           <groupId>org.apache.commons</groupId>
           <artifactId>commons-pool2</artifactId>
       </dependency>
       <!--swagger2-->
       <dependency>
           <groupId>io.springfox</groupId>
           <artifactId>springfox-swagger2</artifactId>
           <version>2.9.2</version>
       </dependency>
       <dependency>
           <groupId>io.springfox</groupId>
           <artifactId>springfox-swagger-ui</artifactId>
           <version>2.9.2</version>
       </dependency>
       <!--Mysql数据库驱动-->
       <dependency>
           <groupId>mysql</groupId>
           <artifactId>mysql-connector-java</artifactId>
           <version>5.1.47</version>
       </dependency>
       <!--SpringBoot集成druid连接池-->
       <dependency>
           <groupId>com.alibaba</groupId>
           <artifactId>druid-spring-boot-starter</artifactId>
           <version>1.1.10</version>
       </dependency>
       <dependency>
           <groupId>com.alibaba</groupId>
           <artifactId>druid</artifactId>
           <version>1.1.16</version>
       </dependency>
       <!--mybatis和springboot整合-->
       <dependency>
           <groupId>org.mybatis.spring.boot</groupId>
           <artifactId>mybatis-spring-boot-starter</artifactId>
           <version>1.3.0</version>
       </dependency>
       <!--hutool-->
       <dependency>
           <groupId>cn.hutool</groupId>
           <artifactId>hutool-all</artifactId>
           <version>5.2.3</version>
       </dependency>
       <!--persistence-->
       <dependency>
           <groupId>javax.persistence</groupId>
           <artifactId>persistence-api</artifactId>
           <version>1.0.2</version>
       </dependency>
       <!--通用Mapper-->
       <dependency>
           <groupId>tk.mybatis</groupId>
           <artifactId>mapper</artifactId>
           <version>4.1.5</version>
       </dependency>
       <dependency>
           <groupId>org.springframework.boot</groupId>
           <artifactId>spring-boot-autoconfigure</artifactId>
       </dependency>
       <!--通用基础配置junit/devtools/test/log4j/lombok/-->
       <dependency>
           <groupId>junit</groupId>
           <artifactId>junit</artifactId>
           <version>${junit.version}</version>
       </dependency>
       <dependency>
           <groupId>org.springframework.boot</groupId>
           <artifactId>spring-boot-starter-test</artifactId>
           <scope>test</scope>
       </dependency>
       <dependency>
           <groupId>log4j</groupId>
           <artifactId>log4j</artifactId>
           <version>${log4j.version}</version>
       </dependency>
       <dependency>
           <groupId>org.projectlombok</groupId>
           <artifactId>lombok</artifactId>
           <version>${lombok.version}</version>
           <optional>true</optional>
       </dependency>
   </dependencies>

   <build>
       <plugins>
           <plugin>
               <groupId>org.springframework.boot</groupId>
               <artifactId>spring-boot-maven-plugin</artifactId>
           </plugin>
       </plugins>
   </build>
- YML
server.port=7070

# ========================swagger=====================
spring.swagger2.enabled=true
#在springboot2.6.X结合swagger2.9.X会提示documentationPluginsBootstrapper空指针异常,
#原因是在springboot2.6.X中将SpringMVC默认路径匹配策略从AntPathMatcher更改为PathPatternParser,
# 导致出错,解决办法是matching-strategy切换回之前ant_path_matcher
spring.mvc.pathmatch.matching-strategy=ant_path_matcher

# ========================redis单机=====================
spring.redis.database=0
## 修改为自己真实IP
spring.redis.host=192.168.238.111
spring.redis.port=6379
spring.redis.password=123456
spring.redis.lettuce.pool.max-active=8
spring.redis.lettuce.pool.max-wait=-1ms
spring.redis.lettuce.pool.max-idle=8
spring.redis.lettuce.pool.min-idle=0

# ========================logging=====================
logging.level.root=info
logging.level.com.atguigu.redis7=info
logging.pattern.console=%d{yyyy-MM-dd HH:mm:ss.SSS} [%thread] %-5level %logger- %msg%n

logging.file.name=D:/mylogs2023/redis7_study.log
logging.pattern.file=%d{yyyy-MM-dd HH:mm:ss.SSS} [%thread] %-5level %logger- %msg%n

# ========================alibaba.druid=====================
spring.datasource.type=com.alibaba.druid.pool.DruidDataSource
spring.datasource.driver-class-name=com.mysql.jdbc.Driver
spring.datasource.url=jdbc:mysql://localhost:3306/db_boot?useUnicode=true&characterEncoding=utf-8&useSSL=false
spring.datasource.username=root
spring.datasource.password=123456
spring.datasource.druid.test-while-idle=false

# ========================mybatis===================
mybatis.mapper-locations=classpath:mapper/*.xml
mybatis.type-aliases-package=com.xfcy.entities
- 启动类
import org.springframework.boot.SpringApplication;
import org.springframework.boot.autoconfigure.SpringBootApplication;
import tk.mybatis.spring.annotation.MapperScan;

/**
 * customer 是有关简单手写布隆过滤器
 */
@MapperScan("com.xfcy.mapper")   // import tk.mybatis.spring.annotation.MapperScan;
@SpringBootApplication
public class Redis7Study2Application {

    public static void main(String[] args) {
        SpringApplication.run(Redis7Study2Application.class, args);
    }
}
布隆过滤器
- filter 包 BloomFilterInit
import lombok.extern.slf4j.Slf4j;
import org.springframework.data.redis.core.RedisTemplate;
import org.springframework.stereotype.Component;

import javax.annotation.PostConstruct;
import javax.annotation.Resource;

/**
 * 布隆过滤器白名单初始化工具类,一开始就设置一部分数据为白名单所有
 * 白名单业务默认规定:布隆过滤器有,redis 有可能有   布隆过滤器无 redis一定无
 * 白名单业务默认规定:whitelistCustomer
 */
@Component
@Slf4j
public class BloomFilterInit {

    @Resource
    private RedisTemplate redisTemplate;

    @PostConstruct // 初始化白名单数据
    public void init() {
        // 1.白名单客户加载到布隆过滤器
        String key = "customer:11";
        // 2.计算hashValue,由于存在计算出来负数的可能,取绝对值
        int hashValue = Math.abs(key.hashCode());
        // 3.通过hashValue 和 2的32次方后取余,获得对应的下标坑位
        long index = (long) (hashValue % Math.pow(2, 32));
        log.info(key + "对应的坑位 index: {}", index);
        // 4.设置redis里面的bitmap对应类型的坑位,将该值设置为1
        redisTemplate.opsForValue().setBit("whitelistCustomer", index, true);
    }
}
- utils包 CheckUtils
import javax.annotation.Resource;


@Component
@Slf4j
public class CheckUtils {

    @Resource
    private RedisTemplate redisTemplate;

    public boolean checkWithBloomFilter(String checkItem, String key){
        int hashValue = Math.abs(key.hashCode());
        long index = (long) (hashValue % Math.pow(2, 32));
        boolean existOK = redisTemplate.opsForValue().getBit(checkItem, index);
        log.info("---->:" + key +"对应坑位下标index:"+ index + "是否存在:" + existOK);
        return existOK;
    }
}
-
业务类
-
entity 拷贝生成的 Customer类
-
mapper 拷贝生成的CustomerMapper 类
-
src/main/resources/mapper 拷贝生成的 CustomerMapper.xml
-
service类 (个人修改了一部分 加上了双检加锁)
-
import com.xfcy.entities.Customer;
import com.xfcy.mapper.CustomerMapper;
import com.xfcy.utils.CheckUtils;
import lombok.extern.slf4j.Slf4j;
import org.springframework.data.redis.core.RedisTemplate;
import org.springframework.stereotype.Service;

import javax.annotation.Resource;
import java.util.concurrent.TimeUnit;

@Service
@Slf4j
public class CustomerService {

    public static final String CACHE_KEY_CUSTOMER = "customer:";

    @Resource
    private CustomerMapper customerMapper;

    @Resource
    private RedisTemplate redisTemplate;

    @Resource
    private CheckUtils checkUtils;

    /**
     * 写操作
     *
     * @param customer
     */
    public void addCustomer(Customer customer) {
        int i = customerMapper.insertSelective(customer);

        if (i > 0) {
            // mysql 插入成功,需要重新查询一次将数据写进redis
            Customer result = customerMapper.selectByPrimaryKey(customer.getId());
            // redis缓存key
            String key = CACHE_KEY_CUSTOMER + customer.getId();
            // 写入redis
            redisTemplate.opsForValue().set(key, result);
        }
    }

    /**
     * 读操作  + 双检加锁  + null缓存
     */
    public Customer findCustomerById(Integer customerId) {
        Customer customer = null;
        // 缓存redis的key名称
        String key = CACHE_KEY_CUSTOMER + customerId;
        // 1.去redis上查询
        customer = (Customer) redisTemplate.opsForValue().get(key);

        // 2. 如果redis有,直接返回  如果redis没有,在mysql上查询
        if (customer == null) {
            // 3.对于高QPS的优化,进来就先加锁,保证一个请求操作,让外面的redis等待一下,避免击穿mysql(大公司的操作 )
            synchronized (CustomerService.class) {
                // 3.1 第二次查询redis,加锁后
                customer = (Customer) redisTemplate.opsForValue().get(key);

                // 4.mysql有,redis无
                if (customer == null) {
                    // 5.再去查询我们的mysql
                    customer = customerMapper.selectByPrimaryKey(customerId);
                    if (customer == null) {
                        // 6.1 defaultNull 规定为redis查询为空、MySQL查询也没有,缓存一个defaultNull标识为空,以防缓存穿透
                        redisTemplate.opsForValue().set(key, "defaultNull", 7L, TimeUnit.DAYS);
                    } else {
                        // 6.2 把mysql查询到的数据会写到到redis, 保持双写一致性  7天过期
                        redisTemplate.opsForValue().set(key, customer, 7L, TimeUnit.DAYS);
                    }
                }
            }
        }
        return customer;
    }

    /**
     * 业务逻辑没有写错,对于QPS <= 1000 可以使用
     * @param customerId
     * @return
     */
//    public Customer findeCustomerById(Integer customerId) {
//        Customer customer = null;
//        // 缓存redis的key名称
//        String key = CACHE_KEY_CUSTOMER + customerId;
//        // 1.去redis上查询
//        customer = (Customer) redisTemplate.opsForValue().get(key);
//        // 2. 如果redis有,直接返回  如果redis没有,在mysql上查询
//        if(customer == null) {
//            customer = customerMapper.selectByPrimaryKey(customerId);
//            if (customer != null) {
//                redisTemplate.opsForValue().set(key, customer);
//            }
//        }
//        return customer;
//    }

    /**
     * 布隆过滤器 + 双检加锁  注意单个服务,在分布式系统锁将锁不住
     *
     * @param customerId
     * @return
     */
    public Customer findCustomerByIdWithBloomFilter(Integer customerId) {

        Customer customer = null;
        // 1.缓存redis的key名称
        String key = CACHE_KEY_CUSTOMER + customerId;

        if (!checkUtils.checkWithBloomFilter("whitelistCustomer", key)) {
            log.info("白名单没有此信息,不可以访问" + key);
            return null;
        }
        // 1.1 去redis上查询
        customer = (Customer) redisTemplate.opsForValue().get(key);

        // 2. 如果redis有,直接返回  如果redis没有,在mysql上查询
        if (customer == null) {
            // 3.对于高QPS的优化,进来就先加锁,保证一个请求操作,让外面的redis等待一下,避免击穿mysql(大公司的操作 )
            synchronized (CustomerService.class) {
                // 3.1 第二次查询redis,加锁后
                customer = (Customer) redisTemplate.opsForValue().get(key);

                // 4.mysql有,redis无
                if (customer == null) {
                    // 5.再去查询我们的mysql
                    customer = customerMapper.selectByPrimaryKey(customerId);
                    if (customer == null) {
                        // 6.1 defaultNull 规定为redis查询为空、MySQL查询也没有,缓存一个defaultNull标识为空,以防缓存穿透
                        redisTemplate.opsForValue().set(key, "defaultNull", 7L, TimeUnit.DAYS);
                    } else {
                        // 6.2 把mysql查询到的数据会写到到redis, 保持双写一致性  7天过期
                        redisTemplate.opsForValue().set(key, customer, 7L, TimeUnit.DAYS);
                    }
                }
            }
        }
        return customer;
    }
}
- controller
import com.xfcy.entities.Customer;
import com.xfcy.service.CustomerService;
import io.swagger.annotations.Api;
import io.swagger.annotations.ApiOperation;
import lombok.extern.slf4j.Slf4j;
import org.springframework.web.bind.annotation.PathVariable;
import org.springframework.web.bind.annotation.RequestMapping;
import org.springframework.web.bind.annotation.RequestMethod;
import org.springframework.web.bind.annotation.RestController;

import javax.annotation.Resource;
import java.sql.Date;
import java.time.LocalDateTime;
import java.time.ZoneId;
import java.util.Random;

@Api("客户Customer接口+布隆过滤器讲解")
@RestController
@Slf4j
public class CustomerController {
    @Resource
    private CustomerService customerService;

    @ApiOperation("数据库初始化2条customer记录插入")
    @RequestMapping(value = "/customer/add", method = RequestMethod.POST)
    public void addCustomer() {
        for (int i = 0; i < 2; i++) {
            Customer customer = new Customer();
            customer.setCname("customer" +i);
            customer.setAge(new Random().nextInt(30)+1);
            customer.setPhone("12345678910");
            customer.setSex((byte) new Random().nextInt(2));
            customer.setBirth(Date.from(LocalDateTime.now().atZone(ZoneId.systemDefault()).toInstant()));

            customerService.addCustomer(customer);
        }
    }

    @ApiOperation("单个customer查询操作,按照customerId查询")
    @RequestMapping(value = "/customer/{customerId}", method = RequestMethod.GET)
    public Customer findCustomerById(@PathVariable("customerId") Integer customerId){
        return customerService.findCustomerById(customerId);
    }


    @ApiOperation("布隆过滤器单个customer查询操作,按照customerId查询")
    @RequestMapping(value = "/bloomfilter/{customerId}", method = RequestMethod.GET)
    public Customer findCustomerByIdWithBloomFilter(@PathVariable("customerId") Integer customerId){
        return customerService.findCustomerByIdWithBloomFilter(customerId);
    }
}
- 启动 swagger测试,注意要看控制台
6.布隆过滤器优缺点
优点
- 高效地插入和查询,内存占用 bit 空间少
缺点
- 不能删除元素
- 因为删除元素会导致误判率增加,因为hash冲突同一个位置可能存的东西是多个共有的,你删除一个元素的同时可能也把其他的删除了
- 存在误判,不能精准过滤
- 有,可能有
- 无,绝对无
为了解决布隆过滤器不能删除元素的问题,布谷鸟过滤器横空出世。