怎么搭建Eureka做配置中心的springcloud
搭建一个用Eureka做注册中心的springcloud
(1)@EnableDiscoveryClient 注解是基于 spring-cloud-commons 依赖,并且在 classpath 中实现。
(2)@EnableEurekaClient 注解是基于 spring-cloud-netflix 依赖,只能用作 Eureka。
(3)@EnableEurekaClient 只适用于 Eureka 作为注册中心,@EnableDiscoveryClient 可以是其他注册中心
以上是给自己的解释
先说一下nacos和eureka的区别。nacos是需要独立安装的软件做服务器,eureka是cloud框架自带的,类似springboot内置的tomcat,所以一般情况都是独立运行一个项目做(就是单独运行eureka)服务的注册中心。
还有我这做的是三个项目分开的,和三个项目继承一个父maven有一丝丝区别,(区别就是差点被版本问题搞崩溃)
接下来就是搭建项目
老规矩,三步走
这里是注册中心的依赖
第一步导依赖
这个是cloud总依赖,里面包含好多组件及其对应的版本
用标签,就是为了下边的依赖不用指定版本,来找这个去自己找版本
  <dependencyManagement>
        <dependencies>
            <!--cloud的依赖-->
            <dependency>
                <groupId>org.springframework.cloud</groupId>
                <artifactId>spring-cloud-dependencies</artifactId>
                <version>Edgware.SR4</version>
                <type>pom</type>
                <scope>import</scope>
            </dependency>
        </dependencies>
    </dependencyManagement>
注册中心和另两个项目的区别就在这个依赖
<!--注册-->
        <dependency>
            <groupId>org.springframework.cloud</groupId>
            <artifactId>spring-cloud-starter-eureka-server</artifactId>
        </dependency>
下边就是配置文件,接下来俩配置文件也是这,就端口和服务名换一下就行
server:
  port: 8088
spring:
  application:
    name: server#这是服务名,虽然它是注册中心也得把自己注册进去(因为虽然做服务中心也能成为服务提供者)(注册中心,提供者,消费者都是一个相对概念,甚至可以相互调用接口)
eureka:
  client:
    service-url:
      defaultZone: http://localhost:8088/eureka
第三步,开启服务(启动类上加@EnableEurekaServer注解)
import org.springframework.boot.SpringApplication;
import org.springframework.boot.autoconfigure.SpringBootApplication;
import org.springframework.cloud.netflix.eureka.server.EnableEurekaServer;

@SpringBootApplication
@EnableEurekaServer
public class EurekaApplication {
    public static void main(String[] args) {
        SpringApplication.run(EurekaApplication.class,args);
    }
}
我这里没有写其他的类,自己加上就行,和写boot项目一样,该咋写咋写,(这个是注册中心,也不用写,主要是下边俩)创建项目也是创建boot就行注意一点版本问题我这里boot项目用的版本是
    <parent>
        <groupId>org.springframework.boot</groupId>
        <artifactId>spring-boot-starter-parent</artifactId>
        <version>1.5.16.RELEASE</version>
    </parent>
接下来就是服务提供者的项目
也是三步走
(三步走的前提都是创建好boot项目,这个提供者需要加上web依赖,好提供暴露出来的接口)
第一步导依赖
  <dependencyManagement>
        <dependencies>
            <!--cloud的依赖-->
            <dependency>
                <groupId>org.springframework.cloud</groupId>
                <artifactId>spring-cloud-dependencies</artifactId>
                <version>Edgware.SR4</version>
                <type>pom</type>
                <scope>import</scope>
            </dependency>
        </dependencies>
    </dependencyManagement>
提供者的依赖和消费者的一样,消费者的我就不提供了
 <!--注册-->
        <dependency>
            <groupId>org.springframework.cloud</groupId>
            <artifactId>spring-cloud-starter-netflix-eureka-client</artifactId>
        </dependency>
第二步配置文件
server:
  port: 8080
spring:
  application:
    name: provider
eureka:
  client:
    service-url:
      defaultZone: http://localhost:8088/eureka
第三步开启服务(加注解@EnableEurekaClient)
import org.springframework.boot.SpringApplication;
import org.springframework.boot.autoconfigure.SpringBootApplication;
//import org.springframework.cloud.client.discovery.EnableDiscoveryClient;
import org.springframework.cloud.netflix.eureka.EnableEurekaClient;


@SpringBootApplication
//@EnableDiscoveryClient这个是开启nacos的,我之前用的nacos改的
@EnableEurekaClient
public class FirstApplication {

    public static void main(String[] args) {
        SpringApplication.run(FirstApplication.class, args);
    }

}
这个需要对外暴露接口,提供一下吧
//就这样,是不是超熟悉,就是单纯的boot项目增删改查而已
//service还有mapper我没有提供,但是,这个自己随意,甚至让他直接返回字符串都行
@Controller
@RequestMapping("/first")
public class UserController {

    @Autowired
    private UserService userService;


    //按id查找
    @ResponseBody
    @GetMapping("/getUser/{id}")
    public String GetUser(@PathVariable int id) {

        String user= userService.find(id).toString();
       //实在不行,就把上边注释,下边放开
       //String user="我是提供者,消费者调用到了";
        return user;
    }

    //查找全部
    @ResponseBody
    @GetMapping("/getUser")
    public List<User> GetUserAll() {
        List<User> all = userService.findAll();

        return all;
    }
 }
接下来就消费者的项目
依然是三步走
第一步导依赖
这次提供一个完整的吧
注意这个有一个远程调用feign,它是创建各种http请求的,且对请求进行了封装,让我们更方便调用。
<?xml version="1.0" encoding="UTF-8"?>
<project xmlns="http://maven.apache.org/POM/4.0.0" xmlns:xsi="http://www.w3.org/2001/XMLSchema-instance"
         xsi:schemaLocation="http://maven.apache.org/POM/4.0.0 https://maven.apache.org/xsd/maven-4.0.0.xsd">
    <modelVersion>4.0.0</modelVersion>
    <parent>
        <groupId>org.springframework.boot</groupId>
        <artifactId>spring-boot-starter-parent</artifactId>
        <version>1.5.16.RELEASE</version>
    </parent>
    <groupId>com.yh</groupId>
    <artifactId>mytwo</artifactId>
    <version>0.0.1-SNAPSHOT</version>
    <name>mytwo</name>
    <description>Demo project for Spring Boot</description>
    <properties>
        <java.version>1.8</java.version>
    </properties>
   <dependencyManagement>
       <dependencies>
           <!--cloud的依赖-->
           <dependency>
               <groupId>org.springframework.cloud</groupId>
               <artifactId>spring-cloud-dependencies</artifactId>
               <version>Edgware.SR4</version>
               <type>pom</type>
               <scope>import</scope>
           </dependency>
       </dependencies>
   </dependencyManagement>
    <dependencies>

        <dependency>
            <groupId>org.springframework.boot</groupId>
            <artifactId>spring-boot-starter-web</artifactId>
        </dependency>

        <dependency>
            <groupId>org.projectlombok</groupId>
            <artifactId>lombok</artifactId>
            <optional>true</optional>
        </dependency>
        <dependency>
            <groupId>org.springframework.boot</groupId>
            <artifactId>spring-boot-starter-test</artifactId>
            <scope>test</scope>
        </dependency>


        <!--注册-->
        <dependency>
            <groupId>org.springframework.cloud</groupId>
            <artifactId>spring-cloud-starter-netflix-eureka-client</artifactId>
        </dependency>
        <!--远程调用-->
        <dependency>
            <groupId>org.springframework.cloud</groupId>
            <artifactId>spring-cloud-starter-openfeign</artifactId>
        </dependency>

    </dependencies>

    <build>
        <plugins>
            <plugin>
                <groupId>org.springframework.boot</groupId>
                <artifactId>spring-boot-maven-plugin</artifactId>
                <configuration>
                    <excludes>
                        <exclude>
                            <groupId>org.projectlombok</groupId>
                            <artifactId>lombok</artifactId>
                        </exclude>
                    </excludes>
                </configuration>
            </plugin>
        </plugins>
    </build>

</project>
第二步配置
server:
  port: 8081
spring:
  application:
    name: consumer
eureka:
  client:
    service-url:
      defaultZone: http://localhost:8088/eureka
第三步开服务加注解@EnableEurekaClient
package com.yh.mytwo;

import org.springframework.boot.SpringApplication;
import org.springframework.boot.autoconfigure.SpringBootApplication;
//import org.springframework.cloud.client.discovery.EnableDiscoveryClient;
import org.springframework.cloud.client.loadbalancer.LoadBalanced;
import org.springframework.cloud.netflix.eureka.EnableEurekaClient;
import org.springframework.cloud.netflix.feign.EnableFeignClients;
import org.springframework.context.annotation.Bean;
import org.springframework.web.client.RestTemplate;
//import org.springframework.cloud.netflix.feign.EnableFeignClients;

@SpringBootApplication
//@EnableDiscoveryClient
@EnableFeignClients//开启feign的
@EnableEurekaClient
public class MytwoApplication {

    public static void main(String[] args) {
        SpringApplication.run(MytwoApplication.class, args);
    }
    /*@LoadBalanced
    @Bean
    public RestTemplate restTemplate() {
        return new RestTemplate();
    }
    这个注掉的也是创建http请求的,只是feign更方便
*/

}
因为我的消费者用的是feign,所以使用它需要多创建一个接口
package com.yh.mytwo.service;

import org.springframework.cloud.netflix.feign.FeignClient;
import org.springframework.web.bind.annotation.GetMapping;
import org.springframework.web.bind.annotation.PathVariable;

//@FeignClient("nacos-provider")
@FeignClient("provider/first")//这个是服务名,那个first是我手贱多加了一层请求路径,如果你就一层,可以去掉/first
public interface FeignTemplate {
    @GetMapping("/getUser/{id}")
    String getUSer(@PathVariable("id") int id);


    @GetMapping("/getUsers")
    String getUSers();
}
接下来就是具体使用了
package com.yh.mytwo.comtroller;


import com.yh.mytwo.service.FeignTemplate;
import org.springframework.beans.factory.annotation.Autowired;
import org.springframework.data.redis.core.StringRedisTemplate;
import org.springframework.web.bind.annotation.PathVariable;
import org.springframework.web.bind.annotation.RequestMapping;
import org.springframework.web.bind.annotation.RequestMethod;
import org.springframework.web.bind.annotation.RestController;
import org.springframework.web.client.RestTemplate;

@RestController
public class ConsumerController {

   // private final RestTemplate restTemplate;


   /* @Autowired
    public ConsumerController(RestTemplate restTemplate) {
        this.restTemplate = restTemplate;
    }*/
    @Autowired
    FeignTemplate feignTemplate;
    @RequestMapping(value = "/getUsers", method = RequestMethod.GET)
    public String echo() {
       // return "I'm 消费者"+ ", " + restTemplate.getForObject("http://nacos-provider/first/getUser", String.class);
     return "I'm 消费者"+ ", " + feignTemplate.getUSers();
    }

    @RequestMapping(value = "/getUser/{id}", method = RequestMethod.GET)
    public String echoTwo(@PathVariable int id) {
        //String  result=restTemplate.getForObject("http://nacos-provider/first/getUser/"+id, String.class);
        String result = feignTemplate.getUSer(id);

        return "I'm 消费者"+ ", " +result;
    }
}
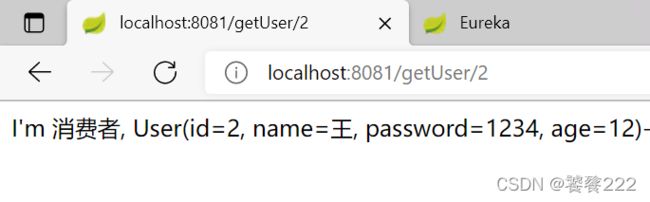
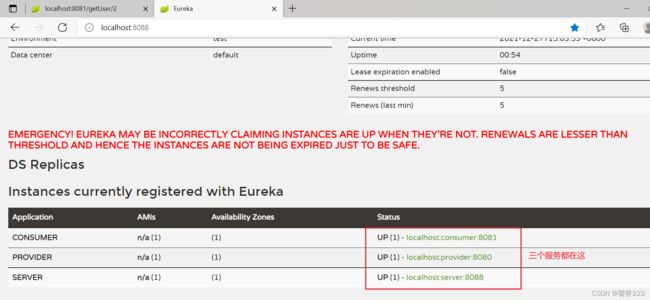
三个项目启动之后访问eureka就行
localhost:8088
因为我的服务端端口我设置的8088
然后就可以访问消费者提供的接口了;localhost:8081/getUser/1