初步部署Prometheus
文章目录
- 前言
- 一、环境准备
-
- 1.1主机说明
-
- 1.1.1修改主机名和全部关闭防火墙和selinux
- 二 Prometheus介绍
-
-
- 2. 1 prometheus的特点
- 2. 2 prometheus的组件
- 2.3 prometheus的架构
- 2.4 prometheus的使用场景
- 2.5 Prometheus概念
-
- 三、Prometheus部署
-
-
- 3.1下载prometheus
- 3.2安装prometheus
- 3.3 启动prometheus
- 3.4 Prometheus配置
-
- 3.4 .1全局配置 global
- 3.4 .2 告警配置 alerting
- 3.4.3 规则文件配置 rule_files
- 3.4.4 拉取配置 scrape_configs
- 3.4.5 远程读写配置 remote_read/remote_write
- 3.4.6 简单配置示例
-
- 四 Node Exporter部署
-
-
- 4.1修改主机名并下载node_exporter
- 4.2 安装node_exporter
- 4.3 启动node_exporter
- 4.4 配置scrape_configs
-
前言
Prometheus是最初在SoundCloud上构建的开源系统监视和警报工具包。自2012年成立以来,许多公司和组织都采用了Prometheus,该项目拥有非常活跃的开发人员和用户社区。Prometheus 于2016年加入了 Cloud Native Computing Foundation,这是继Kubernetes之后的第二个托管项目。
官网:https://prometheus.io 最新版本: 2.19.2
- ① Exporter是一个采集监控数据并通过Prometheus监控规范对外提供数据的组件,能为Prometheus提供监控的接口。
- ② Exporter将监控数据采集的端点通过HTTP服务的形式暴露给Prometheus Server,Prometheus Server通过访问该Exporter提供的Endpoint端点,即可获取到需要采集的监控数据。不同的Exporter负责不同的业务。
①  Prometheus              开源的系统监控和报警框架,灵感源自 Google的Borgmon监控系统

②  AlertManager            处理由客户端应用程序(如Prometheus server)发送的警报。它负责将重复数据删除,分组和路由到正确的接收者集成,还负责沉默和抑制警报

③  Node_Exporter           用来监控各节点的资源信息的exporter,应部署到prometheus监控的所有节点

④  PushGateway             推送网关,用于接收各节点推送的数据并暴露给Prometheus server
一、环境准备
1.1主机说明

1.1.1修改主机名和全部关闭防火墙和selinux
[root@localhost ~] hostname node1
[root@localhost ~] su

systemctl stop firewalld && systemctl disable firewalld

sed -i 's/=enforcing/=disabled/g' /etc/selinux/config  && setenforce 0
![]()
二 Prometheus介绍
2. 1 prometheus的特点
1. 多维的数据模型(基于时间序列的Key、Value键值对)
2. 灵活的查询和聚合语言PromQL
3. 提供本地存储和分布式存储
4. 通过基于HTTP的Pull模型采集时间序列数据
5. 可利用Pushgateway(Prometheus的可选中间件)实现Push模式
6. 可通过动态服务发现或静态配置发现目标机器
7. 支持多种图表和数据大盘
2. 2 prometheus的组件
1. Prometheus server,负责拉取、存储时间序列数据
2. 客户端库(client library),插入应用程序代码
3. 推送网关(push gateway),支持短暂的任务
4. 特殊类型的exporter,支持如HAProxy,StatsD,Graphite等服务
5. 一个alertmanager处理告警
6. 各种支持工具
2.3 prometheus的架构
下图说明了Prometheus的体系结构及其生态系统组件

2.4 prometheus的使用场景
① prometheus非常适合记录任何纯数字时间序列。它既适合以机器为中心的监视,也适合监视高度动态的面向服务的体系结构。在微服务世界中,它对多维数据收集和查询的支持是一种特别的优势。
② prometheus的设计旨在提高可靠性,使其成为中断期间要使用的系统,从而使您能够快速诊断问题。每个prometheus服务器都是独立的,而不依赖于网络存储或其他远程服务,当基础设施部分出现问题时仍然可以使用它。
2.5 Prometheus概念
- ① 数据模型:
prometheus将所有数据存储为时间序列:属于相同 metric名称和相同标签组(键值对)的时间戳值流。
- ② metric 和 标签:
每一个时间序列都是由其 metric名称和一组标签(键值对)组成唯一标识。
metric名称代表了被监控系统的一般特征(如 http_requests_total代表接收到的HTTP请求总数)。它可能包含ASCII字母和数字,以及下划线和冒号,它必须匹配正则表达式 [a-zA-Z_:][a-zA-Z0-9_:]* 。
注意:冒号是为用户定义的记录规则保留的,不应该被exporter使用。
- ③ 标签给prometheus建立了多维度数据模型:对于相同的 metric名称,标签的任何组合都可以标识该 metric的特定维度实例(例如:所有使用POST方法到 /api/tracks 接口的HTTP请求)。查询语言会基于这些维度进行过滤和聚合。更改任何标签值,包括添加或删除标签,都会创建一个新的时间序列。
标签名称可能包含ASCII字母、数字和下划线,它必须匹配正则表达式 [a-zA-Z_:][a-zA-Z0-9_:]* 。 另外,以双下划线__开头的标签名称仅供内部使用
标签值可以包含任何Unicode字符。标签值为空的标签被认为是不存在的标签。
- ④ 表示法:
给定 metric名称和一组标签,通常使用以下表示法标识时间序列:
<metric name>{<label name>=<label value>, ...}
例如,一个时间序列的 metric名称是 api_http_requests_total,标签是 ==method=“POST” ==和 ==handler=“/messages”。==可以这样写:
api_http_requests_total{method="POST", handler="/messages"}
这和OpenTSDB的表示法是一样的。
- metric类型:
Counter 值只能单调增加或重启时归零,可以用来表示处理的请求数、完成的任务数、出现的错误数量等
Gauge 值可以任意增加或减少,可以用来测量温度、当前内存使用等
Histogram 取样观测结果,一般用来请求持续时间或响应大小,并在一个可配置的分布区间(bucket)内计算这些结果,提供所有观测结果的总和
累加的 counter,代表观测区间:<basename>_bucket{le="" }
所有观测值的总数:<basename>_sum
观测的事件数量:<basenmae>_count
Summary 取样观测结果,一般用来请求持续时间或响应大小,提供观测次数及所有观测结果的总和,还可以通过一个滑动的时间窗口计算可分配的分位数
观测的事件流φ-quantiles (0 ≤ φ ≤ 1):<basename>{quantile="φ"}
所有观测值的总和:<basename>_sum
观测的事件数量:<basename>_count
- 实例与任务
① 在prometheus中,一个可以拉取数据的端点叫做实例(instance),一般等同于一个进程。一组有着同样目标的实例(例如为弹性或可用性而复制的进程副本)叫做任务(job)。
② 当prometheus拉取目标时,它会自动添加一些标签到时间序列中,用于标识被拉取的目标:
job:目标所属的任务名称

instance:目标URL中的<host>:<port>部分
如果两个标签在被拉取的数据中已经存在,那么就要看配置选项 honor_labels 的值来决定行为了。
每次对实例的拉取,prometheus会在以下的时间序列中保存一个样本(样本指的是在一个时间序列中特定时间点的一个值):
up{job="" , instance="" }:如果实例健康(可达),则为 1 ,否则为 0
scrape_duration_seconds{job="" , instance="" }:拉取的时长
scrape_samples_post_metric_relabeling{job="" , instance="" }:在 metric relabeling 之后,留存的样本数量
scrape_samples_scraped{job="" , instance="" }:目标暴露出的样本数量
up 时间序列对于实例的可用性监控来说非常有用。
三、Prometheus部署
3.1下载prometheus
[root@node1 software]# mkdir /software && cd /software
[root@node1 software]# wget https://github.com/prometheus/prometheus/releases/download/v2.19.0/prometheus-2.19.0.linux-amd64.tar.gz
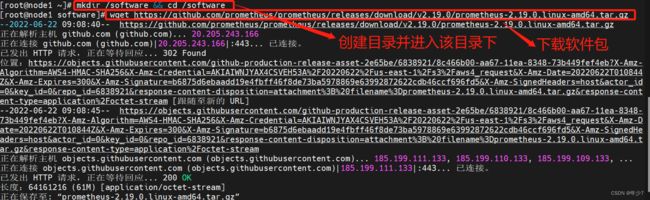
[root@node1 software]# tar xf prometheus-2.19.0.linux-amd64.tar.gz
[root@node1 software]# mv prometheus-2.19.0.linux-amd64 /usr/local/prometheus

3.2安装prometheus
[root@node1 software]# useradd -M -s /sbin/nologin prometheus
[root@node1 software]# mkdir -p /data/prometheus
[root@node1 software]# chown -R prometheus:prometheus /usr/local/prometheus /data/prometheus

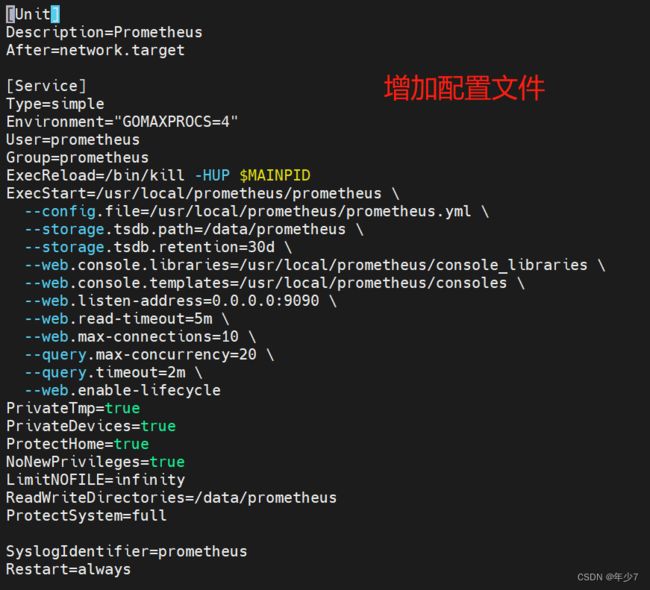
vim /usr/lib/systemd/system/prometheus.service
 [Unit]
Description=Prometheus
After=network.target

[Service]
Type=simple
Environment="GOMAXPROCS=4"
User=prometheus
Group=prometheus
ExecReload=/bin/kill -HUP $MAINPID
ExecStart=/usr/local/prometheus/prometheus \
  --config.file=/usr/local/prometheus/prometheus.yml \
  --storage.tsdb.path=/data/prometheus \
  --storage.tsdb.retention=30d \
  --web.console.libraries=/usr/local/prometheus/console_libraries \
  --web.console.templates=/usr/local/prometheus/consoles \
  --web.listen-address=0.0.0.0:9090 \
  --web.read-timeout=5m \
  --web.max-connections=10 \
  --query.max-concurrency=20 \
  --query.timeout=2m \
  --web.enable-lifecycle
PrivateTmp=true
PrivateDevices=true
ProtectHome=true
NoNewPrivileges=true
LimitNOFILE=infinity
ReadWriteDirectories=/data/prometheus
ProtectSystem=full

SyslogIdentifier=prometheus
Restart=always

[Install]
WantedBy=multi-user.target
3.3 启动prometheus
[root@node1 software]# systemctl daemon-reload
[root@node1 software]# systemctl enable prometheus && systemctl start prometheus
[root@node1 software]# netstat -lntp | grep prometheus
tcp6       0      0 :::9090                 :::*                    LISTEN      43742/prometheus

访问ip:192.168.204.144:9090/graph,
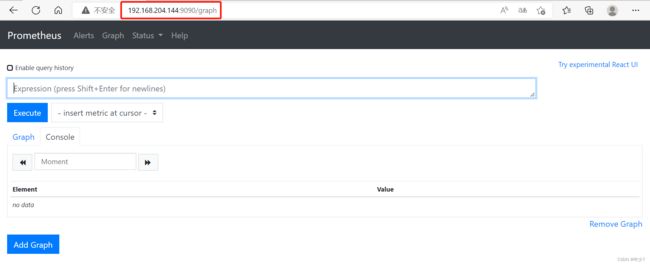
- prometheus部署完成,接下来需要配置prometheus。
3.4 Prometheus配置
prometheus的配置文件==prometheus.yml,==它主要分以下几个配置块:
- ① 全局配置 global
- ② 告警配置 alerting
- ③ 规则文件配置 rule_files
- ④ 拉取配置 scrape_configs
- ⑤ 远程读写配置 remote_read、remote_write
3.4 .1全局配置 global
global指定在所有其他配置上下文中有效的参数。还可用作其他配置部分的默认设置。
global:        # 默认拉取频率
  [ scrape_interval: <duration> | default = 1m ]

  # 拉取超时时间
  [ scrape_timeout: <duration> | default = 10s ]

  # 执行规则频率
  [ evaluation_interval: <duration> | default = 1m ]

  # 通信时添加到任何时间序列或告警的标签
  # external systems (federation, remote storage, Alertmanager).
  external_labels:
    [ <labelname>: <labelvalue> ... ]

  # 记录PromQL查询的日志文件
  [ query_log_file: <string> ]
3.4 .2 告警配置 alerting
alerting指定与Alertmanager相关的设置。
alerting:
  alert_relabel_configs:
    [ - <relabel_config> ... ]
  alertmanagers:
    [ - <alertmanager_config> ... ]
3.4.3 规则文件配置 rule_files
rule_files指定prometheus加载的任何规则的位置,从所有匹配的文件中读取规则和告警。目前没有规则。
rule_files:
  [ - <filepath_glob> ... ]
3.4.4 拉取配置 scrape_configs
① scrape_configs指定prometheus监控哪些资源。默认会拉取prometheus本身的时间序列数据,通过http://localhost:9090/metrics进行拉取。
② 一个scrape_config指定一组目标和参数,描述如何拉取它们。在一般情况下,一个拉取配置指定一个作业。在高级配置中,这可能会改变。
③ 可以通过== static_configs==参数静态配置目标,也可以使用支持的服务发现机制之一动态发现目标。
- 此外,relabel_configs 在拉取之前,可以对任何目标及其标签进行修改。
scrape_configs:
job_name: <job_name>

# 拉取频率
[ scrape_interval: <duration> | default = <global_config.scrape_interval> ]

# 拉取超时时间
[ scrape_timeout: <duration> | default = <global_config.scrape_timeout> ]

# 拉取的http路径
[ metrics_path: <path> | default = /metrics ]

# honor_labels 控制prometheus处理已存在于收集数据中的标签与prometheus将附加在服务器端的标签("作业"和"实例"标签、手动配置的目标标签和由服务发现实现生成的标签)之间的冲突
# 如果 honor_labels 设置为 "true",则通过保持从拉取数据获得的标签值并忽略冲突的服务器端标签来解决标签冲突
# 如果 honor_labels 设置为 "false",则通过将拉取数据中冲突的标签重命名为"exported_"来解决标签冲突(例如"exported_instance"、"exported_job"),然后附加服务器端标签
# 注意,任何全局配置的 "external_labels"都不受此设置的影响。在与外部系统的通信中,只有当时间序列还没有给定的标签时,它们才被应用,否则就会被忽略
[ honor_labels: <boolean> | default = false ]

# honor_timestamps 控制prometheus是否遵守拉取数据中的时间戳
# 如果 honor_timestamps 设置为 "true",将使用目标公开的metrics的时间戳
# 如果 honor_timestamps 设置为 "false",目标公开的metrics的时间戳将被忽略
[ honor_timestamps: <boolean> | default = true ]

# 配置用于请求的协议
[ scheme: <scheme> | default = http ]

# 可选的http url参数
params:
  [ <string>: [<string>, ...] ]

# 在每个拉取请求上配置 username 和 password 来设置 Authorization 头部,password 和 password_file 二选一
basic_auth:
  [ username: <string> ]
  [ password: <secret> ]
  [ password_file: <string> ]

# 在每个拉取请求上配置 bearer token 来设置 Authorization 头部,bearer_token 和 bearer_token_file 二选一
[ bearer_token: <secret> ]

# 在每个拉取请求上配置 bearer_token_file 来设置 Authorization 头部,bearer_token_file 和 bearer_token 二选一
[ bearer_token_file: /path/to/bearer/token/file ]

# 配置拉取请求的TLS设置
tls_config:
  [ <tls_config> ]

# 可选的代理URL
[ proxy_url: <string> ]

# Azure服务发现配置列表
azure_sd_configs:
  [ - <azure_sd_config> ... ]

# Consul服务发现配置列表
consul_sd_configs:
  [ - <consul_sd_config> ... ]

# DNS服务发现配置列表
dns_sd_configs:
  [ - <dns_sd_config> ... ]

# EC2服务发现配置列表
ec2_sd_configs:
  [ - <ec2_sd_config> ... ]

# OpenStack服务发现配置列表
openstack_sd_configs:
  [ - <openstack_sd_config> ... ]

# file服务发现配置列表
file_sd_configs:
  [ - <file_sd_config> ... ]

# GCE服务发现配置列表
gce_sd_configs:
  [ - <gce_sd_config> ... ]

# Kubernetes服务发现配置列表
kubernetes_sd_configs:
  [ - <kubernetes_sd_config> ... ]

# Marathon服务发现配置列表
marathon_sd_configs:
  [ - <marathon_sd_config> ... ]

# AirBnB's Nerve服务发现配置列表
nerve_sd_configs:
  [ - <nerve_sd_config> ... ]

# Zookeeper Serverset服务发现配置列表
serverset_sd_configs:
  [ - <serverset_sd_config> ... ]

# Triton服务发现配置列表
triton_sd_configs:
  [ - <triton_sd_config> ... ]

# 静态配置目标列表
static_configs:
  [ - <static_config> ... ]

# 目标relabel配置列表
relabel_configs:
  [ - <relabel_config> ... ]

# metric relabel配置列表
metric_relabel_configs:
  [ - <relabel_config> ... ]

# 每次拉取样品的数量限制
# metric relabelling之后,如果有超过这个数量的样品,整个拉取将被视为失效。0表示没有限制
[ sample_limit: <int> | default = 0 ]
3.4.5 远程读写配置 remote_read/remote_write
remote_read/remote_write 将数据源与prometheus分离,当前不做配置。
# 与远程写功能相关的设置
remote_write:
  [ - <remote_write> ... ]

# 与远程读功能相关的设置
remote_read:
  [ - <remote_read> ... ]
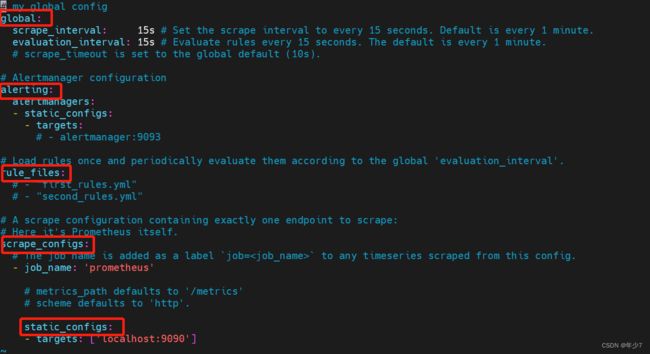
3.4.6 简单配置示例
[root@node1 software]# vim /usr/local/prometheus/prometheus.yml
global:
  scrape_interval: 15s
  evaluation_interval: 15s

alerting:
  alertmanagers:
  - static_configs:
    - targets:
      # - alertmanager:9093

rule_files:
  # - "first_rules.yml"
  # - "second_rules.yml"

scrape_configs:
  - job_name: 'prometheus'
    static_configs:
    - targets: ['localhost:9090']
四 Node Exporter部署

4.1修改主机名并下载node_exporter
[root@node-exporter ~]#  hostname node-exporter
[root@node-exporter ~]#  su

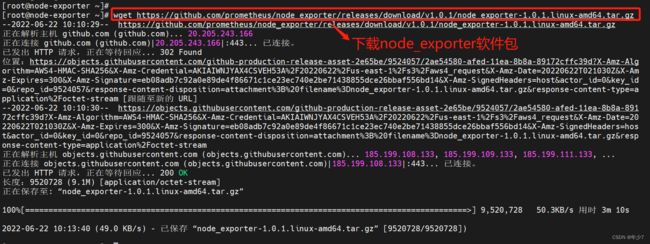
[root@node-exporter ~]# wget https://github.com/prometheus/node_exporter/releases/download/v1.0.1/node_exporter-1.0.1.linux-amd64.tar.gz
[root@node-exporter ~]# tar xf node_exporter-1.0.1.linux-amd64.tar.gz
[root@node-exporter ~]# mv node_exporter-1.0.1.linux-amd64 /usr/local/node_exporter

4.2 安装node_exporter
[root@node-exporter ~]# useradd -M -s /sbin/nologin prometheus              #若已创建,可省略该步
[root@node-exporter ~]# chown -R prometheus:prometheus /usr/local/node_exporter

[root@node-exporter ~]# vim /usr/lib/systemd/system/node_exporter.service
[Unit]
Description=Prometheus
After=network.target

[Service]
Type=simple
Environment="GOMAXPROCS=4"
User=prometheus
Group=prometheus
ExecReload=/bin/kill -HUP $MAINPID
ExecStart=/usr/local/prometheus/prometheus \
  --config.file=/usr/local/prometheus/prometheus.yml \
  --storage.tsdb.path=/data/prometheus \
  --storage.tsdb.retention=30d \
  --web.console.libraries=/usr/local/prometheus/console_libraries \
  --web.console.templates=/usr/local/prometheus/consoles \
  --web.listen-address=0.0.0.0:9090 \
  --web.read-timeout=5m \
  --web.max-connections=10 \
  --query.max-concurrency=20 \
  --query.timeout=2m \
  --web.enable-lifecycle
PrivateTmp=true
PrivateDevices=true
ProtectHome=true
NoNewPrivileges=true
LimitNOFILE=infinity
ReadWriteDirectories=/data/prometheus
ProtectSystem=full

SyslogIdentifier=prometheus
Restart=always

[Install]
WantedBy=multi-user.target

4.3 启动node_exporter
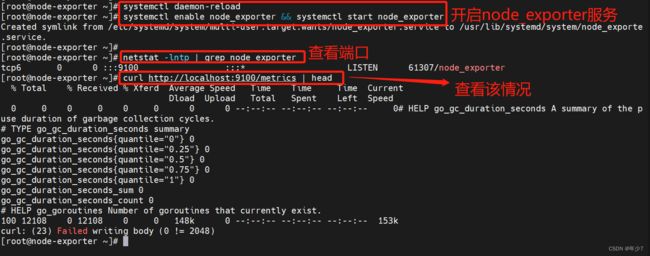
[root@node-exporter ~]# systemctl daemon-reload
[root@node-exporter ~]# systemctl enable node_exporter && systemctl start node_exporter
Created symlink from /etc/systemd/system/multi-user.target.wants/node_exporter.service to /usr/lib/systemd/system/node_exporte.service.
[root@node-exporter ~]#
[root@node-exporter ~]# netstat -lntp | grep node_exporter
tcp6       0      0 :::9100                 :::*                    LISTEN      61307/node_exporter
[root@node-exporter ~]# curl http://localhost:9100/metrics | head
  % Total    % Received % Xferd  Average Speed   Time    Time     Time  Current
                                 Dload  Upload   Total   Spent    Left  Speed
  0     0    0     0    0     0      0      0 --:--:-- --:--:-- --:--:--     0# HELP go_gc_duration_seconds A summary of the puse duration of garbage collection cycles.
# TYPE go_gc_duration_seconds summary
go_gc_duration_seconds{quantile="0"} 0
go_gc_duration_seconds{quantile="0.25"} 0
go_gc_duration_seconds{quantile="0.5"} 0
go_gc_duration_seconds{quantile="0.75"} 0
go_gc_duration_seconds{quantile="1"} 0
go_gc_duration_seconds_sum 0
go_gc_duration_seconds_count 0
# HELP go_goroutines Number of goroutines that currently exist.
100 12108    0 12108    0     0   148k      0 --:--:-- --:--:-- --:--:--  153k
curl: (23) Failed writing body (0 != 2048)
[root@node-exporter ~]#
node exporter展示了prometheus可以拉取的指标,包括在输出中更下方的各种系统指标(带有前缀node_ )。要查看这些指标(以及帮助和类型信息):
[root@node-exporter ~]# curl http://localhost:9100/metrics | grep 'node_'
4.4 配置scrape_configs
vim /usr/local/prometheus/prometheus.yml #修改 scrape_configs 内容
scrape_configs:
  - job_name: 'prometheus'
    static_configs:
    - targets: ['192.168.204.144:9090']

  - job_name: 'node'
    static_configs:
    - targets: ['192.168.204.144:9100','192.168.204.145:9100','192.168.204.146:9100']
