Habitat环境学习二:导航任务中的Habitat-sim基础Habitat-sim Basics for Navigation
导航任务在Habitat-sim任务中的实现
- 官方教程
- 概述
- 重要概念
- 1、Hello World程序
-
-
- 1.0.1 基础设置Basic settings
- 1.0.2 模拟器设置Configurations for the simulator
- 1.0.3 创建模拟器实例
- 1.0.4 初始化Agent
- 1.0.5 导航和探索
-
官方教程
Habitat是一个高效的真实的3D模拟器,旨在促进具身智能的研究。它相较于其他的仿真环境的优势在于速度非常快,采用单个线程可以达到每秒几千帧。
官方视频教程链接
官方jupyter文件链接
概述
这一部分旨在通过一系列编码说明如何使用Habitat-sim进行导航。
重要概念
Habitat-sim用于建模在三维室内仿真环境中进行的具体代理和任务领域。
- Agent:虚拟的具有一套传感器的实体代理(例如,机器人)。它可以观察环境并能够执行改变代理或环境状态的动作;
- Sensor:与特定Agent相关联,能够以指定频率返回环境中的观察数据;
- Scene:虚拟的3D环境,其中包含Agent、场景网格、物体和传感器的三维环境;
- SceneGraph:对Scene进行管理是模拟器中的代码数据结构,场景的分层表示类似于一个树,将环境组织成区域和物体。可以通过编程方式操作。所有场景组件都存在于场景图上;(不能直接被操作)
- Simulator:仿真器后端的实例。给定一组已配置的代理和场景图的动作,可以更新代理和场景图的状态,并为代理拥有的所有活动传感器提供观察。
1、Hello World程序
Habitat Sim由三个重要概念组成:
- 可配置的具身Agent:需要进行配置的虚拟具身Agent。在导航方面,Agent可能是机器人或其他虚拟Agent,其行为和能力可以进行定制;
- 多种传感器:仿真器支持多种传感器类型,用于模拟代理对环境的不同感知方式。这些传感器可以包括视觉传感器(如RGB摄像头)、深度传感器等,以模拟代理在环境中的感知能力;
- Scene场景:仿真器可以处理的通用三维数据集,例如 Matterport、Gibson 和 Replica 数据集。场景是仿真的虚拟环境,包括场景网格、物体、代理和传感器。
1.0.1 基础设置Basic settings
首先,我们指定要加载的场景,指定一个默认代理,并描述一些基本的传感器参数,例如观察的类型、位置以及分辨率(宽度和高度)。
# This is the scene we are going to load.
# we support a variety of mesh formats, such as .glb, .gltf, .obj, .ply
# 加载场景文件
test_scene = os.path.join(
    data_path, "scene_datasets/mp3d_example/17DRP5sb8fy/17DRP5sb8fy.glb"
)
# 指定默认的Agent和几个传感器参数,如与Agent的相对位置
sim_settings = {
    "scene": test_scene,  # Scene path,场景路径
    "default_agent": 0,  # Index of the default agent,默认的Agent索引值
    "sensor_height": 1.5,  # Height of sensors in meters, relative to the agent,传感器参数与Agent的相对位置
    "width": 256,  # Spatial resolution of the observations,观测的分辨率
    "height": 256,
}
1.0.2 模拟器设置Configurations for the simulator
为了运行仿真器,我们需要创建一个仿真器能理解的配置。
- 用于仿真器后端的部分。它指定启动和运行仿真器所需的参数。例如,要加载的场景、是否加载语义网格、是否启用物理引擎等(具体代码);
- 用于Agent的部分。它描述了初始化代理的参数,如高度、质量,以及附加传感器的配置。用户还可以定义位移量,例如在前进操作中的位移量和转向角度(具体代码)。
# This function generates a config for the simulator.
# It contains two parts:
# one for the simulator backend
# one for the agent, where you can attach a bunch of sensors
# 配置包括两部分:模拟器后端和Agent;
def make_simple_cfg(settings):
    # simulator backend,模拟器后端配置
    sim_cfg = habitat_sim.SimulatorConfiguration()
    sim_cfg.scene_id = settings["scene"]

    # agent,Agent配置
    agent_cfg = habitat_sim.agent.AgentConfiguration()

    # In the 1st example, we attach only one sensor,
    # a RGB visual sensor, to the agent
    # 可以将多个传感器加到Agent上,这里加了一个RGBD相机
    rgb_sensor_spec = habitat_sim.CameraSensorSpec()
    rgb_sensor_spec.uuid = "color_sensor" # 名称
    rgb_sensor_spec.sensor_type = habitat_sim.SensorType.COLOR # 传感器类型
    rgb_sensor_spec.resolution = [settings["height"], settings["width"]] # 分辨率
    rgb_sensor_spec.position = [0.0, settings["sensor_height"], 0.0] # 相对位置

    agent_cfg.sensor_specifications = [rgb_sensor_spec] # 通过列表的形式设定传感器

    return habitat_sim.Configuration(sim_cfg, [agent_cfg]) # 返回模拟器的配置


cfg = make_simple_cfg(sim_settings)
这就算配置完成了。在Habitat仿真器的使用中配置是很重要的工作。
1.0.3 创建模拟器实例
配置完成后可以执行,个人的理解是和程序语言中初始化变量一样,只有经过初始化后才能进行执行。
try:  # Needed to handle out of order cell run in Jupyter
    sim.close()
except NameError:
    pass
sim = habitat_sim.Simulator(cfg)
如果成功执行后会打印Loaded navmesh导航网格,而其中navmesh是一个非常重要的概念。

1.0.4 初始化Agent
在初始化仿真器之后,我们可以将代理放置在场景中,设置和查询其状态,例如位置和方向。
# initialize an agent,初始化Agent
agent = sim.initialize_agent(sim_settings["default_agent"])

# Set agent state,设定Agent的状态
agent_state = habitat_sim.AgentState()
agent_state.position = np.array([-0.6, 0.0, 0.0])  # in world space,设定Agent在世界中的初始位置
agent.set_state(agent_state)

# Get agent state,获取Agent的状态
agent_state = agent.get_state()
print("agent_state: position", agent_state.position, "rotation", agent_state.rotation) # 打印Agent当前位置以及四元数的旋转
![]()
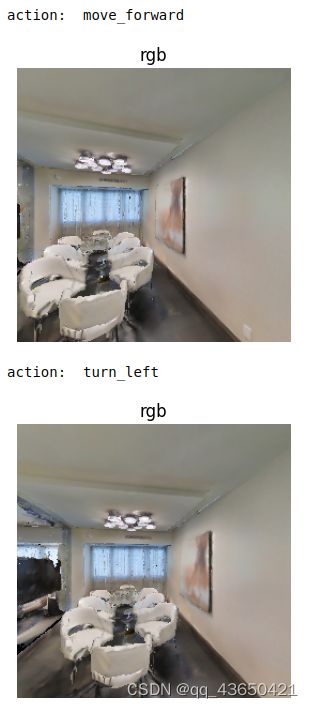
1.0.5 导航和探索
# obtain the default, discrete actions that an agent can perform
# default action space contains 3 actions: move_forward, turn_left, and turn_right
# 定义了包含三个动作的离散动作空间:前进、左转和右转,可以自定义离散动作空间自定义动作
action_names = list(cfg.agents[sim_settings["default_agent"]].action_space.keys())
print("Discrete action space: ", action_names)


def navigateAndSee(action=""):
    if action in action_names:
        observations = sim.step(action)
        print("action: ", action)
        if display:
            display_sample(observations["color_sensor"])


action = "turn_right"
navigateAndSee(action)

action = "turn_right"
navigateAndSee(action)

action = "move_forward"
navigateAndSee(action)

action = "turn_left"
navigateAndSee(action)

# action = "move_backward"   // #illegal, no such action in the default action space,非法动作空间中无该动作
# navigateAndSee(action)
以上就是如何加载场景、如何设置带有传感器的Agent、指示Agent进行导航、查看并获取观测结果。