【Linux】-多线程的知识都收尾(线程池,封装的线程,单例模式,自旋锁)

【Linux】-多线程的知识都收尾(线程池,封装的线程,单例模式,自旋锁)_第1张图片
作者:小树苗渴望变成参天大树
作者宣言:认真写好每一篇博客
作者gitee:gitee✨
作者专栏:C语言,数据结构初阶,Linux,C++ 动态规划算法
如 果 你 喜 欢 作 者 的 文 章 ,就 给 作 者 点 点 关 注 吧!

文章目录

  • 前言
  • 一、线程池
  • 二、单例模式
  • 三、STL,智能指针和线程安全
  • 四、其他常见的各种锁
  • 五、总结


前言

今天我们讲解线程的收尾工作,前面博主花了很长时间给大家讲解线程,确实线程这部分要将的东西太多了,大家把前面的掌握好了就不容易了,这篇博主要讲解的是带大家写一个线程池,还有一些c++中带线程,话不多说,我们开始进入正文的讲解。


提示:以下是本篇文章正文内容,下面案例可供参考

一、线程池

大家还记得我写的进程池代码吗??我们当初实现的进程池,是通过父进程创建多个子进程,父进程给子进程派发任务,子进程处理数据,那我们的线程池也是这样去做的,当时线程池比进程池要麻烦一点,他要多数据进行保护,接下来直接看代码,里面有注释:任务还是之前写的计算器任务。
ThreadPool.hpp:

#include
#include
#include
#include
using namespace std;

struct ThreadInfo
{
    string threadname;
    pthread_t threadid;
};

template<class T>
class ThreadPool
{
    const static int num=3;//线程信息数组的默认容量,也就是线程数亩
public:
    void lock(pthread_mutex_t* lock)
    {
        pthread_mutex_lock(lock);
    }
    void unlock(pthread_mutex_t* lock)
    {
        pthread_mutex_unlock(lock);
    }
    void wait(pthread_cond_t* cond,pthread_mutex_t*lock)
    {
        pthread_cond_wait(cond,lock);
    }

    void signal(pthread_cond_t* cond)
    {
        pthread_cond_signal(cond);
    }

    string getThreadName(pthread_t tid1)//通过获取线程自己的tid,在线程信息数组找匹配的线程名
    {
        string name;
        for(const auto & tid:threadinfo_)
        {
            if(tid.threadid==tid1)
            {
               return tid.threadname;
            }
        }
        return "None";
    }

    bool IsEmpty()
    {
        return tasks_.empty();
    }
public:
    ThreadPool(int threadcap=num):threadinfo_(num)
    {
        //给互斥锁和条件变量进行初始化
        pthread_mutex_init(&lock_,NULL);
        pthread_cond_init(&cond_,NULL);
    }

   static void* threadfunc(void* arg)//因为线程执行的函数必须是一个参数,不用静态的,就会有一个隐藏的this,但有需要this来调用,所以创建线程的时候就直接将this传进来。
    {
        ThreadPool<T>* tp=static_cast<ThreadPool<T>*>(arg);
        string name=tp->getThreadName(pthread_self());
        while(true)
        {
            tp->lock(&tp->lock_);
            while(tp->IsEmpty())
            {
                tp->wait(&tp->cond_,&tp->lock_);
            }
            T task=tp->pop();
            tp->unlock(&tp->lock_);

            task();//处理任务,线程拿到任务就是自己的,所以不需要在加锁里面。


            cout<<name<<" is working on task: "<<task.GetTask()<<endl;

        }

    }
    void start()//启动线程(创建线程)
    {
        for(int i=0;i<threadinfo_.size();i++)//这个线程数初始化的时候就定好了,所以存放线程信息的数组大小也提前开辟好
        {
            threadinfo_[i].threadname="thread"+to_string(i);
            pthread_create(&(threadinfo_[i].threadid),NULL,threadfunc,this);
        }
    }
    T pop()//获取队列中的任务
    {
        T t=tasks_.front();
        tasks_.pop();
        return t;
    }
   void push(const T& task)
    {
        //加锁的目的让队列只能有一个线程访问,我主线程发任务你其他线程先等着,不然我放一办你就读取,读到的数据不完整
        lock(&lock_);
        tasks_.push(task);
        signal(&cond_);//当主线程发布一个任务后,任务队列肯定不为空,就可以唤醒线程来处理了
        unlock(&lock_);
    }
    ~ThreadPool()
    {
        pthread_mutex_destroy(&lock_);
        pthread_cond_destroy(&cond_);
    }
private:
    vector<ThreadInfo> threadinfo_;//存储创建的每个线程(处理主线程发来任务的线程)信息的数组
    queue<T> tasks_;//存放主线程发来任务的队列

    pthread_mutex_t lock_;//用于处理任务线程直接的互斥和同步
    pthread_cond_t cond_;//条件变量
};

main.cc:

#include"ThreadPool.hpp"
#include
#include
#include"task.hpp"
int main()
{
    cout<<"main start"<<endl;
    ThreadPool<Task>* tp=new ThreadPool<Task>(3);
    srand(time(nullptr)^getpid());
    tp->start();//启动线程池
    while(true)
    {
        int x=rand()%10+1;
        int y=rand()%10;
        char op=opers[rand()%opers.size()];

        Task t(x,y,op);//创建任务

        tp->push(t);//提交任务,其余的处理就让线程池去做吧
        
        sleep(1);
        cout<<"result:"<<t.GetResult()<<endl;
        
    }

    return 0;
}

此线程池一秒往线程里面发布一个任务,而线程需要实现同步互斥,所以结果会看到他们按照顺序来执行主线程发布的任务。
【Linux】-多线程的知识都收尾(线程池,封装的线程,单例模式,自旋锁)_第2张图片

二、单例模式

之前在C++的博客中写过单例模式

单例模式是一种 "经典的, 常用的, 常考的设计模式.,IT行业这么火, 涌入的人很多. 俗话说林子大了啥鸟都有. 大佬和菜鸡们两极分化的越来越严重. 为了让菜鸡们不太拖大佬的后腿, 于是大佬们针对一些经典的常见的场景, 给定了一些对应的解决方案, 这个就是 设计模式

单例模式的特点
某些类, 只应该具有一个对象(实例), 就称之为单例.
例如一个男人只能有一个媳妇.在很多服务器开发场景中, 经常需要让服务器加载很多的数据 (上百G) 到内存中. 此时往往要用一个单例的类来管理这些数据.

单例通常有两种设计模式,一种是俄汉,一种是懒汉,今天以懒汉为例:

懒汉方式实现单例模式(线程安全版本)
我们将刚才的线程池改成懒汉模式:
ThreadPooldanli.hpp:

#include
#include
#include
#include
using namespace std;

struct ThreadInfo
{
    string threadname;
    pthread_t threadid;
};

template<class T>
class ThreadPool
{
    const static int num=3;//线程的默认容量
public:
    void lock(pthread_mutex_t* lock)
    {
        pthread_mutex_lock(lock);
    }
    void unlock(pthread_mutex_t* lock)
    {
        pthread_mutex_unlock(lock);
    }
    void wait(pthread_cond_t* cond,pthread_mutex_t*lock)
    {
        pthread_cond_wait(cond,lock);
    }

    void signal(pthread_cond_t* cond)
    {
        pthread_cond_signal(cond);
    }

    string getThreadName(pthread_t tid1)
    {
        string name;
        for(const auto & tid:threadinfo_)
        {
            if(tid.threadid==tid1)
            {
               return tid.threadname;
            }
        }
        return "None";
    }

    bool IsEmpty()
    {
        return tasks_.empty();
    }
public:
   static void* threadfunc(void* arg)
    {
        ThreadPool<T>* tp=static_cast<ThreadPool<T>*>(arg);
        string name=tp->getThreadName(pthread_self());
        while(true)
        {
            tp->lock(&tp->lock_);
            while(tp->IsEmpty())
            {
                tp->wait(&tp->cond_,&tp->lock_);
            }
            T task=tp->pop();
            tp->unlock(&tp->lock_);
            task();
            cout<<name<<" is working on task: "<<task.GetTask()<<endl;

        }
    }
    void start()//启动线程(创建线程)
    {
        for(int i=0;i<threadinfo_.size();i++)
        {
            threadinfo_[i].threadname="thread"+to_string(i);
            pthread_create(&(threadinfo_[i].threadid),NULL,threadfunc,this);
        }
    }
    T pop()
    {
        T t=tasks_.front();
        tasks_.pop();
        return t;
    }
   void push(const T& task)
    {
        lock(&lock_);
        tasks_.push(task);
        signal(&cond_);
        unlock(&lock_);
    }


   static ThreadPool<T>* getInstance()//对外提供单例对象接口,必须静态的,才能使用类名去调用
    {
        if(nullptr==instance_)//双重检查,第一次申请锁后,创建对象,后面的线程连第一个判断就进不去,就不会每个线程都会有申请锁释放锁的过程,增加效率。
        {
            pthread_mutex_lock(&mutex_);
            if(nullptr==instance_)
            {
                instance_=new ThreadPool<T>();
            }
            pthread_mutex_unlock(&mutex_);
        }
        return instance_;
    }

   //防拷贝
    ThreadPool(const ThreadPool&)=delete;
    const ThreadPool& operator=(const ThreadPool&)=delete;
private://将构造函数私有化,就创建不了对象了。
     ThreadPool(int threadcap=num):threadinfo_(num)
    {
        //给互斥锁和条件变量进行初始化
        pthread_mutex_init(&lock_,NULL);
        pthread_cond_init(&cond_,NULL);
    }
     ~ThreadPool()
    {
        pthread_mutex_destroy(&lock_);
        pthread_cond_destroy(&cond_);
    }
private:
    vector<ThreadInfo> threadinfo_;//存储每个线程信息的数组
    queue<T> tasks_;//存放主线程发来任务的队列

    pthread_mutex_t lock_;//互斥锁
    pthread_cond_t cond_;//条件变量
    
    static ThreadPool<T>* instance_;//定一个懒汉的单例对象,不能是栈区的变量,会套娃
    static pthread_mutex_t mutex_;//防止多线程同时创建对象,在刚判断完为不为空的时候,被切走,下次进来直接创建对象,这样就不止一个对象了
};

template<class T>
ThreadPool<T>* ThreadPool<T>::instance_=nullptr;//给单利对象进行初始化

template<class T>
pthread_mutex_t ThreadPool<T>::mutex_=PTHREAD_MUTEX_INITIALIZER;//初始化互斥锁

maindanli.cc:

#include"ThreadPooldanli.hpp"
#include
#include
#include"task.hpp"
int main()
{
    cout<<"main start"<<endl;
    
    srand(time(nullptr)^getpid());
    ThreadPool<Task>::getInstance()->start();//启动线程池
    while(true)
    {
        int x=rand()%10+1;
        int y=rand()%10;
        char op=opers[rand()%opers.size()];

        Task t(x,y,op);//创建任务

         ThreadPool<Task>::getInstance()->push(t);//提交任务
            sleep(1);
        cout<<"result:"<<t.GetResult()<<endl;
        
    }

    return 0;
}

效果和刚才的一样的。
最重要的代码:

 static ThreadPool<T>* getInstance()//对外提供单例对象接口,必须静态的,才能使用类名去调用
    {
        if(nullptr==instance_)//双重检查,第一次申请锁后,创建对象,后面的线程连第一个判断就进不去,就不会每个线程都会有申请锁释放锁的过程,增加效率。
        {
            pthread_mutex_lock(&mutex_);
            if(nullptr==instance_)
            {
                instance_=new ThreadPool<T>();
            }
            pthread_mutex_unlock(&mutex_);
        }
        return instance_;
    }

三、STL,智能指针和线程安全

STL中的容器是否是线程安全的?
不是.
原因是, STL 的设计初衷是将性能挖掘到极致, 而一旦涉及到加锁保证线程安全, 会对性能造成巨大的影响.而且对于不同的容器, 加锁方式的不同, 性能可能也不同(例如hash表的锁表和锁桶).因此 STL 默认不是线程安全. 如果需要在多线程环境下使用, 往往需要调用者自行保证线程安全.
智能指针是否是线程安全的?
对于 unique_ptr, 由于只是在当前代码块范围内生效, 因此不涉及线程安全问题.对于 shared_ptr, 多个对象需要共用一个引用计数变量, 所以会存在线程安全问题. 但是标准库实现的时候考虑到了这个问题, 基于原子操作(CAS)的方式保证 shared_ptr 能够高效, 原子的操作引用计数/

四、其他常见的各种锁

悲观锁:在每次取数据时,总是担心数据会被其他线程修改,所以会在取数据前先加锁(读锁,写锁,行锁等),当其他线程想要访问数据时,被阻塞挂起。
乐观锁:每次取数据时候,总是乐观的认为数据不会被其他线程修改,因此不上锁。但是在更新数据前,会判断其他数据在更新前有没有对数据进行修改。主要采用两种方式:版本号机制和CAS操作。
CAS操作:当需要更新数据时,判断当前内存值和之前取得的值是否相等。如果相等则用新值更新。若不等则失败,失败则重试,一般是一个自旋的过程,即不断重试。
自旋锁: 自旋锁适用于访问临界区时间短的。我们之前使用的锁只要申请失败就被挂起了,等释放后,唤醒在去竞争锁,挂起于欧唤醒浪费时间,自旋锁是一只申请,申请失败还申请,直到申请成功,当一个线程拿到锁,访问临界资源的时间过长,还不如让他挂起,频繁去申请锁不好,所以自旋锁适用于访问临界资源时间少的场景。(trylock函数)
在这里插入图片描述
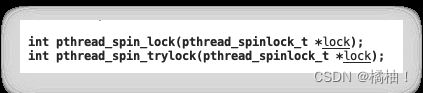
这两个就是自旋锁加锁的方式,第一个是阻塞,第二个是非阻塞,为什么还阻塞呢?原因是他申请不到锁会一直申请,在用户看来是被阻塞住了,非阻塞的意思是,申请失败就返回,没有阻塞效果。

五、总结

到这里我们的多线程部分就讲解到这里,也宣告我们系统部分就讲解到这里了,后面博主贵更新网络相关的知识,就是可以通过网络来获取数据来,让代码变得好玩起来了,我们这票就到这里了,我们下篇再见。

你可能感兴趣的:(Linux系统编程,linux,单例模式,运维)