CICD -- (一) 持续集成 git + jenkins
- 一、版本控制系统
-
- 1、什么是版本控制系统
- 2、git 基本操作
-
- 2.1、本地安装git
- 2.2、配置Git
- 2.3、检查配置文件
- 2.3、创建本地仓库
- 2.4、使用git提交内容到版本管理中
- 2.5、如何修改git版本控制的文件名
- 2.6、如何比对 工作目录内容、暂存区内容 以及 仓库文件内容 的差异
- 2.7、如何查看 commit 提交的快照
- 2.8、文件的回退
- 2.9、分支操作
- 2.10、合并分支时代码冲突问题
- 2.11、git标签
- 3、git的远程仓库
-
- 3.1、添加远程仓库,推送代码
- 3.2、新的开发同学加入分支
- 3.3、如何查看其他开发同学推送的代码呢
- 4、git私有仓库
-
- 4.1、搭建私有仓库 gitlab
-
- 4.1.1、安装依赖包
- 4.1.2、下载安装包并安装
- 4.1.3、修改配置文件,配置域名 和 邮箱
- 4.1.4、配置完成后初始化gitlab,并启动
- 4.1.5、通过域名访问 gitlab
- 4.1.6、汉化 Gitlab 页面
- 4.2、使用Gitlab
-
- 4.2.1、了解 项目(Projects)、用户(Users)、群组(Groups)
- 4.2.2、创建 项目(Projects)、用户(Users)、群组(Groups)
- 4.2.3、调整设置,取消 注册 功能
- 4.2.4、本地推送代码到gitlab
- 4.2.5、Gitlab的分支及tag
- 4.3、Gitlab的备份与恢复
-
- 4.3.1、Gitlab的数据备份
- 二、了解 jenkins
-
- 1、安装jenkins
-
- 1.1、yum安装jenkins
- 1.2、配置dns解析
- 1.3、安装nginx,做反向代理
- 1.4、访问jenkins
- 2、安装jenkins插件
-
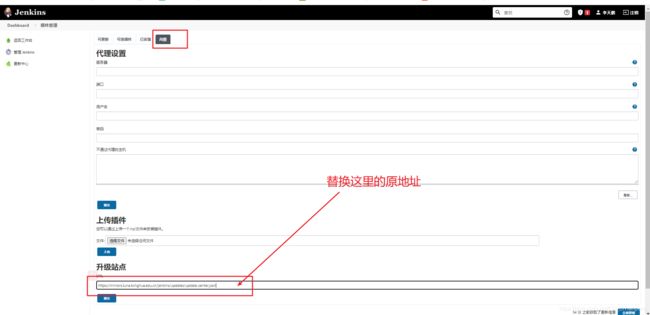
- 2.1、首先,我们来配置下插件加速地址,换成国内源
- 2.2、第一种安装插件的办法(网络安装)
- 2.3、第二种安装插件的办法(文件加载)
- 2.3、第三种安装插件的办法(替换插件目录)
- 3、使用jenkins---创建一个freestyle(自由风格)的软件项目做测试
-
- 3.1、新建一个项目测试
- 3.2、查看构建后的产物
- 4、jenkins 集成 Gitlab
-
- 4.1、安装和gitlab相关的插件
- 4.2、模拟流水线
- 4.2.1、模拟web项目
-
- 4.2.2、新建项目,绑定devops项目组
- 4.2.3、模拟上传v1版本的项目文件
- 4.2.4、模拟上传v1.2版本的项目文件
- 4.2.5、到jenkins上构建流水线(根据tag进行版本发布)
- 4.2.6、编写发布脚本
- 4.2.7、模拟更新代码,进行jenkins构建、回退测试
参考文档:https://www.xuliangwei.com/oldxu/category/linux
- 持续集成:频繁的(一天多次)将代码集成到主干
- 持续集成的好处:
- 便于快速发现错误。每完成一点更新,就集成到主干,可以快速发现错误。定位错误
- 节省测试的人力成本
- 加快软件开发的速度
- 实时交付
- 防止分支大幅度偏离主干。如果不经常集成,主干又在不断更新,会导致以后集成难度变大,或难以集成
- 持续集成的目的: 让产品快速迭代,同时保证高质量。简化工作流程

一、版本控制系统
1、什么是版本控制系统
- 将每一次文件的变化,集中在一个系统中加以版本记录,以便后续查阅特定文件版本的历史版本记录的系统
- 作用:能快速对比版本之间的区别,同时能实现快速回退。实现代码的集中管理
- 常见的版本控制系统:
- SVN:集中式版本控制系统(都在一台服务器上进行代码的修改提交),服务器一旦出现问题,所有人都无法使用
- GIT:分布式版本控制系统(将代码clone到本机,就可以实现代码的管理),更加实用
2、git 基本操作
2.1、本地安装git
yum -y install git
2.2、配置Git
- 配置用户名和邮箱,这两个是必须要配置的
- 配置完成后会在当前用户的家目录下产生一个配置文件.gitconfig
[root@deploy ~]# git config --global user.name "LTP7534"
[root@deploy ~]# git config --global user.email "[email protected]"

# 配置颜色(可配可不配)
[root@deploy ~]# git config --global color.ui true
2.3、检查配置文件
- 可以查看到配置信息
[root@deploy ~]# cat .gitconfig
[user]
        name = LTP7534
        email = xxx28279@qq.com
[color]
        ui = true
2.3、创建本地仓库

# 首先需要创建一个目录(git仓库也相当于文件目录)
[root@deploy ~]# mkdir demo
[root@deploy ~]# cd demo/

# 初始化git目录,将这个目录初始化成git目录(执行初始化后,这个目录才会有版本控制的功能)
[root@deploy demo]# git init
Initialized empty Git repository in /root/demo/.git/
2.4、使用git提交内容到版本管理中
- git add . 提交到暂存区
- git commit -m “描述信息(尽量简洁详细)”
# 首先,我们在这个Git目录下,创建3个文件用于测试
[root@deploy demo]# touch test{1..3}.txt
[root@deploy demo]# ls
test1.txt  test2.txt  test3.txt

# 使用 git status 查看,会出现让你使用 git add 提交刚刚创建的文件到暂存区的提示,
[root@deploy demo]# git status
# On branch master
#
# Initial commit
#
# Untracked files:
#   (use "git add ..." to include in what will be committed)
#
#       test1.txt
#       test2.txt
#       test3.txt
nothing added to commit but untracked files present (use "git add" to track)

# 先add提交test1.txt,再查看,提示test.txt已提交,还剩俩。并且 git rm --cached <file> 可以撤销提交
[root@deploy demo]# git status
# On branch master
# Initial commit
# Changes to be committed:
#   (use "git rm --cached ..." to unstage)
#       new file:   test1.txt
# Untracked files:
#   (use "git add ..." to include in what will be committed)
#       test2.txt
#       test3.txt

# 全部提交,使用 git add .
[root@deploy demo]# git add .
[root@deploy demo]# git status
# On branch master
# Initial commit
# Changes to be committed:
#   (use "git rm --cached ..." to unstage)
#       new file:   test1.txt
#       new file:   test2.txt
#       new file:   test3.txt

# 提交到git
[root@deploy demo]# git commit -m '新增文件 test1.txt test2.txt test3.txt'
 3 files changed, 0 insertions(+), 0 deletions(-)
 create mode 100644 test1.txt
 create mode 100644 test2.txt
 create mode 100644 test3.txt


# 再次使用 git status 查看,此时暂存区已经是空的了
[root@deploy demo]# git status
# On branch master
nothing to commit, working directory clean

# 修改test1.txt文件后再次查看,会提示"modified:   test1.txt",说明此时已经被git管理了
[root@deploy demo]# git status
# On branch master
# Changes not staged for commit:
#   (use "git add ..." to update what will be committed)
#   (use "git checkout -- ..." to discard changes in working directory)
#
#       modified:   test1.txt
#
no changes added to commit (use "git add" and/or "git commit -a")
2.5、如何修改git版本控制的文件名
- 方法一:比较繁琐
# 首先使用Linux的mv命令更名
[root@deploy demo]# mv test1.txt file

# 将test1.txt从暂存区删除
[root@deploy demo]# git rm test1.txt

# 将更名后文件提交到暂存区
[root@deploy demo]# git add file

# 查看状态
[root@deploy demo]# git status
# On branch master
# Changes to be committed:
#   (use "git reset HEAD ..." to unstage)
#       renamed:    test1.txt -> file
- 方法二:使用 git mv 命令
[root@deploy demo]# ls
file  test2.txt  test3.txt

[root@deploy demo]# git mv file test1.txt
# 直接提示更名
[root@deploy demo]# git status
# On branch master
# Changes to be committed:
#   (use "git reset HEAD ..." to unstage)
#
#       renamed:    file -> test1.txt

# git提交
[root@deploy demo]# git commit -m 'rename file'
[master 86262c4] rename file
 1 file changed, 0 insertions(+), 0 deletions(-)
 rename file => test1.txt (100%)

# 目录下文件吗也改变了
[root@deploy demo]# ls
test1.txt  test2.txt  test3.txt
2.6、如何比对 工作目录内容、暂存区内容 以及 仓库文件内容 的差异
- 使用 git diff 命令
# 往test1.txt文件中增加些内容
[root@deploy demo]# echo "小东西" >>test1.txt
工作目录前后版本内容对比(实际上是本地内容 与 暂存区 内容进行了对比)
# 用diff命令对比
[root@deploy demo]# git diff test1.txt
diff --git a/test1.txt b/test1.txt
index 8baef1b..4d636d7 100644
--- a/test1.txt              # 表示变动前的版本
+++ b/test1.txt              # 表示变动后的版本
@@ -1 +1,2 @@
 abc
+小东西                       # 新增的内容
暂存区前后对比 (实际上是 暂存区与仓库内容比对)
- git diff --cached filename
[root@deploy demo]# git add -A .
# 再次使用 diff 命令,不会出现对比提示了(原因是,提交后暂存区内容发生改变,两者一致了)
[root@deploy demo]# git diff test1.txt

# 加上 --cached ,就会出现对比内容
[root@deploy demo]# git diff --cached test1.txt
diff --git a/test1.txt b/test1.txt
index 8baef1b..4d636d7 100644
--- a/test1.txt
+++ b/test1.txt
@@ -1 +1,2 @@
 abc
+小东西
仓库文件版本内容与暂存区对比
# 提交至仓库
[root@deploy demo]# git commit -m 'test diff'

# 此时使用git diff --cached命令,没有提示,说明暂存区与仓库一致了
[root@deploy demo]# git diff --cached test1.txt
2.7、如何查看 commit 提交的快照
- commit 相当于 虚拟机的快照
- 使用git log 可以查看历史 commit记录(由下面,可以看出 -m 描述信息很重要)
# 直接使用git log,会展示详细信息,已经commit的id号
[root@deploy demo]# git log
commit 930458a906ef7a4416da0e39e027fd51c073f145
Author: LTP7534 <3504828279@qq.com>
Date:   Sat Jul 17 18:59:13 2021 +0800

    test diff

commit 86262c4080fc36b5811ee5eca64a41465ff3980c
Author: LTP7534 <3504828279@qq.com>
Date:   Sat Jul 17 18:41:06 2021 +0800

    rename file

commit 40e1bc9654dc137e0e421570689a783048529593
Author: LTP7534 <3504828279@qq.com>
Date:   Sat Jul 17 18:39:19 2021 +0800

    test

commit 1e3f37ab15c12dd73b2f4b53ac5d432ff8183dd4
Author: LTP7534 <3504828279@qq.com>
Date:   Sat Jul 17 18:22:51 2021 +0800

    新增文件 test1.txt test2.txt test3.txt

# 加上 --oneline参数,会更加简洁明了
[root@deploy demo]# git log --oneline
930458a test diff
86262c4 rename file
40e1bc9 test
af18664 test
1e3f37a 新增文件 test1.txt test2.txt test3.txt

# git log 后面跟上 -数字,可以显示第几条(-1 表示最近的一条)
[root@deploy demo]# git log --oneline -1
930458a test diff
2.8、文件的回退
git checkout --:利用暂存区内容回退(这个是基于已经未add提交至缓冲区为前提的回退)暂存区覆盖本地目录git reset HEAD: 若已经add提交至暂存区的场景,利用 仓库目录 覆盖 暂存区,暂存区 再覆盖 本地目录&& git checkout -- git reset --hard: 若已多次commit提交至仓库,需要利用 commit id 进行回退
# 场景一:
# 模拟误操作,清空文件
[root@deploy demo]# >test1.txt
[root@deploy demo]# cat test1.txt    # 此时是空文件了

# 利用暂存区内容,进行回退,git checkout -- <filename>
[root@deploy demo]# git checkout -- test1.txt
[root@deploy demo]# cat test1.txt     # 内容又回来了
abc
小东西
场景二:
# 模拟误操作,清空文件
[root@deploy demo]# >test1.txt
[root@deploy demo]# cat test1.txt    # 此时是空文件了
[root@deploy demo]# git add .        # 提交至暂存区

# 用仓库文件覆盖暂存区
[root@deploy demo]# git reset HEAD test1.txt
# 再执行 git checkout 暂存区覆盖本地目录
[root@deploy demo]# git checkout -- test1.txt
[root@deploy demo]# cat test1.txt                   # 文件内容又回来了
abc
小东西
# 场景三:
# 模拟误操作,多次提交到仓库
[root@deploy demo]# >test1.txt
[root@deploy demo]# git add .                      # 提交至暂存区
[root@deploy demo]# git commit -m "test rollback"  # 提交至仓库
[root@deploy demo]# echo "jijifujiji" >test1.txt
[root@deploy demo]# git add .                         # 提交至暂存区
[root@deploy demo]# git commit -m "test rollback-01"  # 提交至仓库

# 查看commit id
[root@deploy demo]# git log --oneline
d8716e2 test rollback-01
56340c0 test rollback
930458a test diff
86262c4 rename file
40e1bc9 test
af18664 test
1e3f37a 新增文件 test1.txt test2.txt test3.txt

# 我们需要的是回退到两次之前 test diff 版本
[root@deploy demo]# git reset --hard 930458a

[root@deploy demo]# cat test1.txt                  # 成功回退回来
abc
小东西
2.9、分支操作
git branch:查看分支git branch <分支名称>:创建分支git checkout <分支名称>:切换分支git merge <分支名称> [-m “描述信息”]:当前分支合并指定的分支git branch -d <分支名称>:删除分支
# 查看分支
[root@deploy demo]# git branch
* master

# 创建devops分支
[root@deploy demo]# git branch devops

# 再次查看
[root@deploy demo]# git branch
  devops
* master                             # * 代表当前所在分支

# 切换分支
[root@deploy demo]# git checkout devops
Switched to branch 'devops'

# 再次查看
[root@deploy demo]# git branch
* devops
  master

[root@deploy demo]# ls
test1.txt  test2.txt  test3.txt
- 我们基于master分支,创建了一个devops分支,因此在master分支中的文件也会出现在devops分支中
- 生产中如何合并分支:
- 基于主分支,新建一个分支(例如:新建分支devops)
- 在新建分支上进行新的功能开发
- 在新分支上合并maser分支(master分支上的功能是最新的,有很多开发在操作master分支,在devops这个分支功能还在开发中的时候,master分支上可能有多了很多功能)
- 合并后测试新分支的功能
- 测试正常了,才会将新分支上开发的功能合并到master主分支上,并生成新的commit id
# 我们在devops分支下,创建feil4  feil5  feil6 三个文件,并提交到分支上
[root@deploy demo]# git branch
* devops
  master
[root@deploy demo]# ls
file4  file5  file6  test1.txt  test2.txt  test3.txt
[root@deploy demo]# git add .
[root@deploy demo]# git commit -m 'add file4  file5  file6'

# 切回master分支上查看,master分支上没变化(此时,切换到master分支上了)
[root@deploy demo]# git checkout master
Switched to branch 'master'
[root@deploy demo]# ls
test1.txt  test2.txt  test3.txt

# 假设这个时候,有同学在master分支上提交了新功能,创建了file7(此时是在master分支上)
[root@deploy demo]# touch file7
[root@deploy demo]# git add .
[root@deploy demo]# git commit -m 'add file7'
[master b2e94b7] add file7
 1 file changed, 0 insertions(+), 0 deletions(-)
 create mode 100644 file7
[root@deploy demo]# ls
file7  test1.txt  test2.txt  test3.txt

# 再切回devops分支,master分支上新增了file7,但是在devops分支上没有,因此需要合并master分支,获取最新的代码,保证和master上代码一致
[root@deploy demo]# git checkout devops
Switched to branch 'devops'
[root@deploy demo]# git branch
* devops
  master
[root@deploy demo]# ls
file4  file5  file6  test1.txt  test2.txt  test3.txt


# 在devops 分支上合并master分支(合并master分支,必须要再次commit提交)
[root@deploy demo]# git merge master -m "devops 合并 master 内容"
Already up-to-date.
# master分支上新增的file7被合并到devops分支上了
[root@deploy demo]# ls
file4  file5  file6  file7  test1.txt  test2.txt  test3.txt


# 切换回master上,master分支上目前还没有 devops分支新增的 file5 file5 file6,。
[root@deploy demo]# git checkout master
Switched to branch 'master'
[root@deploy demo]# ls
file7  test1.txt  test2.txt  test3.txt

# 在master分支上,将devops分支内容合并上来(主分支合并,不需要-m添加描述信息)
[root@deploy demo]# git merge devops
Updating b2e94b7..c03268e
Fast-forward
 file4 | 0
 file5 | 0
 file6 | 0
 3 files changed, 0 insertions(+), 0 deletions(-)
 create mode 100644 file4
 create mode 100644 file5
 create mode 100644 file6
# master分支和devops分支上内容一致了
[root@deploy demo]# ls
file4  file5  file6  file7  test1.txt  test2.txt  test3.txt
- devops分支开发结束,可以执行删除分支
# 删除devops分支
[root@deploy demo]# git branch -d devops
Deleted branch devops (was c03268e).

[root@deploy demo]# git branch
* master
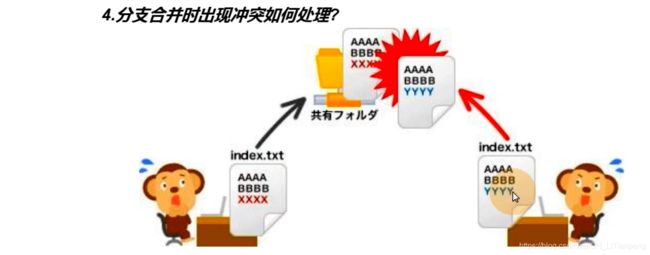
2.10、合并分支时代码冲突问题
# 先基于当前 master分支,创建新的 dev 分支(会将当前master分支上内容clone到新分支上)
[root@deploy demo]# git branch dev
[root@deploy demo]# git branch             # 此时还在master 分支上
  dev
* master

# 在master分支的 file5 中,添加新内容‘xxxxx’ (此时在master 分支上)
[root@deploy demo]# echo 'xxxxx' > file5
[root@deploy demo]# git add .
[root@deploy demo]# git commit -m "new file5 xxxxx"
[dev beee913] new file5 xxxxx
 1 file changed, 1 insertion(+)
[root@deploy demo]# cat file5
xxxxx

# 切换到dev分支上,同样在file5中添加‘yyyyy’内容
[root@deploy demo]# git checkout dev
[root@deploy demo]# echo "yyyyy" >file5
[root@deploy demo]# git add .
[root@deploy demo]# git commit -m "new file5 yyyyy"
[dev 0e65628] new file5 yyyyy
 1 file changed, 1 insertion(+), 1 deletion(-)

# 此时,我们在dev分支上合并master分支,发现会报错,原因就是file文件内容与master上不一致(此时在dev分支上)
[root@deploy demo]# git merge master -m 'test'
Auto-merging file5
CONFLICT (content): Merge conflict in file5
Automatic merge failed; fix conflicts and then commit the result.

# 查看 file5 文件内容
[root@deploy demo]# cat file5
<<<<<<< HEAD
yyyyy
=======
xxxxx
>>>>>>> master

# 这是就需要手动处理,删除报错产生的"<<<<<<< HEAD",">>>>>>> master","======="
[root@deploy demo]# cat file5
yyyyy
xxxxx

# 修改后重新提交,此时的dev分支才处于最新的内容
[root@deploy demo]# git add .
[root@deploy demo]# git commit -m 'merge master'
[dev a504c42] merge master

# 分支测试正常后,到master分支上,合并dev
[root@deploy demo]# git checkout master
Switched to branch 'master'
[root@deploy demo]# cat file5                # 此时,master分支上的file5还只有 "xxxxx"
xxxxx
# master分支合并dev
[root@deploy demo]# git merge dev
Updating b2aa3a2..a504c42
Fast-forward
 file5 | 1 +
 1 file changed, 1 insertion(+)
[root@deploy demo]# cat file5              # 此时master上也是最新的内容了
yyyyy
xxxxx
2.11、git标签
-
git标签的作用
- 我们commit提交代码后,生成的commit id是无序的字符串,很难记忆,不方便查找
例如 : 需要将上周一commit id为"xzc12j3g2j42"的版本打包发布,这样是很不方便的。而使用标签就会方便很多,根据tag寻找对应的commit,如tag v1.2对应commit id “xzc12j3g2j42”,这样就很方便 。
- 我们commit提交代码后,生成的commit id是无序的字符串,很难记忆,不方便查找
-
常用命令
git tag -a "标签名称" -m "描述信息":给最新的commit id大标签git tag: 查看当前存在的所有tag标签git tag -a "标签名称":指定commit id进行打标签-m "描述信息" git tag -d <标签名称>:删除taggit push origin :refs/tags/:删除远程仓库中的tag
# 若不指定commit id,会给最新的commit id 打上标签
[root@deploy demo]# git tag -a 'v1.0' -m '项目启动,新增xxxx功能'

# 查看当前存在的tag
[root@deploy demo]# git tag
v1.0
# 和 git tag 相似
[root@deploy demo]# git tag -l
v1.0

# git show,查看tag的详细内容,包括该tag绑定的commit id的信息
[root@deploy demo]# git show v1.0
tag v1.0
Tagger: LTP7534 <3504828279@qq.com>
Date:   Sun Jul 18 00:34:30 2021 +0800
项目启动,新增xxxx功能
commit a504c421f14f40aa180c33eb9469efad2302e1ca
Merge: 462301d b2aa3a2
Author: LTP7534 <3504828279@qq.com>
Date:   Sun Jul 18 00:19:14 2021 +0800
    merge master
……省略部分
指定commit id打标签
# 查看commit id
[root@deploy demo]# git reflog         # 和 git log --online 类似
a504c42 HEAD@{0}: merge dev: Fast-forward
b2aa3a2 HEAD@{1}: checkout: moving from dev to master
a504c42 HEAD@{2}: commit (merge): merge master
462301d HEAD@{3}: commit: add yyyy to file5
3b1d442 HEAD@{4}: checkout: moving from master to dev
b2aa3a2 HEAD@{5}: commit: add xxxxx to file5
c03268e HEAD@{6}: checkout: moving from dev to master
3b1d442 HEAD@{7}: commit: test
0e65628 HEAD@{8}: commit: new file5 yyyyy

# 直接加上 commit id 就可以指定commit id 打标签
[root@deploy demo]# git tag -a 'v-b-1.0' c03268e -m '旧版本'

# 查看当前存在的标签
[root@deploy demo]# git tag
v-b-1.0
v1.0

# 查看标签的详细信息
[root@deploy demo]# git show v-b-1.0
tag v-b-1.0
Tagger: LTP7534 <3504828279@qq.com>
Date:   Sun Jul 18 00:41:20 2021 +0800
旧版本
commit c03268e3bbc64d015c19e5447785273ebed40b47
Merge: dee798a b2e94b7
Author: LTP7534 <3504828279@qq.com>
Date:   Sat Jul 17 23:42:06 2021 +0800
    devops 合并 master 内容
删除标签
# 删除标签,git tag -d
[root@deploy demo]# git tag -d v-b-1.0
Deleted tag 'v-b-1.0' (was 1ecfa52)

[root@deploy demo]# git tag
v1.0
3、git的远程仓库
- git 连接 远程仓库(github 、gitee 或者 gitlab)
在gitee上创建一个公开的仓库,创建好后,会指导使用方式

上传公钥(注意,要点击"公钥管理",添加有读写权限的公钥)

3.1、添加远程仓库,推送代码
# 添加远程仓库
[root@deploy demo]# git remote add origin git@gitee.com:li-tianpeng/devops.git

# 查看远程仓库用户origin
[root@deploy demo]# git remote
origin
# 加上-v查看详细信息
[root@deploy demo]# git remote -v
origin  git@gitee.com:li-tianpeng/devops.git (fetch)
origin  git@gitee.com:li-tianpeng/devops.git (push)

# 提交到gitee,成功上传
[root@deploy demo]# git push -u origin master
Counting objects: 30, done.
Delta compression using up to 4 threads.
Compressing objects: 100% (24/24), done.
Writing objects: 100% (30/30), 2.39 KiB | 0 bytes/s, done.
Total 30 (delta 12), reused 0 (delta 0)
remote: Powered by GITEE.COM [GNK-6.0]
To git@gitee.com:li-tianpeng/devops.git
 * [new branch]      master -> master
Branch master set up to track remote branch master from origin.
本地文件成功上传到远程仓库

# 重新添加新的origin用户,需要删除之前添加的远程仓库用户
[root@deploy demo]# git remote remove origin
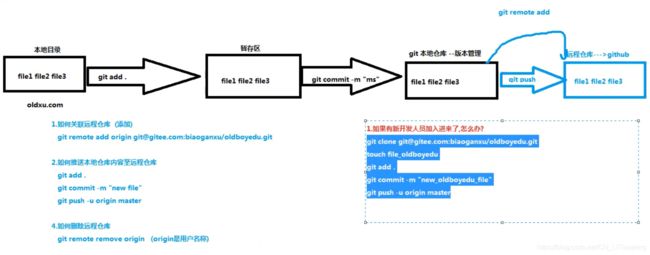
大体流程图
3.2、新的开发同学加入分支
# 使用clone,将远程仓库clone到本地
[root@master01 ~]# git clone git@gitee.com:li-tianpeng/devops.git

# 进入到仓库目录
[root@master01 ~]# cd devops/

# 创建file8,模拟添加功能代码
[root@master01 devops]# touch file8

# 提交到暂存区
[root@master01 devops]# git add .

# 提交到本地仓库
[root@master01 devops]# git commit -m "add file8"

# 推送到远程仓库 git push -u origin master
[root@master01 devops]# git push -u origin master
3.3、如何查看其他开发同学推送的代码呢
[root@deploy demo]# git pull -u origin master

[root@deploy demo]# ls                 # 将新同学开发的 file8 也拉取到本地了
file4  file5  file6  file7  file8  test1.txt  test2.txt  test3.txt
4、git私有仓库
- 10.4.7.14(运维主机)
- 10.4.7.15(gitlab 仓库)
4.1、搭建私有仓库 gitlab
- 官方地址:https://about.gitlab.com/install/#centos-7
- 软件包下载地址:https://mirror.tuna.tsinghua.edu.cn/gitlab-ce/yum/el7
- Gitlab 与 Github 功能相同,但是Github的私有仓库是收费的
- Gitlab的优势和应用场景:
- 开源免费,搭建简单,维护成本低,适合中小型企业
- 权限管理,能实现代码对部分人可见,确保项目的安全性
- 离线同步,保证我们不再实时依赖网络环境进行代码提交
4.1.1、安装依赖包
[root@gitlab ~]# yum -y install curl wegt postfix policycoreutils-python openssh-server perl
4.1.2、下载安装包并安装
[root@gitlab ~]# wget 'https://mirror.tuna.tsinghua.edu.cn/gitlab-ce/yum/el7/gitlab-ce-12.0.3-ce.0.el7.x86_64.rpm'

[root@gitlab ~]# yum localinstall -y gitlab-ce-12.0.3-ce.0.el7.x86_64.rpm
4.1.3、修改配置文件,配置域名 和 邮箱
[root@gitlab ~]# vim /etc/gitlab/gitlab.rb
external_url 'http://gitlab.prod.com'             # 将external_url 后面改成自己的域名
……省略部分
### Email Settings                                               # 将下面三个注释去掉,配置邮箱信息
gitlab_rails['gitlab_email_enabled'] = true
gitlab_rails['gitlab_email_from'] = '[email protected]'           # 配置邮箱地址
gitlab_rails['gitlab_email_display_name'] = 'Devops_gitlab'      # 邮件发件人的显示名
……省略部分
# 搜索smtp,配置smtp服务器
gitlab_rails['smtp_enable'] = true
gitlab_rails['smtp_address'] = "smtp.qq.com"                     # 选择qq的smtp服务器
gitlab_rails['smtp_port'] = 465
gitlab_rails['smtp_user_name'] = "[email protected]"             # 邮箱用户名
gitlab_rails['smtp_password'] = "kafgmcoblrvfdabd"               # 邮箱授权码
gitlab_rails['smtp_domain'] = "qq.com"                           # 填qq的域名
gitlab_rails['smtp_authentication'] = "login"
gitlab_rails['smtp_enable_starttls_auto'] = true
gitlab_rails['smtp_tls'] = true                                  # 这里改成true
到 10.4.7.14 上配置dns
$ORIGIN prod.com.
$TTL 600    ; 10 minutes
@       IN SOA    dns.prod.com. dnsadmin.host.com. (
                  2019111001 ; serial
                  10800      ; refresh (3 hours)
                  900        ; retry (15 minutes)
                  604800     ; expire (1 week)
                  86400      ; minimum (1 day)
                  )
              NS   dns.prod.com.
$TTL 60       ; 1 minute
harbor  A       10.4.7.14
dns     A       10.4.7.14
nginx   A       10.4.7.11
jenkins A       10.4.7.11
gitlab  A       10.4.7.15
重载named并ping测试
[root@deploy ~]# systemctl restart named
[root@deploy ~]# ping gitlab.prod.com
PING gitlab.prod.com (10.4.7.15) 56(84) bytes of data.
64 bytes from 10.4.7.15 (10.4.7.15): icmp_seq=1 ttl=64 time=0.219 ms
64 bytes from 10.4.7.15 (10.4.7.15): icmp_seq=2 ttl=64 time=1.16 ms
64 bytes from 10.4.7.15 (10.4.7.15): icmp_seq=3 ttl=64 time=0.723 ms
- gitlab是默认启用prometheus 和 grafana 的,比较吃内存,实验环境中可以修改配置,将这两个组件关闭
4.1.4、配置完成后初始化gitlab,并启动
[root@gitlab ~]# gitlab-ctl reconfigure

# gitlab-ctl status 查看运行的组件
[root@gitlab ~]# gitlab-ctl status
run: alertmanager: (pid 9911) 57s; run: log: (pid 9909) 57s
run: gitaly: (pid 9870) 57s; run: log: (pid 9869) 57s
run: gitlab-monitor: (pid 9902) 57s; run: log: (pid 9901) 57s
run: gitlab-workhorse: (pid 9895) 57s; run: log: (pid 9890) 57s
run: grafana: (pid 9906) 57s; run: log: (pid 9904) 57s
run: logrotate: (pid 9896) 57s; run: log: (pid 9894) 57s
run: nginx: (pid 9888) 57s; run: log: (pid 9887) 57s
run: node-exporter: (pid 9903) 57s; run: log: (pid 9893) 57s
run: postgres-exporter: (pid 9910) 57s; run: log: (pid 9907) 57s
run: postgresql: (pid 9875) 57s; run: log: (pid 9873) 57s
run: prometheus: (pid 9900) 57s; run: log: (pid 9899) 57s
run: redis: (pid 9874) 57s; run: log: (pid 9871) 57s
run: redis-exporter: (pid 9898) 57s; run: log: (pid 9897) 57s
run: sidekiq: (pid 9892) 57s; run: log: (pid 9891) 57s
run: unicorn: (pid 9886) 57s; run: log: (pid 9883) 57s

# gitlab-ctl start 启动gitlab
[root@gitlab ~]# gitlab-ctl start
ok: run: alertmanager: (pid 9911) 126s
ok: run: gitaly: (pid 9870) 126s
ok: run: gitlab-monitor: (pid 9902) 126s
ok: run: gitlab-workhorse: (pid 9895) 126s
ok: run: grafana: (pid 9906) 126s
ok: run: logrotate: (pid 9896) 126s
ok: run: nginx: (pid 9888) 126s
ok: run: node-exporter: (pid 9903) 126s
ok: run: postgres-exporter: (pid 9910) 126s
ok: run: postgresql: (pid 9875) 126s
ok: run: prometheus: (pid 9900) 126s
ok: run: redis: (pid 9874) 126s
ok: run: redis-exporter: (pid 9898) 126s
ok: run: sidekiq: (pid 9892) 126s
ok: run: unicorn: (pid 9886) 126s
注意:每次修改 /etc/gitlab/gitlab.rb 配置文件,都需要reconfigure初始化后生效
- 运维FAQ:
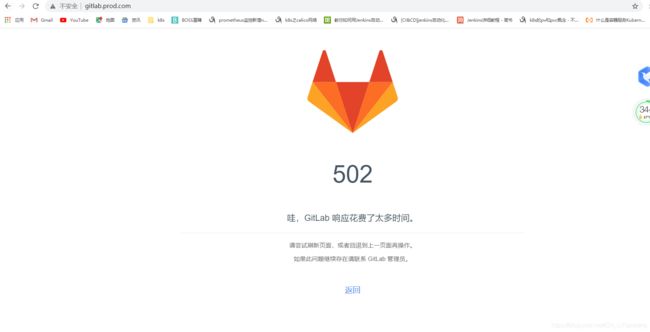
- 问题描述:启动Gitlab后访问一直处于502,查看组件状态正常
- 排查办法:
gitlab-ctl tail unicorn查看 unicorn日志,发现是端口冲突 - 解决办法:
vim /etc/gitlab/gitlab.rb修改Gitlab配置,然后将unicorn['port'] = 8080的端口修改并去掉注释
4.1.5、通过域名访问 gitlab
注意:第一次配置的root用户密码一定要记住,只有一次配置机会
- 我这里就配置密码"admin123"方便记忆


4.1.6、汉化 Gitlab 页面
- 汉化补丁包下载地址:https://gitlab.com/xhang/gitlab
- 一定要选择和gitlab版本匹配的补丁包

# 将补丁包下载到本地
[root@gitlab ~]# wget 'https://gitlab.com/xhang/gitlab/-/archive/v12.0.3/gitlab-v12.0.3.tar.gz'
[root@gitlab ~]# tar xf gitlab-v12.0.3.tar.gz
# 首先 停止 gitlab
[root@gitlab ~]# gitlab-ctl stop

# 将gitlab目录下内容
[root@gitlab ~]# \cp -r gitlab-v12.0.3/* /opt/gitlab/embedded/service/gitlab-rails/    # 会出现以下两个报错,可以忽略
cp: cannot overwrite non-directory ‘/opt/gitlab/embedded/service/gitlab-rails/log’ with directory ‘gitlab/log’
cp: cannot overwrite non-directory ‘/opt/gitlab/embedded/service/gitlab-rails/tmp’ with directory ‘gitlab/tmp’
启动gitlab
[root@gitlab ~]# gitlab-ctl start
启动成功后,立即刷新,会出现502报错,因为nginx还没有完全启动,需要等待大概1分钟左右
设置默认语言为中文

4.2、使用Gitlab
4.2.1、了解 项目(Projects)、用户(Users)、群组(Groups)


4.2.2、创建 项目(Projects)、用户(Users)、群组(Groups)
- 步骤:
- 1、创建 项目组
- 2、创建项目,并隶属于某个组
- 3、创建用户,设定密码,分配权限
创建群组

基于群组创建项目


创建用户,将用户加入组
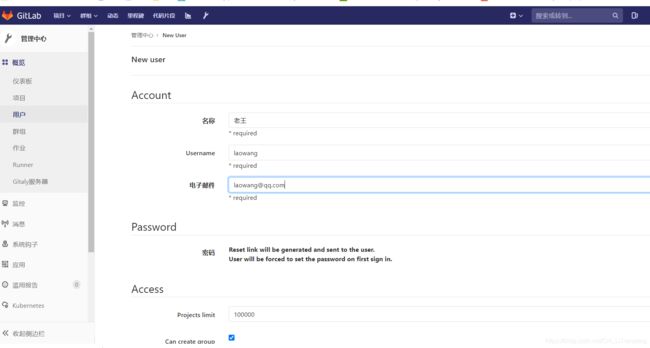

用户创建完成后,就会收到邮箱信息,通过收到的链接修改密码

设置完成后,就可以进入Gitlab (此时还看不了项目,因为没有加入 群组)

管理人员将 老王 加入项目组

这是在用 老王 用户查看,可以查看到 crm 这个项目了

4.2.3、调整设置,取消 注册 功能
- 取消用户注册功能,否则 不论是谁都可以申请账号了
- “设置"下的"通用”,找到"注册限制",勾选掉注册功能

4.2.4、本地推送代码到gitlab

首先要初始化本地仓库
# 初始化配置
[root@deploy ~]# git config user.name "LTP"
[root@deploy ~]# git config user.email "[email protected]"
# 初始化本地仓库
[root@deploy ~]# mkdir crm_projiect
[root@deploy ~]# cd crm_projiect/
[root@deploy crm_projiect]# git init
第一种:使用 http 的方式
- http的方式每次都需要输入用户名和密码,很不方便
# 首先将gitlab仓库clone到本地
[root@deploy ~]# git clone http://gitlab.prod.com/devops/crm.git
Cloning into 'crm'...
Username for 'http://gitlab.prod.com': laowang
Password for 'http://[email protected]':
warning: You appear to have cloned an empty repository.

# 在本地添加 远程仓库用户 origin
[root@deploy crm_projiect]# git remote add origin http://gitlab.prod.com/devops/crm.git

# 进入到仓库目录
[root@deploy ~]# cd crm_projiect/

# 编写README.MD 文件
[root@deploy crm_projiect]# vim README.MD
# CRM Collaborative development
* 1. 开发web首页
* 2. 开发引擎
* 3. 测试功能

# 本地提交
[root@deploy crm_projiect]# git add .
[root@deploy crm_projiect]# git commit -m 'ADD README.MD'

# 推送到 gitlab
[root@deploy crm_projiect]# git push -u origin master
到gitlab上查看

第二种:ssh key的方式
首选删除 之前 基于http连接远程仓库的用户 origin
[root@deploy crm_projiect]# git remote -v
origin  http://gitlab.prod.com/devops/crm.git (fetch)
origin  http://gitlab.prod.com/devops/crm.git (push)
[root@deploy crm_projiect]# git remote remove origin
再使用ssh的方式重新创建远程用户
[root@deploy crm_projiect]# git remote add origin git@gitlab.prod.com:devops/crm.git
# 在本地仓库新增文件file1,并在本地提交
[root@deploy crm_projiect]# echo "Hello Gitlab" >file1
[root@deploy crm_projiect]# git add .
[root@deploy crm_projiect]# git commit -m "add file1"
查看本地的公钥id_rsa.pub 配置到gitlab上
[root@deploy crm_projiect]# cat ~/.ssh/id_rsa.pub
ssh-rsa AAAAB3NzaC1yc2EAAAADAQABAAABAQDY4XcakzmjQjFUVKKJvQJFMAsNiWwxd+p7CFMceecW822DWzoUyW8cUCdV0GRiD6gUifa0Zi8F6kOeCCfyxaFBxZB0FZscZBJanerwOoTvCvd7UwrBQOmeSsA4EqBb0n/9YP4Nqfk4QNYQUZP69+dNPcj7hvnaBR1/9ZqgPQNnOyNPrKRl6i8OTQNGVOtQ8vt90BoTxiz8V0is6HrX9y4B9mJ2YljGA8rKsuMhXlUZta3YxB4rRZyI/mWfej25XjCzYWgFj9rbdjxCFyR2Co+ch8BdmGMIb/ULOorHBZD2ZpHzUnqqZWPbIEcqeBA9KqbFiVubIIhW7knvmJFgGaXf root@deploy
# 将新增的file5推送到gitlab(无需在输入用户密码,直接上传成功)
[root@deploy crm_projiect]# git push -u origin master
到 gitlab.prod.com 查看

4.2.5、Gitlab的分支及tag
- 与本地的git使用一样
# 创建一个devops分支,并切换到devops分支上
[root@deploy crm_projiect]# git branch devops
[root@deploy crm_projiect]# git checkout devops
Switched to branch 'devops'
[root@deploy crm_projiect]# git branch
* devops
  master

# 在新分支中创建 devops_file 文件,并在本地提交
[root@deploy crm_projiect]# echo "This is devops" >devops_file
[root@deploy crm_projiect]# git add .
[root@deploy crm_projiect]# git commit  -m 'add devops_file'

# 推送至 Gitlab
[root@deploy crm_projiect]# git push -u origin devops

# 删除远程仓库中的tag
[root@deploy crm_projiect]# git push origin :refs/tags/v1.1
到gitlab上查看

- 合并分支
[root@deploy crm_projiect]# git checkout master

[root@deploy crm_projiect]# git merge devops

# 查看本地是否有待提交的代码
[root@deploy crm_projiect]# git status
# On branch master
nothing to commit, working directory clean

# 推送到master分支
[root@deploy crm_projiect]# git push -u origin master
- tag的使用
# 给最新的commit id打上tag
[root@deploy crm_projiect]# git tag -a 'v1.0' -m 'add devops_file'

# 查看tag
[root@deploy crm_projiect]# git tag
v1.0

# 推送tag至gitlab
[root@deploy crm_projiect]# git push origin v1.0
到gitlab上查看

4.3、Gitlab的备份与恢复
4.3.1、Gitlab的数据备份
- 默认的备份路径:/var/opt/gitlab/backups (一般我们都会出现指定一个新目录,专门存放)
[root@gitlab ~]# grep ‘backup_path’ /etc/gitlab/gitlab.rb
# gitlab_rails[‘manage_backup_path’] = true
# gitlab_rails[‘backup_path’] = “/var/opt/gitlab/backups”
1、修改默认备份路径
创建一个新的目录,存放gitlab数据(注意,这个目录一定要有很大的空间,挂载一个非常大的磁盘)
[root@gitlab ~]# mkdir -p /data/gitlab/backup
修改默认的备份路径
[root@gitlab ~]# vim /etc/gitlab/gitlab.rb
……省略部分
gitlab_rails['manage_backup_path'] = true
gitlab_rails['backup_path'] = "/data/gitlab/backup"            # 指定备份目录
gitlab_rails['backup_keep_time'] = 604800                      # 备份文件保留时间(一周)
重新加载配置文件
[root@gitlab ~]# gitlab-ctl reconfigure
2、使用命令备份(这种备份属于一次性备份,默认备份路径依旧没变),在默认路径下生成.tar备份文件
- 可以使用命令方式,制作计划任务
[root@gitlab ~]# gitlab-rake gitlab:backup:create

[root@gitlab ~]# ls /data/gitlab/backup
1626630504_2021_07_19_12.0.3_gitlab_backup.tar
3、模拟误操作,删除项目
- 点击进入crm 项目,点击"设置",点击"高级",找到最后的删除项目
项目已被删除
4、恢复gitlab数据- 首先关闭 unicorn 和 sidekiq,停止数据库写入
- 然后使用
gitlab-rake gitlab:backup:restore BACKUP=<备份文件名称>命令恢复数据
# 停止数据库写入功能
[root@gitlab ~]# gitlab-ctl stop unicorn
[root@gitlab ~]# gitlab-ctl stop sidekiq

# 查看备份文件名称为 "1626630504_2021_07_19_12.0.3" (备份文件名称为除去"_gitlab_backup.tar"的部分)
[root@gitlab ~]# ls /data/gitlab/backup
1626630504_2021_07_19_12.0.3_gitlab_backup.tar

# 指定文件名称,进行恢复
[root@gitlab ~]# gitlab-rake gitlab:backup:restore BACKUP=1626630504_2021_07_19_12.0.3

# 恢复结束后,重启gitlab
[root@gitlab backup]# gitlab-ctl restart
再次访问 gitlab.prod.com ,数据已经全部回来了

二、了解 jenkins
- jenkins 可以看做一个调度平台,能对各种开源软件进行集成
- 官方地址:https://www.jenkins.io/zh/doc/
1、安装jenkins
1.1、yum安装jenkins
这里使用yum的方式进行安装,参考地址:https://pkg.jenkins.io/redhat-stable/
# 首先要安装java环境 jdk
[root@deploy crm_projiect]# yum -y install java

# 安装jenkins的yum仓库
[root@deploy crm_projiect]# sudo wget -O /etc/yum.repos.d/jenkins.repo https://pkg.jenkins.io/redhat-stable/jenkins.repo
[root@deploy crm_projiect]# sudo rpm --import https://pkg.jenkins.io/redhat-stable/jenkins.io.key

# 安装jenkins
[root@deploy crm_projiect]# yum -y install jenkins

# 启动jenkins
[root@deploy crm_projiect]# systemctl start jenkins

# jenkins启动后,会占用8080端口
[root@deploy crm_projiect]# ss -lnpt |grep 8080
LISTEN     0      50          :::8080                    :::*                   users:(("java",pid=2128,fd=142))
1.2、配置dns解析
$ORIGIN prod.com.
$TTL 600    ; 10 minutes
@       IN SOA    dns.prod.com. dnsadmin.host.com. (
                  2019111001 ; serial
                  10800      ; refresh (3 hours)
                  900        ; retry (15 minutes)
                  604800     ; expire (1 week)
                  86400      ; minimum (1 day)
                  )
              NS   dns.prod.com.
$TTL 60       ; 1 minute
harbor  A       10.4.7.14
dns     A       10.4.7.14
nginx   A       10.4.7.11
gitlab  A       10.4.7.15
jenkins A       10.4.7.14
1.3、安装nginx,做反向代理
[root@deploy crm_projiect]# vim /etc/nginx/conf.d/jenkins.prod.com.conf
server {
    listen       80;
    server_name  jenkins.prod.com;

    client_max_body_size 1000m;

    location / {
        proxy_pass http://127.0.0.1:8080;
    }
}

[root@deploy crm_projiect]# systemctl restart nginx
1.4、访问jenkins

[root@deploy crm_projiect]# cat /var/lib/jenkins/secrets/initialAdminPassword
82060192f5e74e92b830eb38e0aace7c
网速好的同学,可以使用推荐安装的插件安装,然后登入并配置用户和密码

2、安装jenkins插件
有三种方式来安装jenkins插件
2.1、首先,我们来配置下插件加速地址,换成国内源
- 访问清华源地址,找到"jenkins",点击"updates/",找到"update-center.json",复制下该链接
- 复制的地址为 https://mirrors.tuna.tsinghua.edu.cn/jenkins/updates/update-center.json

- 将获取到的清华源地址,添加jenkins中

2.2、第一种安装插件的办法(网络安装)
- 直接在jenkins上搜索并点击安装

2.3、第二种安装插件的办法(文件加载)
- 点击"高级",点击"上传插件"栏中的"选择文件",选中下载好的插件.hpi文件,直接上传

2.3、第三种安装插件的办法(替换插件目录)
- 这种办法比较适合初次安装时,加载大量插件时使用
# 首先停止jenkins
[root@deploy ~]# systemctl stop jenkins

# 将插件包上传到机器并解压
[root@deploy ~]# ll -h jenkins-2.289.2_plugins.tar.gz
-rw-r--r-- 1 root root 149M Jul 18 20:56 jenkins-2.289.2_plugins.tar.gz
[root@deploy ~]# tar xf jenkins-2.289.2_plugins.tar.gz

# 删除/var/lib/jenkins/plugins 原本的插件目录
[root@deploy ~]# rm -rf /var/lib/jenkins/plugins

# 将解压的插件目录移动到/var/lib/jenkins/下
[root@deploy ~]# mv plugins /var/lib/jenkins/

# 更改目录属主(也可以修改/etc/sysconfig/jenkins文件下,jenkins的用户为root,就不用改属主了)
[root@deploy ~]# chown -R jenkins.jenkins /var/lib/jenkins/plugins

# 启动jenkins
[root@deploy ~]# systemctl start jenkins
可以查看jenkins日志,可以看到jenkins的启动情况,出现 “fully up and running”,启动才完全
[root@deploy ~]# tail -f /var/log/jenkins/jenkins.log
注意:插件不建议随便升级,有可能和你当前的版本不适用
3、使用jenkins—创建一个freestyle(自由风格)的软件项目做测试
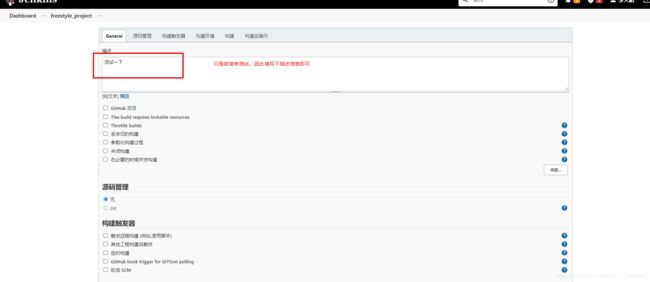
3.1、新建一个项目测试


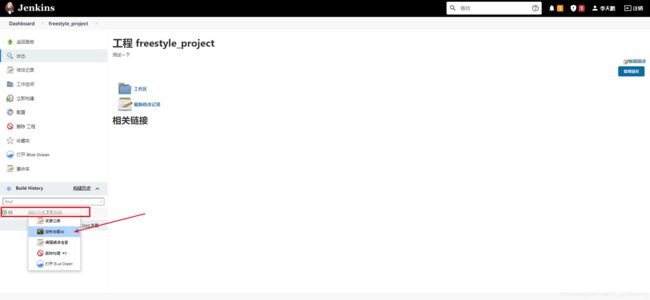
保存后,点击"立即构建"

点击构建后,可以查看到构建记录,也可以在控制台输出构建过程
3.2、查看构建后的产物
- 构建后的产物,会在/var/lib/jenkins/workspace/目录下对应的项目目录中
[root@deploy ~]# ll /var/lib/jenkins/workspace/
total 0
drwxr-xr-x 2 jenkins jenkins 32 Jul 18 22:42 freestyle_project

[root@deploy ~]# ll /var/lib/jenkins/workspace/freestyle_project
total 4
-rw-r--r-- 1 jenkins jenkins 12 Jul 18 22:42 file1
-rw-r--r-- 1 jenkins jenkins  0 Jul 18 22:42 file2
4、jenkins 集成 Gitlab

- jenkins 如何集成 Gitlab:jenkins只是一个调度平台,因此需要安装与gitlab相关的插件完成集成
- jenkins 与 Gitlab集成的思路:
- 1、开发提交代码执Gitlab
- 2、jenkins安装Gitlab所需插件
- 3、jenkins创建freestyle项目,然后配置gitlab仓库对应地址
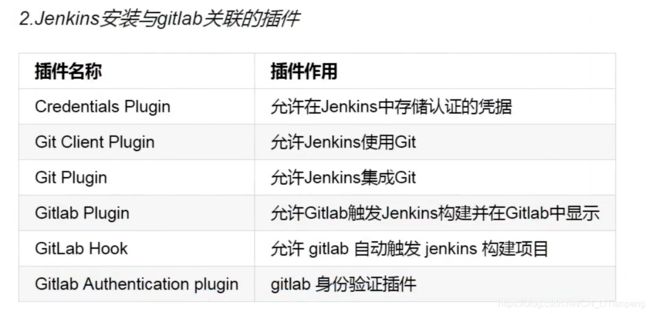
4.1、安装和gitlab相关的插件
- 需要安装的相关插件
4.2、模拟流水线
4.2.1、模拟web项目
- 10.4.7.14 :充当nginx负载均衡,以及web后端,dns服务器
- 10.4.7.15:充当web后端
修改两个节点的 /etc/nginx/nginx.conf 文件,修改端口及根目录位置
[root@deploy ~]# vim /etc/nginx/nginx.conf
   server {
        listen       8880;
        listen       [::]:8880;
        server_name  _;
        root         /web-test/code/demo;
在 10.4.7.14 上配置nginx负载均衡
# 后端服务端口为8880,dns域名为 nginx.prod.com
[root@deploy web-ui]# cat /etc/nginx/conf.d/nginx.prod.com.conf
upstream backend-web {
        server 10.4.7.14:8880;
        server 10.4.7.15:8880;
}

server {
    listen       80;
    server_name  nginx.prod.com;

    client_max_body_size 1000m;

    location / {
        proxy_pass http://backend-web;
        proxy_set_header Host $http_host;
    }
}
访问 nginx.prod.com 查看
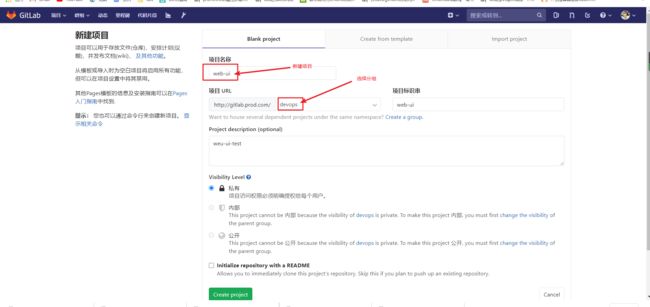
4.2.2、新建项目,绑定devops项目组
此时点击项目,可以看到项目组中有两个成员(root 和 laowang)
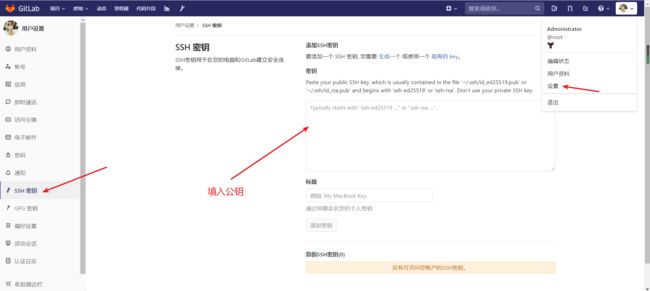
配置ssh公钥,免密连接gitlab
4.2.3、模拟上传v1版本的项目文件
# 添加远程用户
[root@deploy crm]# git remote add origin
# 将gitlab项目仓库clone到本地
[root@deploy crm]# git clone git@gitlab.prod.com:devops/web-ui.git
# 将demo项目文件放到这个新的仓库目录中
[root@deploy crm]# mv demo web-ui/
[root@deploy crm]# cd web-ui/
[root@deploy web-ui]# ls
demo
[root@deploy web-ui]# touch README.md
[root@deploy web-ui]# git add .
[root@deploy web-ui]# git commit -m 'new web'
# 上传项目文件
[root@deploy web-ui]# git push -u origin master

# 给刚刚上传的commit id打上tag
[root@deploy web-ui]# git tag -a 'v1.1' -m "first push"
[root@deploy web-ui]# git tag
v1.1
[root@deploy web-ui]# git push -u origin v1.1

# 这个文件中只有一个index.html文件,用于后面流水线测试,里面的内容是Test-v1
[root@deploy web-ui]# cat demo/index.html
<html><body><h1>Test-v1</h1>
</body></html>
成功上传

4.2.4、模拟上传v1.2版本的项目文件
# 修改文件内容为Test-v1.2
[root@deploy web-ui]# cat demo/index.html
<html><body><h1>Test-v1.2</h1>
</body></html>

# 再次提交上传
[root@deploy web-ui]# git add .
[root@deploy web-ui]# git commit -m "second"
[root@deploy web-ui]# git push -u origin master

# 打上标签
[root@deploy web-ui]# git tag -a "v1.2" -m "v1.2"
[root@deploy web-ui]# git tag
v1.1
v1.2

# 上传标签
[root@deploy web-ui]# git push -u origin v1.2

4.2.5、到jenkins上构建流水线(根据tag进行版本发布)
- 构建一个新流水线
- 注意:一定要安装好git的相关插件,并将jenkins的用户改为root
修改jenkins的运行用户为root
[root@deploy ~]# vim /etc/sysconfig/jenkins
JENKINS_USER="root"# 将原来的jenkins修改为root


构建参数选择
- 选择"git参数",会自动识别gitlab中的tag,自定义名称(如:git_version)作为变量接收tag值,在配置"源码管理"时可以利用这个变量传入tag值,达到根据tag拉取代码的效果
- 选择"选项参数",定义参数名称(如:action),添加两个选项"deploy"和"rollback",分别代表部署和回退


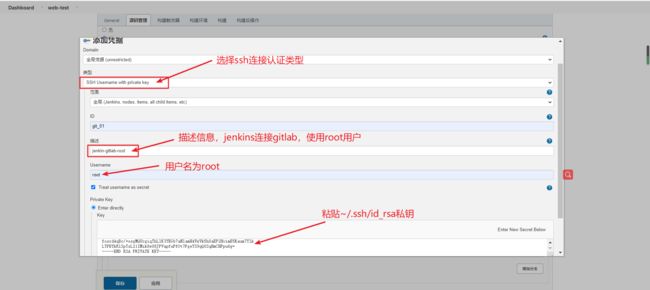
配置 源码管理 - 在url中填入Gitlab的ssh连接方式
- 在Credentials参数下,配置ssh连接的用户及私钥
- 在指定分支中,配置上面git参数的tag变量

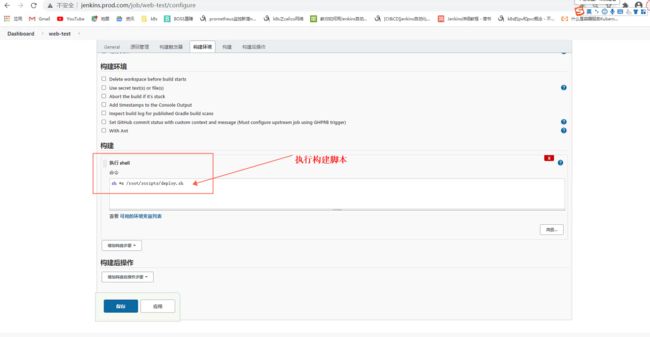
构建方式的选择
- 选择"执行shell", 利用shell脚本自动构建
jenkins提供了很多内置变量,可以在构建脚本中被调用,这里我们主要用到两个参数变量
- GIT_COMMIT:构建时选择clone的commit_id
- GIT_PREVIOUS_SUCCESSFUL_COMMIT:历史构建成功的commit_id
- 这两个参数在deploy部署时用到,如果${GIT_COMMIT} == ${GIT_COMMIT},就表示当前构建的版本已经被部署过了,只需要执行rollback回退就行
- WORKSPACE:该参数是我们git项目下载文件存放目录的变量

4.2.6、编写发布脚本
[root@deploy ~]# mkdir scripts
[root@deploy ~]# cd scripts/
[root@deploy scripts]# pwd
/root/scripts
[root@deploy scripts]# cat deploy.sh
#!/bin/bash

DATE=$(date +%Y-%m-%d-%H-%M-%S)
webserver="10.4.7.14 10.4.7.15"
Sdir=/opt
Ddir=/web-test/code
Postfix=${DATE}-${git_version}

# 到项目目录,将拉取下来的项目文件进行打包(打包的目的是为了方便传输给其他worker节点)
get_code(){
    cd ${WORKSPACE} && \
    tar czf ${Sdir}/code-${Postfix}.tar.gz ./*
}

# 将内容scp到各个节点
scp_webserver(){
    for host in ${webserver};do
        scp ${Sdir}/code-${Postfix}.tar.gz root@${host}:${Sdir}
        ssh ${host} "mkdir ${Ddir}-${Postfix} &&\
                     tar xf ${Sdir}/code-${Postfix}.tar.gz -C ${Ddir}-${Postfix} &&\
                     rm -rf ${Ddir} &&\
                     ln -s ${Ddir}-${Postfix} ${Ddir}"
    done
}

rollback(){
    rollback_dir=$(find /web-test/ -maxdepth 1 -type d -name "code*-${git_version}")
    for host in ${webserver};do
        ssh ${host} "rm -rf ${Ddir} &&\
                     ln -s ${rollback_dir} ${Ddir}"
    done
}

deploy(){
    get_code
    scp_webserver
}

if [[ ${action} == deploy ]];then
    if [[ ${GIT_COMMIT} == ${GIT_PREVIOUS_SUCCESSFUL_COMMIT} ]];then
        echo "这个版本已经部署过,若要使用旧版本,请选择rollback版本回退"
        exit 1
    else
        deploy
    fi
elif [[ ${action} == rollback ]];then
    rollback
fi
4.2.7、模拟更新代码,进行jenkins构建、回退测试
当前我们所在的版本是v1.3

- clone代码到本地,修改版本为v1.4,重新上传测试构建
[root@deploy ~]# git clone git@gitlab.prod.com:devops/web-ui.git

# 进入到仓库目录
[root@deploy ~]# cd web-ui/demo/
[root@deploy demo]# vim index.html
[root@deploy demo]# cat index.html
<html><body><h1>Test-v1.4</h1>
</body></html>

# 提交新代码,并打标签
[root@deploy demo]# git add .
[root@deploy demo]# git commit -m 'v1.4'
[root@deploy demo]# git tag -a 'v1.4' -m 'add tag v1.4'
[root@deploy demo]# git push -u origin v1.4 master
- 1、到jenkins上构建测试
- 点击"Build with Parameters" 参数化构建
- 选择刚刚上传的v1.4标签
- 选择deploy进行部署
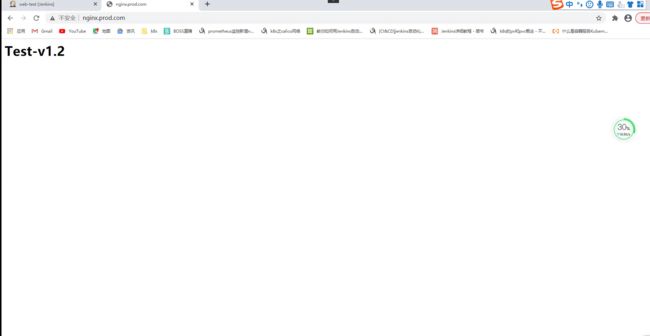
- 点击开始构建,完成后访问测试是否升级为 1.4版本

访问测试,自动上线为 v1.4版本

-
2、到jenkins上回退测试
- 点击"Build with Parameters" 参数化构建
- 选择选择需要回退的版本,这里就选 v1.1
- 选择 rollback ,进行回滚
- 点击开始构建,完成后访问测试是否回滚为 v1.1 版本
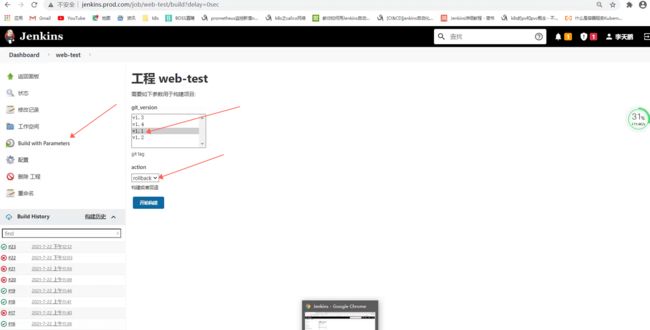
访问测试,成功回滚为 v1.1 版本

-
3、测试重复构建是否会提示报错
- 由于每构建一次,就会在目录中生成一个文件,因此要避免重复构建的问题。
- 解决这个问题的思路是:倘若选择的版本已经曾经构建过,那么就会构建失败并报错提示选择回滚的方式来回退到这个版本
- 测试:选择之前构建过的 v1.4 版本,再次构建,查看控制台输出

查看控制台输出,有构建失败提示
