Ubuntu搭建国标平台wvp-GB28181-pro
目录
- 简介
- 安装和编译
-
- 1.查看操作系统信息
- 2.安装最新版的nodejs
- 3.安装java环境
- 4.安装mysql
- 5.安装redis
- 6.安装编译器
- 7.安装cmake
- 8.安装依赖库
- 9.编译ZLMediaKit
-
- 9.1.编译结果说明
- 10.编译wvp-GB28181-pro
-
- 10.1.编译结果说明
- 配置
-
- 1.WVP-PRO配置文件
-
- 1.1.Mysql数据库配置
- 1.2.REDIS数据库配置
- 1.3.配置服务启动端口
- 1.4.配置28181相关信息
- 1.5.配置ZLMediaKit连接信息
- 1.6.个性化定制信息配置
- 2.ZLMediaKit配置文件
-
- 2.1.文件使用
- 2.1.配置
- 运行测试
-
- 1.运行ZLMediaKit
-
- 1.1.ZLMediaKit测试命令
- 2.运行wvp-GB28181-pro
-
- 2.1.测试命令
- 3.添加GB28181设备模拟器
- 参考资料
简介
官网wvp-GB28181-pro: https://doc.wvp-pro.cn/#/
流媒体服务器: https://github.com/ZLMediaKit/ZLMediaKit
WVP-PRO使用Spring boot开发,maven管理依赖。
参考官网既可安装部署.
为了方便搭建,开源软件以后修改可能导致配置失败,把ZLMediaKit和wvp-GB28181-pro配置文件和项目commit ID记录到仓库中.
https://gitee.com/fedorayang/wvp-gb28181-pro_-zlmedia-kit_config.git
安装和编译
以Ubuntu 22.04.3 LTS为例
1.查看操作系统信息
lsb_release -a
#输出一下信息
LSB Version:    core-11.1.0ubuntu4-noarch:security-11.1.0ubuntu4-noarch
Distributor ID: Ubuntu
Description:    Ubuntu 22.04.3 LTS
Release:        22.04
Codename:       jammy
2.安装最新版的nodejs
参考 ubuntu安装nodejs环境: https://blog.csdn.net/fedorayang/article/details/135837204
3.安装java环境
sudo apt install -y openjdk-11-jre maven

#确认java安装成功
java --version
#输出版本信息
openjdk 11.0.21 2023-10-17
OpenJDK Runtime Environment (build 11.0.21+9-post-Ubuntu-0ubuntu122.04)
OpenJDK 64-Bit Server VM (build 11.0.21+9-post-Ubuntu-0ubuntu122.04, mixed mode, sharing)
4.安装mysql
mysql如果以前安装过其他数据库可能存在冲突,需要完全卸载后安装,具体安装步骤参考 myql入门: https://blog.csdn.net/fedorayang/article/details/135847981
5.安装redis
sudo apt update
sudo apt install redis-server

#启动
redis-server

#查看Redis是否正常
systemctl status redis
redis-cli
#输入ping返回PONG表示正常
6.安装编译器
sudo apt install build-essential
7.安装cmake
参考文章 cmake入门: https://blog.csdn.net/fedorayang/article/details/134513536
8.安装依赖库
#除了openssl,其他其实都可以不安装
sudo apt install -y libssl-dev
sudo apt install -y libsdl1.2-dev
sudo apt install -y libavcodec-dev
sudo apt install -y libavutil-dev
sudo apt install -y ffmpeg
9.编译ZLMediaKit
git clone --depth 1 https://gitee.com/xia-chu/ZLMediaKit
cd ZLMediaKit
git submodule update --init
#编译
mkdir build
cd build
cmake ..
make -j4
9.1.编译结果说明
编译结果在release目录下,主要有三部分组成:
-
MediaServer 进程
cd ZLMediaKit/release/linux/Debug #通过-h可以了解启动参数 ./MediaServer -h -
c api 的 SDK
头文件在ZLMediaKit/api/include
库文件为:ZLMediaKit/release/linux/Debug/libmk_api.so
- 以
test_开头的测试程序
相关代码在ZLMediaKit/tests目录下,你可以对照代码启动测试进程。
10.编译wvp-GB28181-pro
git clone https://gitee.com/pan648540858/wvp-GB28181-pro.git

#1.编译前端页面
cd wvp-GB28181-pro/web_src/
npm --registry=https://registry.npmmirror.com install
npm run build
#编译完成后会生成目录: wvp-GB28181-pro/src/main/resources/static

#2.生成可执行jar
cd wvp-GB28181-pro
mvn package
#编译后生成文件: wvp-GB28181-pro/target/wvp-pro-2.7.0-01260305.jar

#3.生成war
cd wvp-GB28181-pro
mvn package -P war
#编译后生成文件: wvp-GB28181-pro/target/wvp-pro-2.7.0-01260312.war
10.1.编译结果说明
最终编译生成的结果在wvp-GB28181-pro/target目录,内容如下:

配置
有两个配置文件:1.WVP-PRO配置文件;2.ZLMediaKit配置文件.
1.WVP-PRO配置文件
./src/main/resources/application.yml
./target/classes/application.yml
./target/wvp-pro-2.7.0-01260312/WEB-INF/classes/application.yml

./src/main/resources/all-application.yml
./target/classes/all-application.yml
./target/wvp-pro-2.7.0-01260312/WEB-INF/classes/all-application.yml
如上all-application.yml,application.yml使用哪一组都可以,这里使用all-application.yml进行修改.
1.1.Mysql数据库配置
这里有两点注意:
- share数据库删除
- master数据库wvp2需要修改为wvp,必须要和建立的数据库名称对应
# [必选] jdbc数据库配置
datasource:
	# mysql配置
	dynamic:
		primary: master
		datasource:
			master:
				type: com.zaxxer.hikari.HikariDataSource
				driver-class-name: com.mysql.cj.jdbc.Driver
				url: jdbc:mysql://127.0.0.1:3306/wvp?useUnicode=true&characterEncoding=UTF8&rewriteBatchedStatements=true&serverTimezone=PRC&useSSL=false&allowMultiQueries=true
				username: root
				password: root123
				hikari:
					connection-timeout: 20000             # 是客户端等待连接池连接的最大毫秒数
					initialSize: 50                       # 连接池初始化连接数
					maximum-pool-size: 200                # 连接池最大连接数
					minimum-idle: 10                       # 连接池最小空闲连接数
					idle-timeout: 300000                  # 允许连接在连接池中空闲的最长时间(以毫秒为单位)
					max-lifetime: 1200000                 # 是池中连接关闭后的最长生命周期(以毫秒为单位)
MySQL设置
#查看数据库状态
systemctl status mysql
#进入mysql
mysql -u root -p

#mysql更改
use mysql;
update user set host='%' where user= 'root';
flush privileges;
select host,user,plugin from user where user='root';
#更改root用户密码为root123,参考上面的配置
alter user 'root'@'%' identified with mysql_native_password by 'root123';
flush privileges;
grant all on *.* to 'root'@'%';
flush privileges;


#wvp数据库修改,需要和url: jdbc:mysql://127.0.0.1:3306/wvp?对应
create DATABASE wvp;
use wvp;
source /home/multimedia/gb28181/wvp-GB28181-pro/数据库/初始化-mysql.sql
flush privileges;
exit
1.2.REDIS数据库配置
1.3.配置服务启动端口
# [可选] WVP监听的HTTP端口, 网页和接口调用都是这个端口
server:
    port: 18080
1.4.配置28181相关信息
sip:
	#SIP信令服务器IP地址
    ip: 0.0.0.0
    port: 5060
    domain: 4401020049
    id: 44010200492000000001
    password: admin123
1.5.配置ZLMediaKit连接信息
#zlm 默认服务器配置
media:
   # ZLMediaKit的服务ID,必须配置
    id: FQ3TF8yT83wh5Wvz
    # [必须修改] zlm服务器的内网IP,sdp-ip与stream-ip使用默认值的情况下,这里不要使用127.0.0.1/0.0.0.0
    ip: 192.168.1.3
    # [必须修改] zlm服务器的http.port
    http-port: 80
    # [可选] 返回流地址时的ip,置空使用 media.ip
    #stream-ip:
    # [可选] wvp在国标信令中使用的ip,此ip为摄像机可以访问到的ip, 置空使用 media.ip
    #sdp-ip:
    # [可选] zlm服务器的hook所使用的IP, 默认使用sip.ip
    #hook-ip:
    # [可选] zlm服务器的http.sslport, 置空使用zlm配置文件配置
    #http-ssl-port:
    # [可选] zlm服务器的rtmp.port, 置空使用zlm配置文件配置
    #rtmp-port:
    # [可选] zlm服务器的rtmp.sslport, 置空使用zlm配置文件配置
    #rtmp-ssl-port:
    # [可选] zlm服务器的 rtp_proxy.port, 置空使用zlm配置文件配置
    #rtp-proxy-port:
    # [可选] zlm服务器的 rtsp.port, 置空使用zlm配置文件配置
    #rtsp-port:
    # [可选] zlm服务器的 rtsp.sslport, 置空使用zlm配置文件配置
    #rtsp-ssl-port:
    # [可选] zlm服务器的hook.admin_params=secret
    secret: BkPj2ca6QPpY5RccREJq4kAOu9ZEt70x
    # 启用多端口模式, 多端口模式使用端口区分每路流,兼容性更好。 单端口使用流的ssrc区分, 点播超时建议使用多端口测试
    rtp:
        # [可选] 是否启用多端口模式, 开启后会在portRange范围内选择端口用于媒体流传输
        enable: true
        # [可选] 在此范围内选择端口用于媒体流传输, 必须提前在zlm上配置该属性,不然自动配置此属性可能不成功
        port-range: 30000,35000 # 端口范围
        # [可选] 国标级联在此范围内选择端口发送媒体流,请不要与收流端口范围重合
        send-port-range: 35002,35006 # 端口范围
- id必须和2.1.配置中
general.mediaServerId设置一致 - ip必须正确设置
- http-port和2.1.配置中
http.port相同 - secret和2.1.配置中
api.secret相同 - rtp和2.1.配置中
rtp_proxy.rtp_proxy相同
1.6.个性化定制信息配置
# [根据业务需求配置]
user-settings:
    # [可选] 服务ID,不写则为000000
    #server-id:
2.ZLMediaKit配置文件
2.1.文件使用
./release/linux/Debug/config.ini
./conf/config.ini

#默认使用./release/linux/Debug/config.ini

#修改并保存配置文件后,运行如下命令就能使ZLMediaKit热加载配置文件,而不必先关闭服务然后再开启
killall -1 MediaServer`
2.1.配置
[api]
    #一些比较敏感的http api在访问时需要提供secret,否则无权限调用
    #如果是通过127.0.0.1访问,那么可以不提供secret
    secret=BkPj2ca6QPpY5RccREJq4kAOu9ZEt70x

[general]
    #服务器唯一id,用于触发hook时区别是哪台服务器
    mediaServerId=FQ3TF8yT83wh5Wvz

[http]
    #http服务器监听端口
    port=80

[rtp_proxy]
    #随机端口范围,最少确保36个端口
    #该范围同时限制rtsp服务器udp端口范围
    port_range=30000-35000
-
mediaServerId需要和1.5.配置ZLMediaKit连接信息中的ID设置一致 - secret需要和1.5.配置ZLMediaKit相同
运行测试
1.运行ZLMediaKit
cd ZLMediaKit/release/linux/Debug
sudo ./MediaServer -c /home/multimedia/gb28181/config/ZLMediaKitConfig.ini
1.1.ZLMediaKit测试命令
http://192.168.1.3/
http://192.168.1.3/webassist/?secret=BkPj2ca6QPpY5RccREJq4kAOu9ZEt70x
https://192.168.1.3/webrtc/
2.运行wvp-GB28181-pro
cd wvp-GB28181-pro/target
#测试命令
sudo java -jar wvp-pro-*.jar --spring.config.location=/home/multimedia/gb28181/config/wvp-GB28181-pro-config.yml
2.1.测试命令
curl localhost:18080

http://192.168.1.3:18080/#/login
#用户名: admin
#密码: admin
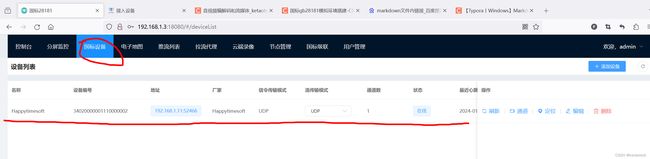
3.添加GB28181设备模拟器
国标gb28181模拟环境搭建: https://blog.csdn.net/fedorayang/article/details/135498173
1.4.配置28181相关信息
<config>
    <server_ip>192.168.1.3server_ip>
    <server_port>5060server_port>
    <server_id>44010200492000000001server_id>
    <server_domain>4401020049server_domain>
    <password>admin123password>
    <protocol>udpprotocol>
config>
其他配置项默认.
设备模拟器配置好后,启动wvp-GB28181-pro自动识别到设备.
流传输模式:UDP,TCP被动模式最常用.
参考资料
国标gb28181保姆级入门教程: https://blog.csdn.net/fedorayang/article/details/135499219
全网首发 开源28181 国产开源系统openeuler 编译ZLMediaKit wvp-GB28181-pro: https://www.bilibili.com/video/BV1hA4y1S7Gw?vd_source=a795ec50b290a151c69819df1d6cb37a