springBoot集成mybatis+mysql项目搭建
大家都知道,现在Spring框架几乎无处不用,目前最新版本据说是Spring5,现在常用的基本还是Spring4.X,很多公司甚至用的还是Spring3.x,而Spring领域其中最好用的莫过于SpringBoot,这是从SpringMVC衍变出来的,本质还是SpringMVC,但是要比SpringMVC好用的多,因为很好用,所以笔者闲暇之际用SpringBoot从头至尾摸索着搭建了一个案例,分享出来,希望对感兴趣的朋友有所帮助。废话不说了,进入主题,直接分享案例搭建全流程。
本项目使用的环境:
开发工具:Intellij IDEA 2017.1.3
jdk:1.8.0_51
maven:3.5.2
额外功能
mybatis generator 自动生成代码插件
步骤:
1.创建一个springboot项目:
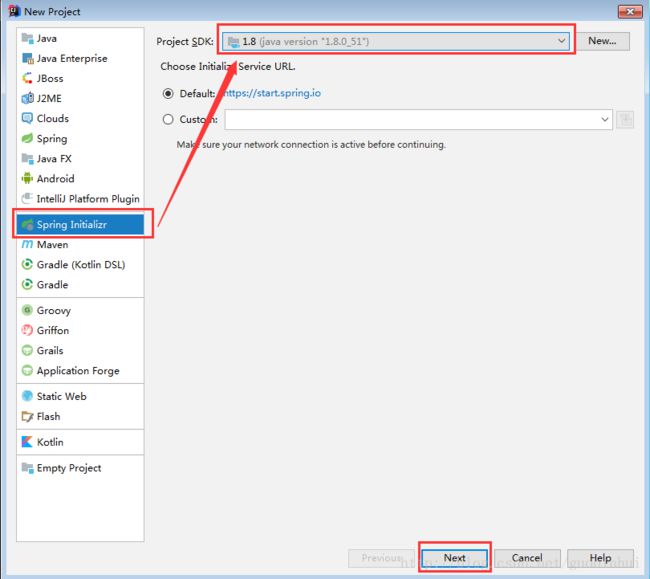
2.创建项目的文件结构以及jdk的版本

3.选择项目所需要的依赖

选择持久化框架的依赖
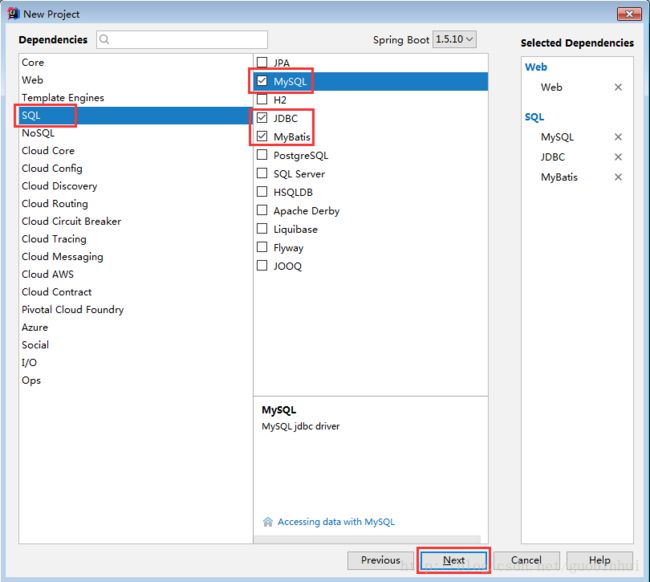
然后点击finish
5.项目结构如下:

6.查看文件pom.xml:
    4.0.0

    com.ocean
    springboot-mybatis-demo
    0.0.1-SNAPSHOT
    jar

    springboot-mybatis-demo
    Demo project for Spring Boot


        org.springframework.boot
        spring-boot-starter-parent
        1.5.10.RELEASE


        UTF-8
        UTF-8
        1.8


            org.springframework.boot
            spring-boot-starter-jdbc


            org.mybatis.spring.boot
            mybatis-spring-boot-starter
            1.3.1


            org.springframework.boot
            spring-boot-starter-web


            mysql
            mysql-connector-java
            5.1.6


            org.springframework.boot
            spring-boot-starter-test
            test


                org.springframework.boot
                spring-boot-maven-plugin


                org.mybatis.generator
                mybatis-generator-maven-plugin
                1.3.1

                    ${basedir}/src/main/resources/generator/generatorConfig.xml
                    true
                    true
7.本案例不使用application.properties文件 而使用更加简洁的application.yml文件。将resource文件夹下原有的application.properties文件删除,创建application.yml配置文件(备注:其实SpringBoot底层会把application.yml文件解析为application.properties), 文件的内容如下(此处只配置最基本的):
server:
  port: 8080

spring:
    datasource:
        name: test
        url: jdbc:mysql://127.0.0.1:3306/chenyun01
        username: root
        password: root
        driver-class-name: com.mysql.jdbc.Driver
mybatis:
  mapper-locations: classpath:mapping/*Mapper.xml
  type-aliases-package: com.ocean.pojo
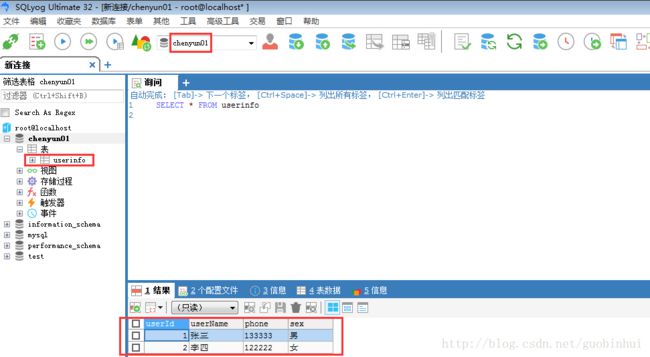
8.创建数据库:
在mysql(此处用SQLyog客户端)下创建数据库chenyun01,新建数据表userInfo,插入2条数据,结构如下
9.配置mybatis generator 自动生成代码插件
配置pom.xml中generator 插件所对应的配置文件 ${basedir}/src/main/resources/generator/generatorConfig.xml
自动生成代码:点击run----> Edit Configurations
添加配置

运行
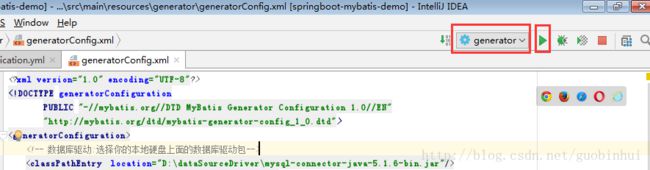
最后生成的项目结构:

10.我们还需要修改有点东西,因为生成的类中的路径写了全路径,所以我们要把前面多余的(main.java.)删掉:

生成的接口文件UserMapper.java
package com.ocean.dao;
import  com.ocean.pojo.UserInfo;

import java.util.List;

public interface UserInfoMapper {
    /**
     * This method was generated by MyBatis Generator.
     * This method corresponds to the database table userinfo
     *
     * @mbggenerated
     */
    int insert(UserInfo record);

    /**
     * This method was generated by MyBatis Generator.
     * This method corresponds to the database table userInfo
     *
     * @mbggenerated
     */
    int insertSelective(com.ocean.pojo.UserInfo record);
    //这个方式我自己单独加的方法
    List findAllUser();
}
模型(POJO)UserInfo.java
package com.ocean.pojo;

public class UserInfo {
    /**
     * This field was generated by MyBatis Generator.
     * This field corresponds to the database column userinfo.userId
     *
     * @mbggenerated
     */
    private Integer userid;

    /**
     * This field was generated by MyBatis Generator.
     * This field corresponds to the database column userinfo.userName
     *
     * @mbggenerated
     */
    private String username;

    /**
     * This field was generated by MyBatis Generator.
     * This field corresponds to the database column userinfo.phone
     *
     * @mbggenerated
     */
    private String phone;

    /**
     * This field was generated by MyBatis Generator.
     * This field corresponds to the database column userinfo.sex
     *
     * @mbggenerated
     */
    private String sex;

    /**
     * This method was generated by MyBatis Generator.
     * This method returns the value of the database column userinfo.userId
     *
     * @return the value of userinfo.userId
     *
     * @mbggenerated
     */
    public Integer getUserid() {
        return userid;
    }

    /**
     * This method was generated by MyBatis Generator.
     * This method sets the value of the database column userinfo.userId
     *
     * @param userid the value for userinfo.userId
     *
     * @mbggenerated
     */
    public void setUserid(Integer userid) {
        this.userid = userid;
    }

    /**
     * This method was generated by MyBatis Generator.
     * This method returns the value of the database column userinfo.userName
     *
     * @return the value of userinfo.userName
     *
     * @mbggenerated
     */
    public String getUsername() {
        return username;
    }

    /**
     * This method was generated by MyBatis Generator.
     * This method sets the value of the database column userinfo.userName
     *
     * @param username the value for userinfo.userName
     *
     * @mbggenerated
     */
    public void setUsername(String username) {
        this.username = username == null ? null : username.trim();
    }

    /**
     * This method was generated by MyBatis Generator.
     * This method returns the value of the database column userinfo.phone
     *
     * @return the value of userinfo.phone
     *
     * @mbggenerated
     */
    public String getPhone() {
        return phone;
    }

    /**
     * This method was generated by MyBatis Generator.
     * This method sets the value of the database column userinfo.phone
     *
     * @param phone the value for userinfo.phone
     *
     * @mbggenerated
     */
    public void setPhone(String phone) {
        this.phone = phone == null ? null : phone.trim();
    }

    /**
     * This method was generated by MyBatis Generator.
     * This method returns the value of the database column userinfo.sex
     *
     * @return the value of userinfo.sex
     *
     * @mbggenerated
     */
    public String getSex() {
        return sex;
    }

    /**
     * This method was generated by MyBatis Generator.
     * This method sets the value of the database column userinfo.sex
     *
     * @param sex the value for userinfo.sex
     *
     * @mbggenerated
     */
    public void setSex(String sex) {
        this.sex = sex == null ? null : sex.trim();
    }
}
对于映射文件UserInfoMapper.xml,删除多余的“main.java.”字符,配置xml的namespace
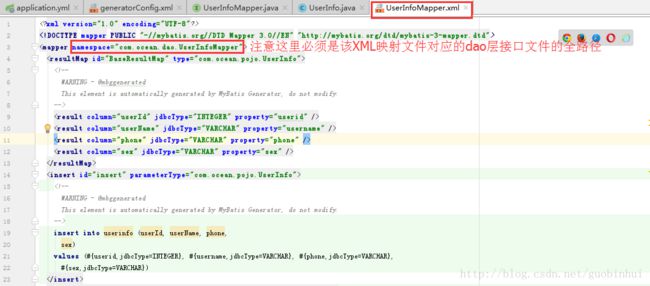
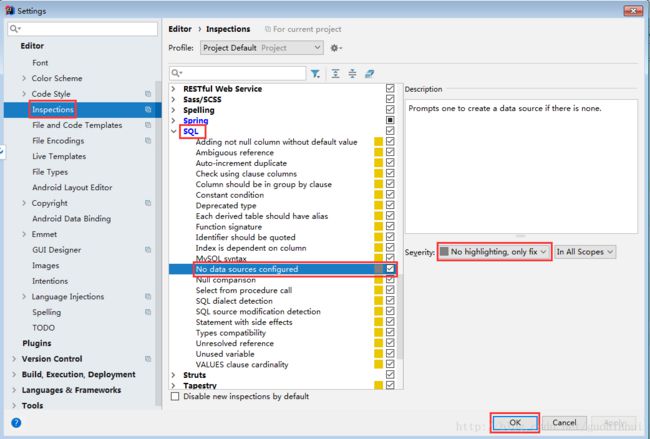
如果有的人的xml里的sql语句有黄色的背景,真心看不下去时(解决方案按照下图):
UserMapper.xml
insert into userinfo (userId, userName, phone,
sex)
values (#{userid,jdbcType=INTEGER}, #{username,jdbcType=VARCHAR}, #{phone,jdbcType=VARCHAR},
#{sex,jdbcType=VARCHAR})
insert into userinfo
userId,
userName,
phone,
sex,
#{userid,jdbcType=INTEGER},
#{username,jdbcType=VARCHAR},
#{phone,jdbcType=VARCHAR},
#{sex,jdbcType=VARCHAR},
11.打开类SpringbootMybatisDemoApplication.java,这个是springboot的启动类。我们需要添加点东西:
package com.ocean.springbootmybatisdemo;

import org.mybatis.spring.annotation.MapperScan;
import org.springframework.boot.SpringApplication;
import org.springframework.boot.autoconfigure.SpringBootApplication;
import org.springframework.boot.context.embedded.EmbeddedServletContainerCustomizer;
import org.springframework.boot.web.servlet.ErrorPage;
import org.springframework.context.annotation.Bean;
import org.springframework.context.annotation.ComponentScan;
import org.springframework.http.HttpStatus;

@SpringBootApplication
@MapperScan("com.ocean.dao")
@ComponentScan(basePackages = {"com.ocean.*"})
public class SpringbootMybatisDemoApplication {

    public static void main(String[] args) {
        SpringApplication.run(SpringbootMybatisDemoApplication.class, args);
    }
}
12.到这里本案例的搭建工作都完成了,接下来就是直接在浏览器上测试:
首先看一下完成之后的文件的结构:

现在把controller,service层的代码都写好(因做演示,此处控制器只写了一个方法):UserController.java
package com.ocean.controller;

import com.ocean.service.IUserService;
import org.springframework.beans.factory.annotation.Autowired;
import org.springframework.web.bind.annotation.RequestMapping;
import org.springframework.web.bind.annotation.RequestMethod;
import org.springframework.web.bind.annotation.RestController;

import java.util.List;

@RestController
@RequestMapping(value = {"/user"})
public class UserController {

    @Autowired
    private IUserService userService;

    @RequestMapping(value = {"/findAll"},produces = {"application/json;charset=UTF-8"},method = RequestMethod.GET)
    public List getAllUsers(){
       List list =  userService.findAllUser();
       return list;
    }
}
IUserService.java
package com.ocean.service;

import java.util.List;

public interface IUserService {
    List findAllUser();
}
UserServiceImpl.java
package com.ocean.service.impl;
import com.ocean.dao.UserInfoMapper;
import com.ocean.service.IUserService;
import org.springframework.beans.factory.annotation.Autowired;
import org.springframework.stereotype.Service;
import java.util.List;
@Service(value = "userService")
public class UserServiceImpl implements IUserService {
@Autowired
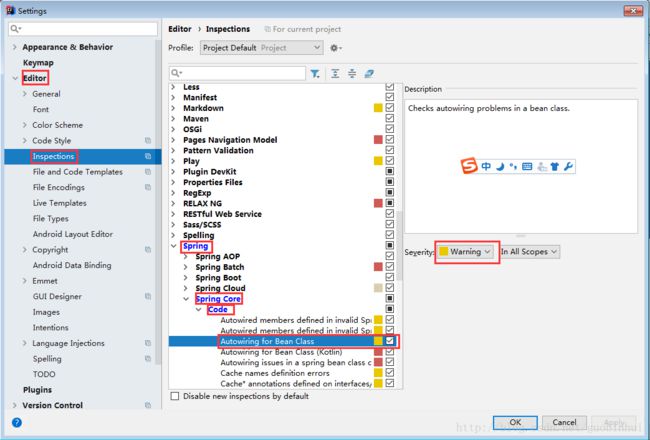
private UserInfoMapper userDao;//这里可能会报错,但是并不会影响
@Override
public List findAllUser(){
return userDao.findAllUser();
}
}
如果强迫症看不下去上面那个报错:(解决方法)
直接在浏览器访问,返回的数据确实是表里插入的2条数据,说明项目已经搭建成功了!!

源码地址:https://github.com/guobinhui/javaWeb-project/tree/master/springboot-mybatis-demo
---------------------
作者:guobinhui
来源:CSDN
原文:https://blog.csdn.net/guobinhui/article/details/79289189
版权声明:本文为博主原创文章,转载请附上博文链接!