Netty源码一:服务端启动
示例
public class Server {

    public static void main(String[] args) throws InterruptedException {
        // todo  创建两个 eventGroup boss 接受客户端的连接, 底层就是一个死循环, 不断的监听事件 处理事件
        // new NioEventLoopGroup(1); todo 入参1 表示设置boss设置为1个线程, 默认  = 计算机的 核数*2
        EventLoopGroup bossGroup = new NioEventLoopGroup(1);
        // todo  worker处理客户端的请求
        EventLoopGroup workerGroup = new NioEventLoopGroup();

        try {
            // todo 创建NettyServer的启动辅助类
            ServerBootstrap serverBootstrap = new ServerBootstrap();
            serverBootstrap
            // todo 到目前为止,group()就是把 上面创建的两个 事件循环组一个给了父类(AbstractBootStrap),一个给了自己
            .group(bossGroup, workerGroup)

            // todo  在每个netty服务器启动的时候,都会执行这个方法 ,接收了 NioServerSocketChannel.class 去反射;
            // todo  channel 是它父类的方法
            // todo  到目前为止仍然是赋值的操作, 把它赋值给 ServerBootstrap的父类 AbstractServerBootstrap
            .channel(NioServerSocketChannel.class)

            // todo 为客户端的连接设置相应的配置属性
            .childOption(ChannelOption.TCP_NODELAY,true)

            // todo 为每一个新添加进来的 属性信息, 可以理解成是跟业务逻辑有关 信息
            .childAttr(AttributeKey.newInstance("MyChildAttr"),"MyChildAttValue")

            // todo 添加handler
            .handler(new ServerHandler())

            // todo 添加自定义的子处理器, 处理workerGroup 的请求事件
            .childHandler(new MyServerInitializer()); // 添加自己的Initializer

            // sync() 可以当netty一直在这里等待
            // todo 启动!!!  实际上前面的准备工作都是为了Bind()方法准备的    bind()是它父类的方法, 这里有必要sync同步的等待,毕竟是服务端启动的步奏
            ChannelFuture channelFuture = serverBootstrap.bind(8899).sync();

            Channel channel = channelFuture.channel();

            channel.closeFuture().sync(); // todo 确保程序执行完closeFuture后,再往下进行

        } finally {
            bossGroup.shutdownGracefully();
            workerGroup.shutdownGracefully();
        }
    }
}
�
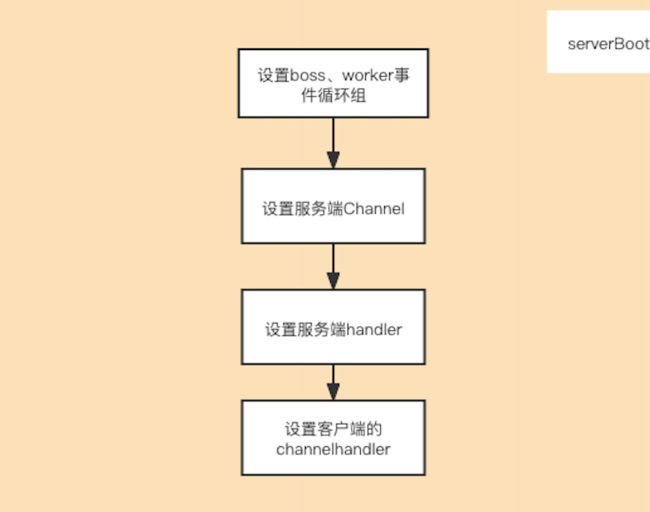
这里主要做了几件事:
- 设置boss、worker事件循环组
- 设置服务端channel
- 设置服务端handler
- 设置子处理器 childHandler
- 进行绑定操作bind, 这一块是核心
ServerBootstrap.bind
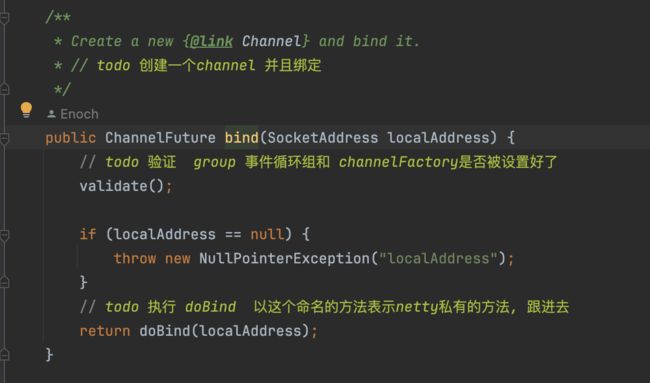
最终会调用到abstractBootstrap.doBind操作
AbstractBootstrap.doBind
private ChannelFuture doBind(final SocketAddress localAddress) {
    // todo  初始化 和 注册  带 Future 字眼的表示异步!!!  它本身返回的就是一个ChannelFuture
    final ChannelFuture regFuture = initAndRegister();

    final Channel channel = regFuture.channel();


    if (regFuture.cause() != null) {
        return regFuture;
    }

    if (regFuture.isDone()) {
        // At this point we know that the registration was complete and successful.
        ChannelPromise promise = channel.newPromise();
        // TODO  继续绑定端口 doBind0
        doBind0(regFuture, channel, localAddress, promise);
        return promise;
    } else {
        // Registration future is almost always fulfilled already, but just in case it's not.
        final PendingRegistrationPromise promise = new PendingRegistrationPromise(channel);
        regFuture.addListener(new ChannelFutureListener() {
            @Override
            public void operationComplete(ChannelFuture future) throws Exception {
                Throwable cause = future.cause();
                if (cause != null) {
                    // Registration on the EventLoop failed so fail the ChannelPromise directly to not cause an
                    // IllegalStateException once we try to access the EventLoop of the Channel.
                    promise.setFailure(cause);
                } else {
                    // Registration was successful, so set the correct executor to use.
                    // See https://github.com/netty/netty/issues/2586
                    promise.registered();

                    doBind0(regFuture, channel, localAddress, promise);
                }
            }
        });
        return promise;
    }
}
�先看initAndRegister方法
final ChannelFuture  initAndRegister() {
    Channel channel = null;
    try {
        // todo 这个 channelFactory是那个 反射工厂ReflectiveChannelFactory  对服务端来说, 可以创建   NioServerSocketChannel  对象
        // todo 而这个对象又是 Selector的一种实现  就是SelectorProvider.providor()方法
        // todo 实例化 NioServerSocketChannel, 通过反射走的是无参的构造, 我们去追踪它的无参构造去
        channel = channelFactory.newChannel();


        // todo 初始化Channel, 好几轮赋值, 以及添加 handler 等组件
        init(channel);

    } catch (Throwable t) {
        if (channel != null) {
            // channel can be null if newChannel crashed (eg SocketException("too many open files"))
            channel.unsafe().closeForcibly();
        }
        // as the Channel is not registered yet we need to force the usage of the GlobalEventExecutor
        return new DefaultChannelPromise(channel, GlobalEventExecutor.INSTANCE).setFailure(t);
    }

    // todo  注册 group  == BOSS EventLoopGroup , -- > 暂时以为, 他是想确保把通过反射创建出来的NioServerSocketChannel注册进 BossGroup
    // todo  目的是,让通过这个NioServerSocketChannel中的ServerSocketChannel 去 accept客户端的连接, 进而把连接通过Acceptor 扔给 WorkerGroup
    // todo   config()--> ServerBootstrapConfig
    // todo   group()--> NioEventLoopGroup -- workerGroup
    // todo   我们用户点进去  进入 EventLoopGroup. 而 Debug 进入的是 MultithreadEventLoopGroup类 , 因为我这里的是 NioEventLoopGroup 是 MultithreadEventLoopGroup类的子类
    // todo  !!! 忽略的一个重点, group是 MultithreadEventLoopGroup类  我们知道这个类中维护的是 BossGroup, 即将channel注册进bossgroup中
    ChannelFuture regFuture = config().group().register(channel);

    if (regFuture.cause() != null) { // todo 非空表示注册失败了
        if (channel.isRegistered()) {
            channel.close();
        } else {
            channel.unsafe().closeForcibly();
        }
    }

    // If we are here and the promise is not failed, it's one of the following cases:
    // todo 如果我们期待的结果并没有失败, 就会出现下面几种情况

    // 1) If we attempted registration from the event loop, the registration has been completed at this point.
    //    i.e. It's safe to attempt bind() or connect() now because the channel has been registered.
    // todo 如果我们 企图往事件循环中注册通道, 因为现在这个通道晶注册完毕了,所以 bind() 和 connet()是安全的

    // 2) If we attempted registration from the other thread, the registration request has been successfully
    //    added to the event loop's task queue for later execution.
    //    i.e. It's safe to attempt bind() or connect() now:
    //         because bind() or connect() will be executed *after* the scheduled registration task is executed
    //         because register(), bind(), and connect() are all bound to the same thread.
    return regFuture;
}
channelFactory.newChannel(反射创建channel)
channelFactory.newChannel() 会最终调用到 外面配置的�NioServerSocketChannel.newInstance,也就是最终会走到它的构造方法
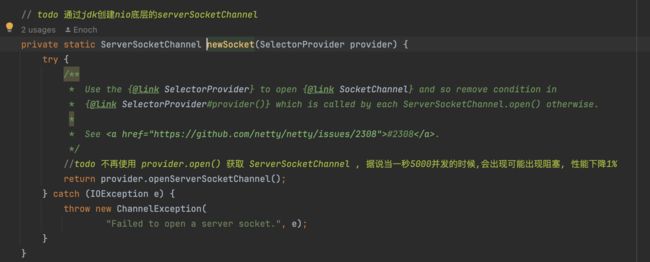
记住jdk的是 serverSocketChannel,接下来是调用带ServerSocketChannel的构造方法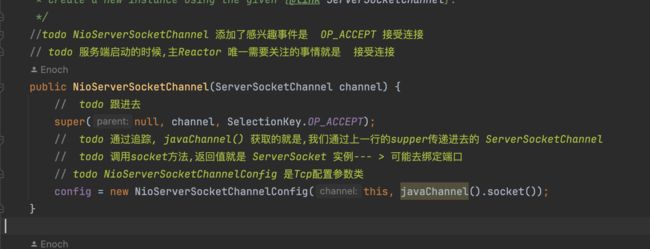
super()一路最终调用AbstractNioChannel的构造方法,下面就是创建了一个NioServerSocketChannelConfig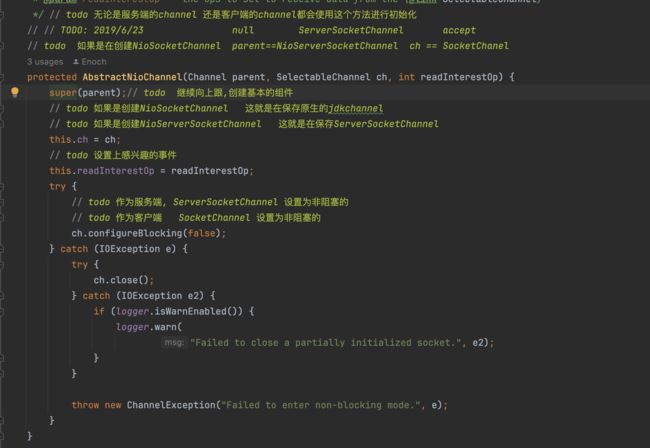
这里AbstractNioChannel的构造方法里面做了几件事:
- 继续调用super,调用到AbstractChannel的构造方法,里面设置channelId、创建NioMessageUnsafe对象、创建Pipline对象
- 保存传入进来的jdk原生的ServerSocketChannel
- 设置上感兴趣的事件
- 设置非阻塞
最后用一张图总结一下: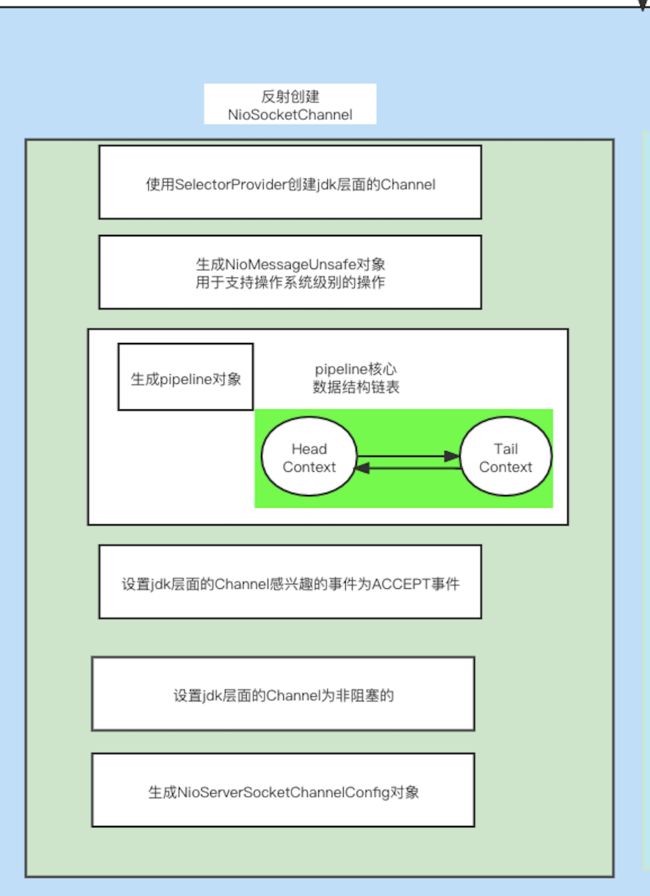
init(channel):初始化channel
@Override
void init(Channel channel) throws Exception {
    // todo ChannelOption 是在配置 Channel 的 ChannelConfig 的信息
    final Map<ChannelOption<?>, Object> options = options0();
    synchronized (options) {
        // todo 把 NioserverSocketChannel 和 options Map传递进去, 给Channel里面的属性赋值
        // todo 这些常量值全是关于和诸如TCP协议相关的信息
        setChannelOptions(channel, options, logger);
    }
    // todo 再次一波 给Channel里面的属性赋值  attrs0()是获取到用户自定义的业务逻辑属性 --  AttributeKey
    final Map<AttributeKey<?>, Object> attrs = attrs0();
    // todo 这个map中维护的是 程序运行时的 动态的 业务数据 , 可以实现让业务数据随着netty的运行原来存进去的数据还能取出来
    synchronized (attrs) {
        for (Entry<AttributeKey<?>, Object> e : attrs.entrySet()) {
            @SuppressWarnings("unchecked")
            AttributeKey<Object> key = (AttributeKey<Object>) e.getKey();
            channel.attr(key).set(e.getValue());
        }
    }
    // todo-------   options   attrs :   都可以在创建BootStrap时动态的传递进去


    // todo ChannelPipeline   本身 就是一个重要的组件, 他里面是一个一个的处理器, 说他是高级过滤器,交互的数据 会一层一层经过它
    // todo 下面直接就调用了 p , 说明,在channel调用pipeline方法之前, pipeline已经被创建出来了!,
    // todo 到底是什么时候创建出来的 ?  其实是在创建NioServerSocketChannel这个通道对象时,在他的顶级抽象父类(AbstractChannel)中创建了一个默认的pipeline对象
    /// todo 补充: ChannelHandlerContext 是 ChannelHandler和Pipeline 交互的桥梁
    ChannelPipeline p = channel.pipeline();

    // todo  workerGroup 处理IO线程
    final EventLoopGroup currentChildGroup = childGroup;
    // todo 我们自己添加的 Initializer
    final ChannelHandler currentChildHandler = childHandler;

    final Entry<ChannelOption<?>, Object>[] currentChildOptions;
    final Entry<AttributeKey<?>, Object>[] currentChildAttrs;


    // todo 这里是我们在Server类中添加的一些针对新连接channel的属性设置, 这两者属性被acceptor使用到!!!
    synchronized (childOptions) {
        currentChildOptions = childOptions.entrySet().toArray(newOptionArray(childOptions.size()));
    }
    synchronized (childAttrs) {
        currentChildAttrs = childAttrs.entrySet().toArray(newAttrArray(childAttrs.size()));
    }

    // todo 下面的代码中是Netty原生默认会往NioServerSocketChannel的管道里面添加了一个 ChannelInitializer  ,
    // todo 通过这个ChannelInitializer可以实现大批量的往 pipeline中添加处理器
    // todo  ( 后来我们自己添加的ChildHandler 就继承了的这个ChannelInitializer , 而这个就继承了的这个ChannelInitializer 实现了ChannelHandler)
    p.addLast(new ChannelInitializer<Channel>() { // todo 进入addlast

        // todo 这是个匿名内部类, 一旦new ,就去执行它的构造方法群, 完事后再回来看下面的代码,

        // todo  这个ChannelInitializer 方便我们一次性往pipeline中添加多个处理器
        @Override
        public void initChannel(final Channel ch) throws Exception {
            final ChannelPipeline pipeline = ch.pipeline();
            // todo  获取Bootstrap的handler 对象, 没有则返回空
            // todo  这个handler 针对BossGroup的Channel  , 给他添加上我们在server类中添加的handler()里面添加处理器
            ChannelHandler handler = config.handler();
            if (handler != null) {
                pipeline.addLast(handler);
            }

            // todo ServerBootstrapAcceptor 接收器, 是一个特殊的chanelHandler
            ch.eventLoop().execute(new Runnable() {
                    @Override
                    public void run() {
                        // todo !!! --   这个很重要,在ServerBootStrap里面,netty已经为我们生成了接收器  --!!!
                        // todo 专门处理新连接的接入, 把新连接的channel绑定在 workerGroup中的某一条线程上
                        // todo 用于处理用户的请求, 但是还有没搞明白它是怎么触发执行的
                        pipeline.addLast(new ServerBootstrapAcceptor(
                                // todo 这些参数是用户自定义的参数
                                // todo NioServerSocketChannel, worker线程组  处理器   关系的事件
                                ch, currentChildGroup, currentChildHandler, currentChildOptions, currentChildAttrs));
                    }
                });
        }
    });
    System.out.println("哈哈哈哈.....");
}
�代码看着一大堆,其实就做了几件事:
- 将ServerBootStrap配置上的参数应用到channel上
- 然后在channel的pipline的链表上增加了一个ChannelInitializer
- 但是这个时候其实是没有执行ChannelInitializer里面的方法的
具体流程如图所示:
�
�
EventLoopGroup.register(channel):
由于EventLoopGroup是继承MutithreadEventLoopGroup,最终会调用到它
�
这里的next(一组EventLoopGroup里面有很多EventLoop,使用轮训算法给你找一个EventLoop)返回的是NioEventLoop: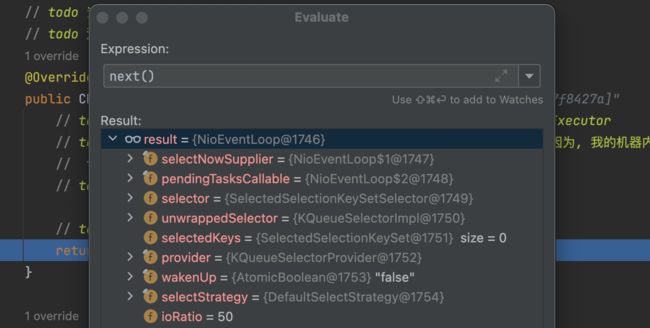
由于EventLoop继承的是SingleThreadEventLoop,最终调用到它的register方法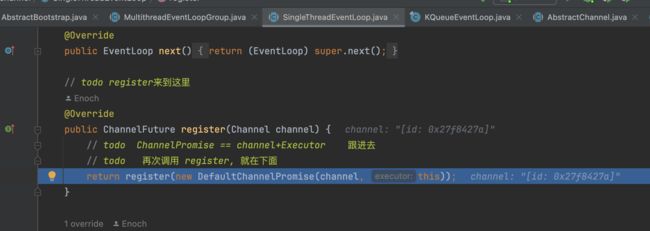

最终会调用AbstractChannel.register方法
@Override
// todo 入参 eventLoop == SingleThreadEventLoop   promise == NioServerSocketChannel + Executor
public final void register(EventLoop eventLoop, final ChannelPromise promise) {
    if (eventLoop == null) {
        throw new NullPointerException("eventLoop");
    }
    if (isRegistered()) {
        promise.setFailure(new IllegalStateException("registered to an event loop already"));
        return;
    }
    if (!isCompatible(eventLoop)) {
        promise.setFailure(
            new IllegalStateException("incompatible event loop type: " + eventLoop.getClass().getName()));
        return;
    }
    // todo 赋值给自己的 事件循环, 把当前的eventLoop赋值给当前的Channel上  作用是标记后续的所有注册的操作都得交给我这个eventLoop处理, 正好对应着下面的判断
    // todo 保证了 即便是在多线程的环境下一条channel 也只能注册关联上唯一的eventLoop,唯一的线程
    AbstractChannel.this.eventLoop = eventLoop;

    // todo 下面的分支判断里面执行的代码是一样的!!, 为什么? 这是netty的重点, 它大量的使用线程, 线程之间就会产生同步和并发的问题
    // todo 下面的分支,目的就是把线程可能带来的问题降到最低限度
    // todo 进入inEventLoop() --> 判断当前执行这行代码的线程是否就是 SingleThreadEventExecutor里面维护的那条唯一的线程
    // todo 解释下面分支的必要性, 一个eventLoop可以注册多个channel, 但是channel的整个生命周期中所有的IO事件,仅仅和它关联上的thread有关系
    // todo 而且,一个eventLoop在他的整个生命周期中,只和唯一的线程进行绑定,
    //
    // todo 当我们注册channel的时候就得确保给他专属它的thread,
    // todo 如果是新的连接到了,
    if (eventLoop.inEventLoop()) {
        // todo 进入regist0()
        register0(promise);
    } else {
        try {
            // todo 如果不是,它以一个任务的形式提交  事件循环 , 新的任务在新的线程开始,  规避了多线程的并发
            // todo 他是SimpleThreadEventExucutor中execute()实现的,把任务添加到执行队列执行
            eventLoop.execute(new Runnable() {
                @Override
                public void run() {
                    register0(promise);
                }
            });
        } catch (Throwable t) {
            logger.warn(
                "Force-closing a channel whose registration task was not accepted by an event loop: {}",
                AbstractChannel.this, t);
            closeForcibly();
            closeFuture.setClosed();
            safeSetFailure(promise, t);
        }
    }
}
�总结一下一共做了几件事:
- 将EventLoop赋值给channel
- 判断执行当前代码是不是EventLoop里面那个唯一线程在执行,如果是由它在执行,那就直接执行register0,如果不是就创建一个任务然后 eventLoop.execute执行, 由于EventLoop继承了SingleThreadEventExecutor,最终会调用到SingleThreadEventExecutor.execute方法
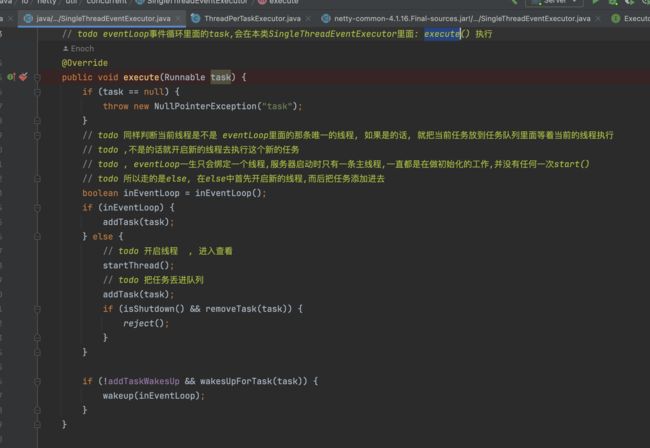
这个executor.execute具体如下:
结合上面所有的内容总结:
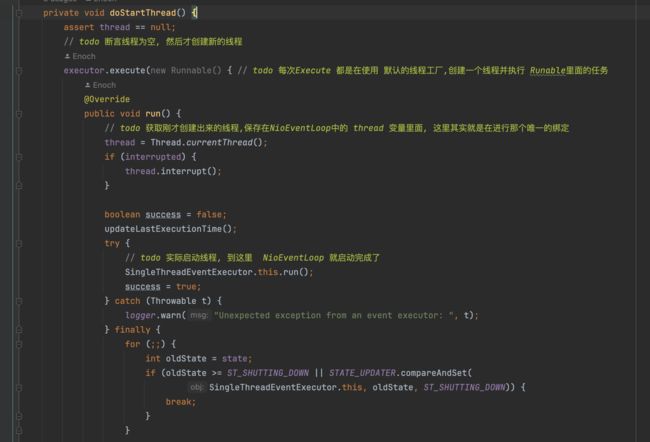
- 利用ThreadPerTaskExecutor创建了一个线程,并启动
- 这个线程执行的是SingleThreadEventExecutor.this.run(); 最终又会跑到执行 NioEventLoop的run方法,如图所示:
- 上面其实就是创建了一个线程,然后不断的执行NioEventLoop的run方法
- 将传进来的task放到队列中,有点类似于线程池的设计,后续这个NioEventLoop会从对列中取出任务执行
这个流程如图所示:
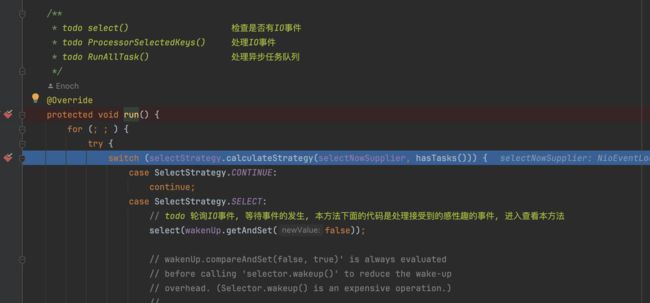
NioEventLoop.run (类似于线程池)

它不断的run,最终会执行到我们往里面提交的register0方法,我们来看register0方法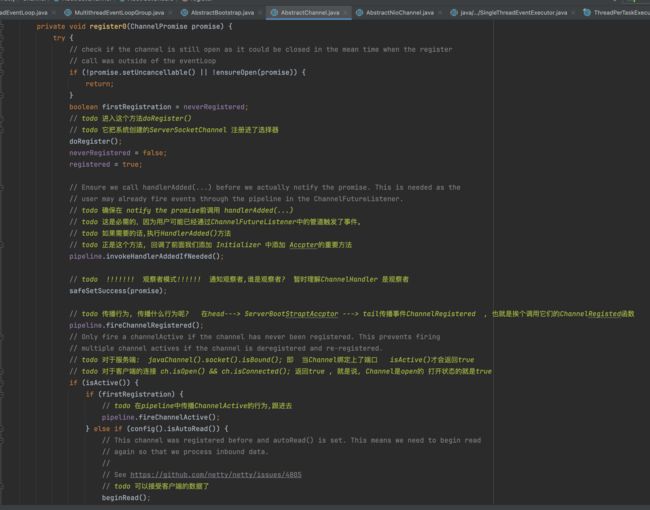
具体做了几件事:
- 向Selector注册上Jdk层面上的channel:doRegister
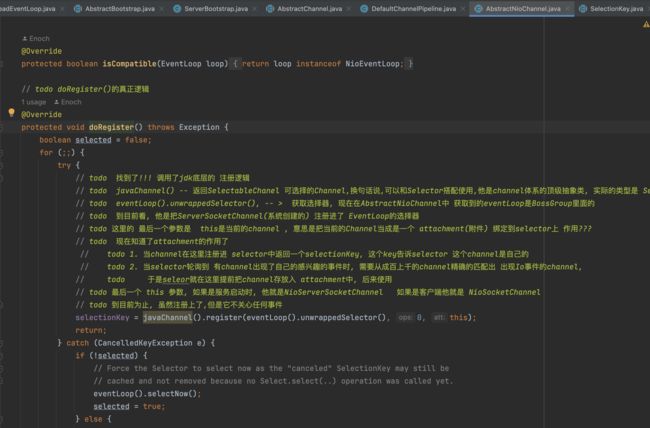
- 回调触发之前配置的childHandler:
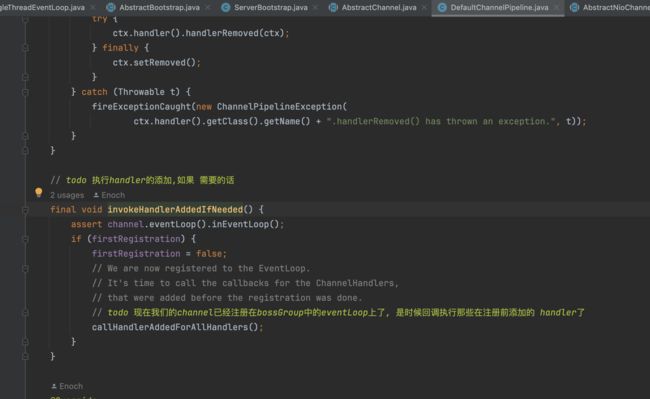
回调我们之前设置的Channelnitializer:
如果说我们配置了 ,在这一步会加入到Pipline中,具体长这样:
接下来 又往NioEventLoop中提交了一个任务,
完整的流程图如下: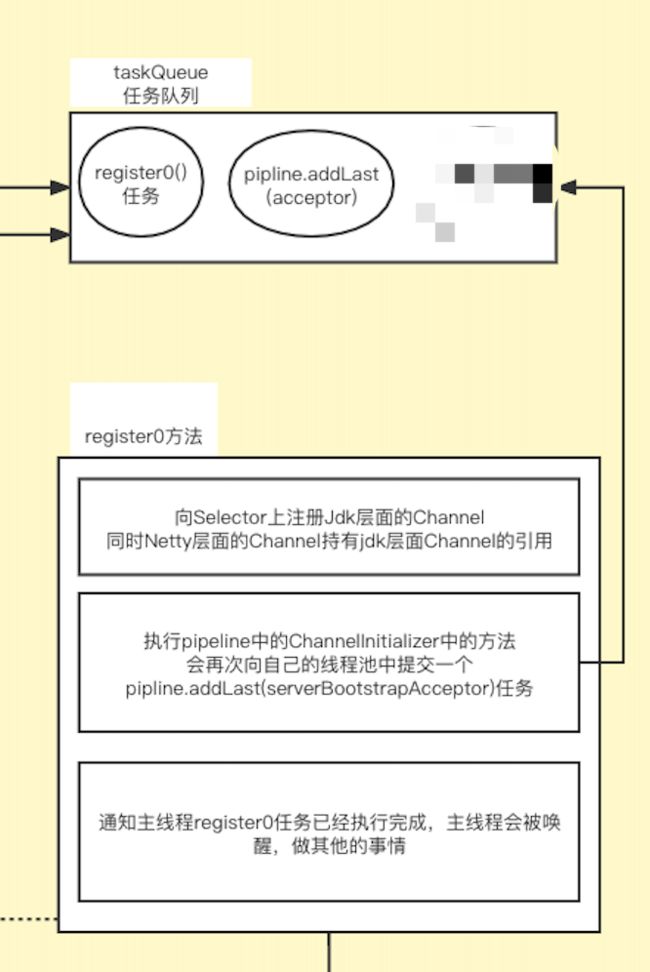
- 通知主线程register0已经完成,主线程会被唤醒做其他事
doBind0: 绑定端口

这个比较简单,往NioEventLoop 提交一个 channel.bind的task
最终会调用到AbstractChannel.bind方法
这里主要做了几件事:
- 使用nio原生Jdk绑定端口
- pipeline.fireChannelActive 会传播事件,它会触发channel的read,最终为已经注册到select的channel绑定感兴趣的Accept事件
- 唤醒主线程
doBind0完整的流程图如下: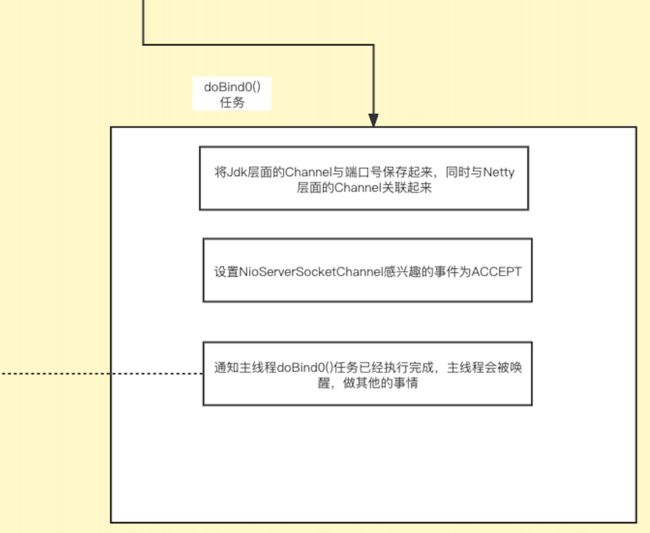
完整的启动图
