elasticsearch
黑马 elasticsearch
– elasticsearch基础
0.学习目标
1.初识elasticsearch
1.1.了解ES
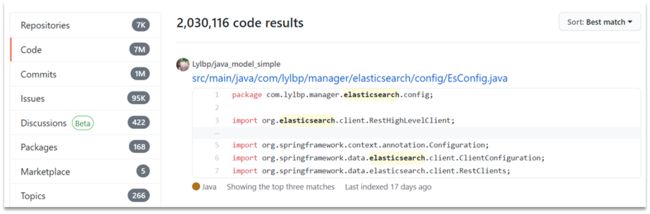
1.1.1.elasticsearch的作用
elasticsearch是一款非常强大的开源搜索引擎,具备非常多强大功能,可以帮助我们从海量数据中快速找到需要的内容
例如:
-
在GitHub搜索代码
-
在电商网站搜索商品

-
在百度搜索答案

-
在打车软件搜索附近的车
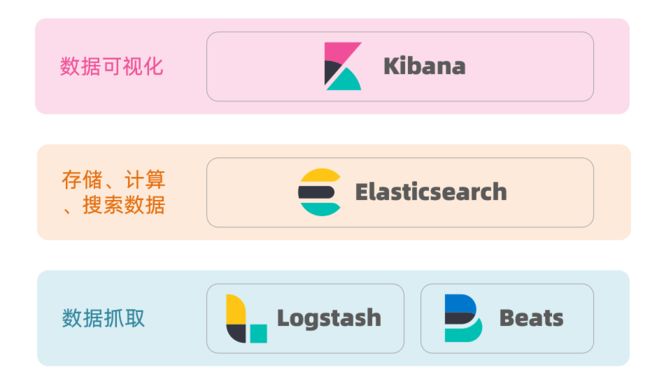
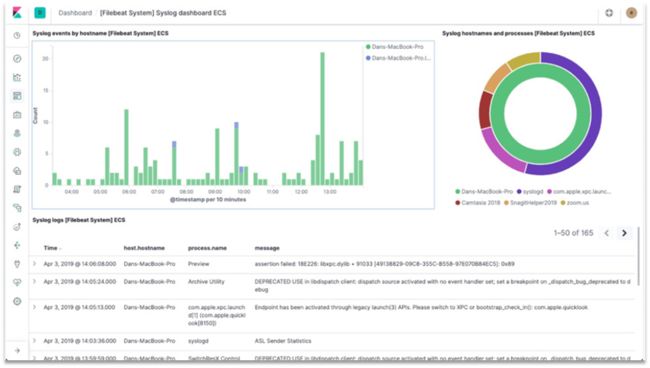
1.1.2.ELK技术栈
elasticsearch结合kibana、Logstash、Beats,也就是elastic stack(ELK)。被广泛应用在日志数据分析、实时监控等领域:

而elasticsearch是elastic stack的核心,负责存储、搜索、分析数据。
1.1.3.elasticsearch和lucene
elasticsearch底层是基于lucene来实现的。
Lucene是一个Java语言的搜索引擎类库,是Apache公司的顶级项目,由DougCutting于1999年研发。官网地址:https://lucene.apache.org/ 。
elasticsearch的发展历史:
- 2004年Shay Banon基于Lucene开发了Compass
- 2010年Shay Banon 重写了Compass,取名为Elasticsearch。

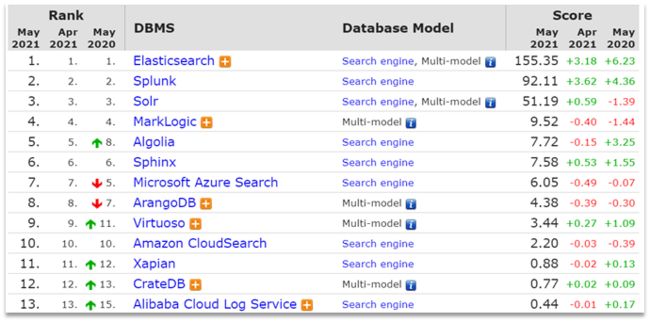
1.1.4.为什么不是其他搜索技术?
目前比较知名的搜索引擎技术排名:

虽然在早期,Apache Solr是最主要的搜索引擎技术,但随着发展elasticsearch已经渐渐超越了Solr,独占鳌头:

1.1.5.总结
什么是elasticsearch?
- 一个开源的分布式搜索引擎,可以用来实现搜索、日志统计、分析、系统监控等功能
什么是elastic stack(ELK)?
- 是以elasticsearch为核心的技术栈,包括beats、Logstash、kibana、elasticsearch
什么是Lucene?
- 是Apache的开源搜索引擎类库,提供了搜索引擎的核心API
1.2.倒排索引
倒排索引的概念是基于MySQL这样的正向索引而言的。
1.2.1.正向索引
那么什么是正向索引呢?例如给下表(tb_goods)中的id创建索引:

如果是根据id查询,那么直接走索引,查询速度非常快。
但如果是基于title做模糊查询,只能是逐行扫描数据,流程如下:
1)用户搜索数据,条件是title符合"%手机%"
2)逐行获取数据,比如id为1的数据
3)判断数据中的title是否符合用户搜索条件
4)如果符合则放入结果集,不符合则丢弃。回到步骤1
逐行扫描,也就是全表扫描,随着数据量增加,其查询效率也会越来越低。当数据量达到数百万时,就是一场灾难。
1.2.2.倒排索引
倒排索引中有两个非常重要的概念:
- 文档(
Document):用来搜索的数据,其中的每一条数据就是一个文档。例如一个网页、一个商品信息 - 词条(
Term):对文档数据或用户搜索数据,利用某种算法分词,得到的具备含义的词语就是词条。例如:我是中国人,就可以分为:我、是、中国人、中国、国人这样的几个词条
创建倒排索引是对正向索引的一种特殊处理,流程如下:
- 将每一个文档的数据利用算法分词,得到一个个词条
- 创建表,每行数据包括词条、词条所在文档id、位置等信息
- 因为词条唯一性,可以给词条创建索引,例如hash表结构索引
如图:

倒排索引的搜索流程如下(以搜索"华为手机"为例):
1)用户输入条件"华为手机"进行搜索。
2)对用户输入内容分词,得到词条:华为、手机。
3)拿着词条在倒排索引中查找,可以得到包含词条的文档id:1、2、3。
4)拿着文档id到正向索引中查找具体文档。
如图:
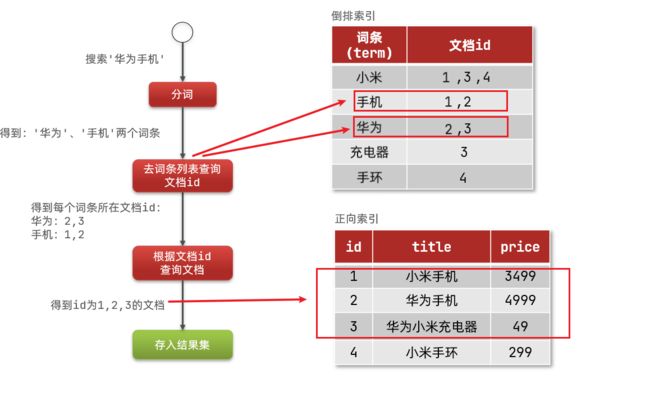
虽然要先查询倒排索引,再查询倒排索引,但是无论是词条、还是文档id都建立了索引,查询速度非常快!无需全表扫描。
1.2.3.正向和倒排
那么为什么一个叫做正向索引,一个叫做倒排索引呢?
-
正向索引是最传统的,根据id索引的方式。但根据词条查询时,必须先逐条获取每个文档,然后判断文档中是否包含所需要的词条,是根据文档找词条的过程。
-
而倒排索引则相反,是先找到用户要搜索的词条,根据词条得到保护词条的文档的id,然后根据id获取文档。是根据词条找文档的过程。
是不是恰好反过来了?
那么两者方式的优缺点是什么呢?
正向索引:
- 优点:
- 可以给多个字段创建索引
- 根据索引字段搜索、排序速度非常快
- 缺点:
- 根据非索引字段,或者索引字段中的部分词条查找时,只能全表扫描。
倒排索引:
- 优点:
- 根据词条搜索、模糊搜索时,速度非常快
- 缺点:
- 只能给词条创建索引,而不是字段
- 无法根据字段做排序
1.3.es的一些概念
elasticsearch中有很多独有的概念,与mysql中略有差别,但也有相似之处。
1.3.1.文档和字段
elasticsearch是面向**文档(Document)**存储的,可以是数据库中的一条商品数据,一个订单信息。文档数据会被序列化为json格式后存储在elasticsearch中:
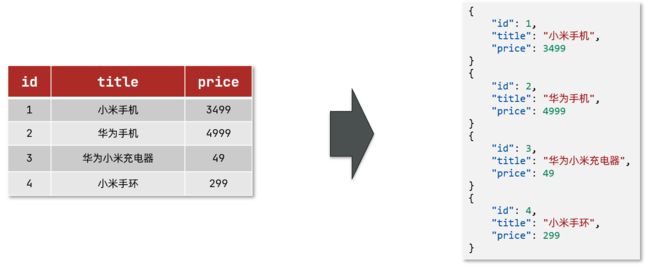
而Json文档中往往包含很多的字段(Field),类似于数据库中的列。
1.3.2.索引和映射
索引(Index),就是相同类型的文档的集合。
例如:
- 所有用户文档,就可以组织在一起,称为用户的索引;
- 所有商品的文档,可以组织在一起,称为商品的索引;
- 所有订单的文档,可以组织在一起,称为订单的索引;
因此,我们可以把索引当做是数据库中的表。
数据库的表会有约束信息,用来定义表的结构、字段的名称、类型等信息。因此,索引库中就有映射(mapping),是索引中文档的字段约束信息,类似表的结构约束。
1.3.3.mysql与elasticsearch
我们统一的把mysql与elasticsearch的概念做一下对比:
| MySQL | Elasticsearch | 说明 |
|---|---|---|
| Table | Index | 索引(index),就是文档的集合,类似数据库的表(table) |
| Row | Document | 文档(Document),就是一条条的数据,类似数据库中的行(Row),文档都是JSON格式 |
| Column | Field | 字段(Field),就是JSON文档中的字段,类似数据库中的列(Column) |
| Schema | Mapping | Mapping(映射)是索引中文档的约束,例如字段类型约束。类似数据库的表结构(Schema) |
| SQL | DSL | DSL是elasticsearch提供的JSON风格的请求语句,用来操作elasticsearch,实现CRUD |
是不是说,我们学习了elasticsearch就不再需要mysql了呢?
并不是如此,两者各自有自己的擅长支出:
-
Mysql:擅长事务类型操作,可以确保数据的安全和一致性
-
Elasticsearch:擅长海量数据的搜索、分析、计算
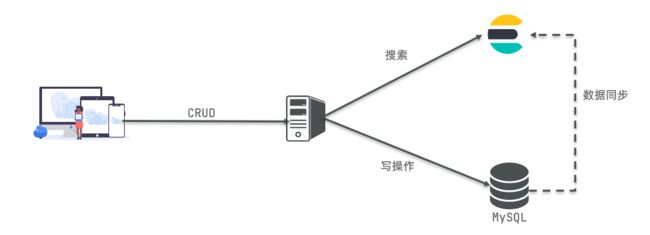
因此在企业中,往往是两者结合使用:
- 对安全性要求较高的写操作,使用mysql实现
- 对查询性能要求较高的搜索需求,使用elasticsearch实现
- 两者再基于某种方式,实现数据的同步,保证一致性

1.4.安装es、kibana
1.4.1.安装
参考课前资料:
1)下载ealastic search和kibana
docker pull elasticsearch:7.6.2
docker pull kibana:7.6.2
2)配置
mkdir -p /mydata/elasticsearch/config  创建目录
mkdir -p /mydata/elasticsearch/data
echo "http.host: 0.0.0.0" >/mydata/elasticsearch/config/elasticsearch.yml

//将mydata/elasticsearch/文件夹中文件都可读可写
chmod -R 777 /mydata/elasticsearch/
启动ealastic search
docker run --name elasticsearch -p 9200:9200 -p 9300:9300 \
-e  "discovery.type=single-node" \
-e ES_JAVA_OPTS="-Xms64m -Xmx512m" \
-v /mydata/elasticsearch/config/elasticsearch.yml:/usr/share/elasticsearch/config/elasticsearch.yml \
-v /mydata/elasticsearch/data:/usr/share/elasticsearch/data \
-v  /mydata/elasticsearch/plugins:/usr/share/elasticsearch/plugins \
-d elasticsearch:7.6.2
(4)启动kibana:
docker run --name kibana -e ELASTICSEARCH_HOSTS=http://43.142.99.26:9200 -p 5601:5601 -d kibana:7.6.2
1.4.2.分词器
1.4.3.总结
分词器的作用是什么?
- 创建倒排索引时对文档分词
- 用户搜索时,对输入的内容分词
IK分词器有几种模式?
- ik_smart:智能切分,粗粒度
- ik_max_word:最细切分,细粒度
IK分词器如何拓展词条?如何停用词条?
- 利用config目录的IkAnalyzer.cfg.xml文件添加拓展词典和停用词典
- 在词典中添加拓展词条或者停用词条
2.索引库操作
索引库就类似数据库表,mapping映射就类似表的结构。
我们要向es中存储数据,必须先创建“库”和“表”。
2.1.mapping映射属性
mapping是对索引库中文档的约束,常见的mapping属性包括:
- type:字段数据类型,常见的简单类型有:
- 字符串:text(可分词的文本)、keyword(精确值,例如:品牌、国家、ip地址)
- 数值:long、integer、short、byte、double、float、
- 布尔:boolean
- 日期:date
- 对象:object
- index:是否创建索引,默认为true
- analyzer:使用哪种分词器
- properties:该字段的子字段
例如下面的json文档:
{
    "age": 21,
    "weight": 52.1,
    "isMarried": false,
    "info": "黑马程序员Java讲师",
    "email": "[email protected]",
    "score": [99.1, 99.5, 98.9],
    "name": {
        "firstName": "云",
        "lastName": "赵"
    }
}
对应的每个字段映射(mapping):
- age:类型为 integer;参与搜索,因此需要index为true;无需分词器
- weight:类型为float;参与搜索,因此需要index为true;无需分词器
- isMarried:类型为boolean;参与搜索,因此需要index为true;无需分词器
- info:类型为字符串,需要分词,因此是text;参与搜索,因此需要index为true;分词器可以用ik_smart
- email:类型为字符串,但是不需要分词,因此是keyword;不参与搜索,因此需要index为false;无需分词器
- score:虽然是数组,但是我们只看元素的类型,类型为float;参与搜索,因此需要index为true;无需分词器
- name:类型为object,需要定义多个子属性
- name.firstName;类型为字符串,但是不需要分词,因此是keyword;参与搜索,因此需要index为true;无需分词器
- name.lastName;类型为字符串,但是不需要分词,因此是keyword;参与搜索,因此需要index为true;无需分词器
2.2.索引库的CRUD
这里我们统一使用Kibana编写DSL的方式来演示。
2.2.1.创建索引库和映射
基本语法:
- 请求方式:PUT
- 请求路径:/索引库名,可以自定义
- 请求参数:mapping映射
格式:
PUT /索引库名称
{
  "mappings": {
    "properties": {
      "字段名":{
        "type": "text",
        "analyzer": "ik_smart"
      },
      "字段名2":{
        "type": "keyword",
        "index": "false"
      },
      "字段名3":{
        "properties": {
          "子字段": {
            "type": "keyword"
          }
        }
      },
      // ...略
    }
  }
}
示例:
PUT /heima
{
  "mappings": {
    "properties": {
      "info":{
        "type": "text",
        "analyzer": "ik_smart"
      },
      "email":{
        "type": "keyword",
        "index": "falsae"
      },
      "name":{
        "properties": {
          "firstName": {
            "type": "keyword"
          }
        }
      },
      // ... 略
    }
  }
}
2.2.2.查询索引库
基本语法:
-
请求方式:GET
-
请求路径:/索引库名
-
请求参数:无
格式:
GET /索引库名
示例:

2.2.3.修改索引库
倒排索引结构虽然不复杂,但是一旦数据结构改变(比如改变了分词器),就需要重新创建倒排索引,这简直是灾难。因此索引库一旦创建,无法修改mapping。
虽然无法修改mapping中已有的字段,但是却允许添加新的字段到mapping中,因为不会对倒排索引产生影响。
语法说明:
PUT /索引库名/_mapping
{
  "properties": {
    "新字段名":{
      "type": "integer"
    }
  }
}
示例:

2.2.4.删除索引库
语法:
-
请求方式:DELETE
-
请求路径:/索引库名
-
请求参数:无
格式:
DELETE /索引库名
在kibana中测试:

2.2.5.总结
索引库操作有哪些?
- 创建索引库:PUT /索引库名
- 查询索引库:GET /索引库名
- 删除索引库:DELETE /索引库名
- 添加字段:PUT /索引库名/_mapping
3.文档操作
3.1.新增文档
语法:
POST /索引库名/_doc/文档id
{
    "字段1": "值1",
    "字段2": "值2",
    "字段3": {
        "子属性1": "值3",
        "子属性2": "值4"
    },
    // ...
}
示例:
POST /heima/_doc/1
{
    "info": "黑马程序员Java讲师",
    "email": "[email protected]",
    "name": {
        "firstName": "云",
        "lastName": "赵"
    }
}
响应:

3.2.查询文档
根据rest风格,新增是post,查询应该是get,不过查询一般都需要条件,这里我们把文档id带上。
语法:
GET /{索引库名称}/_doc/{id}
通过kibana查看数据:
GET /heima/_doc/1
查看结果:

3.3.删除文档
删除使用DELETE请求,同样,需要根据id进行删除:
语法:
DELETE /{索引库名}/_doc/id值
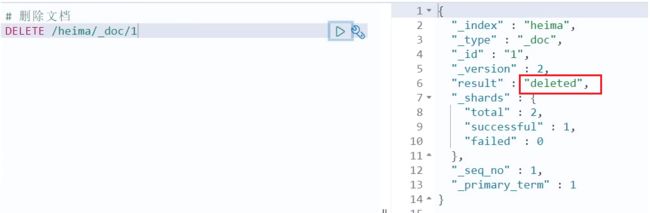
示例:
# 根据id删除数据
DELETE /heima/_doc/1
结果:

3.4.修改文档
修改有两种方式:
- 全量修改:直接覆盖原来的文档
- 增量修改:修改文档中的部分字段
3.4.1.全量修改
全量修改是覆盖原来的文档,其本质是:
- 根据指定的id删除文档
- 新增一个相同id的文档
注意:如果根据id删除时,id不存在,第二步的新增也会执行,也就从修改变成了新增操作了。
语法:
PUT /{索引库名}/_doc/文档id
{
    "字段1": "值1",
    "字段2": "值2",
    // ... 略
}
示例:
PUT /heima/_doc/1
{
    "info": "黑马程序员高级Java讲师",
    "email": "[email protected]",
    "name": {
        "firstName": "云",
        "lastName": "赵"
    }
}
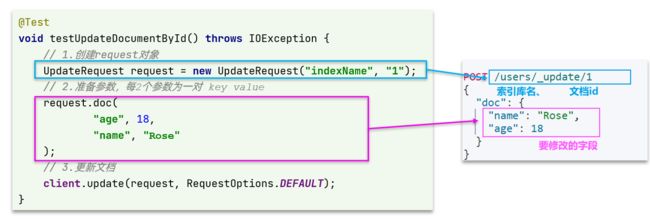
3.4.2.增量修改
增量修改是只修改指定id匹配的文档中的部分字段。
语法:
POST /{索引库名}/_update/文档id
{
    "doc": {
         "字段名": "新的值",
    }
}
示例:
POST /heima/_update/1
{
  "doc": {
    "email": "[email protected]"
  }
}
3.5.总结
文档操作有哪些?
- 创建文档:POST /{索引库名}/_doc/文档id { json文档 }
- 查询文档:GET /{索引库名}/_doc/文档id
- 删除文档:DELETE /{索引库名}/_doc/文档id
- 修改文档:
- 全量修改:PUT /{索引库名}/_doc/文档id { json文档 }
- 增量修改:POST /{索引库名}/_update/文档id { “doc”: {字段}}
4.RestAPI
ES官方提供了各种不同语言的客户端,用来操作ES。这些客户端的本质就是组装DSL语句,通过http请求发送给ES。官方文档地址:https://www.elastic.co/guide/en/elasticsearch/client/index.html
其中的Java Rest Client又包括两种:
- Java Low Level Rest Client
- Java High Level Rest Client
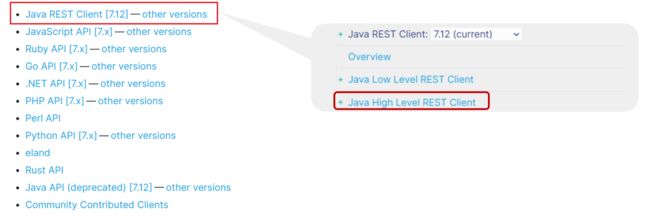
我们学习的是Java HighLevel Rest Client客户端API
4.0.导入Demo工程
4.0.1.导入数据
首先导入课前资料提供的数据库数据:
数据结构如下:
CREATE TABLE `tb_hotel` (
  `id` bigint(20) NOT NULL COMMENT '酒店id',
  `name` varchar(255) NOT NULL COMMENT '酒店名称;例:7天酒店',
  `address` varchar(255) NOT NULL COMMENT '酒店地址;例:航头路',
  `price` int(10) NOT NULL COMMENT '酒店价格;例:329',
  `score` int(2) NOT NULL COMMENT '酒店评分;例:45,就是4.5分',
  `brand` varchar(32) NOT NULL COMMENT '酒店品牌;例:如家',
  `city` varchar(32) NOT NULL COMMENT '所在城市;例:上海',
  `star_name` varchar(16) DEFAULT NULL COMMENT '酒店星级,从低到高分别是:1星到5星,1钻到5钻',
  `business` varchar(255) DEFAULT NULL COMMENT '商圈;例:虹桥',
  `latitude` varchar(32) NOT NULL COMMENT '纬度;例:31.2497',
  `longitude` varchar(32) NOT NULL COMMENT '经度;例:120.3925',
  `pic` varchar(255) DEFAULT NULL COMMENT '酒店图片;例:/img/1.jpg',
  PRIMARY KEY (`id`)
) ENGINE=InnoDB DEFAULT CHARSET=utf8mb4;
4.0.2.导入项目
然后导入课前资料提供的项目:

项目结构如图:
4.0.3.mapping映射分析
创建索引库,最关键的是mapping映射,而mapping映射要考虑的信息包括:
- 字段名
- 字段数据类型
- 是否参与搜索
- 是否需要分词
- 如果分词,分词器是什么?
其中:
- 字段名、字段数据类型,可以参考数据表结构的名称和类型
- 是否参与搜索要分析业务来判断,例如图片地址,就无需参与搜索
- 是否分词呢要看内容,内容如果是一个整体就无需分词,反之则要分词
- 分词器,我们可以统一使用ik_max_word
来看下酒店数据的索引库结构:
PUT /hotel
{
  "mappings": {
    "properties": {
      "id": {
        "type": "keyword"
      },
      "name":{
        "type": "text",
        "analyzer": "ik_max_word",
        "copy_to": "all"
      },
      "address":{
        "type": "keyword",
        "index": false
      },
      "price":{
        "type": "integer"
      },
      "score":{
        "type": "integer"
      },
      "brand":{
        "type": "keyword",
        "copy_to": "all"
      },
      "city":{
        "type": "keyword",
        "copy_to": "all"
      },
      "starName":{
        "type": "keyword"
      },
      "business":{
        "type": "keyword"
      },
      "location":{
        "type": "geo_point"
      },
      "pic":{
        "type": "keyword",
        "index": false
      },
      "all":{
        "type": "text",
        "analyzer": "ik_max_word"
      }
    }
  }
}
几个特殊字段说明:
- location:地理坐标,里面包含精度、纬度
- all:一个组合字段,其目的是将多字段的值 利用copy_to合并,提供给用户搜索
地理坐标说明:

copy_to说明:

4.0.4.初始化RestClient
在elasticsearch提供的API中,与elasticsearch一切交互都封装在一个名为RestHighLevelClient的类中,必须先完成这个对象的初始化,建立与elasticsearch的连接。
分为三步:
1)引入es的RestHighLevelClient依赖:
<dependency>
    <groupId>org.elasticsearch.clientgroupId>
    <artifactId>elasticsearch-rest-high-level-clientartifactId>
dependency>
2)因为SpringBoot默认的ES版本是7.6.2,所以我们需要覆盖默认的ES版本:
<properties>
    <java.version>1.8java.version>
    <elasticsearch.version>7.12.1elasticsearch.version>
properties>
3)初始化RestHighLevelClient:
初始化的代码如下:
RestHighLevelClient client = new RestHighLevelClient(RestClient.builder(
        HttpHost.create("http://192.168.150.101:9200")
));
这里为了单元测试方便,我们创建一个测试类HotelIndexTest,然后将初始化的代码编写在@BeforeEach方法中:
package cn.itcast.hotel;

import org.apache.http.HttpHost;
import org.elasticsearch.client.RestHighLevelClient;
import org.junit.jupiter.api.AfterEach;
import org.junit.jupiter.api.BeforeEach;
import org.junit.jupiter.api.Test;

import java.io.IOException;

public class HotelIndexTest {
    private RestHighLevelClient client;

    @BeforeEach
    void setUp() {
        this.client = new RestHighLevelClient(RestClient.builder(
                HttpHost.create("http://192.168.150.101:9200")
        ));
    }

    @AfterEach
    void tearDown() throws IOException {
        this.client.close();
    }
}
4.1.创建索引库
4.1.1.代码解读
创建索引库的API如下:
代码分为三步:
- 1)创建Request对象。因为是创建索引库的操作,因此Request是CreateIndexRequest。
- 2)添加请求参数,其实就是DSL的JSON参数部分。因为json字符串很长,这里是定义了静态字符串常量MAPPING_TEMPLATE,让代码看起来更加优雅。
- 3)发送请求,client.indices()方法的返回值是IndicesClient类型,封装了所有与索引库操作有关的方法。
4.1.2.完整示例
在hotel-demo的cn.itcast.hotel.constants包下,创建一个类,定义mapping映射的JSON字符串常量:
package cn.itcast.hotel.constants;

public class HotelConstants {
    public static final String MAPPING_TEMPLATE = "{\n" +
            "  \"mappings\": {\n" +
            "    \"properties\": {\n" +
            "      \"id\": {\n" +
            "        \"type\": \"keyword\"\n" +
            "      },\n" +
            "      \"name\":{\n" +
            "        \"type\": \"text\",\n" +
            "        \"analyzer\": \"ik_max_word\",\n" +
            "        \"copy_to\": \"all\"\n" +
            "      },\n" +
            "      \"address\":{\n" +
            "        \"type\": \"keyword\",\n" +
            "        \"index\": false\n" +
            "      },\n" +
            "      \"price\":{\n" +
            "        \"type\": \"integer\"\n" +
            "      },\n" +
            "      \"score\":{\n" +
            "        \"type\": \"integer\"\n" +
            "      },\n" +
            "      \"brand\":{\n" +
            "        \"type\": \"keyword\",\n" +
            "        \"copy_to\": \"all\"\n" +
            "      },\n" +
            "      \"city\":{\n" +
            "        \"type\": \"keyword\",\n" +
            "        \"copy_to\": \"all\"\n" +
            "      },\n" +
            "      \"starName\":{\n" +
            "        \"type\": \"keyword\"\n" +
            "      },\n" +
            "      \"business\":{\n" +
            "        \"type\": \"keyword\"\n" +
            "      },\n" +
            "      \"location\":{\n" +
            "        \"type\": \"geo_point\"\n" +
            "      },\n" +
            "      \"pic\":{\n" +
            "        \"type\": \"keyword\",\n" +
            "        \"index\": false\n" +
            "      },\n" +
            "      \"all\":{\n" +
            "        \"type\": \"text\",\n" +
            "        \"analyzer\": \"ik_max_word\"\n" +
            "      }\n" +
            "    }\n" +
            "  }\n" +
            "}";
}
在hotel-demo中的HotelIndexTest测试类中,编写单元测试,实现创建索引:
@Test
void createHotelIndex() throws IOException {
    // 1.创建Request对象
    CreateIndexRequest request = new CreateIndexRequest("hotel");
    // 2.准备请求的参数:DSL语句
    request.source(MAPPING_TEMPLATE, XContentType.JSON);
    // 3.发送请求
    client.indices().create(request, RequestOptions.DEFAULT);
}
4.2.删除索引库
删除索引库的DSL语句非常简单:
DELETE /hotel
与创建索引库相比:
- 请求方式从PUT变为DELTE
- 请求路径不变
- 无请求参数
所以代码的差异,注意体现在Request对象上。依然是三步走:
- 1)创建Request对象。这次是DeleteIndexRequest对象
- 2)准备参数。这里是无参
- 3)发送请求。改用delete方法
在hotel-demo中的HotelIndexTest测试类中,编写单元测试,实现删除索引:
@Test
void testDeleteHotelIndex() throws IOException {
    // 1.创建Request对象
    DeleteIndexRequest request = new DeleteIndexRequest("hotel");
    // 2.发送请求
    client.indices().delete(request, RequestOptions.DEFAULT);
}
4.3.判断索引库是否存在
判断索引库是否存在,本质就是查询,对应的DSL是:
GET /hotel
因此与删除的Java代码流程是类似的。依然是三步走:
- 1)创建Request对象。这次是GetIndexRequest对象
- 2)准备参数。这里是无参
- 3)发送请求。改用exists方法
@Test
void testExistsHotelIndex() throws IOException {
    // 1.创建Request对象
    GetIndexRequest request = new GetIndexRequest("hotel");
    // 2.发送请求
    boolean exists = client.indices().exists(request, RequestOptions.DEFAULT);
    // 3.输出
    System.err.println(exists ? "索引库已经存在!" : "索引库不存在!");
}
4.4.总结
JavaRestClient操作elasticsearch的流程基本类似。核心是client.indices()方法来获取索引库的操作对象。
索引库操作的基本步骤:
- 初始化RestHighLevelClient
- 创建XxxIndexRequest。XXX是Create、Get、Delete
- 准备DSL( Create时需要,其它是无参)
- 发送请求。调用RestHighLevelClient#indices().xxx()方法,xxx是create、exists、delete
5.RestClient操作文档
为了与索引库操作分离,我们再次参加一个测试类,做两件事情:
- 初始化RestHighLevelClient
- 我们的酒店数据在数据库,需要利用IHotelService去查询,所以注入这个接口
package cn.itcast.hotel;

import cn.itcast.hotel.pojo.Hotel;
import cn.itcast.hotel.service.IHotelService;
import org.junit.jupiter.api.AfterEach;
import org.junit.jupiter.api.BeforeEach;
import org.junit.jupiter.api.Test;
import org.springframework.beans.factory.annotation.Autowired;
import org.springframework.boot.test.context.SpringBootTest;

import java.io.IOException;
import java.util.List;

@SpringBootTest
public class HotelDocumentTest {
    @Autowired
    private IHotelService hotelService;

    private RestHighLevelClient client;

    @BeforeEach
    void setUp() {
        this.client = new RestHighLevelClient(RestClient.builder(
                HttpHost.create("http://192.168.150.101:9200")
        ));
    }

    @AfterEach
    void tearDown() throws IOException {
        this.client.close();
    }
}
5.1.新增文档
我们要将数据库的酒店数据查询出来,写入elasticsearch中。
5.1.1.索引库实体类
数据库查询后的结果是一个Hotel类型的对象。结构如下:
@Data
@TableName("tb_hotel")
public class Hotel {
    @TableId(type = IdType.INPUT)
    private Long id;
    private String name;
    private String address;
    private Integer price;
    private Integer score;
    private String brand;
    private String city;
    private String starName;
    private String business;
    private String longitude;
    private String latitude;
    private String pic;
}
与我们的索引库结构存在差异:
- longitude和latitude需要合并为location
因此,我们需要定义一个新的类型,与索引库结构吻合:
package cn.itcast.hotel.pojo;

import lombok.Data;
import lombok.NoArgsConstructor;

@Data
@NoArgsConstructor
public class HotelDoc {
    private Long id;
    private String name;
    private String address;
    private Integer price;
    private Integer score;
    private String brand;
    private String city;
    private String starName;
    private String business;
    private String location;
    private String pic;

    public HotelDoc(Hotel hotel) {
        this.id = hotel.getId();
        this.name = hotel.getName();
        this.address = hotel.getAddress();
        this.price = hotel.getPrice();
        this.score = hotel.getScore();
        this.brand = hotel.getBrand();
        this.city = hotel.getCity();
        this.starName = hotel.getStarName();
        this.business = hotel.getBusiness();
        this.location = hotel.getLatitude() + ", " + hotel.getLongitude();
        this.pic = hotel.getPic();
    }
}
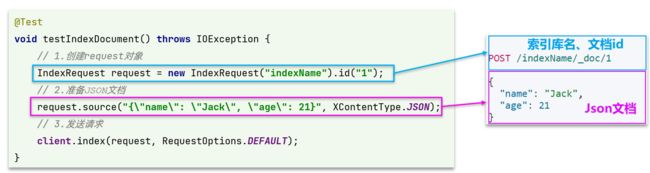
5.1.2.语法说明
新增文档的DSL语句如下:
POST /{索引库名}/_doc/1
{
    "name": "Jack",
    "age": 21
}
对应的java代码如图:

可以看到与创建索引库类似,同样是三步走:
- 1)创建Request对象
- 2)准备请求参数,也就是DSL中的JSON文档
- 3)发送请求
变化的地方在于,这里直接使用client.xxx()的API,不再需要client.indices()了。
5.1.3.完整代码
我们导入酒店数据,基本流程一致,但是需要考虑几点变化:
- 酒店数据来自于数据库,我们需要先查询出来,得到hotel对象
- hotel对象需要转为HotelDoc对象
- HotelDoc需要序列化为json格式
因此,代码整体步骤如下:
- 1)根据id查询酒店数据Hotel
- 2)将Hotel封装为HotelDoc
- 3)将HotelDoc序列化为JSON
- 4)创建IndexRequest,指定索引库名和id
- 5)准备请求参数,也就是JSON文档
- 6)发送请求
在hotel-demo的HotelDocumentTest测试类中,编写单元测试:
@Test
void testAddDocument() throws IOException {
    // 1.根据id查询酒店数据
    Hotel hotel = hotelService.getById(61083L);
    // 2.转换为文档类型
    HotelDoc hotelDoc = new HotelDoc(hotel);
    // 3.将HotelDoc转json
    String json = JSON.toJSONString(hotelDoc);

    // 1.准备Request对象
    IndexRequest request = new IndexRequest("hotel").id(hotelDoc.getId().toString());
    // 2.准备Json文档
    request.source(json, XContentType.JSON);
    // 3.发送请求
    client.index(request, RequestOptions.DEFAULT);
}
5.2.查询文档
5.2.1.语法说明
查询的DSL语句如下:
GET /hotel/_doc/{id}
非常简单,因此代码大概分两步:
- 准备Request对象
- 发送请求
不过查询的目的是得到结果,解析为HotelDoc,因此难点是结果的解析。完整代码如下:
可以看到,结果是一个JSON,其中文档放在一个_source属性中,因此解析就是拿到_source,反序列化为Java对象即可。
与之前类似,也是三步走:
- 1)准备Request对象。这次是查询,所以是GetRequest
- 2)发送请求,得到结果。因为是查询,这里调用client.get()方法
- 3)解析结果,就是对JSON做反序列化
5.2.2.完整代码
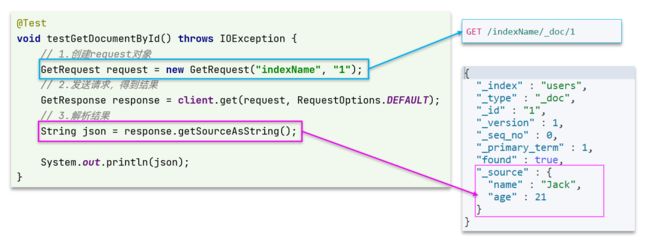
在hotel-demo的HotelDocumentTest测试类中,编写单元测试:
@Test
void testGetDocumentById() throws IOException {
    // 1.准备Request
    GetRequest request = new GetRequest("hotel", "61082");
    // 2.发送请求,得到响应
    GetResponse response = client.get(request, RequestOptions.DEFAULT);
    // 3.解析响应结果
    String json = response.getSourceAsString();

    HotelDoc hotelDoc = JSON.parseObject(json, HotelDoc.class);
    System.out.println(hotelDoc);
}
5.3.删除文档
删除的DSL为是这样的:
DELETE /hotel/_doc/{id}
与查询相比,仅仅是请求方式从DELETE变成GET,可以想象Java代码应该依然是三步走:
- 1)准备Request对象,因为是删除,这次是DeleteRequest对象。要指定索引库名和id
- 2)准备参数,无参
- 3)发送请求。因为是删除,所以是client.delete()方法
在hotel-demo的HotelDocumentTest测试类中,编写单元测试:
@Test
void testDeleteDocument() throws IOException {
    // 1.准备Request
    DeleteRequest request = new DeleteRequest("hotel", "61083");
    // 2.发送请求
    client.delete(request, RequestOptions.DEFAULT);
}
5.4.修改文档
5.4.1.语法说明
修改我们讲过两种方式:
- 全量修改:本质是先根据id删除,再新增
- 增量修改:修改文档中的指定字段值
在RestClient的API中,全量修改与新增的API完全一致,判断依据是ID:
- 如果新增时,ID已经存在,则修改
- 如果新增时,ID不存在,则新增
这里不再赘述,我们主要关注增量修改。
代码示例如图:
与之前类似,也是三步走:
- 1)准备Request对象。这次是修改,所以是UpdateRequest
- 2)准备参数。也就是JSON文档,里面包含要修改的字段
- 3)更新文档。这里调用client.update()方法
5.4.2.完整代码
在hotel-demo的HotelDocumentTest测试类中,编写单元测试:
@Test
void testUpdateDocument() throws IOException {
    // 1.准备Request
    UpdateRequest request = new UpdateRequest("hotel", "61083");
    // 2.准备请求参数
    request.doc(
        "price", "952",
        "starName", "四钻"
    );
    // 3.发送请求
    client.update(request, RequestOptions.DEFAULT);
}
5.5.批量导入文档
案例需求:利用BulkRequest批量将数据库数据导入到索引库中。
步骤如下:
-
利用mybatis-plus查询酒店数据
-
将查询到的酒店数据(Hotel)转换为文档类型数据(HotelDoc)
-
利用JavaRestClient中的BulkRequest批处理,实现批量新增文档
5.5.1.语法说明
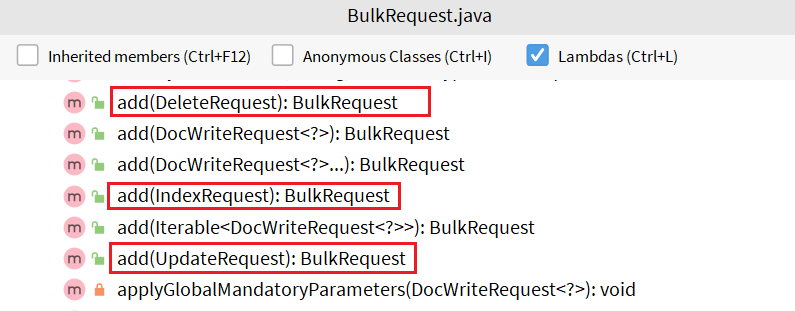
批量处理BulkRequest,其本质就是将多个普通的CRUD请求组合在一起发送。
其中提供了一个add方法,用来添加其他请求:

可以看到,能添加的请求包括:
- IndexRequest,也就是新增
- UpdateRequest,也就是修改
- DeleteRequest,也就是删除
因此Bulk中添加了多个IndexRequest,就是批量新增功能了。示例:

其实还是三步走:
- 1)创建Request对象。这里是BulkRequest
- 2)准备参数。批处理的参数,就是其它Request对象,这里就是多个IndexRequest
- 3)发起请求。这里是批处理,调用的方法为client.bulk()方法
我们在导入酒店数据时,将上述代码改造成for循环处理即可。
5.5.2.完整代码
在hotel-demo的HotelDocumentTest测试类中,编写单元测试:
@Test
void testBulkRequest() throws IOException {
    // 批量查询酒店数据
    List<Hotel> hotels = hotelService.list();

    // 1.创建Request
    BulkRequest request = new BulkRequest();
    // 2.准备参数,添加多个新增的Request
    for (Hotel hotel : hotels) {
        // 2.1.转换为文档类型HotelDoc
        HotelDoc hotelDoc = new HotelDoc(hotel);
        // 2.2.创建新增文档的Request对象
        request.add(new IndexRequest("hotel")
                    .id(hotelDoc.getId().toString())
                    .source(JSON.toJSONString(hotelDoc), XContentType.JSON));
    }
    // 3.发送请求
    client.bulk(request, RequestOptions.DEFAULT);
}
5.6.小结
文档操作的基本步骤:
- 初始化RestHighLevelClient
- 创建XxxRequest。XXX是Index、Get、Update、Delete、Bulk
- 准备参数(Index、Update、Bulk时需要)
- 发送请求。调用RestHighLevelClient#.xxx()方法,xxx是index、get、update、delete、bulk
- 解析结果(Get时需要)
尚硅谷 elasticsearch
1. ELASTICSEARCH
1、安装elastic search
dokcer中安装elastic search
(1)下载ealastic search和kibana
docker pull elasticsearch:7.6.2
docker pull kibana:7.6.2
(2)配置
mkdir -p /mydata/elasticsearch/config  创建目录
mkdir -p /mydata/elasticsearch/data
echo "http.host: 0.0.0.0" >/mydata/elasticsearch/config/elasticsearch.yml

//将mydata/elasticsearch/文件夹中文件都可读可写
chmod -R 777 /mydata/elasticsearch/
(3)启动Elastic search
docker run --name elasticsearch -p 9200:9200 -p 9300:9300 \
-e  "discovery.type=single-node" \
-e ES_JAVA_OPTS="-Xms64m -Xmx512m" \
-v /mydata/elasticsearch/config/elasticsearch.yml:/usr/share/elasticsearch/config/elasticsearch.yml \
-v /mydata/elasticsearch/data:/usr/share/elasticsearch/data \
-v  /mydata/elasticsearch/plugins:/usr/share/elasticsearch/plugins \
-d elasticsearch:7.6.2
设置开机启动elasticsearch
docker update elasticsearch --restart=always
(4)启动kibana:
docker run --name kibana -e ELASTICSEARCH_HOSTS=http://192.168.6.128:9200 -p 5601:5601 -d kibana:7.6.2
设置开机启动kibana
docker update kibana --restart=always
(5)测试
查看elasticsearch版本信息: http://192.168.6.128:9200/
{
    "name": "0adeb7852e00",
    "cluster_name": "elasticsearch",
    "cluster_uuid": "9gglpP0HTfyOTRAaSe2rIg",
    "version": {
        "number": "7.6.2",
        "build_flavor": "default",
        "build_type": "docker",
        "build_hash": "ef48eb35cf30adf4db14086e8aabd07ef6fb113f",
        "build_date": "2020-03-26T06:34:37.794943Z",
        "build_snapshot": false,
        "lucene_version": "8.4.0",
        "minimum_wire_compatibility_version": "6.8.0",
        "minimum_index_compatibility_version": "6.0.0-beta1"
    },
    "tagline": "You Know, for Search"
}
显示elasticsearch 节点信息http://192.168.6.128:9200/_cat/nodes ,
127.0.0.1 76 95 1 0.26 1.40 1.22 dilm * 0adeb7852e00
访问Kibana: http://192.168.6.128:5601/app/kibana

2、初步检索
1)_CAT
(1)GET/cat/nodes:查看所有节点
如:http://192.168.6.128:9200/_cat/nodes :
127.0.0.1 61 91 11 0.08 0.49 0.87 dilm * 0adeb7852e00
注:*表示集群中的主节点
(2)GET/cat/health:查看es健康状况
如:http://192.168.6.128:9200/_cat/health
1588332616 11:30:16 elasticsearch green 1 1 3 3 0 0 0 0 - 100.0%
注:green表示健康值正常
(3)GET/_cat/master:查看主节点_信息
如: http://192.168.6.128:9200/_cat/master
vfpgxbusTC6-W3C2Np31EQ 127.0.0.1 127.0.0.1 0adeb7852e00
(4)GET/_cat/indicies:查看所有索引 ,等价于mysql数据库的show databases;
如: http://192.168.6.128:9200/_cat/indices
green open .kibana_task_manager_1   KWLtjcKRRuaV9so_v15WYg 1 0 2 0 39.8kb 39.8kb
green open .apm-agent-configuration cuwCpJ5ER0OYsSgAJ7bVYA 1 0 0 0   283b   283b
green open .kibana_1                PqK_LdUYRpWMy4fK0tMSPw 1 0 7 0 31.2kb 31.2kb
2)索引一个文档
保存一个数据,保存在哪个索引的哪个类型下,指定用那个唯一标识
PUT customer/external/1;在customer索引下的external类型下保存1号数据为
PUT customer/external/1
{
 "name":"John Doe"
}
PUT和POST都可以
POST新增。如果不指定id,会自动生成id。指定id就会修改这个数据,并新增版本号;
PUT可以新增也可以修改。PUT必须指定id;由于PUT需要指定id,我们一般用来做修改操作,不指定id会报错。
下面是在postman中的测试数据:

创建数据成功后,显示201 created表示插入记录成功。
{
    "_index": "customer",
    "_type": "external",
    "_id": "1",
    "_version": 1,
    "result": "created",
    "_shards": {
        "total": 2,
        "successful": 1,
        "failed": 0
    },
    "_seq_no": 0,
    "_primary_term": 1
}
这些返回的JSON串的含义;这些带有下划线开头的,称为元数据,反映了当前的基本信息。
“_index”: “customer” 表明该数据在哪个数据库下;
“_type”: “external” 表明该数据在哪个类型下;
“_id”: “1” 表明被保存数据的id;
“_version”: 1, 被保存数据的版本
“result”: “created” 这里是创建了一条数据,如果重新put一条数据,则该状态会变为updated,并且版本号也会发生变化。
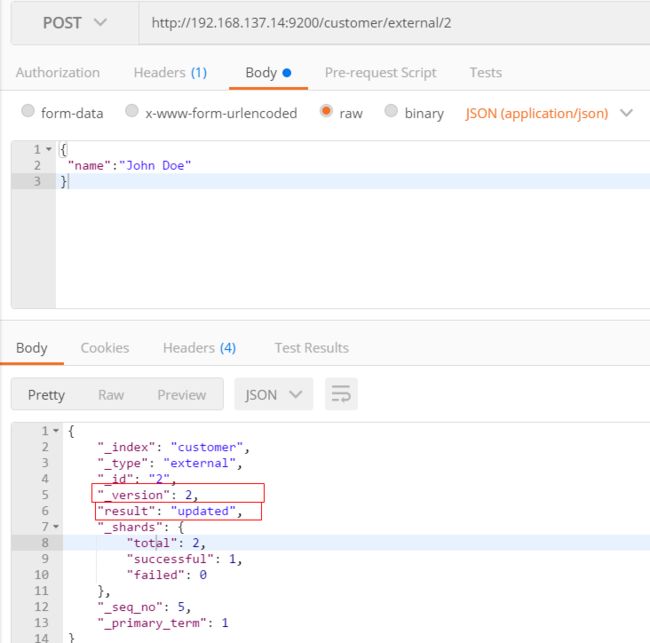
下面选用POST方式:
添加数据的时候,不指定ID,会自动的生成id,并且类型是新增:

再次使用POST插入数据,仍然是新增的:

添加数据的时候,指定ID,会使用该id,并且类型是新增:

再次使用POST插入数据,类型为updated
3)查看文档
GET /customer/external/1
http://192.168.6.128:9200/customer/external/1
{
    "_index": "customer",//在哪个索引
    "_type": "external",//在哪个类型
    "_id": "1",//记录id
    "_version": 3,//版本号
    "_seq_no": 6,//并发控制字段,每次更新都会+1,用来做乐观锁
    "_primary_term": 1,//同上,主分片重新分配,如重启,就会变化
    "found": true,
    "_source": {
        "name": "John Doe"
    }
}
通过“if_seq_no=1&if_primary_term=1 ”,当序列号匹配的时候,才进行修改,否则不修改。
实例:将id=1的数据更新为name=1,然后再次更新为name=2,起始_seq_no=6,_primary_term=1
(1)将name更新为1
http://192.168.6.128:9200/customer/external/1?if_seq_no=1&if_primary_term=1

(2)将name更新为2,更新过程中使用seq_no=6
http://192.168.6.128:9200/customer/external/1?if_seq_no=6&if_primary_term=1
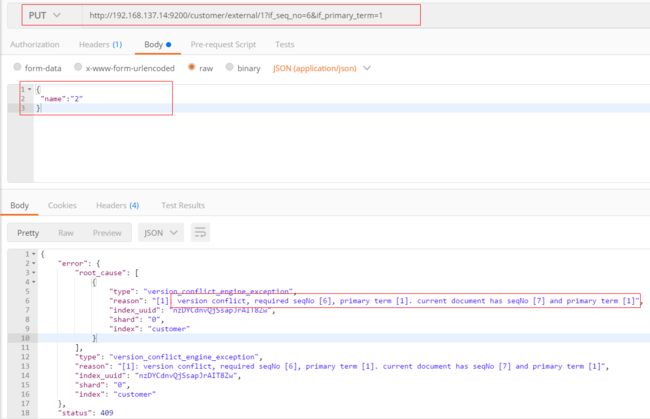
出现更新错误。
(3)查询新的数据
http://192.168.6.128:9200/customer/external/1
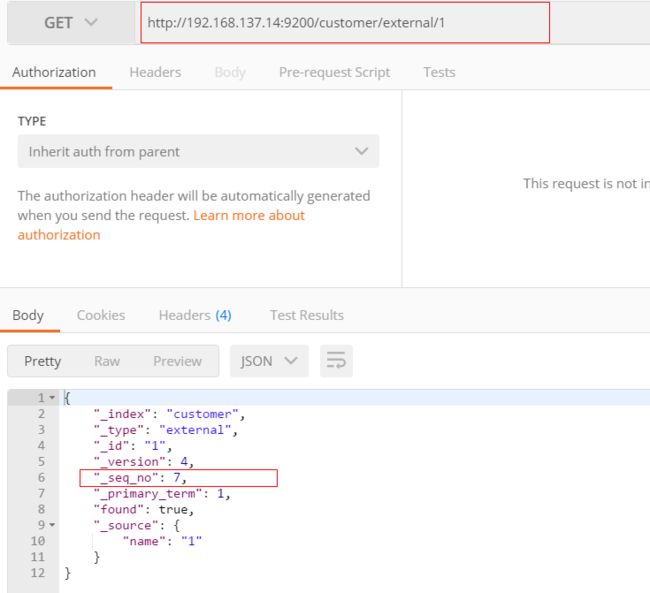
能够看到_seq_no变为7。
(4)再次更新,更新成功
http://192.168.6.128:9200/customer/external/1?if_seq_no=7&if_primary_term=1

4)更新文档


(1)POST更新文档,带有_update
http://192.168.6.128:9200/customer/external/1/_update
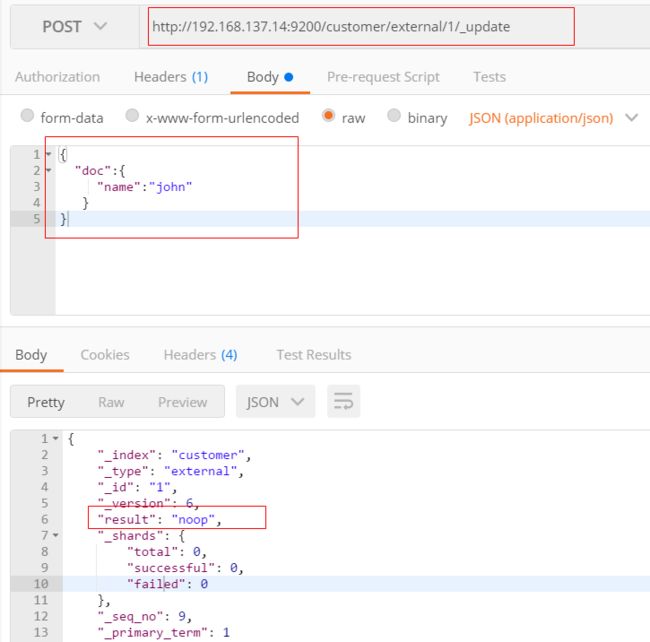
如果再次执行更新,则不执行任何操作,序列号也不发生变化

POST更新方式,会对比原来的数据,和原来的相同,则不执行任何操作(version和_seq_no)都不变。
(2)POST更新文档,不带_update

在更新过程中,重复执行更新操作,数据也能够更新成功,不会和原来的数据进行对比。
5)删除文档或索引
DELETE customer/external/1
DELETE customer
注:elasticsearch并没有提供删除类型的操作,只提供了删除索引和文档的操作。
实例:删除id=1的数据,删除后继续查询

实例:删除整个costomer索引数据
删除前,所有的索引
green  open .kibana_task_manager_1   KWLtjcKRRuaV9so_v15WYg 1 0 2 0 39.8kb 39.8kb
green  open .apm-agent-configuration cuwCpJ5ER0OYsSgAJ7bVYA 1 0 0 0   283b   283b
green  open .kibana_1                PqK_LdUYRpWMy4fK0tMSPw 1 0 7 0 31.2kb 31.2kb
yellow open customer                 nzDYCdnvQjSsapJrAIT8Zw 1 1 4 0  4.4kb  4.4kb
删除“ customer ”索引

删除后,所有的索引
green  open .kibana_task_manager_1   KWLtjcKRRuaV9so_v15WYg 1 0 2 0 39.8kb 39.8kb
green  open .apm-agent-configuration cuwCpJ5ER0OYsSgAJ7bVYA 1 0 0 0   283b   283b
green  open .kibana_1                PqK_LdUYRpWMy4fK0tMSPw 1 0 7 0 31.2kb 31.2kb
6)eleasticsearch的批量操作——bulk
语法格式:
{action:{metadata}}\n   //例如index保存记录,update更新
{request body  }\n

{action:{metadata}}\n
{request body  }\n
这里的批量操作,当发生某一条执行发生失败时,其他的数据仍然能够接着执行,也就是说彼此之间是独立的。
bulk api以此按顺序执行所有的action(动作)。如果一个单个的动作因任何原因失败,它将继续处理它后面剩余的动作。当bulk api返回时,它将提供每个动作的状态(与发送的顺序相同),所以您可以检查是否一个指定的动作是否失败了。
实例1: 执行多条数据 (postman 报错,在kibana中的Dev_tools中执行)
POST /customer/external/_bulk
{"index":{"_id":"1"}}
{"name":"John Doe"}
{"index":{"_id":"2"}}
{"name":"John Doe"}
执行结果
#! Deprecation: [types removal] Specifying types in bulk requests is deprecated.
{
  "took" : 491,
  "errors" : false,
  "items" : [
    {
      "index" : {
        "_index" : "customer",
        "_type" : "external",
        "_id" : "1",
        "_version" : 1,
        "result" : "created",
        "_shards" : {
          "total" : 2,
          "successful" : 1,
          "failed" : 0
        },
        "_seq_no" : 0,
        "_primary_term" : 1,
        "status" : 201
      }
    },
    {
      "index" : {
        "_index" : "customer",
        "_type" : "external",
        "_id" : "2",
        "_version" : 1,
        "result" : "created",
        "_shards" : {
          "total" : 2,
          "successful" : 1,
          "failed" : 0
        },
        "_seq_no" : 1,
        "_primary_term" : 1,
        "status" : 201
      }
    }
  ]
}
实例2:对于整个索引执行批量操作
POST /_bulk
{"delete":{"_index":"website","_type":"blog","_id":"123"}}
{"create":{"_index":"website","_type":"blog","_id":"123"}}
{"title":"my first blog post"}
{"index":{"_index":"website","_type":"blog"}}
{"title":"my second blog post"}
{"update":{"_index":"website","_type":"blog","_id":"123"}}
{"doc":{"title":"my updated blog post"}}
运行结果:
#! Deprecation: [types removal] Specifying types in bulk requests is deprecated.
{
  "took" : 608,
  "errors" : false,
  "items" : [
    {
      "delete" : {
        "_index" : "website",
        "_type" : "blog",
        "_id" : "123",
        "_version" : 1,
        "result" : "not_found",
        "_shards" : {
          "total" : 2,
          "successful" : 1,
          "failed" : 0
        },
        "_seq_no" : 0,
        "_primary_term" : 1,
        "status" : 404
      }
    },
    {
      "create" : {
        "_index" : "website",
        "_type" : "blog",
        "_id" : "123",
        "_version" : 2,
        "result" : "created",
        "_shards" : {
          "total" : 2,
          "successful" : 1,
          "failed" : 0
        },
        "_seq_no" : 1,
        "_primary_term" : 1,
        "status" : 201
      }
    },
    {
      "index" : {
        "_index" : "website",
        "_type" : "blog",
        "_id" : "MCOs0HEBHYK_MJXUyYIz",
        "_version" : 1,
        "result" : "created",
        "_shards" : {
          "total" : 2,
          "successful" : 1,
          "failed" : 0
        },
        "_seq_no" : 2,
        "_primary_term" : 1,
        "status" : 201
      }
    },
    {
      "update" : {
        "_index" : "website",
        "_type" : "blog",
        "_id" : "123",
        "_version" : 3,
        "result" : "updated",
        "_shards" : {
          "total" : 2,
          "successful" : 1,
          "failed" : 0
        },
        "_seq_no" : 3,
        "_primary_term" : 1,
        "status" : 200
      }
    }
  ]
}
7)样本测试数据
准备了一份顾客银行账户信息的虚构的JSON文档样本。每个文档都有下列的schema(模式)。
{
	"account_number": 1,
	"balance": 39225,
	"firstname": "Amber",
	"lastname": "Duke",
	"age": 32,
	"gender": "M",
	"address": "880 Holmes Lane",
	"employer": "Pyrami",
	"email": "[email protected]",
	"city": "Brogan",
	"state": "IL"
}
https://github.com/elastic/elasticsearch/blob/master/docs/src/test/resources/accounts.json?raw=true ,导入测试数据,
POST bank/account/_bulk
3、检索
1)search Api
ES支持两种基本方式检索;
- 通过REST request uri 发送搜索参数 (uri +检索参数);
- 通过REST request body 来发送它们(uri+请求体);
信息检索


uri+请求体进行检索
GET /bank/_search
{
  "query": { "match_all": {} },
  "sort": [
    { "account_number": "asc" },
    {"balance":"desc"}
  ]
}
HTTP客户端工具(),get请求不能够携带请求体,
GET bank/_search?q=*&sort=account_number:asc
//q=* 查询所有,sort=account_number:asc 按照account_number进行asc升序排列sort
返回结果:
{
  "took" : 235,
  "timed_out" : false,
  "_shards" : {
    "total" : 1,
    "successful" : 1,
    "skipped" : 0,
    "failed" : 0
  },
  "hits" : {
    "total" : {
      "value" : 1000,
      "relation" : "eq"
    },
    "max_score" : null,
    "hits" : [
      {
        "_index" : "bank",
        "_type" : "account",
        "_id" : "0",
        "_score" : null,
        "_source" : {
          "account_number" : 0,
          "balance" : 16623,
          "firstname" : "Bradshaw",
          "lastname" : "Mckenzie",
          "age" : 29,
          "gender" : "F",
          "address" : "244 Columbus Place",
          "employer" : "Euron",
          "email" : "[email protected]",
          "city" : "Hobucken",
          "state" : "CO"
        },
        "sort" : [
          0
        ]
      },
      {
        "_index" : "bank",
        "_type" : "account",
        "_id" : "1",
        "_score" : null,
        "_source" : {
          "account_number" : 1,
          "balance" : 39225,
          "firstname" : "Amber",
          "lastname" : "Duke",
          "age" : 32,
          "gender" : "M",
          "address" : "880 Holmes Lane",
          "employer" : "Pyrami",
          "email" : "[email protected]",
          "city" : "Brogan",
          "state" : "IL"
        },
        "sort" : [
          1
        ]
      },
      {
        "_index" : "bank",
        "_type" : "account",
        "_id" : "2",
        "_score" : null,
        "_source" : {
          "account_number" : 2,
          "balance" : 28838,
          "firstname" : "Roberta",
          "lastname" : "Bender",
          "age" : 22,
          "gender" : "F",
          "address" : "560 Kingsway Place",
          "employer" : "Chillium",
          "email" : "[email protected]",
          "city" : "Bennett",
          "state" : "LA"
        },
        "sort" : [
          2
        ]
      },
      {
        "_index" : "bank",
        "_type" : "account",
        "_id" : "3",
        "_score" : null,
        "_source" : {
          "account_number" : 3,
          "balance" : 44947,
          "firstname" : "Levine",
          "lastname" : "Burks",
          "age" : 26,
          "gender" : "F",
          "address" : "328 Wilson Avenue",
          "employer" : "Amtap",
          "email" : "[email protected]",
          "city" : "Cochranville",
          "state" : "HI"
        },
        "sort" : [
          3
        ]
      },
      {
        "_index" : "bank",
        "_type" : "account",
        "_id" : "4",
        "_score" : null,
        "_source" : {
          "account_number" : 4,
          "balance" : 27658,
          "firstname" : "Rodriquez",
          "lastname" : "Flores",
          "age" : 31,
          "gender" : "F",
          "address" : "986 Wyckoff Avenue",
          "employer" : "Tourmania",
          "email" : "[email protected]",
          "city" : "Eastvale",
          "state" : "HI"
        },
        "sort" : [
          4
        ]
      },
      {
        "_index" : "bank",
        "_type" : "account",
        "_id" : "5",
        "_score" : null,
        "_source" : {
          "account_number" : 5,
          "balance" : 29342,
          "firstname" : "Leola",
          "lastname" : "Stewart",
          "age" : 30,
          "gender" : "F",
          "address" : "311 Elm Place",
          "employer" : "Diginetic",
          "email" : "[email protected]",
          "city" : "Fairview",
          "state" : "NJ"
        },
        "sort" : [
          5
        ]
      },
      {
        "_index" : "bank",
        "_type" : "account",
        "_id" : "6",
        "_score" : null,
        "_source" : {
          "account_number" : 6,
          "balance" : 5686,
          "firstname" : "Hattie",
          "lastname" : "Bond",
          "age" : 36,
          "gender" : "M",
          "address" : "671 Bristol Street",
          "employer" : "Netagy",
          "email" : "[email protected]",
          "city" : "Dante",
          "state" : "TN"
        },
        "sort" : [
          6
        ]
      },
      {
        "_index" : "bank",
        "_type" : "account",
        "_id" : "7",
        "_score" : null,
        "_source" : {
          "account_number" : 7,
          "balance" : 39121,
          "firstname" : "Levy",
          "lastname" : "Richard",
          "age" : 22,
          "gender" : "M",
          "address" : "820 Logan Street",
          "employer" : "Teraprene",
          "email" : "[email protected]",
          "city" : "Shrewsbury",
          "state" : "MO"
        },
        "sort" : [
          7
        ]
      },
      {
        "_index" : "bank",
        "_type" : "account",
        "_id" : "8",
        "_score" : null,
        "_source" : {
          "account_number" : 8,
          "balance" : 48868,
          "firstname" : "Jan",
          "lastname" : "Burns",
          "age" : 35,
          "gender" : "M",
          "address" : "699 Visitation Place",
          "employer" : "Glasstep",
          "email" : "[email protected]",
          "city" : "Wakulla",
          "state" : "AZ"
        },
        "sort" : [
          8
        ]
      },
      {
        "_index" : "bank",
        "_type" : "account",
        "_id" : "9",
        "_score" : null,
        "_source" : {
          "account_number" : 9,
          "balance" : 24776,
          "firstname" : "Opal",
          "lastname" : "Meadows",
          "age" : 39,
          "gender" : "M",
          "address" : "963 Neptune Avenue",
          "employer" : "Cedward",
          "email" : "[email protected]",
          "city" : "Olney",
          "state" : "OH"
        },
        "sort" : [
          9
        ]
      }
    ]
  }
}
(1)只有9条数据,这是因为存在分页查询;
(2)详细的字段信息,参照: https://www.elastic.co/guide/en/elasticsearch/reference/current/getting-started-search.html
The response also provides the following information about the search request:
took– how long it took Elasticsearch to run the query, in millisecondstimed_out– whether or not the search request timed out_shards– how many shards were searched and a breakdown of how many shards succeeded, failed, or were skipped.max_score– the score of the most relevant document foundhits.total.value- how many matching documents were foundhits.sort- the document’s sort position (when not sorting by relevance score)hits._score- the document’s relevance score (not applicable when usingmatch_all)
2)Query DSL
(1)基本语法格式
Elasticsearch提供了一个可以执行查询的Json风格的DSL。这个被称为Query DSL,该查询语言非常全面。
一个查询语句的典型结构
QUERY_NAME:{
   ARGUMENT:VALUE,
   ARGUMENT:VALUE,...
}
如果针对于某个字段,那么它的结构如下:
{
  QUERY_NAME:{
     FIELD_NAME:{
       ARGUMENT:VALUE,
       ARGUMENT:VALUE,...
      }
   }
}
GET bank/_search
{
  "query": {
    "match_all": {}
  },
  "from": 0,
  "size": 5,
  "sort": [
    {
      "account_number": {
        "order": "desc"
      }
    }
  ]
}
//match_al查询所有,从第0个数据拿5个数据
query定义如何查询;
- match_all查询类型【代表查询所有的所有】,es中可以在query中组合非常多的查询类型完成复杂查询;
- 除了query参数之外,我们可也传递其他的参数以改变查询结果,如sort,size;
- from+size限定,完成分页功能;
- sort排序,多字段排序,会在前序字段相等时后续字段内部排序,否则以前序为准;
(2)返回部分字段
GET bank/_search
{
  "query": {
    "match_all": {}
  },
  "from": 0,
  "size": 5,
  "sort": [
    {
      "account_number": {
        "order": "desc"
      }
    }
  ],
  "_source": ["balance","firstname"]

}
查询结果:
{
  "took" : 18,
  "timed_out" : false,
  "_shards" : {
    "total" : 1,
    "successful" : 1,
    "skipped" : 0,
    "failed" : 0
  },
  "hits" : {
    "total" : {
      "value" : 1000,
      "relation" : "eq"
    },
    "max_score" : null,
    "hits" : [
      {
        "_index" : "bank",
        "_type" : "account",
        "_id" : "999",
        "_score" : null,
        "_source" : {
          "firstname" : "Dorothy",
          "balance" : 6087
        },
        "sort" : [
          999
        ]
      },
      {
        "_index" : "bank",
        "_type" : "account",
        "_id" : "998",
        "_score" : null,
        "_source" : {
          "firstname" : "Letha",
          "balance" : 16869
        },
        "sort" : [
          998
        ]
      },
      {
        "_index" : "bank",
        "_type" : "account",
        "_id" : "997",
        "_score" : null,
        "_source" : {
          "firstname" : "Combs",
          "balance" : 25311
        },
        "sort" : [
          997
        ]
      },
      {
        "_index" : "bank",
        "_type" : "account",
        "_id" : "996",
        "_score" : null,
        "_source" : {
          "firstname" : "Andrews",
          "balance" : 17541
        },
        "sort" : [
          996
        ]
      },
      {
        "_index" : "bank",
        "_type" : "account",
        "_id" : "995",
        "_score" : null,
        "_source" : {
          "firstname" : "Phelps",
          "balance" : 21153
        },
        "sort" : [
          995
        ]
      }
    ]
  }
}
(3)match匹配查询
- 基本类型(非字符串),“account_number”: 20 可加可不加“ ” 不加就是精确匹配
GET bank/_search
{
  "query": {
    "match": {
      "account_number": "20"
    }
  }
}
match返回account_number=20的数据。
查询结果:
{
  "took" : 1,
  "timed_out" : false,
  "_shards" : {
    "total" : 1,
    "successful" : 1,
    "skipped" : 0,
    "failed" : 0
  },
  "hits" : {
    "total" : {
      "value" : 1,
      "relation" : "eq"
    },
    "max_score" : 1.0,
    "hits" : [
      {
        "_index" : "bank",
        "_type" : "account",
        "_id" : "20",
        "_score" : 1.0,
        "_source" : {
          "account_number" : 20,
          "balance" : 16418,
          "firstname" : "Elinor",
          "lastname" : "Ratliff",
          "age" : 36,
          "gender" : "M",
          "address" : "282 Kings Place",
          "employer" : "Scentric",
          "email" : "[email protected]",
          "city" : "Ribera",
          "state" : "WA"
        }
      }
    ]
  }
}
- 字符串,全文检索“ ” 模糊查询
GET bank/_search
{
  "query": {
    "match": {
      "address": "kings"
    }
  }
}
全文检索,最终会按照评分进行排序,会对检索条件进行分词匹配。
查询结果:
{
  "took" : 30,
  "timed_out" : false,
  "_shards" : {
    "total" : 1,
    "successful" : 1,
    "skipped" : 0,
    "failed" : 0
  },
  "hits" : {
    "total" : {
      "value" : 2,
      "relation" : "eq"
    },
    "max_score" : 5.990829,
    "hits" : [
      {
        "_index" : "bank",
        "_type" : "account",
        "_id" : "20",
        "_score" : 5.990829,
        "_source" : {
          "account_number" : 20,
          "balance" : 16418,
          "firstname" : "Elinor",
          "lastname" : "Ratliff",
          "age" : 36,
          "gender" : "M",
          "address" : "282 Kings Place",
          "employer" : "Scentric",
          "email" : "[email protected]",
          "city" : "Ribera",
          "state" : "WA"
        }
      },
      {
        "_index" : "bank",
        "_type" : "account",
        "_id" : "722",
        "_score" : 5.990829,
        "_source" : {
          "account_number" : 722,
          "balance" : 27256,
          "firstname" : "Roberts",
          "lastname" : "Beasley",
          "age" : 34,
          "gender" : "F",
          "address" : "305 Kings Hwy",
          "employer" : "Quintity",
          "email" : "[email protected]",
          "city" : "Hayden",
          "state" : "PA"
        }
      }
    ]
  }
}
(4) match_phrase [短句匹配]
将需要匹配的值当成一整个单词(不分词)进行检索
GET bank/_search
{
  "query": {
    "match_phrase": {
      "address": "mill road"
    }
  }
}
查处address中包含mill_road的所有记录,并给出相关性得分
查看结果:
{
  "took" : 32,
  "timed_out" : false,
  "_shards" : {
    "total" : 1,
    "successful" : 1,
    "skipped" : 0,
    "failed" : 0
  },
  "hits" : {
    "total" : {
      "value" : 1,
      "relation" : "eq"
    },
    "max_score" : 8.926605,
    "hits" : [
      {
        "_index" : "bank",
        "_type" : "account",
        "_id" : "970",
        "_score" : 8.926605,
        "_source" : {
          "account_number" : 970,
          "balance" : 19648,
          "firstname" : "Forbes",
          "lastname" : "Wallace",
          "age" : 28,
          "gender" : "M",
          "address" : "990 Mill Road",
          "employer" : "Pheast",
          "email" : "[email protected]",
          "city" : "Lopezo",
          "state" : "AK"
        }
      }
    ]
  }
}
match_phrase和match的区别,观察如下实例:
match_phrase是做短语匹配
match是分词匹配,例如990 Mill匹配含有990或者Mill的结果
GET bank/_search
{
  "query": {
    "match_phrase": {
      "address": "990 Mill"
    }
  }
}
查询结果:
{
  "took" : 0,
  "timed_out" : false,
  "_shards" : {
    "total" : 1,
    "successful" : 1,
    "skipped" : 0,
    "failed" : 0
  },
  "hits" : {
    "total" : {
      "value" : 1,
      "relation" : "eq"
    },
    "max_score" : 10.806405,
    "hits" : [
      {
        "_index" : "bank",
        "_type" : "account",
        "_id" : "970",
        "_score" : 10.806405,
        "_source" : {
          "account_number" : 970,
          "balance" : 19648,
          "firstname" : "Forbes",
          "lastname" : "Wallace",
          "age" : 28,
          "gender" : "M",
          "address" : "990 Mill Road",
          "employer" : "Pheast",
          "email" : "[email protected]",
          "city" : "Lopezo",
          "state" : "AK"
        }
      }
    ]
  }
}
使用match的keyword
GET bank/_search
{
  "query": {
    "match": {
      "address.keyword": "990 Mill"
    }
  }
}
查询结果,一条也未匹配到
{
  "took" : 0,
  "timed_out" : false,
  "_shards" : {
    "total" : 1,
    "successful" : 1,
    "skipped" : 0,
    "failed" : 0
  },
  "hits" : {
    "total" : {
      "value" : 0,
      "relation" : "eq"
    },
    "max_score" : null,
    "hits" : [ ]
  }
}
修改匹配条件为“990 Mill Road”
GET bank/_search
{
  "query": {
    "match": {
      "address.keyword": "990 Mill Road"
    }
  }
}
查询出一条数据
{
  "took" : 1,
  "timed_out" : false,
  "_shards" : {
    "total" : 1,
    "successful" : 1,
    "skipped" : 0,
    "failed" : 0
  },
  "hits" : {
    "total" : {
      "value" : 1,
      "relation" : "eq"
    },
    "max_score" : 6.5032897,
    "hits" : [
      {
        "_index" : "bank",
        "_type" : "account",
        "_id" : "970",
        "_score" : 6.5032897,
        "_source" : {
          "account_number" : 970,
          "balance" : 19648,
          "firstname" : "Forbes",
          "lastname" : "Wallace",
          "age" : 28,
          "gender" : "M",
          "address" : "990 Mill Road",
          "employer" : "Pheast",
          "email" : "[email protected]",
          "city" : "Lopezo",
          "state" : "AK"
        }
      }
    ]
  }
}
文本字段的匹配,使用keyword,匹配的条件就是要显示字段的全部值,要进行精确匹配的。
match_phrase是做短语匹配,只要文本中包含匹配条件既包含这个短语,就能匹配到。
(5)multi_math【多字段匹配】
GET bank/_search
{
  "query": {
    "multi_match": {
      "query": "mill",
      "fields": [
        "state",
        "address"
      ]
    }
  }
}
state或者address中包含mill,并且在查询过程中,会对于查询条件进行分词。
查询结果:
{
  "took" : 28,
  "timed_out" : false,
  "_shards" : {
    "total" : 1,
    "successful" : 1,
    "skipped" : 0,
    "failed" : 0
  },
  "hits" : {
    "total" : {
      "value" : 4,
      "relation" : "eq"
    },
    "max_score" : 5.4032025,
    "hits" : [
      {
        "_index" : "bank",
        "_type" : "account",
        "_id" : "970",
        "_score" : 5.4032025,
        "_source" : {
          "account_number" : 970,
          "balance" : 19648,
          "firstname" : "Forbes",
          "lastname" : "Wallace",
          "age" : 28,
          "gender" : "M",
          "address" : "990 Mill Road",
          "employer" : "Pheast",
          "email" : "[email protected]",
          "city" : "Lopezo",
          "state" : "AK"
        }
      },
      {
        "_index" : "bank",
        "_type" : "account",
        "_id" : "136",
        "_score" : 5.4032025,
        "_source" : {
          "account_number" : 136,
          "balance" : 45801,
          "firstname" : "Winnie",
          "lastname" : "Holland",
          "age" : 38,
          "gender" : "M",
          "address" : "198 Mill Lane",
          "employer" : "Neteria",
          "email" : "[email protected]",
          "city" : "Urie",
          "state" : "IL"
        }
      },
      {
        "_index" : "bank",
        "_type" : "account",
        "_id" : "345",
        "_score" : 5.4032025,
        "_source" : {
          "account_number" : 345,
          "balance" : 9812,
          "firstname" : "Parker",
          "lastname" : "Hines",
          "age" : 38,
          "gender" : "M",
          "address" : "715 Mill Avenue",
          "employer" : "Baluba",
          "email" : "[email protected]",
          "city" : "Blackgum",
          "state" : "KY"
        }
      },
      {
        "_index" : "bank",
        "_type" : "account",
        "_id" : "472",
        "_score" : 5.4032025,
        "_source" : {
          "account_number" : 472,
          "balance" : 25571,
          "firstname" : "Lee",
          "lastname" : "Long",
          "age" : 32,
          "gender" : "F",
          "address" : "288 Mill Street",
          "employer" : "Comverges",
          "email" : "[email protected]",
          "city" : "Movico",
          "state" : "MT"
        }
      }
    ]
  }
}
(6)bool用来做复合查询
复合语句可以合并,任何其他查询语句,包括符合语句。这也就意味着,复合语句之间
可以互相嵌套,可以表达非常复杂的逻辑。
must:必须达到must所列举的所有条件
GET bank/_search
{
   "query":{
        "bool":{
             "must":[
              {"match":{"address":"mill"}},
              {"match":{"gender":"M"}}
             ]
         }
    }
}
must_not,必须不匹配must_not所列举的所有条件。
should,应该满足should所列举的条件。
实例:查询gender=m,并且address=mill的数据
GET bank/_search
{
  "query": {
    "bool": {
      "must": [
        {
          "match": {
            "gender": "M"
          }
        },
        {
          "match": {
            "address": "mill"
          }
        }
      ]
    }
  }
}
查询结果:
{
  "took" : 1,
  "timed_out" : false,
  "_shards" : {
    "total" : 1,
    "successful" : 1,
    "skipped" : 0,
    "failed" : 0
  },
  "hits" : {
    "total" : {
      "value" : 3,
      "relation" : "eq"
    },
    "max_score" : 6.0824604,
    "hits" : [
      {
        "_index" : "bank",
        "_type" : "account",
        "_id" : "970",
        "_score" : 6.0824604,
        "_source" : {
          "account_number" : 970,
          "balance" : 19648,
          "firstname" : "Forbes",
          "lastname" : "Wallace",
          "age" : 28,
          "gender" : "M",
          "address" : "990 Mill Road",
          "employer" : "Pheast",
          "email" : "[email protected]",
          "city" : "Lopezo",
          "state" : "AK"
        }
      },
      {
        "_index" : "bank",
        "_type" : "account",
        "_id" : "136",
        "_score" : 6.0824604,
        "_source" : {
          "account_number" : 136,
          "balance" : 45801,
          "firstname" : "Winnie",
          "lastname" : "Holland",
          "age" : 38,
          "gender" : "M",
          "address" : "198 Mill Lane",
          "employer" : "Neteria",
          "email" : "[email protected]",
          "city" : "Urie",
          "state" : "IL"
        }
      },
      {
        "_index" : "bank",
        "_type" : "account",
        "_id" : "345",
        "_score" : 6.0824604,
        "_source" : {
          "account_number" : 345,
          "balance" : 9812,
          "firstname" : "Parker",
          "lastname" : "Hines",
          "age" : 38,
          "gender" : "M",
          "address" : "715 Mill Avenue",
          "employer" : "Baluba",
          "email" : "[email protected]",
          "city" : "Blackgum",
          "state" : "KY"
        }
      }
    ]
  }
}
must_not:必须不是指定的情况
实例:查询gender=m,并且address=mill的数据,但是age不等于38的
GET bank/_search
{
  "query": {
    "bool": {
      "must": [
        {
          "match": {
            "gender": "M"
          }
        },
        {
          "match": {
            "address": "mill"
          }
        }
      ],
      "must_not": [
        {
          "match": {
            "age": "38"
          }
        }
      ]
    }
  }
查询结果:
{
  "took" : 4,
  "timed_out" : false,
  "_shards" : {
    "total" : 1,
    "successful" : 1,
    "skipped" : 0,
    "failed" : 0
  },
  "hits" : {
    "total" : {
      "value" : 1,
      "relation" : "eq"
    },
    "max_score" : 6.0824604,
    "hits" : [
      {
        "_index" : "bank",
        "_type" : "account",
        "_id" : "970",
        "_score" : 6.0824604,
        "_source" : {
          "account_number" : 970,
          "balance" : 19648,
          "firstname" : "Forbes",
          "lastname" : "Wallace",
          "age" : 28,
          "gender" : "M",
          "address" : "990 Mill Road",
          "employer" : "Pheast",
          "email" : "[email protected]",
          "city" : "Lopezo",
          "state" : "AK"
        }
      }
    ]
  }
}
should:应该达到should列举的条件,如果到达会增加相关文档的评分,并不会改变查询的结果。如果query中只有should且只有一种匹配规则,那么should的条件就会被作为默认匹配条件二区改变查询结果。
实例:匹配lastName应该等于Wallace的数据
GET bank/_search
{
  "query": {
    "bool": {
      "must": [
        {
          "match": {
            "gender": "M"
          }
        },
        {
          "match": {
            "address": "mill"
          }
        }
      ],
      "must_not": [
        {
          "match": {
            "age": "18"
          }
        }
      ],
      "should": [
        {
          "match": {
            "lastname": "Wallace"
          }
        }
      ]
    }
  }
}
查询结果:
{
  "took" : 5,
  "timed_out" : false,
  "_shards" : {
    "total" : 1,
    "successful" : 1,
    "skipped" : 0,
    "failed" : 0
  },
  "hits" : {
    "total" : {
      "value" : 3,
      "relation" : "eq"
    },
    "max_score" : 12.585751,
    "hits" : [
      {
        "_index" : "bank",
        "_type" : "account",
        "_id" : "970",
        "_score" : 12.585751,
        "_source" : {
          "account_number" : 970,
          "balance" : 19648,
          "firstname" : "Forbes",
          "lastname" : "Wallace",
          "age" : 28,
          "gender" : "M",
          "address" : "990 Mill Road",
          "employer" : "Pheast",
          "email" : "[email protected]",
          "city" : "Lopezo",
          "state" : "AK"
        }
      },
      {
        "_index" : "bank",
        "_type" : "account",
        "_id" : "136",
        "_score" : 6.0824604,
        "_source" : {
          "account_number" : 136,
          "balance" : 45801,
          "firstname" : "Winnie",
          "lastname" : "Holland",
          "age" : 38,
          "gender" : "M",
          "address" : "198 Mill Lane",
          "employer" : "Neteria",
          "email" : "[email protected]",
          "city" : "Urie",
          "state" : "IL"
        }
      },
      {
        "_index" : "bank",
        "_type" : "account",
        "_id" : "345",
        "_score" : 6.0824604,
        "_source" : {
          "account_number" : 345,
          "balance" : 9812,
          "firstname" : "Parker",
          "lastname" : "Hines",
          "age" : 38,
          "gender" : "M",
          "address" : "715 Mill Avenue",
          "employer" : "Baluba",
          "email" : "[email protected]",
          "city" : "Blackgum",
          "state" : "KY"
        }
      }
    ]
  }
}
能够看到相关度越高,得分也越高。
(7)Filter【结果过滤】
并不是所有的查询都需要产生分数,特别是哪些仅用于filtering过滤的文档。为了不计算分数,elasticsearch会自动检查场景并且优化查询的执行。
GET bank/_search
{
  "query": {
    "bool": {
      "must": [
        {
          "match": {
            "address": "mill"
          }
        }
      ],
      "filter": {
        "range": {
          "balance": {
            "gte": "10000",
            "lte": "20000"
          }
        }
      }
    }
  }
}
这里先是查询所有匹配address=mill的文档,然后再根据10000<=balance<=20000进行过滤查询结果
查询结果:
{
  "took" : 2,
  "timed_out" : false,
  "_shards" : {
    "total" : 1,
    "successful" : 1,
    "skipped" : 0,
    "failed" : 0
  },
  "hits" : {
    "total" : {
      "value" : 1,
      "relation" : "eq"
    },
    "max_score" : 5.4032025,
    "hits" : [
      {
        "_index" : "bank",
        "_type" : "account",
        "_id" : "970",
        "_score" : 5.4032025,
        "_source" : {
          "account_number" : 970,
          "balance" : 19648,
          "firstname" : "Forbes",
          "lastname" : "Wallace",
          "age" : 28,
          "gender" : "M",
          "address" : "990 Mill Road",
          "employer" : "Pheast",
          "email" : "[email protected]",
          "city" : "Lopezo",
          "state" : "AK"
        }
      }
    ]
  }
}
Each must, should, and must_not element in a Boolean query is referred to as a query clause. How well a document meets the criteria in each must or should clause contributes to the document’s relevance score. The higher the score, the better the document matches your search criteria. By default, Elasticsearch returns documents ranked by these relevance scores.
在boolean查询中,must, should 和must_not 元素都被称为查询子句 。 文档是否符合每个“must”或“should”子句中的标准,决定了文档的“相关性得分”。 得分越高,文档越符合您的搜索条件。 默认情况下,Elasticsearch返回根据这些相关性得分排序的文档。
The criteria in a must_not clause is treated as a filter. It affects whether or not the document is included in the results, but does not contribute to how documents are scored. You can also explicitly specify arbitrary filters to include or exclude documents based on structured data.
“must_not”子句中的条件被视为“过滤器”。 它影响文档是否包含在结果中, 但不影响文档的评分方式。 还可以显式地指定任意过滤器来包含或排除基于结构化数据的文档。
filter在使用过程中,并不会计算相关性得分_score:
GET bank/_search
{
  "query": {
    "bool": {
      "must": [
        {
          "match": {
            "address": "mill"
          }
        }
      ],
      "filter": {
        "range": {
          "balance": {
            "gte": "10000",
            "lte": "20000"
          }
        }
      }
    }
  }
}
//gte:>=  lte:<=
查询结果:
{
  "took" : 1,
  "timed_out" : false,
  "_shards" : {
    "total" : 1,
    "successful" : 1,
    "skipped" : 0,
    "failed" : 0
  },
  "hits" : {
    "total" : {
      "value" : 213,
      "relation" : "eq"
    },
    "max_score" : 0.0,
    "hits" : [
      {
        "_index" : "bank",
        "_type" : "account",
        "_id" : "20",
        "_score" : 0.0,
        "_source" : {
          "account_number" : 20,
          "balance" : 16418,
          "firstname" : "Elinor",
          "lastname" : "Ratliff",
          "age" : 36,
          "gender" : "M",
          "address" : "282 Kings Place",
          "employer" : "Scentric",
          "email" : "[email protected]",
          "city" : "Ribera",
          "state" : "WA"
        }
      },
      {
        "_index" : "bank",
        "_type" : "account",
        "_id" : "37",
        "_score" : 0.0,
        "_source" : {
          "account_number" : 37,
          "balance" : 18612,
          "firstname" : "Mcgee",
          "lastname" : "Mooney",
          "age" : 39,
          "gender" : "M",
          "address" : "826 Fillmore Place",
          "employer" : "Reversus",
          "email" : "[email protected]",
          "city" : "Tooleville",
          "state" : "OK"
        }
      },
      {
        "_index" : "bank",
        "_type" : "account",
        "_id" : "51",
        "_score" : 0.0,
        "_source" : {
          "account_number" : 51,
          "balance" : 14097,
          "firstname" : "Burton",
          "lastname" : "Meyers",
          "age" : 31,
          "gender" : "F",
          "address" : "334 River Street",
          "employer" : "Bezal",
          "email" : "[email protected]",
          "city" : "Jacksonburg",
          "state" : "MO"
        }
      },
      {
        "_index" : "bank",
        "_type" : "account",
        "_id" : "56",
        "_score" : 0.0,
        "_source" : {
          "account_number" : 56,
          "balance" : 14992,
          "firstname" : "Josie",
          "lastname" : "Nelson",
          "age" : 32,
          "gender" : "M",
          "address" : "857 Tabor Court",
          "employer" : "Emtrac",
          "email" : "[email protected]",
          "city" : "Sunnyside",
          "state" : "UT"
        }
      },
      {
        "_index" : "bank",
        "_type" : "account",
        "_id" : "121",
        "_score" : 0.0,
        "_source" : {
          "account_number" : 121,
          "balance" : 19594,
          "firstname" : "Acevedo",
          "lastname" : "Dorsey",
          "age" : 32,
          "gender" : "M",
          "address" : "479 Nova Court",
          "employer" : "Netropic",
          "email" : "[email protected]",
          "city" : "Islandia",
          "state" : "CT"
        }
      },
      {
        "_index" : "bank",
        "_type" : "account",
        "_id" : "176",
        "_score" : 0.0,
        "_source" : {
          "account_number" : 176,
          "balance" : 18607,
          "firstname" : "Kemp",
          "lastname" : "Walters",
          "age" : 28,
          "gender" : "F",
          "address" : "906 Howard Avenue",
          "employer" : "Eyewax",
          "email" : "[email protected]",
          "city" : "Why",
          "state" : "KY"
        }
      },
      {
        "_index" : "bank",
        "_type" : "account",
        "_id" : "183",
        "_score" : 0.0,
        "_source" : {
          "account_number" : 183,
          "balance" : 14223,
          "firstname" : "Hudson",
          "lastname" : "English",
          "age" : 26,
          "gender" : "F",
          "address" : "823 Herkimer Place",
          "employer" : "Xinware",
          "email" : "[email protected]",
          "city" : "Robbins",
          "state" : "ND"
        }
      },
      {
        "_index" : "bank",
        "_type" : "account",
        "_id" : "222",
        "_score" : 0.0,
        "_source" : {
          "account_number" : 222,
          "balance" : 14764,
          "firstname" : "Rachelle",
          "lastname" : "Rice",
          "age" : 36,
          "gender" : "M",
          "address" : "333 Narrows Avenue",
          "employer" : "Enaut",
          "email" : "[email protected]",
          "city" : "Wright",
          "state" : "AZ"
        }
      },
      {
        "_index" : "bank",
        "_type" : "account",
        "_id" : "227",
        "_score" : 0.0,
        "_source" : {
          "account_number" : 227,
          "balance" : 19780,
          "firstname" : "Coleman",
          "lastname" : "Berg",
          "age" : 22,
          "gender" : "M",
          "address" : "776 Little Street",
          "employer" : "Exoteric",
          "email" : "[email protected]",
          "city" : "Eagleville",
          "state" : "WV"
        }
      },
      {
        "_index" : "bank",
        "_type" : "account",
        "_id" : "272",
        "_score" : 0.0,
        "_source" : {
          "account_number" : 272,
          "balance" : 19253,
          "firstname" : "Lilly",
          "lastname" : "Morgan",
          "age" : 25,
          "gender" : "F",
          "address" : "689 Fleet Street",
          "employer" : "Biolive",
          "email" : "[email protected]",
          "city" : "Sunbury",
          "state" : "OH"
        }
      }
    ]
  }
}
能看到所有文档的 “_score” : 0.0。
(8)term
和match一样。匹配某个属性的值。全文检索字段用match,其他非text字段匹配用term。
Avoid using the
termquery fortextfields.避免对文本字段使用“term”查询
By default, Elasticsearch changes the values of
textfields as part of analysis. This can make finding exact matches fortextfield values difficult.默认情况下,Elasticsearch作为analysis的一部分更改’ text '字段的值。这使得为“text”字段值寻找精确匹配变得困难。
To search
textfield values, use the match.要搜索“text”字段值,请使用匹配。
https://www.elastic.co/guide/en/elasticsearch/reference/7.6/query-dsl-term-query.html
使用term匹配查询
GET bank/_search
{
  "query": {
    "term": {
      "age": "28"
    }
  }
}
如果是text则查不到:
GET bank/_search
{
  "query": {
    "term": {
      "gender" : "F"
    }
  }
}
{
  "took" : 0,
  "timed_out" : false,
  "_shards" : {
    "total" : 1,
    "successful" : 1,
    "skipped" : 0,
    "failed" : 0
  },
  "hits" : {
    "total" : {
      "value" : 0,
      "relation" : "eq"
    },
    "max_score" : null,
    "hits" : [ ]
  }
}
一条也没有匹配到
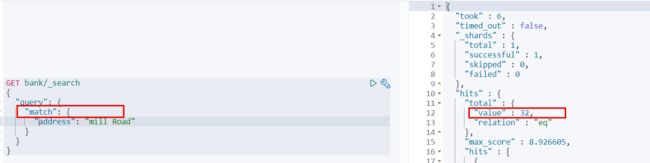
而更换为match匹配时,能够匹配到32个文档

也就是说,全文检索字段用match,其他非text字段匹配用term。
(9)Aggregation(执行聚合)
聚合提供了从数据中分组和提取数据的能力。最简单的聚合方法大致等于SQL Group by和SQL聚合函数。在elasticsearch中,执行搜索返回this(命中结果),并且同时返回聚合结果,把以响应中的所有hits(命中结果)分隔开的能力。这是非常强大且有效的,你可以执行查询和多个聚合,并且在一次使用中得到各自的(任何一个的)返回结果,使用一次简洁和简化的API啦避免网络往返。
“size”:0
size:0不显示搜索数据
aggs:执行聚合。聚合语法如下:
"aggs":{
    "aggs_name这次聚合的名字,方便展示在结果集中":{
        "AGG_TYPE聚合的类型(avg,term,terms)":{}
     }
},
搜索address中包含mill的所有人的年龄分布以及平均年龄,但不显示这些人的详情
GET bank/_search
{
  "query": {
    "match": {
      "address": "Mill"
    }
  },
  "aggs": {
    "ageAgg": {
      "terms": {
        "field": "age",
        "size": 10
      }
    },
    "ageAvg": {
      "avg": {
        "field": "age"
      }
    },
    "balanceAvg": {
      "avg": {
        "field": "balance"
      }
    }
  },
  "size": 0
}
//ageAgg:聚合名字  terms:聚合类型  "field": "age":按照age字段聚合  size:10:取出前十种age
//avg:平均值聚合类型
//不显示这些人的详情,只看聚合结果
查询结果:
{
  "took" : 2,
  "timed_out" : false,
  "_shards" : {
    "total" : 1,
    "successful" : 1,
    "skipped" : 0,
    "failed" : 0
  },
  "hits" : {
    "total" : {
      "value" : 4,
      "relation" : "eq"
    },
    "max_score" : null,
    "hits" : [ ]
  },
  "aggregations" : {
    "ageAgg" : {
      "doc_count_error_upper_bound" : 0,
      "sum_other_doc_count" : 0,
      "buckets" : [
        {
          "key" : 38,
          "doc_count" : 2
        },
        {
          "key" : 28,
          "doc_count" : 1
        },
        {
          "key" : 32,
          "doc_count" : 1
        }
      ]
    },
    "ageAvg" : {
      "value" : 34.0
    },
    "balanceAvg" : {
      "value" : 25208.0
    }
  }
}
复杂:
按照年龄聚合,并且求这些年龄段的这些人的平均薪资
GET bank/_search
{
  "query": {
    "match_all": {}
  },
  "aggs": {
    "ageAgg": {
      "terms": {
        "field": "age",
        "size": 100
      },
      "aggs": {
        "ageAvg": {
          "avg": {
            "field": "balance"
          }
        }
      }
    }
  },
  "size": 0
}
输出结果:
{
  "took" : 49,
  "timed_out" : false,
  "_shards" : {
    "total" : 1,
    "successful" : 1,
    "skipped" : 0,
    "failed" : 0
  },
  "hits" : {
    "total" : {
      "value" : 1000,
      "relation" : "eq"
    },
    "max_score" : null,
    "hits" : [ ]
  },
  "aggregations" : {
    "ageAgg" : {
      "doc_count_error_upper_bound" : 0,
      "sum_other_doc_count" : 0,
      "buckets" : [
        {
          "key" : 31,
          "doc_count" : 61,
          "ageAvg" : {
            "value" : 28312.918032786885
          }
        },
        {
          "key" : 39,
          "doc_count" : 60,
          "ageAvg" : {
            "value" : 25269.583333333332
          }
        },
        {
          "key" : 26,
          "doc_count" : 59,
          "ageAvg" : {
            "value" : 23194.813559322032
          }
        },
        {
          "key" : 32,
          "doc_count" : 52,
          "ageAvg" : {
            "value" : 23951.346153846152
          }
        },
        {
          "key" : 35,
          "doc_count" : 52,
          "ageAvg" : {
            "value" : 22136.69230769231
          }
        },
        {
          "key" : 36,
          "doc_count" : 52,
          "ageAvg" : {
            "value" : 22174.71153846154
          }
        },
        {
          "key" : 22,
          "doc_count" : 51,
          "ageAvg" : {
            "value" : 24731.07843137255
          }
        },
        {
          "key" : 28,
          "doc_count" : 51,
          "ageAvg" : {
            "value" : 28273.882352941175
          }
        },
        {
          "key" : 33,
          "doc_count" : 50,
          "ageAvg" : {
            "value" : 25093.94
          }
        },
        {
          "key" : 34,
          "doc_count" : 49,
          "ageAvg" : {
            "value" : 26809.95918367347
          }
        },
        {
          "key" : 30,
          "doc_count" : 47,
          "ageAvg" : {
            "value" : 22841.106382978724
          }
        },
        {
          "key" : 21,
          "doc_count" : 46,
          "ageAvg" : {
            "value" : 26981.434782608696
          }
        },
        {
          "key" : 40,
          "doc_count" : 45,
          "ageAvg" : {
            "value" : 27183.17777777778
          }
        },
        {
          "key" : 20,
          "doc_count" : 44,
          "ageAvg" : {
            "value" : 27741.227272727272
          }
        },
        {
          "key" : 23,
          "doc_count" : 42,
          "ageAvg" : {
            "value" : 27314.214285714286
          }
        },
        {
          "key" : 24,
          "doc_count" : 42,
          "ageAvg" : {
            "value" : 28519.04761904762
          }
        },
        {
          "key" : 25,
          "doc_count" : 42,
          "ageAvg" : {
            "value" : 27445.214285714286
          }
        },
        {
          "key" : 37,
          "doc_count" : 42,
          "ageAvg" : {
            "value" : 27022.261904761905
          }
        },
        {
          "key" : 27,
          "doc_count" : 39,
          "ageAvg" : {
            "value" : 21471.871794871793
          }
        },
        {
          "key" : 38,
          "doc_count" : 39,
          "ageAvg" : {
            "value" : 26187.17948717949
          }
        },
        {
          "key" : 29,
          "doc_count" : 35,
          "ageAvg" : {
            "value" : 29483.14285714286
          }
        }
      ]
    }
  }
}
查出所有年龄分布,并且这些年龄段中M的平均薪资和F的平均薪资以及这个年龄段的总体平均薪资
GET bank/_search
{
  "query": {
    "match_all": {}
  },
  "aggs": {
    "ageAgg": {
      "terms": {
        "field": "age",
        "size": 100
      },
      "aggs": {
        "genderAgg": {
          "terms": {
            "field": "gender.keyword"
          },
          "aggs": {
            "balanceAvg": {
              "avg": {
                "field": "balance"
              }
            }
          }
        },
        "ageBalanceAvg": {
          "avg": {
            "field": "balance"
          }
        }
      }
    }
  },
  "size": 0
}
//"field": "gender.keyword" gender是txt没法聚合 必须加.keyword精确替代
输出结果:
{
  "took" : 119,
  "timed_out" : false,
  "_shards" : {
    "total" : 1,
    "successful" : 1,
    "skipped" : 0,
    "failed" : 0
  },
  "hits" : {
    "total" : {
      "value" : 1000,
      "relation" : "eq"
    },
    "max_score" : null,
    "hits" : [ ]
  },
  "aggregations" : {
    "ageAgg" : {
      "doc_count_error_upper_bound" : 0,
      "sum_other_doc_count" : 0,
      "buckets" : [
        {
          "key" : 31,
          "doc_count" : 61,
          "genderAgg" : {
            "doc_count_error_upper_bound" : 0,
            "sum_other_doc_count" : 0,
            "buckets" : [
              {
                "key" : "M",
                "doc_count" : 35,
                "balanceAvg" : {
                  "value" : 29565.628571428573
                }
              },
              {
                "key" : "F",
                "doc_count" : 26,
                "balanceAvg" : {
                  "value" : 26626.576923076922
                }
              }
            ]
          },
          "ageBalanceAvg" : {
            "value" : 28312.918032786885
          }
        }
      ]
        .......//省略其他
    }
  }
}
3)Mapping
(1)字段类型
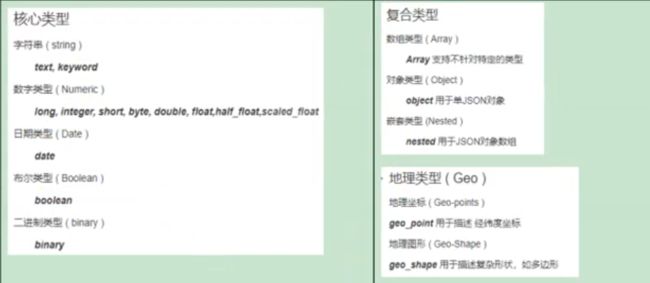
(2)映射
Mapping(映射)
Maping是用来定义一个文档(document),以及它所包含的属性(field)是如何存储和索引的。比如:使用maping来定义:
-
哪些字符串属性应该被看做全文本属性(full text fields);
-
哪些属性包含数字,日期或地理位置;
-
文档中的所有属性是否都嫩被索引(all 配置);
-
日期的格式;
-
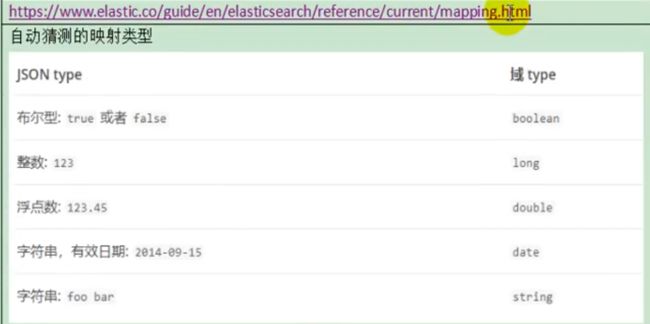
自定义映射规则来执行动态添加属性;
-
查看mapping信息
GET bank/_mapping{ "bank" : { "mappings" : { "properties" : { "account_number" : { "type" : "long" }, "address" : { "type" : "text", "fields" : { "keyword" : { "type" : "keyword", "ignore_above" : 256 } } }, "age" : { "type" : "long" }, "balance" : { "type" : "long" }, "city" : { "type" : "text", "fields" : { "keyword" : { "type" : "keyword", "ignore_above" : 256 } } }, "email" : { "type" : "text", "fields" : { "keyword" : { "type" : "keyword", "ignore_above" : 256 } } }, "employer" : { "type" : "text", "fields" : { "keyword" : { "type" : "keyword", "ignore_above" : 256 } } }, "firstname" : { "type" : "text", "fields" : { "keyword" : { "type" : "keyword", "ignore_above" : 256 } } }, "gender" : { "type" : "text", "fields" : { "keyword" : { "type" : "keyword", "ignore_above" : 256 } } }, "lastname" : { "type" : "text", "fields" : { "keyword" : { "type" : "keyword", "ignore_above" : 256 } } }, "state" : { "type" : "text", "fields" : { "keyword" : { "type" : "keyword", "ignore_above" : 256 } } } } } } } -
修改mapping信息
(3)新版本改变
ElasticSearch7-去掉type概念
-
关系型数据库中两个数据表示是独立的,即使他们里面有相同名称的列也不影响使用,但ES中不是这样的。elasticsearch是基于Lucene开发的搜索引擎,而ES中不同type下名称相同的filed最终在Lucene中的处理方式是一样的。
- 两个不同type下的两个user_name,在ES同一个索引下其实被认为是同一个filed,你必须在两个不同的type中定义相同的filed映射。否则,不同type中的相同字段名称就会在处理中出现冲突的情况,导致Lucene处理效率下降。
- 去掉type就是为了提高ES处理数据的效率。
-
Elasticsearch 7.x URL中的type参数为可选。比如,索引一个文档不再要求提供文档类型。
-
Elasticsearch 8.x 不再支持URL中的type参数。
-
解决:
将索引从多类型迁移到单类型,每种类型文档一个独立索引将已存在的索引下的类型数据,全部迁移到指定位置即可。详见数据迁移
Elasticsearch 7.x
- Specifying types in requests is deprecated. For instance, indexing a document no longer requires a document
type. The new index APIs arePUT {index}/_doc/{id}in case of explicit ids andPOST {index}/_docfor auto-generated ids. Note that in 7.0,_docis a permanent part of the path, and represents the endpoint name rather than the document type.- The
include_type_nameparameter in the index creation, index template, and mapping APIs will default tofalse. Setting the parameter at all will result in a deprecation warning.- The
_default_mapping type is removed.Elasticsearch 8.x
- Specifying types in requests is no longer supported.
- The
include_type_nameparameter is removed.
创建映射
创建索引并指定属性的映射规则(相当于新建表并制定字段和字段类型)
PUT /my_index
{
  "mappings": {
    "properties": {
      "age": {
        "type": "integer"
      },
      "email": {
        "type": "keyword"
      },
      "name": {
        "type": "text"
      }
    }
  }
}
输出:
{
  "acknowledged" : true,
  "shards_acknowledged" : true,
  "index" : "my_index"
}
查看映射
GET /my_index
输出结果:
//"index" : false 是否被索引即能被检索到,默认是true
{
  "my_index" : {
    "aliases" : { },
    "mappings" : {
      "properties" : {
        "age" : {
          "type" : "integer"
        },
        "email" : {
          "type" : "keyword"
        },
        "employee-id" : {
          "type" : "keyword",
          "index" : false
        },
        "name" : {
          "type" : "text"
        }
      }
    },
    "settings" : {
      "index" : {
        "creation_date" : "1588410780774",
        "number_of_shards" : "1",
        "number_of_replicas" : "1",
        "uuid" : "ua0lXhtkQCOmn7Kh3iUu0w",
        "version" : {
          "created" : "7060299"
        },
        "provided_name" : "my_index"
      }
    }
  }
}
添加新的字段映射
PUT /my_index/_mapping
{
  "properties": {
    "employee-id": {
      "type": "keyword",
      "index": false
    }
  }
}
这里的 “index”: false,表明新增的字段不能被检索,只是一个冗余字段。
更新映射
对于已经存在的字段映射,我们不能更新。更新必须创建新的索引,进行数据迁移。
数据迁移
先创建new_twitter的正确映射。然后使用如下方式进行数据迁移。
POST reindex [固定写法]
{
  "source":{
      "index":"twitter"
   },
  "dest":{
      "index":"new_twitters"
   }
}
将旧索引的type下的数据进行迁移
POST reindex [固定写法]
{
  "source":{
      "index":"twitter",
      "twitter":"twitter"
   },
  "dest":{
      "index":"new_twitters"
   }
}
更多详情见: https://www.elastic.co/guide/en/elasticsearch/reference/7.6/docs-reindex.html
GET /bank/_search
{
  "took" : 0,
  "timed_out" : false,
  "_shards" : {
    "total" : 1,
    "successful" : 1,
    "skipped" : 0,
    "failed" : 0
  },
  "hits" : {
    "total" : {
      "value" : 1000,
      "relation" : "eq"
    },
    "max_score" : 1.0,
    "hits" : [
      {
        "_index" : "bank",
        "_type" : "account",//类型为account
        "_id" : "1",
        "_score" : 1.0,
        "_source" : {
          "account_number" : 1,
          "balance" : 39225,
          "firstname" : "Amber",
          "lastname" : "Duke",
          "age" : 32,
          "gender" : "M",
          "address" : "880 Holmes Lane",
          "employer" : "Pyrami",
          "email" : "[email protected]",
          "city" : "Brogan",
          "state" : "IL"
        }
      },
      ...
GET /bank/_search

想要将年龄修改为integer
PUT /newbank
{
  "mappings": {
    "properties": {
      "account_number": {
        "type": "long"
      },
      "address": {
        "type": "text"
      },
      "age": {
        "type": "integer"
      },
      "balance": {
        "type": "long"
      },
      "city": {
        "type": "keyword"
      },
      "email": {
        "type": "keyword"
      },
      "employer": {
        "type": "keyword"
      },
      "firstname": {
        "type": "text"
      },
      "gender": {
        "type": "keyword"
      },
      "lastname": {
        "type": "text",
        "fields": {
          "keyword": {
            "type": "keyword",
            "ignore_above": 256
          }
        }
      },
      "state": {
        "type": "keyword"
      }
    }
  }
}
查看“newbank”的映射:
GET /newbank/_mapping
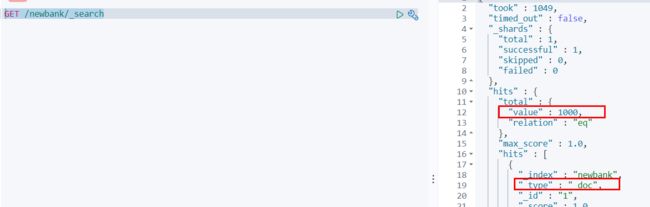
能够看到age的映射类型被修改为了integer.
将bank中的数据迁移到newbank中
POST _reindex
{
  "source": {
    "index": "bank",
    "type": "account"
  },
  "dest": {
    "index": "newbank"
  }
}
运行输出:
#! Deprecation: [types removal] Specifying types in reindex requests is deprecated.
{
  "took" : 768,
  "timed_out" : false,
  "total" : 1000,
  "updated" : 0,
  "created" : 1000,
  "deleted" : 0,
  "batches" : 1,
  "version_conflicts" : 0,
  "noops" : 0,
  "retries" : {
    "bulk" : 0,
    "search" : 0
  },
  "throttled_millis" : 0,
  "requests_per_second" : -1.0,
  "throttled_until_millis" : 0,
  "failures" : [ ]
}
查看newbank中的数据

4)分词
一个tokenizer(分词器)接收一个字符流,将之分割为独立的tokens(词元,通常是独立的单词),然后输出tokens流。
例如:whitespace tokenizer遇到空白字符时分割文本。它会将文本“Quick brown fox!”分割为[Quick,brown,fox!]。
该tokenizer(分词器)还负责记录各个terms(词条)的顺序或position位置(用于phrase短语和word proximity词近邻查询),以及term(词条)所代表的原始word(单词)的start(起始)和end(结束)的character offsets(字符串偏移量)(用于高亮显示搜索的内容)。
elasticsearch提供了很多内置的分词器,可以用来构建custom analyzers(自定义分词器)。
关于分词器: https://www.elastic.co/guide/en/elasticsearch/reference/7.6/analysis.html
POST _analyze
{
  "analyzer": "standard",
  "text": "The 2 QUICK Brown-Foxes jumped over the lazy dog's bone."
}
执行结果:
{
"tokens" : [
{
"token" : "the",
"start_offset" : 0,
"end_offset" : 3,
"type" : "" ,
"position" : 0
},
{
"token" : "2",
"start_offset" : 4,
"end_offset" : 5,
"type" : "" ,
"position" : 1
},
{
"token" : "quick",
"start_offset" : 6,
"end_offset" : 11,
"type" : "" ,
"position" : 2
},
{
"token" : "brown",
"start_offset" : 12,
"end_offset" : 17,
"type" : "" ,
"position" : 3
},
{
"token" : "foxes",
"start_offset" : 18,
"end_offset" : 23,
"type" : "" ,
"position" : 4
},
{
"token" : "jumped",
"start_offset" : 24,
"end_offset" : 30,
"type" : "" ,
"position" : 5
},
{
"token" : "over",
"start_offset" : 31,
"end_offset" : 35,
"type" : "" ,
"position" : 6
},
{
"token" : "the",
"start_offset" : 36,
"end_offset" : 39,
"type" : "" ,
"position" : 7
},
{
"token" : "lazy",
"start_offset" : 40,
"end_offset" : 44,
"type" : "" ,
"position" : 8
},
{
"token" : "dog's",
"start_offset" : 45,
"end_offset" : 50,
"type" : "" ,
"position" : 9
},
{
"token" : "bone",
"start_offset" : 51,
"end_offset" : 55,
"type" : "" ,
"position" : 10
}
]
}
(1)安装ik分词器

所有的语言分词,默认使用的都是“Standard Analyzer”,但是这些分词器针对于中文的分词,并不友好。为此需要安装中文的分词器。
注意:不能用默认elasticsearch-plugin install xxx.zip 进行自动安装
https://github.com/medcl/elasticsearch-analysis-ik/releases/download 对应es版本安装
在前面安装的elasticsearch时,我们已经将elasticsearch容器的“/usr/share/elasticsearch/plugins”目录,映射到宿主机的“ /mydata/elasticsearch/plugins”目录下,所以比较方便的做法就是下载“/elasticsearch-analysis-ik-7.6.2.zip”文件,然后解压到该文件夹下即可。安装完毕后,需要重启elasticsearch容器。
如果不嫌麻烦,还可以采用如下的方式。
(1)查看elasticsearch版本号:
[root@hadoop-104 ~]# curl http://localhost:9200
{
  "name" : "0adeb7852e00",
  "cluster_name" : "elasticsearch",
  "cluster_uuid" : "9gglpP0HTfyOTRAaSe2rIg",
  "version" : {
    "number" : "7.6.2",      #版本号为7.6.2
    "build_flavor" : "default",
    "build_type" : "docker",
    "build_hash" : "ef48eb35cf30adf4db14086e8aabd07ef6fb113f",
    "build_date" : "2020-03-26T06:34:37.794943Z",
    "build_snapshot" : false,
    "lucene_version" : "8.4.0",
    "minimum_wire_compatibility_version" : "6.8.0",
    "minimum_index_compatibility_version" : "6.0.0-beta1"
  },
  "tagline" : "You Know, for Search"
}
[root@hadoop-104 ~]#
(2)进入es容器内部plugin目录
- docker exec -it 容器id /bin/bash
[root@hadoop-104 ~]# docker exec -it elasticsearch /bin/bash
[root@0adeb7852e00 elasticsearch]#
- wget https://github.com/medcl/elasticsearch-analysis-ik/releases/download/v7.6.2/elasticsearch-analysis-ik-7.6.2.zip
[root@0adeb7852e00 elasticsearch]# pwd
/usr/share/elasticsearch
#下载ik7.6.2
[root@0adeb7852e00 elasticsearch]# wget https://github.com/medcl/elasticsearch-analysis-ik/releases/download/v7.6.2/elasticsearch-analysis-ik-7.6.2.zip
- unzip 下载的文件
[root@0adeb7852e00 elasticsearch]# unzip elasticsearch-analysis-ik-7.6.2.zip -d ink
Archive:  elasticsearch-analysis-ik-7.6.2.zip
   creating: ik/config/
  inflating: ik/config/main.dic
  inflating: ik/config/quantifier.dic
  inflating: ik/config/extra_single_word_full.dic
  inflating: ik/config/IKAnalyzer.cfg.xml
  inflating: ik/config/surname.dic
  inflating: ik/config/suffix.dic
  inflating: ik/config/stopword.dic
  inflating: ik/config/extra_main.dic
  inflating: ik/config/extra_stopword.dic
  inflating: ik/config/preposition.dic
  inflating: ik/config/extra_single_word_low_freq.dic
  inflating: ik/config/extra_single_word.dic
  inflating: ik/elasticsearch-analysis-ik-7.6.2.jar
  inflating: ik/httpclient-4.5.2.jar
  inflating: ik/httpcore-4.4.4.jar
  inflating: ik/commons-logging-1.2.jar
  inflating: ik/commons-codec-1.9.jar
  inflating: ik/plugin-descriptor.properties
  inflating: ik/plugin-security.policy
[root@0adeb7852e00 elasticsearch]#
#移动到plugins目录下
[root@0adeb7852e00 elasticsearch]# mv ik plugins/
- rm -rf *.zip
[root@0adeb7852e00 elasticsearch]# rm -rf elasticsearch-analysis-ik-7.6.2.zip
确认是否安装好了分词器
(2)测试分词器
使用默认
GET my_index/_analyze
{
   "text":"我是中国人"
}
请观察执行结果:
{
"tokens" : [
{
"token" : "我",
"start_offset" : 0,
"end_offset" : 1,
"type" : "" ,
"position" : 0
},
{
"token" : "是",
"start_offset" : 1,
"end_offset" : 2,
"type" : "" ,
"position" : 1
},
{
"token" : "中",
"start_offset" : 2,
"end_offset" : 3,
"type" : "" ,
"position" : 2
},
{
"token" : "国",
"start_offset" : 3,
"end_offset" : 4,
"type" : "" ,
"position" : 3
},
{
"token" : "人",
"start_offset" : 4,
"end_offset" : 5,
"type" : "" ,
"position" : 4
}
]
}
GET my_index/_analyze
{
   "analyzer": "ik_smart",
   "text":"我是中国人"
}
输出结果:
{
  "tokens" : [
    {
      "token" : "我",
      "start_offset" : 0,
      "end_offset" : 1,
      "type" : "CN_CHAR",
      "position" : 0
    },
    {
      "token" : "是",
      "start_offset" : 1,
      "end_offset" : 2,
      "type" : "CN_CHAR",
      "position" : 1
    },
    {
      "token" : "中国人",
      "start_offset" : 2,
      "end_offset" : 5,
      "type" : "CN_WORD",
      "position" : 2
    }
  ]
}
GET my_index/_analyze
{
   "analyzer": "ik_max_word",
   "text":"我是中国人"
}
输出结果:
{
  "tokens" : [
    {
      "token" : "我",
      "start_offset" : 0,
      "end_offset" : 1,
      "type" : "CN_CHAR",
      "position" : 0
    },
    {
      "token" : "是",
      "start_offset" : 1,
      "end_offset" : 2,
      "type" : "CN_CHAR",
      "position" : 1
    },
    {
      "token" : "中国人",
      "start_offset" : 2,
      "end_offset" : 5,
      "type" : "CN_WORD",
      "position" : 2
    },
    {
      "token" : "中国",
      "start_offset" : 2,
      "end_offset" : 4,
      "type" : "CN_WORD",
      "position" : 3
    },
    {
      "token" : "国人",
      "start_offset" : 3,
      "end_offset" : 5,
      "type" : "CN_WORD",
      "position" : 4
    }
  ]
}
(3)自定义词库
- 修改/usr/share/elasticsearch/plugins/ik/config中的IKAnalyzer.cfg.xml
/usr/share/elasticsearch/plugins/ik/config
DOCTYPE properties SYSTEM "http://java.sun.com/dtd/properties.dtd">
<properties>
	<comment>IK Analyzer 扩展配置comment>

	<entry key="ext_dict">entry>

	<entry key="ext_stopwords">entry>

	<entry key="remote_ext_dict">http://192.168.6.128/es/fenci.txtentry>


properties>
原来的xml
DOCTYPE properties SYSTEM "http://java.sun.com/dtd/properties.dtd">
<properties>
	<comment>IK Analyzer 扩展配置comment>

	<entry key="ext_dict">entry>

	<entry key="ext_stopwords">entry>


properties>
修改完成后,需要重启elasticsearch容器,否则修改不生效。
更新完成后,es只会对于新增的数据用更新分词。历史数据是不会重新分词的。如果想要历史数据重新分词,需要执行:
POST my_index/_update_by_query?conflicts=proceed
http://192.168.6.128/es/fenci.txt,这个是nginx上资源的访问路径
在运行下面实例之前,需要安装nginx(安装方法见安装nginx),然后创建“fenci.txt”文件,内容如下:
echo "樱桃萨其马,带你甜蜜入夏" > /mydata/nginx/html/fenci.txt
测试效果:
GET my_index/_analyze
{
   "analyzer": "ik_max_word",
   "text":"樱桃萨其马,带你甜蜜入夏"
}
输出结果:
{
  "tokens" : [
    {
      "token" : "樱桃",
      "start_offset" : 0,
      "end_offset" : 2,
      "type" : "CN_WORD",
      "position" : 0
    },
    {
      "token" : "萨其马",
      "start_offset" : 2,
      "end_offset" : 5,
      "type" : "CN_WORD",
      "position" : 1
    },
    {
      "token" : "带你",
      "start_offset" : 6,
      "end_offset" : 8,
      "type" : "CN_WORD",
      "position" : 2
    },
    {
      "token" : "甜蜜",
      "start_offset" : 8,
      "end_offset" : 10,
      "type" : "CN_WORD",
      "position" : 3
    },
    {
      "token" : "入夏",
      "start_offset" : 10,
      "end_offset" : 12,
      "type" : "CN_WORD",
      "position" : 4
    }
  ]
}
4、elasticsearch-Rest-Client
1)9300: TCP
- spring-data-elasticsearch:transport-api.jar;
- springboot版本不同,ransport-api.jar不同,不能适配es版本
- 7.x已经不建议使用,8以后就要废弃
2)9200: HTTP
-
jestClient: 非官方,更新慢;
-
RestTemplate:模拟HTTP请求,ES很多操作需要自己封装,麻烦;
-
HttpClient:同上;
-
Elasticsearch-Rest-Client:官方RestClient,封装了ES操作,API层次分明,上手简单;
最终选择Elasticsearch-Rest-Client(elasticsearch-rest-high-level-client);
https://www.elastic.co/guide/en/elasticsearch/client/java-rest/current/java-rest-high.html
5、附录:安装Nginx
-
随便启动一个nginx实例,只是为了复制出配置
docker run -p 8081:80 --name nginx -d nginx:1.10 -
将容器内的配置文件拷贝到/mydata/nginx/conf/ 下
mkdir -p /mydata/nginx/html mkdir -p /mydata/nginx/logs mkdir -p /mydata/nginx/conf docker container cp nginx:/etc/nginx . #拷贝到当前文件夹 #由于拷贝完成后会在config中存在一个nginx文件夹,所以需要将它的内容移动到conf中 mv /mydata/nginx/conf/nginx/* /mydata/nginx/conf/ rm -rf /mydata/nginx/conf/nginx -
终止原容器:
docker stop nginx -
执行命令删除原容器:
docker rm nginx -
创建新的Nginx,执行以下命令
docker run -p 80:80 --name nginx \ -v /mydata/nginx/html:/usr/share/nginx/html \ -v /mydata/nginx/logs:/var/log/nginx \ -v /mydata/nginx/conf/:/etc/nginx \ -d nginx:1.10 -
设置开机启动nginx
docker update nginx --restart=always -
创建“/mydata/nginx/html/index.html”文件,测试是否能够正常访问
echo 'hello nginx!
' >/mydata/nginx/html/index.html访问:http://ngix所在主机的IP:80/index.html
SpringBoot整合ElasticSearch
1、导入依赖
这里的版本要和所按照的ELK版本匹配。
<dependency>
    <groupId>org.elasticsearch.clientgroupId>
    <artifactId>elasticsearch-rest-high-level-clientartifactId>
    <version>7.6.2version>
dependency>
在spring-boot-dependencies中所依赖的ELK版本位6.8.7
6.8.7

需要在项目中将它改为7.6.2
    <properties>
        ...
        <elasticsearch.version>7.6.2elasticsearch.version>
    properties>
2、编写测试类
1)测试保存数据
https://www.elastic.co/guide/en/elasticsearch/client/java-rest/current/java-rest-high-document-index.html
    @Test
    public void indexData() throws IOException {
        IndexRequest indexRequest = new IndexRequest ("users");

        User user = new User();
        user.setUserName("张三");
        user.setAge(20);
        user.setGender("男");
        String jsonString = JSON.toJSONString(user);
        //设置要保存的内容
        indexRequest.source(jsonString, XContentType.JSON);
        //执行创建索引和保存数据
        IndexResponse index = client.index(indexRequest, GulimallElasticSearchConfig.COMMON_OPTIONS);

        System.out.println(index);

    }
测试前:
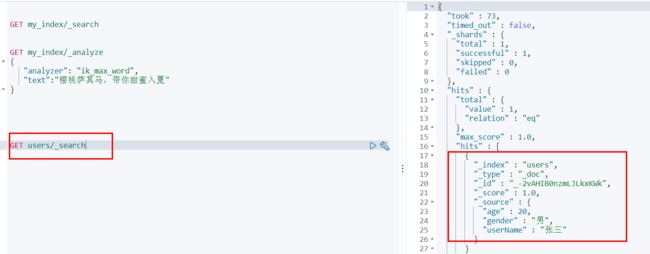
测试后:

2)测试获取数据
https://www.elastic.co/guide/en/elasticsearch/client/java-rest/current/java-rest-high-search.html
    @Test
    public void searchData() throws IOException {
        GetRequest getRequest = new GetRequest(
                "users",
                "_-2vAHIB0nzmLJLkxKWk");

        GetResponse getResponse = client.get(getRequest, RequestOptions.DEFAULT);
        System.out.println(getResponse);
        String index = getResponse.getIndex();
        System.out.println(index);
        String id = getResponse.getId();
        System.out.println(id);
        if (getResponse.isExists()) {
            long version = getResponse.getVersion();
            System.out.println(version);
            String sourceAsString = getResponse.getSourceAsString();
            System.out.println(sourceAsString);
            Map sourceAsMap = getResponse.getSourceAsMap();
            System.out.println(sourceAsMap);
            byte[] sourceAsBytes = getResponse.getSourceAsBytes();
        } else {

        }
    }
查询state="AK"的文档:
{
	"took": 1,
	"timed_out": false,
	"_shards": {
		"total": 1,
		"successful": 1,
		"skipped": 0,
		"failed": 0
	},
	"hits": {
		"total": {
			"value": 22,   //匹配到了22条
			"relation": "eq"
		},
		"max_score": 3.7952394,
		"hits": [{
			"_index": "bank",
			"_type": "account",
			"_id": "210",
			"_score": 3.7952394,
			"_source": {
				"account_number": 210,
				"balance": 33946,
				"firstname": "Cherry",
				"lastname": "Carey",
				"age": 24,
				"gender": "M",
				"address": "539 Tiffany Place",
				"employer": "Martgo",
				"email": "[email protected]",
				"city": "Fairacres",
				"state": "AK"
			}
		},
           ....//省略其他
          ]
	}
}
搜索address中包含mill的所有人的年龄分布以及平均年龄,平均薪资
GET bank/_search
{
  "query": {
    "match": {
      "address": "Mill"
    }
  },
  "aggs": {
    "ageAgg": {
      "terms": {
        "field": "age",
        "size": 10
      }
    },
    "ageAvg": {
      "avg": {
        "field": "age"
      }
    },
    "balanceAvg": {
      "avg": {
        "field": "balance"
      }
    }
  }
}
java实现
    /**
     * 复杂检索:在bank中搜索address中包含mill的所有人的年龄分布以及平均年龄,平均薪资
     * @throws IOException
     */
    @Test
    public void searchData() throws IOException {
        //1. 创建检索请求
        SearchRequest searchRequest = new SearchRequest();

        //1.1)指定索引
        searchRequest.indices("bank");
        //1.2)构造检索条件
        SearchSourceBuilder sourceBuilder = new SearchSourceBuilder();
        sourceBuilder.query(QueryBuilders.matchQuery("address","Mill"));

        //1.2.1)按照年龄分布进行聚合
        TermsAggregationBuilder ageAgg=AggregationBuilders.terms("ageAgg").field("age").size(10);
        sourceBuilder.aggregation(ageAgg);

        //1.2.2)计算平均年龄
        AvgAggregationBuilder ageAvg = AggregationBuilders.avg("ageAvg").field("age");
        sourceBuilder.aggregation(ageAvg);
        //1.2.3)计算平均薪资
        AvgAggregationBuilder balanceAvg = AggregationBuilders.avg("balanceAvg").field("balance");
        sourceBuilder.aggregation(balanceAvg);

        System.out.println("检索条件:"+sourceBuilder);
        searchRequest.source(sourceBuilder);
        //2. 执行检索
        SearchResponse searchResponse = client.search(searchRequest, RequestOptions.DEFAULT);
        System.out.println("检索结果:"+searchResponse);

        //3. 将检索结果封装为Bean
        SearchHits hits = searchResponse.getHits();
        SearchHit[] searchHits = hits.getHits();
        for (SearchHit searchHit : searchHits) {
            String sourceAsString = searchHit.getSourceAsString();
            Account account = JSON.parseObject(sourceAsString, Account.class);
            System.out.println(account);

        }

        //4. 获取聚合信息
        Aggregations aggregations = searchResponse.getAggregations();

        Terms ageAgg1 = aggregations.get("ageAgg");

        for (Terms.Bucket bucket : ageAgg1.getBuckets()) {
            String keyAsString = bucket.getKeyAsString();
            System.out.println("年龄:"+keyAsString+" ==> "+bucket.getDocCount());
        }
        Avg ageAvg1 = aggregations.get("ageAvg");
        System.out.println("平均年龄:"+ageAvg1.getValue());

        Avg balanceAvg1 = aggregations.get("balanceAvg");
        System.out.println("平均薪资:"+balanceAvg1.getValue());


    }
可以尝试对比打印的条件和执行结果,和前面的ElasticSearch的检索语句和检索结果进行比较;
其他
1. kibana控制台命令
ctrl+home:回到文档首部;
ctril+end:回到文档尾部。
    ...
    7.6.2
### 2、编写测试类

#### 1)测试保存数据

 https://www.elastic.co/guide/en/elasticsearch/client/java-rest/current/java-rest-high-document-index.html


```java
    @Test
    public void indexData() throws IOException {
        IndexRequest indexRequest = new IndexRequest ("users");

        User user = new User();
        user.setUserName("张三");
        user.setAge(20);
        user.setGender("男");
        String jsonString = JSON.toJSONString(user);
        //设置要保存的内容
        indexRequest.source(jsonString, XContentType.JSON);
        //执行创建索引和保存数据
        IndexResponse index = client.index(indexRequest, GulimallElasticSearchConfig.COMMON_OPTIONS);

        System.out.println(index);

    }
测试前:
[外链图片转存中…(img-aTttE65T-1657722496917)]
测试后:
[外链图片转存中…(img-3nSPamAb-1657722496917)]
2)测试获取数据
https://www.elastic.co/guide/en/elasticsearch/client/java-rest/current/java-rest-high-search.html
    @Test
    public void searchData() throws IOException {
        GetRequest getRequest = new GetRequest(
                "users",
                "_-2vAHIB0nzmLJLkxKWk");

        GetResponse getResponse = client.get(getRequest, RequestOptions.DEFAULT);
        System.out.println(getResponse);
        String index = getResponse.getIndex();
        System.out.println(index);
        String id = getResponse.getId();
        System.out.println(id);
        if (getResponse.isExists()) {
            long version = getResponse.getVersion();
            System.out.println(version);
            String sourceAsString = getResponse.getSourceAsString();
            System.out.println(sourceAsString);
            Map sourceAsMap = getResponse.getSourceAsMap();
            System.out.println(sourceAsMap);
            byte[] sourceAsBytes = getResponse.getSourceAsBytes();
        } else {

        }
    }
查询state="AK"的文档:
{
	"took": 1,
	"timed_out": false,
	"_shards": {
		"total": 1,
		"successful": 1,
		"skipped": 0,
		"failed": 0
	},
	"hits": {
		"total": {
			"value": 22,   //匹配到了22条
			"relation": "eq"
		},
		"max_score": 3.7952394,
		"hits": [{
			"_index": "bank",
			"_type": "account",
			"_id": "210",
			"_score": 3.7952394,
			"_source": {
				"account_number": 210,
				"balance": 33946,
				"firstname": "Cherry",
				"lastname": "Carey",
				"age": 24,
				"gender": "M",
				"address": "539 Tiffany Place",
				"employer": "Martgo",
				"email": "[email protected]",
				"city": "Fairacres",
				"state": "AK"
			}
		},
           ....//省略其他
          ]
	}
}
搜索address中包含mill的所有人的年龄分布以及平均年龄,平均薪资
GET bank/_search
{
  "query": {
    "match": {
      "address": "Mill"
    }
  },
  "aggs": {
    "ageAgg": {
      "terms": {
        "field": "age",
        "size": 10
      }
    },
    "ageAvg": {
      "avg": {
        "field": "age"
      }
    },
    "balanceAvg": {
      "avg": {
        "field": "balance"
      }
    }
  }
}
java实现
    /**
     * 复杂检索:在bank中搜索address中包含mill的所有人的年龄分布以及平均年龄,平均薪资
     * @throws IOException
     */
    @Test
    public void searchData() throws IOException {
        //1. 创建检索请求
        SearchRequest searchRequest = new SearchRequest();

        //1.1)指定索引
        searchRequest.indices("bank");
        //1.2)构造检索条件
        SearchSourceBuilder sourceBuilder = new SearchSourceBuilder();
        sourceBuilder.query(QueryBuilders.matchQuery("address","Mill"));

        //1.2.1)按照年龄分布进行聚合
        TermsAggregationBuilder ageAgg=AggregationBuilders.terms("ageAgg").field("age").size(10);
        sourceBuilder.aggregation(ageAgg);

        //1.2.2)计算平均年龄
        AvgAggregationBuilder ageAvg = AggregationBuilders.avg("ageAvg").field("age");
        sourceBuilder.aggregation(ageAvg);
        //1.2.3)计算平均薪资
        AvgAggregationBuilder balanceAvg = AggregationBuilders.avg("balanceAvg").field("balance");
        sourceBuilder.aggregation(balanceAvg);

        System.out.println("检索条件:"+sourceBuilder);
        searchRequest.source(sourceBuilder);
        //2. 执行检索
        SearchResponse searchResponse = client.search(searchRequest, RequestOptions.DEFAULT);
        System.out.println("检索结果:"+searchResponse);

        //3. 将检索结果封装为Bean
        SearchHits hits = searchResponse.getHits();
        SearchHit[] searchHits = hits.getHits();
        for (SearchHit searchHit : searchHits) {
            String sourceAsString = searchHit.getSourceAsString();
            Account account = JSON.parseObject(sourceAsString, Account.class);
            System.out.println(account);

        }

        //4. 获取聚合信息
        Aggregations aggregations = searchResponse.getAggregations();

        Terms ageAgg1 = aggregations.get("ageAgg");

        for (Terms.Bucket bucket : ageAgg1.getBuckets()) {
            String keyAsString = bucket.getKeyAsString();
            System.out.println("年龄:"+keyAsString+" ==> "+bucket.getDocCount());
        }
        Avg ageAvg1 = aggregations.get("ageAvg");
        System.out.println("平均年龄:"+ageAvg1.getValue());

        Avg balanceAvg1 = aggregations.get("balanceAvg");
        System.out.println("平均薪资:"+balanceAvg1.getValue());


    }
可以尝试对比打印的条件和执行结果,和前面的ElasticSearch的检索语句和检索结果进行比较;
其他
1. kibana控制台命令
ctrl+home:回到文档首部;
ctril+end:回到文档尾部。