STM32标准库——(3)LED闪烁、LED流水灯、蜂鸣器
1.相关API
1.1 GPIOSpeed_TypeDef
/**
  * @brief  Output Maximum frequency selection  最大频率选择
  */

typedef enum
{
  GPIO_Speed_10MHz = 1,
  GPIO_Speed_2MHz,
  GPIO_Speed_50MHz
}GPIOSpeed_TypeDef;
1.2 GPIOMode_TypeDef
/**
  * @brief  Configuration Mode enumeration  配置模式枚举
  */

typedef enum
{ GPIO_Mode_AIN = 0x0,			//模拟输入
  GPIO_Mode_IN_FLOATING = 0x04,	//浮空输入
  GPIO_Mode_IPD = 0x28,			//下拉输入
  GPIO_Mode_IPU = 0x48,			//上拉输入
  GPIO_Mode_Out_OD = 0x14,		//开漏输出
  GPIO_Mode_Out_PP = 0x10,		//推挽输出
  GPIO_Mode_AF_OD = 0x1C,		//复用功能开漏输出
  GPIO_Mode_AF_PP = 0x18		//复用功能推挽输出
}GPIOMode_TypeDef;
1.3 GPIO_InitTypeDef
/**
  * @brief  GPIO Init structure definition
  */

typedef struct
{
  uint16_t GPIO_Pin;             /*!< Specifies the GPIO pins to be configured. 指定要配置的GPIO引脚。
                                      This parameter can be any value of @ref 该参数可以是@ref的任意值
  GPIO_pins_define */

  GPIOSpeed_TypeDef GPIO_Speed;  /*!< Specifies the speed for the selected pins. 指定所选引脚的速度。
                                      This parameter can be a value of @ref
  GPIOSpeed_TypeDef */

  GPIOMode_TypeDef GPIO_Mode;    /*!< Specifies the operating mode for the selected pins. 指定所选引脚的工作模式。
                                      This parameter can be a value of @ref
  GPIOMode_TypeDef */
}GPIO_InitTypeDef;
1.4 BitAction
/**
  * @brief  Bit_SET and Bit_RESET enumeration  位SET和位RESET枚举
  */

typedef enum
{ Bit_RESET = 0,
  Bit_SET = 1;
}BitAction;
//这里一般用来强转 如果输入高低电平不是特定参数 而是0或1 则需要在0或1前面加上BitAction 如下:
    GPIO_WriteBit(GPIOA,GPIO_Pin_0,(BitAction)0);
	Delay_ms(500);
	GPIO_WriteBit(GPIOA,GPIO_Pin_0,(BitAction)1);
	Delay_ms(500);
1.5 GPIO_pins_define
/** @defgroup GPIO_pins_define GPIO引脚定义
  * @{
  */

#define GPIO_Pin_0                 ((uint16_t)0x0001)  /*!< Pin 0 selected */
#define GPIO_Pin_1                 ((uint16_t)0x0002)  /*!< Pin 1 selected */
#define GPIO_Pin_2                 ((uint16_t)0x0004)  /*!< Pin 2 selected */
#define GPIO_Pin_3                 ((uint16_t)0x0008)  /*!< Pin 3 selected */
#define GPIO_Pin_4                 ((uint16_t)0x0010)  /*!< Pin 4 selected */
#define GPIO_Pin_5                 ((uint16_t)0x0020)  /*!< Pin 5 selected */
#define GPIO_Pin_6                 ((uint16_t)0x0040)  /*!< Pin 6 selected */
#define GPIO_Pin_7                 ((uint16_t)0x0080)  /*!< Pin 7 selected */
#define GPIO_Pin_8                 ((uint16_t)0x0100)  /*!< Pin 8 selected */
#define GPIO_Pin_9                 ((uint16_t)0x0200)  /*!< Pin 9 selected */
#define GPIO_Pin_10                ((uint16_t)0x0400)  /*!< Pin 10 selected */
#define GPIO_Pin_11                ((uint16_t)0x0800)  /*!< Pin 11 selected */
#define GPIO_Pin_12                ((uint16_t)0x1000)  /*!< Pin 12 selected */
#define GPIO_Pin_13                ((uint16_t)0x2000)  /*!< Pin 13 selected */
#define GPIO_Pin_14                ((uint16_t)0x4000)  /*!< Pin 14 selected */
#define GPIO_Pin_15                ((uint16_t)0x8000)  /*!< Pin 15 selected */
#define GPIO_Pin_All               ((uint16_t)0xFFFF)  /*!< All pins selected */
//c语言不支持2进制 需要写成16进制格式 最后一个对应16个端口
1.6 GPIO_Init
void GPIO_Init(GPIO_TypeDef* GPIOx, GPIO_InitTypeDef* GPIO_InitStruct);
功能:
	根据 GPIO_InitStruct 中指定的参数初始化外设 GPIOx 寄存器
参数:
	GPIOx:x 可以是 A,B,C,D 或者 E,来选择 GPIO 外设
    GPIO_InitStruct:指向结构 GPIO_InitTypeDef 的指针,包含了外设 GPIO 的配置信息
返回值:
	无
1.7 GPIO_SetBits
void GPIO_SetBits(GPIO_TypeDef* GPIOx, uint16_t GPIO_Pin);
功能:
	设置指定的数据端口位
参数:
	GPIOx:x 可以是 A,B,C,D 或者 E,来选择 GPIO 外设
    GPIO_Pin:待设置的端口位
返回值:
	无
1.8 GPIO_ResetBits
void GPIO_ResetBits(GPIO_TypeDef* GPIOx, uint16_t GPIO_Pin);
功能:
	清除指定的数据端口位
参数:
	GPIOx:x 可以是 A,B,C,D 或者 E,来选择 GPIO 外设
    GPIO_Pin:待设置的端口位
返回值:
	无
1.9 GPIO_WriteBit
void GPIO_WriteBit(GPIO_TypeDef* GPIOx, uint16_t GPIO_Pin, BitAction BitVal);
功能:
	设置或者清除指定的数据端口位
参数:
	GPIOx:x 可以是 A,B,C,D 或者 E,来选择 GPIO 外设
    GPIO_Pin:待设置或者清除指的端口位
返回值:
	无
1.10 GPIO_Write
void GPIO_Write(GPIO_TypeDef* GPIOx, uint16_t PortVal);
功能:
	向指定 GPIO 数据端口写入数据
参数:
	GPIOx:x 可以是 A,B,C,D 或者 E,来选择 GPIO 外设
    PortVal: 待写入端口数据寄存器的值
返回值:
	无
//第二个参数需要写16进制 由于c语言不支持二进制 格式如下:
    GPIO_Write(GPIOA,~0x0002);//0000 0000 0000 0010
	Delay_ms(100);
	GPIO_Write(GPIOA,~0x0004);//0000 0000 0000 0100
	Delay_ms(100);
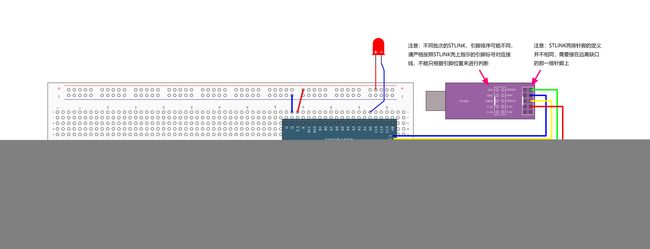
2.LED闪烁
2.1 接线图
2.2 相关代码
main.c
#include "stm32f10x.h"                  // Device header
#include "Delay.h"

int main(void)
{
	/*开启时钟*/
	RCC_APB2PeriphClockCmd(RCC_APB2Periph_GPIOA, ENABLE);	//开启GPIOA的时钟
															//使用各个外设前必须开启时钟,否则对外设的操作无效

	/*GPIO初始化*/
	GPIO_InitTypeDef GPIO_InitStructure;					//定义结构体变量

	GPIO_InitStructure.GPIO_Mode = GPIO_Mode_Out_PP;//推挽模式(高低电平都能驱动):长脚接+ 短脚接PA0/ 短脚接PA0 长脚接-
	//GPIO_InitStructure.GPIO_Mode = GPIO_Mode_Out_OD;//开漏模式(低电平驱动):长脚接+ 短脚接PA0
	GPIO_InitStructure.GPIO_Pin = GPIO_Pin_0;				//GPIO引脚,赋值为第0号引脚
	GPIO_InitStructure.GPIO_Speed = GPIO_Speed_50MHz;		//GPIO速度,赋值为50MHz

	GPIO_Init(GPIOA, &GPIO_InitStructure);					//将赋值后的构体变量传递给GPIO_Init函数
															//函数内部会自动根据结构体的参数配置相应寄存器
															//实现GPIOA的初始化

	/*主循环,循环体内的代码会一直循环执行*/
	while (1)
	{
		/*设置PA0引脚的高低电平,实现LED闪烁,下面展示3种方法*/

		/*方法1:GPIO_ResetBits设置低电平,GPIO_SetBits设置高电平*/
		GPIO_ResetBits(GPIOA, GPIO_Pin_0);					//将PA0引脚设置为低电平
		Delay_ms(500);										//延时500ms
		GPIO_SetBits(GPIOA, GPIO_Pin_0);					//将PA0引脚设置为高电平
		Delay_ms(500);										//延时500ms

		/*方法2:GPIO_WriteBit设置低/高电平,由Bit_RESET/Bit_SET指定*/
		GPIO_WriteBit(GPIOA, GPIO_Pin_0, Bit_RESET);		//将PA0引脚设置为低电平
		Delay_ms(500);										//延时500ms
		GPIO_WriteBit(GPIOA, GPIO_Pin_0, Bit_SET);			//将PA0引脚设置为高电平
		Delay_ms(500);										//延时500ms

		/*方法3:GPIO_WriteBit设置低/高电平,由数据0/1指定,数据需要强转为BitAction类型*/
		GPIO_WriteBit(GPIOA, GPIO_Pin_0, (BitAction)0);		//将PA0引脚设置为低电平
		Delay_ms(500);										//延时500ms
		GPIO_WriteBit(GPIOA, GPIO_Pin_0, (BitAction)1);		//将PA0引脚设置为高电平
		Delay_ms(500);										//延时500ms
	}
}
现象:LED灯每隔500ms闪烁一次
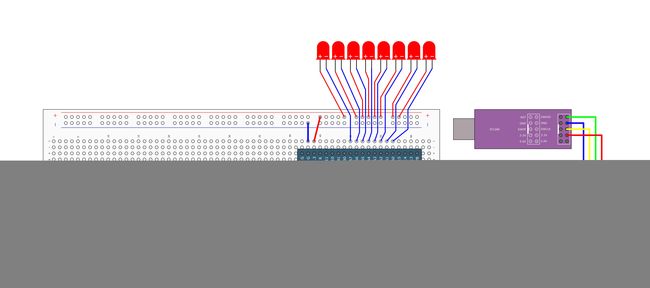
3.LED流水灯
3.1 接线图
3.2 相关代码
main.c
#include "stm32f10x.h"                  // Device header
#include "Delay.h"

int main(void)
{
	RCC_APB2PeriphClockCmd(RCC_APB2Periph_GPIOA,ENABLE);

	GPIO_InitTypeDef GPIO_InitStructure;
	//GPIO_InitStructure.GPIO_Mode = GPIO_Mode_Out_PP;//推挽模式(高低电平都能驱动):长脚接+ 短脚接PA0/ 短脚接PA0 长脚接-
	GPIO_InitStructure.GPIO_Mode = GPIO_Mode_Out_OD;//开漏模式(低电平驱动):长脚接+ 短脚接PA0
	GPIO_InitStructure.GPIO_Pin = GPIO_Pin_All;//这里只用了低八位来演示 高八位暂时用不到 索性直接选择了全部 如果要只选择前八位 可以用以下格式:GPIO_Pin_0 | GPIO_Pin_1 | GPIO_Pin_2...以此类推
	GPIO_InitStructure.GPIO_Speed = GPIO_Speed_50MHz;//GPIO速度,赋值为50MHz
	GPIO_Init(GPIOA,&GPIO_InitStructure);

	while(1)
	{
		/*使用GPIO_Write,同时设置GPIOA所有引脚的高低电平,实现LED流水灯*/
		GPIO_Write(GPIOA, ~0x0001);	//0000 0000 0000 0001,PA0引脚为低电平,其他引脚均为高电平,注意数据有按位取反
		Delay_ms(100);				//延时100ms
		GPIO_Write(GPIOA, ~0x0002);	//0000 0000 0000 0010,PA1引脚为低电平,其他引脚均为高电平
		Delay_ms(100);				//延时100ms
		GPIO_Write(GPIOA, ~0x0004);	//0000 0000 0000 0100,PA2引脚为低电平,其他引脚均为高电平
		Delay_ms(100);				//延时100ms
		GPIO_Write(GPIOA, ~0x0008);	//0000 0000 0000 1000,PA3引脚为低电平,其他引脚均为高电平
		Delay_ms(100);				//延时100ms
		GPIO_Write(GPIOA, ~0x0010);	//0000 0000 0001 0000,PA4引脚为低电平,其他引脚均为高电平
		Delay_ms(100);				//延时100ms
		GPIO_Write(GPIOA, ~0x0020);	//0000 0000 0010 0000,PA5引脚为低电平,其他引脚均为高电平
		Delay_ms(100);				//延时100ms
		GPIO_Write(GPIOA, ~0x0040);	//0000 0000 0100 0000,PA6引脚为低电平,其他引脚均为高电平
		Delay_ms(100);				//延时100ms
		GPIO_Write(GPIOA, ~0x0080);	//0000 0000 1000 0000,PA7引脚为低电平,其他引脚均为高电平
		Delay_ms(100);				//延时100ms
	}
	}

}
现象:8个LED灯每隔100ms闪烁一次 形成流水灯
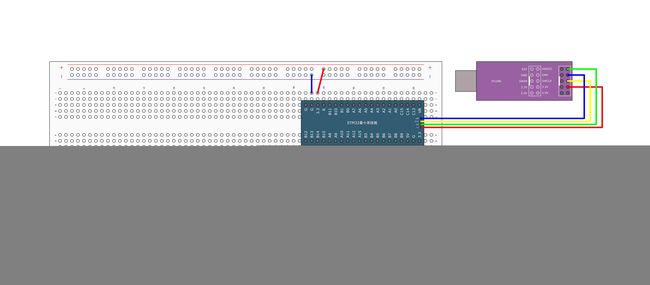
4.蜂鸣器
4.1 接线图
4.2 相关代码
main.c
#include "stm32f10x.h"                  // Device header
#include "Delay.h"

int main(void)
{
	/*开启时钟*/
	RCC_APB2PeriphClockCmd(RCC_APB2Periph_GPIOB, ENABLE);	//开启GPIOB的时钟
															//使用各个外设前必须开启时钟,否则对外设的操作无效

	/*GPIO初始化*/
	GPIO_InitTypeDef GPIO_InitStructure;					//定义结构体变量

	GPIO_InitStructure.GPIO_Mode = GPIO_Mode_Out_PP;		//GPIO模式,赋值为推挽输出模式
	GPIO_InitStructure.GPIO_Pin = GPIO_Pin_12;				//GPIO引脚,赋值为第12号引脚
	GPIO_InitStructure.GPIO_Speed = GPIO_Speed_50MHz;		//GPIO速度,赋值为50MHz

	GPIO_Init(GPIOB, &GPIO_InitStructure);					//将赋值后的构体变量传递给GPIO_Init函数
															//函数内部会自动根据结构体的参数配置相应寄存器
															//实现GPIOB的初始化

	/*主循环,循环体内的代码会一直循环执行*/
	while (1)
	{
		GPIO_ResetBits(GPIOB, GPIO_Pin_12);		//将PB12引脚设置为低电平,蜂鸣器鸣叫
		Delay_ms(100);							//延时100ms
		GPIO_SetBits(GPIOB, GPIO_Pin_12);		//将PB12引脚设置为高电平,蜂鸣器停止
		Delay_ms(100);							//延时100ms
		GPIO_ResetBits(GPIOB, GPIO_Pin_12);		//将PB12引脚设置为低电平,蜂鸣器鸣叫
		Delay_ms(100);							//延时100ms
		GPIO_SetBits(GPIOB, GPIO_Pin_12);		//将PB12引脚设置为高电平,蜂鸣器停止
		Delay_ms(700);							//延时700ms
	}
}
现象:蜂鸣器第一次叫100ms 第二次叫后个700ms再叫一次 不断循环 类似与闹钟发出的声音