netty在项目中的使用以及netty的文档(第六期)
与本项目相关技术的博文
b站上面本期视频版本,观看视频食用更佳!点击即可跳转,找不到视频可以直接搜索我 目前叫 呆呆呆呆梦
目前已经写的文章有。并且有对应视频版本。
git项目地址 【IM即时通信系统(企聊聊)】点击可跳转
sprinboot单体项目升级成springcloud项目 【第一期】
前端项目技术选型以及页面展示【第二期】
分布式权限 shiro + jwt + redis【第三期】
给为服务添加运维模块 统一管理【第四期】
微服务数据库模块【第五期】
netty与mq在项目中的使用(第六期)】
分布式websocket即时通信(IM)系统构建指南【第七期】
1.netty模块的基本使用
netty的端口由gateway转接
        #升级为gateway 代理websocket
        - id: websocket1
        #地址根据自己情况来写
          uri: ws://127.0.0.1:8888
          predicates:
            - Path=/websocket
netty 要新开发一个端口。然后暴露出websocket功能。在哔哩哔哩上面有相关视频
1.1 开始
 try{
            ServerBootstrap bootstrap = new ServerBootstrap();
            bootstrap.group(bossGroup,workGroup)
                     //服务端可连接队列数,对应TCP/IP协议listen函数中backlog参数  还有几个选项没加,需要学习
                     .option(ChannelOption.SO_BACKLOG, 1024)
                     .channel(NioServerSocketChannel.class)
                    //添加日志处理器?或者切面
                     .childHandler(myWebSocketChannelHandler);
            System.out.println("WebSocketServe========>客户端等待连接....");
            Channel ch = bootstrap.bind(8888).sync().channel();
            ch.closeFuture().sync();

        }catch (Exception e){
            e.printStackTrace();
        }finally {
//            优雅的退出程序
            bossGroup.shutdownGracefully();
            workGroup.shutdownGracefully();
        }
开始开辟一个端口
1.2 添加handler切面
@Service
@ChannelHandler.Sharable
public class MyWebSocketChannelHandler extends ChannelInitializer<SocketChannel> {

    @Autowired
    MyWebSocketHandler myWebSocketHandler;

    @Autowired
    RegisterHandler registerHandler;

    @Autowired
    SingleMessageHandler singleMessageHandler;

    @Autowired
    GroupMessageHandler groupMessageHandler;

    @Autowired
    GreatGroupHandler creatGroupHandler;

    @Override
    protected void initChannel(SocketChannel e) throws Exception {
        e.pipeline().addLast("http-codec", new HttpServerCodec()) //http编解码
        /**

         *HttpObjectAggregator 因为http在传输过程中是分段的,HttpObjectAggregator可以将多个段聚合起来
         * 这就是为什么当浏览器发送大量数据时,会发出多次http请求
         */
                    .addLast("aggregator",new HttpObjectAggregator(65536)) //httpContent消息聚合
                    .addLast("http-chunked",new ChunkedWriteHandler())  // HttpContent 压缩
                /**

                 *WebSocketServerProtocolHandler 对应websocket,它的数据是以 帧(frame)形式 传递
                 * 可以看到 WebSocketFrame 下有六个子类
                 * 浏览器请求时,ws://localhost:7000/XXX 表示请求的资源
                 * 核心功能是 将http协议升级为ws协议,保持长连接
                 */
                    .addLast("protocolHandler",new WebSocketServerProtocolHandler("/websocket"))
                    .addLast("base_handler",myWebSocketHandler)
                    .addLast("register_handler",registerHandler)
                    .addLast("single_message",singleMessageHandler)
                    .addLast("creat_group",creatGroupHandler)
                    .addLast("group_message",groupMessageHandler)
//                    .addLast(HeartBeatRequestHandler.INSTANCE)
                    .addLast(ExceptionHandler.INSTANCE);
    }
}
添加handler切面
RegisterHandler :处理注册的handler
SingleMessageHandler:处理单聊的handler
GroupMessageHandler :处理群聊的handler
GreatGroupHandler :创建群组的handler
myWebSocketHandler:接受信息的handler
netty
连接地址
let url = ‘ws://127.0.1:8888/websocket’;
一、注册接口文档
| 参数详解 | 注册消息 |
|---|---|
| type | 7代表向handler里面注册 |
| openid | 当前发送消息的用户 |
| userName | 用户名 |
| loginStatus | 登录状态 1代表是登录状态 0 代表退出状态 |
| 示例 | {“type”:7,“params”:{“openid”:“1879878-NKCNO-NKNK”,“userName”:“rose”,“loginStatus”:“1”}} |
| 传输格式 | json |
| 返回参数 | 暂无 |
二、单聊接口文档
| 参数详解 | 单聊发送消息 |
|---|---|
| type | 1 代表发送私聊的消息 |
| params | toMessageId:发送给目标用户的id message:消息 fileType:文件类型 |
| 传输格式 | json |
| 返回参数 | {“type”:0,“params”:{“date”:“Sat Jun 24 15:50:41 CST 2023”,“message”:“20230624”},“status”:200} |
| type | 0代表收到了消息 |
| param | date:日期 message:收到的消息 |
| status | 返回状态200代表成功 |
| MQ接口文档 | |
|---|---|
| type | 类型 |
| status | 返回状态 |
| params | message:消息 fileType:传输文件类型 fromUser:消息传输方 toUser:消息目的地 |
三、群聊接口文档
| 参数详解 | 群聊发送消息 |
|---|---|
| type | 9:群聊里面发送消息 |
| params | toMessageId:聊天室id message:消息 fileType:文件类型 |
| 传输格式 | json |
| 返回参数 | {“type”:0,“params”:{“date”:“Sat Jun 24 15:50:41 CST 2023”,“message”:“20230624”},“status”:200} |
| type | 0代表收到了消息 |
| param | date:日期 message:收到的消息 |
| status | 返回状态200代表成功 |
·
接收传递给前端的
 public ByteBuf getByteBuf(ChannelHandlerContext ctx, String message) {
        ByteBuf byteBuf = ctx.alloc().buffer();
        User fromUser = SessionUtils.getUser(ctx.channel());
        JSONObject data = new JSONObject();
        data.put("type", commond.SELF_RESPONSE);
        data.put("status", 200);
        JSONObject params = new JSONObject();
        params.put("message", message);
        params.put("date", new Date().toString());
        data.put("params", params);
        byte []bytes = data.toJSONString().getBytes(Charset.forName("utf-8"));
        byteBuf.writeBytes(bytes);
        return byteBuf;
    }
四、使用apipost测试websocket
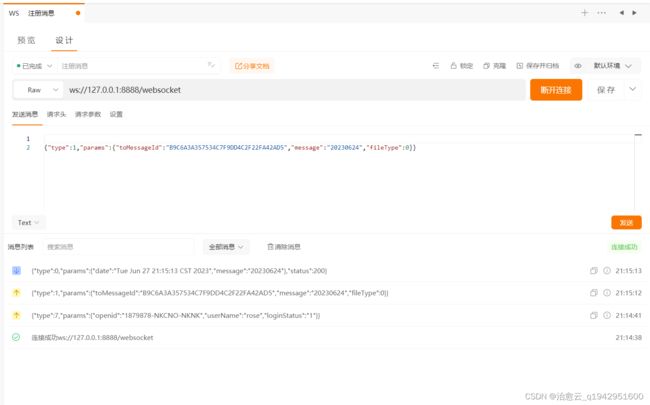
通过接口测试工具 就可以不用前端模拟请求调用接口
四、异常处理接口文档
| 异常处理返回值 | |
|---|---|
| type | 500 |
| status | 500 |
五、给ws添加权限,
TODO 还没有做