Istio

三. Istio
官网
Github
- Connect 连接: 服务发现、负载均衡、重试、路由、故障注入、重定向、A/B测试、金丝雀发布
- Secure 安全方面: 认证、通道加密、访问授权
- Control 控制: 访问控制、限速、配额管理、服务计费
- Observe 观察: 链路跟踪、监控、日志搜集、可视化

(一). 概念
- Google 、 IBM 和 Lyft 于2017年5月24日发布0.1版本, 2018年7月31日晚24点,Istio 推出1.0正式版本,并表示可用于生产环境
- 部署最好选择最新但是不要太靠前的版本用于生产, 1.5之前版本和1.5之后的架构是不一样的(1.5进行了架构重构)
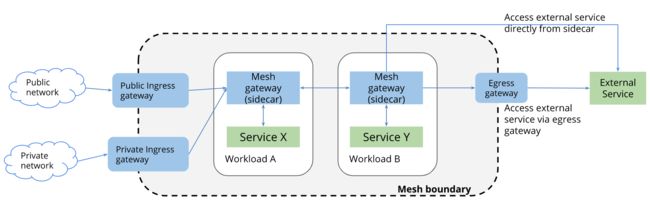
1. gateway
- 在
Kubernetes环境中,Kubernetes Ingress用于配置需要在集群外部公开的服务。但是在Istio服务网格中,更好的方法是使用新的配置模型,即Istio Gateway,Gateway 允许将Istio流量管理的功能应用于进入集群的流量,gateway 分为两种,分别是Ingress-gateway和Egress-gateway
如下
Istio部署过程,可以得到/root/istio-1.13.2/samples/multicluster目录信息
cd /root/istio-1.13.2/samples/multicluster
./gen-eastwest-gateway.sh --mesh mesh1 --cluster cluster1 --network network1 | istioctl install -y -f -

[root@lonely ~/istio-1.13.2/samples/multicluster]# kubectl  -n istio-system  get po |grep eastwestgateway
istio-eastwestgateway-56dcd6468d-nhbbc   1/1     Running   0          40m
(二). 架构
- Istio 分为 Data plane(数据平面)和 Control plane(控制平面)

1. Data plane
- 数据平面的 Sidecar 代理可以调节和控制应用服务之间所有的网络通信,当 pod 被 istio 注入后,就被纳入到服务网格中,每个应用服务 Pod 启动时会伴随启动 2个容器
istio-init和istio-proxy- istio-init: 该容器主要功能是初始化 Pod 网络和对 Pod 设置
iptable规则,拦截我们所有的入站(inbound)和出站(outbound)流量, 然后把所有的流量导入到istio-proxy,让他来处理流量, 而istio-proxy定义了规则, 就实现了流量的控制, 设置完成后自动结束 - istio-proxy: 该容器会启动两个进程:
pilot-agent以及Sidecar代理(Istio使用的是Envoy),pilot-agent的作用是同步管理数据,启动并管理 Sidecar 代理服务进程,上报遥测数据,Sidecar 代理则根据管理策略完成流量管控、生成遥测数据 - Envoy: 可以理解为充当
nginx的角色,做为proxy代理,负责接管pod的入口和出口流量,Envoy代理是唯一与数据通信交互的Istio组件,使用 C++ 开发,性能较高,Envoy和Nginx对比 (后面会对Envoy做详细介绍)
- istio-init: 该容器主要功能是初始化 Pod 网络和对 Pod 设置

2. Control plane
1). Pilot
- 负责在运行时配置代理, 实现xDS 协议
2). Citadel
- 负责证书颁发和轮换
3). Gallery
- 负责在 Istio 内验证、摄取、聚合、转换和分发配置
(三). 部署
官网
Github
Kubernetes 对应 Istio 版本
Kubernetes 版本:1.21.4
# Istioctl 下载地址
[root@lonely ~]# wget https://github.com/istio/istio/releases/download/1.13.2/istio-1.13.2-linux-amd64.tar.gz
[root@lonely ~]# tar xf istio-1.13.2-linux-amd64.tar.gz
[root@lonely ~]# cd istio-1.13.2
[root@lonely ~/istio-1.13.2]# ll
total 28
drwxr-x---  2 root root    22 Mar  9  2022 bin				# 运行文件
-rw-r--r--  1 root root 11348 Mar  9  2022 LICENSE
drwxr-xr-x  5 root root    52 Mar  9  2022 manifests		# 部署文件等
-rw-r-----  1 root root   880 Mar  9  2022 manifest.yaml
-rw-r--r--  1 root root  5866 Mar  9  2022 README.md
drwxr-xr-x 23 root root  4096 Mar  9  2022 samples			# 一些案例, 里面有 Kiali 部署的yaml文件(如下会说到)
drwxr-xr-x  3 root root    57 Mar  9  2022 tools			# 生成证书工具、命令自动补全等

[root@lonely ~/istio-1.13.2]# cp bin/istioctl /usr/local/bin/

# Istio profile
[root@lonely ~]# istioctl profile list
Istio configuration profiles:
    default
    demo
    empty
    external
    minimal
    openshift
    preview
    remote

# profile yaml文件所在位置
[root@lonely ~/istio-1.13.2/manifests]# ll profiles/
total 36
-rw-r--r-- 1 root root 4778 Mar  9  2022 default.yaml
-rw-r--r-- 1 root root 1836 Mar  9  2022 demo.yaml
-rw-r--r-- 1 root root  317 Mar  9  2022 empty.yaml
-rw-r--r-- 1 root root  590 Mar  9  2022 external.yaml
-rw-r--r-- 1 root root  216 Mar  9  2022 minimal.yaml
-rw-r--r-- 1 root root  504 Mar  9  2022 openshift.yaml
-rw-r--r-- 1 root root  747 Mar  9  2022 preview.yaml
-rw-r--r-- 1 root root  116 Mar  9  2022 remote.yaml


# 获取yaml,这里使用 demo profile
[root@lonely ~]# istioctl manifest generate --set profile=default > istio-kubernetes-default-manifest.yaml

# 生成默认模式(default)配置文件
[root@lonely ~]# istioctl profile dump >default-config.yaml
1. profile
- 生产环境使用
default模式- demo profile 会安装 ingressgateway、egressgateway、istio-pilot 等 istio 组件,同时会安装 grafana、istio-tracing、kiali、prometheus 等外部插件
| 核心组件/模式 | default | demo | minimal | remote | empty | preview |
|---|---|---|---|---|---|---|
| 说明 | 适合生产 | 仅供学习,不适合生产 | 最小化安装 | |||
istio-egress gateway |
✔ | |||||
istio-ingress gateway |
✔ | ✔ | ✔ | |||
istiod |
✔ | ✔ | ✔ | ✔ |
| profile | 描述 |
|---|---|
| default | 根据 IstioOperator API 的默认设置启动组件, 建议用于生产部署和 Multicluster Mesh 中的 Primary Cluster |
| demo | 这一配置具有适度的资源需求,旨在展示 Istio 的功能, 它适合运行 Bookinfo 应用程序和相关任务, 这是通过快速开始指导安装的配置, 此配置文件启用了高级别的追踪和访问日志,因此不适合进行性能测试, 也不适用生产 |
| empty | |
| external | |
| minimal | 与默认配置文件相同,但只安装了控制平面组件。 它允许您使用 Separate Profile 配置控制平面和数据平面组件(例如 Gateway) |
| openshift | |
| preview | 预览文件包含的功能都是实验性。这是为了探索 Istio 的新功能。不确保稳定性、安全性和性能(使用风险需自负) |
| remote | 配置 Multicluster Mesh 的 Remote Cluster |
2. 安装
- 默认会创建在 istio-system 名称空间,也会创建许多 CRD, 可以
kubectl get crd查看,这些是为了创建 istio 功能的,还有 egress、ingress、istiod 的pod 和 deployment
# 也可以用获取的yaml文件进行部署和卸载
[root@lonely ~/istio-1.13.2]# istioctl install --set profile=demo
This will install the Istio 1.13.2 demo profile with ["Istio core" "Istiod" "Ingress gateways" "Egress gateways"] components into the cluster. Proceed? (y/N) y

[root@lonely ~/istio-1.13.2]# kubectl  -n istio-system get po
NAME                                    READY   STATUS    RESTARTS   AGE
istio-egressgateway-66fdd867f4-lg5pt    1/1     Running   0          4m14s
istio-ingressgateway-77968dbd74-8m45c   1/1     Running   0          4m14s
istiod-699b647f8b-xrn8b                 1/1     Running   0          5m18s

# 查看安装了什么
[root@lonely ~/istio-1.13.2]# istioctl version
client version: 1.13.2
control plane version: 1.13.2
data plane version: 1.13.2 (2 proxies)


# 卸载
istioctl manifest generate --set profile=demo | kubectl delete -f -
(四). 实践

涉及陌生的 Resource, 后面会详细介绍,先部署起来
kubectl label namespace default istio-injection=enabled
kubectl apply -f samples/bookinfo/platform/kube/bookinfo.yaml
[[email protected] ~/istio-1.13.0]# kubectl get po
NAME READY STATUS RESTARTS AGE
details-v1-79f774bdb9-5dm4z 2/2 Running 0 5m20s
productpage-v1-6b746f74dc-4jb9k 2/2 Running 0 5m18s
ratings-v1-b6994bb9-hncrp 2/2 Running 0 5m20s
reviews-v1-545db77b95-49rp7 2/2 Running 0 5m19s
reviews-v2-7bf8c9648f-ppllc 2/2 Running 0 5m19s
reviews-v3-84779c7bbc-pt268 2/2 Running 0 5m19s
# 等待全部pod启动成功之后在进行下一步
# 检查返回的页面标题来验证应用是否已在集群中运行,并已提供网页服务:
[[email protected] ~/istio-1.13.0]# kubectl exec "$(kubectl get pod -l app=ratings -o jsonpath='{.items[0].metadata.name}')" -c ratings -- curl -sS productpage:9080/productpage | grep -o ".* "
<title>Simple Bookstore App</title>
kubectl apply -f samples/bookinfo/networking/bookinfo-gateway.yaml
# 确保配置文件没有问题
[[email protected] ~/istio-1.13.0]# istioctl analyze
✔ No validation issues found when analyzing namespace: default.
kubectl get svc istio-ingressgateway -n istio-system
NAME TYPE CLUSTER-IP EXTERNAL-IP PORT(S) AGE
istio-ingressgateway LoadBalancer 10.108.24.124 <pending> 15021:31879/TCP,80:30862/TCP,443:32166/TCP,31400:30364/TCP,15443:32477/TCP 29m
# 由于环境中没有外部负载均衡器,我们就选择一个节点端口来代替。
# 设置入站的端口
export INGRESS_PORT=$(kubectl -n istio-system get service istio-ingressgateway -o jsonpath='{.spec.ports[?(@.name=="http2")].nodePort}')
export SECURE_INGRESS_PORT=$(kubectl -n istio-system get service istio-ingressgateway -o jsonpath='{.spec.ports[?(@.name=="https")].nodePort}')
export INGRESS_HOST=172.164.100.45 # worker节点的IP
# 您需要创建防火墙规则,以允许 TCP 流量发送到 ingressgateway 服务地端口。 运行下面的命令,以允许 HTTP 端口或 HTTPS 端口的流量,或两者的流量都允许。
export INGRESS_HOST=$(kubectl get po -l istio=ingressgateway -n istio-system -o jsonpath='{.items[0].status.hostIP}')
# 设置环境变量 GATEWAY_URL
export GATEWAY_URL=$INGRESS_HOST:$INGRESS_PORT
# 确保 IP 地址和端口均成功地赋值给了环境变量
[[email protected] /opt]# echo "$GATEWAY_URL"
172.164.100.45:31111
# 获取 Bookinfo 应用的外部访问地址,浏览器访问确认 Bookinfo 应用的产品页面是否可以打开
[[email protected] /opt]# echo "http://$GATEWAY_URL/productpage"
http://172.164.100.45:31111/productpage

1. Istio crd
| CRD | 说明 |
|---|---|
| Gateway | 网关配置 |
| VirtualServices | http、tcp、tls的路由、故障注入 |
| DestinationRules | 目标规则、负债均衡、熔断、subset、基于地域负债均衡、tls等 |
| Sidecar | 减少ingress、egress配置 |
| authorizationpolicies | 权限 |
| peerauthentications | 配置双向tls |
| requestauthentications | 配置jwt认证 |
| workloadentries | |
| workloadgroups | |
| serviceentries | 服务条目 |
| proxyconfigs | 代理的配置、并发和环境变量 |
| wasmplugins | |
| envoyfilters | 直接配置Envoy的配置规则,下发到Envoy并直接生效 |
| istiooperators | 用于安装的 |
| telemetries | 标签、测试等 |
kubectl get crd |grep istio
四. Kiali
官网
Kiali 和 Istio 对应版本
- Kiali 为 Service Mesh 提供了一个观测的可视化平台
# 进入之前下载的Istio目录
cd /root/istio-1.13.2/samples/addons

[root@lonely ~/istio-1.13.2/samples/addons]# ll
total 280
drwxr-xr-x 2 root root    113 Mar  9  2022 extras
-rw-r--r-- 1 root root 245578 Mar  9  2022 grafana.yaml
-rw-r--r-- 1 root root   2533 Mar  9  2022 jaeger.yaml
-rw-r--r-- 1 root root  11826 Mar  9  2022 kiali.yaml
-rw-r--r-- 1 root root  14114 Mar  9  2022 prometheus.yaml
-rw-r--r-- 1 root root   5194 Mar  9  2022 README.md

# 部署
kubectl apply -f kiali.yaml
kubectl patch svc kiali -n istio-system -p '{"spec": {"type": "NodePort"}}'


[root@lonely ~/istio-1.13.2/samples/addons]# kubectl  -n istio-system  get svc |grep kiali
kiali                  NodePort       10.105.26.47     <none>        20001:32617/TCP,9090:30673/TCP

# 浏览器 http://172.164.100.44:32617/
# 浏览器登录发现报错:
Could not fetch metrics: error in metric request_count: Post "http://prometheus.istio-system:9090/api/v1/query_range": dial tcp: lookup prometheus.istio-system on 10.96.0.10:53: no such host

# 解决,只部署 Prometheus 就可以
kubectl apply -f prometheus.yaml
kubectl apply -f grafana.yaml
kubectl apply -f jaeger.yaml
kubectl apply -f extras/zipkin.yaml