Android学习之路(22) 从模块化到组件化
从模块化到组件化
一、从模块化到组件化
Android 应用项目 , 都存在一个应用模块 ( Application Module ) , 在 build.gradle 构建脚本中 , 第一个插件配置 com.android.application , 表明 该 Module 编译打包后的输出是 APK 安装包 ; 该项目可以直接运行 ;
plugins {
    id 'com.android.application'
    id 'kotlin-android'
}
如果在 build.gradle 配置的是 com.android.library 插件 , 那么 编译 Module 打包后输出的是 aar 依赖库 ; 该项目不能直接运行 ;
plugins {
    id 'com.android.library'
    id 'kotlin-android'
}
模块化 :
随着应用业务增加 , 功能变得越来越复杂 , 不能将所有的功能放在一个 Application 模块中 ; 大型项目的开发不能只有一个 Module , 大多数情况下 , Android 工程中 , 除了有一个 Application 模块外 , 还有若干 Library 模块提供给应用模块引用 ; 应用中还可能存在一个基础的 SDK 依赖库 , 提供给 Library 模块引用 , Application 再引用这些 Library 模块 ;
模块化的缺点 :
Library 模块中实现了一个功能 , 如果要运行的话 , 需要借助 Application 模块 , 这就需要将整个项目全部编译一遍 , 如果项目有几百个模块 , 调试运行就很困难 ;
单个开发者可能只负责几个模块 , 还涉及了与其它模块开发人者进行协作 ;
组件化 :
组件化是在模块化的基础上 , 可以 动态切换其模块类型 , 将 Library 模块切换成 Application 模块 , 这样独立的模块可以直接运行 ; 在进行 组件模式 开发时 , 将其变成 Application 模块 , 在 集成模式 开发时 , 将其变成 Library 模块 ; 组件开发时 , 单个 Library 模块变成 Application 模块 , 可以生成独立运行的 APK 安装包 ;
二、build.gradle 构建脚本分析
组件化实现需要依赖 Gradle ;
build.gradle 脚本都是使用 Groovy 语言编写的代码 , Groovy 也是 JVM 上语言 , 与 Java 语言完全兼容 , 其调用的 api 都是 Java 语言的 ; Android Studio 中的 Android 工程 , 在 Project 层级下有一个 build.gradle 构建脚本 , 在 Application 模块 和 Library 模块 中 , 也都各自存在一个 Module 级别的 build.gradle 构建脚本 ;
Project 下的 build.gradle 编译时会被翻译成 Project.java 类对象 , 该类路径是 gradle-6.5\src\core-api\org\gradle\api\Project.java ;
// Top-level build file where you can add configuration options common to all sub-projects/modules.
buildscript {
    ext.kotlin_version = "1.4.31"
    repositories {
        google()
        jcenter()
    }
    dependencies {
        classpath "com.android.tools.build:gradle:4.1.2"
        classpath "org.jetbrains.kotlin:kotlin-gradle-plugin:$kotlin_version"

        // NOTE: Do not place your application dependencies here; they belong
        // in the individual module build.gradle files
    }
}

allprojects {
    repositories {
        google()
        jcenter()
    }
}

task clean(type: Delete) {
    delete rootProject.buildDir
}
其中的 buildscript , allprojects 等都是 Project.java 中的函数 ;
@HasInternalProtocol
public interface Project extends Comparable, ExtensionAware, PluginAware {

    /**
     * Configures the build script classpath for this project.
     *
     * The given closure is executed against this project's {@link ScriptHandler}. The {@link ScriptHandler} is
     * passed to the closure as the closure's delegate.
     *
     * @param configureClosure the closure to use to configure the build script classpath.
     */
    void buildscript(Closure configureClosure);

    /**
     * Configures this project and each of its sub-projects.
     *
     * This method executes the given closure against this project and its sub-projects. The target {@link Project}
     * is passed to the closure as the closure's delegate.
     *
     * @param configureClosure The closure to execute.
     */
    void allprojects(Closure configureClosure);
}
使用 Gradle 实现组件化 ( Gradle 变量定义与使用 )
一、顶层 Gradle 定义扩展变量
在 Project 层级的 build.gradle 中 , 使用 apply from: “component.gradle” , 引入 component.gradle 配置 ;
// 将 component.gradle 配置文件中的内容导入到该位置
// 相当于引入头文件
apply from: "component.gradle"
apply from 相当于引入头文件 , 将 component.gradle 配置文件中的所有内容 , 原封不动的拷贝到该语句所在位置 ;
component.gradle 是开发者自定义的一个配置文件 , 是使用 Groovy 语言编写的 ;
ext 是 extension 扩展 , 通过 ext 可以定义扩展的变量 ;
component.gradle 文件内容如下 : 全局使用的变量定义在这里 ;
// ext 是 extension 扩展的含义
// ext 后的 {} 花括号 , 是闭包 ,
ext{
    // 定义 android 变量 , 类型是字典 Map 集合
    // 其中定义了若干键值对集合
    androidConfig = [
            compileSdkVersion : 30,
            minSdkVersion : 18,
            targetSdkVersion : 30,
            versionCode : 1,
            versionName : "1.0"
    ]

    applicationId = [
            "app" : "kim.hsl.component",
            "mylibrary" : "",
            "mylibrary2" : "",
    ]
}
在 Project 层级的 build.gradle 中定义的变量 , 可以在 Module 级的 build.gradle 中使用 ;
如 : 在上述 Project 层级的 build.gradle 中引入了 component.gradle 配置 , 那么在 Module 级别的 build.gradle 中可以通过 rootProject.ext.android 的方式调用在 component.gradle 定义的 android 变量 ;
在顶层构建脚本中定义的变量 , 在任何 Module 中的构建脚本都都可以获取该变量 ;
二、获取顶层的 Gradle 对象
在 build.gradle 中调用 rootProject , 相当于调用 Project 对象的 getRootProject() 方法 , 这是 Groovy 提供的语法糖 , 类似于 Kotlin 用法 ; 该方法返回一个 Project 对象 , 该对象代表根目录下的 Project 层级的 build.gradle 构建脚本对应的 Project 对象 ;
rootProject 相当于顶层的 Project 级别的 build.gradle ;
Project 对应 getRootProject 方法源码 :
public interface Project extends Comparable, ExtensionAware, PluginAware {
    String DEFAULT_BUILD_FILE = "build.gradle";
    String PATH_SEPARATOR = ":";
    String DEFAULT_BUILD_DIR_NAME = "build";
    String GRADLE_PROPERTIES = "gradle.properties";

    Project getRootProject();
}
三、Module 中使用 Gradle 变量
上面在顶层的 build.gradle 中定义了扩展变量 , 可以在 Module 下的 build.gradle 中获取 ;
使用 rootProject.ext.androidConfig 代码 , 可以获取在顶层 component.gradle 中定义的 androidConfig 变量 ;
// 定义 android 变量 , 类型是字典 Map 集合
// 其中定义了若干键值对集合
androidConfig = [
        compileSdkVersion : 30,
        minSdkVersion : 18,
        targetSdkVersion : 30,
        versionCode : 1,
        versionName : "1.0"
]
将 rootProject.ext.androidConfig 变量赋值给本地的 def androidConfig 变量 , def 相当于 Java 中的 Object , def androidConfig 是声明了一个新变量 , 名称是 androidConfig ;
// def 相当于 Java 中的 Object
// 声明 config 和 appId 变量 , 并为其赋值
def androidConfig = rootProject.ext.androidConfig
def appId = rootProject.ext.applicationId
通过调用 androidConfig.compileSdkVersion , 可以获取 component.gradle 中定义的 androidConfig 变量中对应的 compileSdkVersion 键对应的值 30 ;
通过调用 androidConfig.minSdkVersion , 可以获取 component.gradle 中定义的 androidConfig 变量对应的 minSdkVersion 键对应的值 18 ;
部分代码示例 :
// def 相当于 Java 中的 Object
// 声明 config 和 appId 变量 , 并为其赋值
def androidConfig = rootProject.ext.androidConfig
def appId = rootProject.ext.applicationId

android {
    compileSdkVersion androidConfig.compileSdkVersion
    buildToolsVersion "30.0.3"

    defaultConfig {
        applicationId appId["app"]
        minSdkVersion androidConfig.minSdkVersion
        targetSdkVersion androidConfig.targetSdkVersion
        versionCode androidConfig.versionCode
        versionName androidConfig.versionName

        testInstrumentationRunner "androidx.test.runner.AndroidJUnitRunner"
    }
}
这样做的好处是 , 可以统一管理 Android 应用的配置版本 , 不用每个 Module 都进行独立修改 ;
四、Gradle 中打印变量值
在 build.gradle 中打印输出变量值 , 在 Module 下的 build.gradle 中使用 println 函数 打印变量 , 变量放在 “${}” 中 , 打印结果在 编译时输出到 Build 面板中 ;
println("Print Variable : rootProject.ext.android : ${rootProject.ext.android}")
注意 : 不要打印中文 , 会出现乱码 ;
五、涉及到的 Gradle 构建脚本
顶层 Gradle 代码示例 :
// Top-level build file where you can add configuration options common to all sub-projects/modules.

// 将 component.gradle 配置文件中的内容导入到该位置
// 相当于引入头文件
apply from: "component.gradle"

buildscript {
    ext.kotlin_version = "1.4.10"
    repositories {
        google()
        jcenter()
    }
    dependencies {
        classpath "com.android.tools.build:gradle:4.1.0"
        classpath "org.jetbrains.kotlin:kotlin-gradle-plugin:$kotlin_version"

        // NOTE: Do not place your application dependencies here; they belong
        // in the individual module build.gradle files
    }
}

allprojects {
    repositories {
        google()
        jcenter()
    }
}

task clean(type: Delete) {
    delete rootProject.buildDir
}
引入的 Gradle 代码 :
// ext 是 extension 扩展的含义
// ext 后的 {} 花括号 , 是闭包 ,
ext{
    // 定义 android 变量 , 类型是字典 Map 集合
    // 其中定义了若干键值对集合
    androidConfig = [
            compileSdkVersion : 30,
            minSdkVersion : 18,
            targetSdkVersion : 30,
            versionCode : 1,
            versionName : "1.0"
    ]

    applicationId = [
            "app" : "kim.hsl.component",
            "mylibrary" : "",
            "mylibrary2" : "",
    ]
}
Module 层级的 Gradle 代码示例 : Component\app\build.gradle 构建脚本 ;
plugins {
    id 'com.android.application'
    id 'kotlin-android'
}

println("Print Variable : rootProject.ext.androidConfig : ${rootProject.ext.androidConfig}")

// def 相当于 Java 中的 Object
// 声明 config 和 appId 变量 , 并为其赋值
def androidConfig = rootProject.ext.androidConfig
def appId = rootProject.ext.applicationId

android {
    compileSdkVersion androidConfig.compileSdkVersion
    buildToolsVersion "30.0.3"

    defaultConfig {
        applicationId appId["app"]
        minSdkVersion androidConfig.minSdkVersion
        targetSdkVersion androidConfig.targetSdkVersion
        versionCode androidConfig.versionCode
        versionName androidConfig.versionName

        testInstrumentationRunner "androidx.test.runner.AndroidJUnitRunner"
    }

    buildTypes {
        release {
            minifyEnabled false
            proguardFiles getDefaultProguardFile('proguard-android-optimize.txt'), 'proguard-rules.pro'
        }
    }
    compileOptions {
        sourceCompatibility JavaVersion.VERSION_1_8
        targetCompatibility JavaVersion.VERSION_1_8
    }
    kotlinOptions {
        jvmTarget = '1.8'
    }
}

dependencies {

    implementation "org.jetbrains.kotlin:kotlin-stdlib:$kotlin_version"
    implementation 'androidx.core:core-ktx:1.3.2'
    implementation 'androidx.appcompat:appcompat:1.2.0'
    implementation 'com.google.android.material:material:1.3.0'
    implementation 'androidx.constraintlayout:constraintlayout:2.0.4'
    testImplementation 'junit:junit:4.+'
    androidTestImplementation 'androidx.test.ext:junit:1.1.2'
    androidTestImplementation 'androidx.test.espresso:espresso-core:3.3.0'
}
使用Gradle实现组件化(组件模式与集成模式切换)
一、模块化与组件化模式控制
在顶层 build.gradle 定义扩展变量 , 用于标识当前是 模块化模式 还是 组件化模式 , 模块化模式就是默认的模式 ;
// ext 是 extension 扩展的含义
// ext 后的 {} 花括号 , 是闭包 ,
ext{
    // 是否是模块化模式
    // 集成模式 true ( 默认模式 , 模块化 )
    // 组件模式 false ( 组件化 )
    isModuleMode = false
}
如果将变量定义在 build.gradle 构建脚本中 , 需要使用 ext 扩展变量 , 在 gradle.properties 可以直接定义 ;
在 Application Module 下的 build.gradle 保持不变 :
apply plugin: 'com.android.application'
apply plugin: 'kotlin-android'
在 Library Module 下的 build.gradle 中控制当前 Module 是 Application 模块还是 Library 模块 ;
// 根据 isModuleMode 动态切换 集成模式 / 组件模式
if (isModuleMode){
    // 集成模式
    apply plugin: 'com.android.library'
}else{
    // 组件模式
    apply plugin: 'com.android.application'
}
apply plugin: 'kotlin-android'
二、applicationId 设置
Application 模块在 " android/defaultConfig " 层级下 , 必须有 applicationId ;
Library 模块不需要配置 applicationId ;
这里需要进行分别处理 , 如果是 Library 模块 , 在 组件模式 下 , 必须配置 " android / defaultConfig / applicationId " 选项 ; 但是在 集成模式 下 , 必须不能配置 " android / defaultConfig / applicationId " 选项 ;
主要配置如下 : 在 集成模式 下 , 不配置 applicationId ; 在 组件模式 下 , 才配置 applicationId 选项 ;
android {
    defaultConfig {
        if (!isModuleMode){
            // 组件模式 : 必须配置 applicationId
            applicationId appId["library1"]
        }
    }
}
注意 : 在 Application Module 下不进行上述配置 , 只有在 Library Module 下才进行上述配置 ;
三、使用 sourceSets 配置组件模式下使用的清单文件
使用 sourceSets 资源配置选项 , 可以配置 java , manifest , res , assets , 等目录 ;
Android Studio 中
- 默认的 Java 代码的路径是 Component\app\src\main\java
- 默认的清单文件路径是 Component\app\src\main\AndroidManifest.xml
- 默认的资源路径是 Component\app\src\main\res
- 默认的 Assets 资源路径是 Component\app\src\main\assets
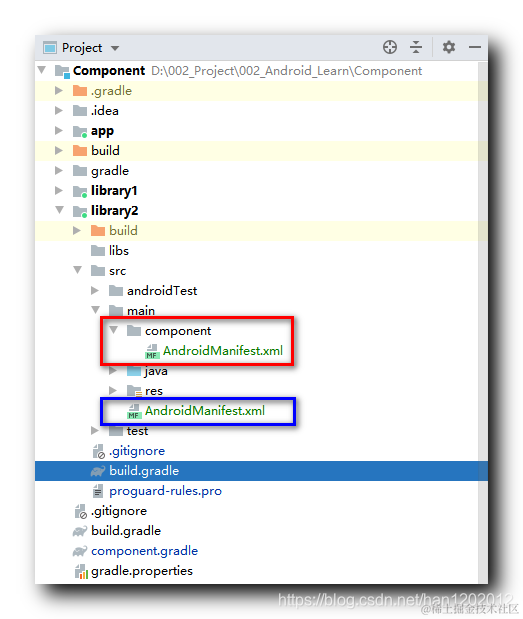
在 Library Module 中 , 一般不会配置 Launcher Activity , 因此在 组件模式 下 , 需要指定一个新的 AndroidManifest.xml 清单文件 ;这里在 main 目录下创建 component 目录 , 组件化 相关文件 , 都放在该目录中 ;下图中 , 蓝色矩形框中是默认的清单文件 , 在 集成模式 下的 Library Module 中使用 ; 红色矩形框中是 组件模式 下使用的清单文件 , 在 Application Module 中使用 ;
配置 清单文件 示例 :
android {
    compileSdkVersion androidConfig.compileSdkVersion
    buildToolsVersion "30.0.3"

    defaultConfig {
        if (!isModuleMode){
            // 组件模式 : 必须配置 applicationId
            applicationId appId["library2"]
        }

        // 资源配置
        sourceSets{
            main{
                if (!isModuleMode){
                    // 组件化模式下使用 ComponentAndroidManifest.xml 作为清单文件
                    manifest.srcFile 'src/main/component/AndroidManifest.xml'
                }
            }
        }

    }
}
四、组件模式 与 集成模式 切换示例
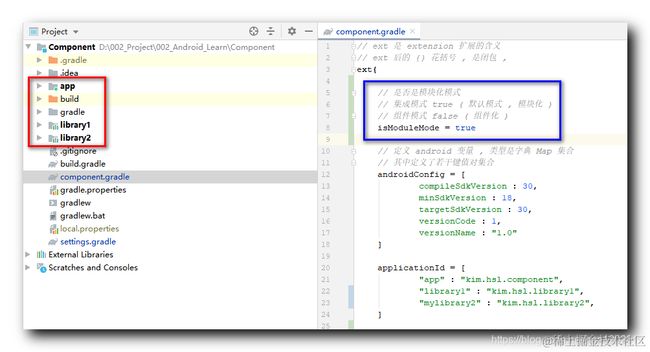
将 component.gradle 中的 isModuleMode 变量设置为 true , 当前的模式就是默认的模块化模式 ;
编译后效果如下 : 1个 Application 应用 , 2个 Library 应用 ;
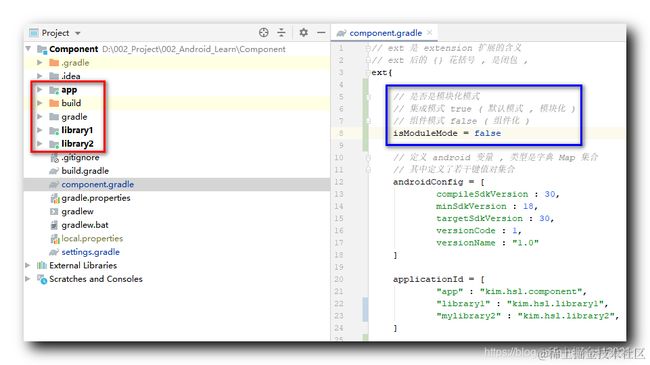
将 component.gradle 中的 isModuleMode 变量设置为 false , 当前的模式就是 组件模式 ;
编译后效果如下 : 3 个 Application 应用 ;
五、完整的 Gradle 配置
1、Project 层级的 build.gradle
// Top-level build file where you can add configuration options common to all sub-projects/modules.

// 将 component.gradle 配置文件中的内容导入到该位置
// 相当于引入头文件
apply from: "component.gradle"

buildscript {
    ext.kotlin_version = "1.4.10"
    repositories {
        google()
        jcenter()
    }
    dependencies {
        classpath "com.android.tools.build:gradle:4.1.0"
        classpath "org.jetbrains.kotlin:kotlin-gradle-plugin:$kotlin_version"

        // NOTE: Do not place your application dependencies here; they belong
        // in the individual module build.gradle files
    }
}

allprojects {
    repositories {
        google()
        jcenter()
    }
}

task clean(type: Delete) {
    delete rootProject.buildDir
}
2、Project 层级的扩展变量定义
// ext 是 extension 扩展的含义
// ext 后的 {} 花括号 , 是闭包 ,
ext{

    // 是否是模块化模式
    // 集成模式 true ( 默认模式 , 模块化 )
    // 组件模式 false ( 组件化 )
    isModuleMode = false

    // 定义 android 变量 , 类型是字典 Map 集合
    // 其中定义了若干键值对集合
    androidConfig = [
            compileSdkVersion : 30,
            minSdkVersion : 18,
            targetSdkVersion : 30,
            versionCode : 1,
            versionName : "1.0"
    ]

    applicationId = [
            "app" : "kim.hsl.component",
            "library1" : "kim.hsl.library1",
            "mylibrary2" : "kim.hsl.library2",
    ]

    // androidx 版本号
    androidxVersion = "1.2.0"

    // 统一管理依赖库
    dependencies = [
            // ${} 表示引用之前定义的变量
            "appcompat" : "androidx.appcompat:appcompat:${androidxVersion}"
    ]
}
3、主应用的 build.gradle
apply plugin: 'com.android.application'
apply plugin: 'kotlin-android'


println("Print Variable : rootProject.ext.androidConfig : ${rootProject.ext.androidConfig}")

// def 相当于 Java 中的 Object
// 声明 config 和 appId 变量 , 并为其赋值
def androidConfig = rootProject.ext.androidConfig
def appId = rootProject.ext.applicationId

android {
    compileSdkVersion androidConfig.compileSdkVersion
    buildToolsVersion "30.0.3"

    defaultConfig {
        applicationId appId["app"]
        minSdkVersion androidConfig.minSdkVersion
        targetSdkVersion androidConfig.targetSdkVersion
        versionCode androidConfig.versionCode
        versionName androidConfig.versionName

        testInstrumentationRunner "androidx.test.runner.AndroidJUnitRunner"
    }

    buildTypes {
        release {
            minifyEnabled false
            proguardFiles getDefaultProguardFile('proguard-android-optimize.txt'), 'proguard-rules.pro'
        }
    }
    compileOptions {
        sourceCompatibility JavaVersion.VERSION_1_8
        targetCompatibility JavaVersion.VERSION_1_8
    }
    kotlinOptions {
        jvmTarget = '1.8'
    }
}

dependencies {

    implementation "org.jetbrains.kotlin:kotlin-stdlib:$kotlin_version"
    implementation 'androidx.core:core-ktx:1.3.2'
    implementation 'androidx.appcompat:appcompat:1.2.0'
    implementation 'com.google.android.material:material:1.3.0'
    implementation 'androidx.constraintlayout:constraintlayout:2.0.4'
    testImplementation 'junit:junit:4.+'
    androidTestImplementation 'androidx.test.ext:junit:1.1.2'
    androidTestImplementation 'androidx.test.espresso:espresso-core:3.3.0'

    if (isModuleMode){
        // 集成模式下才能引用这两个 Library Module
        implementation project(':library1')
        implementation project(':library2')
    }
}
4、Library 模块的 build.gradle
// 根据 isModuleMode 动态切换 集成模式 / 组件模式
if (isModuleMode){
    // 集成模式
    apply plugin: 'com.android.library'
}else{
    // 组件模式
    apply plugin: 'com.android.application'
}
apply plugin: 'kotlin-android'


println("Print Variable : rootProject.ext.androidConfig : ${rootProject.ext.androidConfig}")

// def 相当于 Java 中的 Object
// 声明 config 和 appId 变量 , 并为其赋值
def androidConfig = rootProject.ext.androidConfig
def appId = rootProject.ext.applicationId

android {
    compileSdkVersion androidConfig.compileSdkVersion
    buildToolsVersion "30.0.3"

    defaultConfig {
        if (!isModuleMode){
            // 组件模式 : 必须配置 applicationId
            applicationId appId["library1"]
        }

        minSdkVersion androidConfig.minSdkVersion
        targetSdkVersion androidConfig.targetSdkVersion
        versionCode androidConfig.versionCode
        versionName androidConfig.versionName

        testInstrumentationRunner "androidx.test.runner.AndroidJUnitRunner"

        // 资源配置
        sourceSets{
            main{
                if (!isModuleMode){
                    // 组件化模式下使用 ComponentAndroidManifest.xml 作为清单文件
                    manifest.srcFile 'src/main/component/AndroidManifest.xml'
                }
            }
        }
    }

    buildTypes {
        release {
            minifyEnabled false
            proguardFiles getDefaultProguardFile('proguard-android-optimize.txt'), 'proguard-rules.pro'
        }
    }
    compileOptions {
        sourceCompatibility JavaVersion.VERSION_1_8
        targetCompatibility JavaVersion.VERSION_1_8
    }
    kotlinOptions {
        jvmTarget = '1.8'
    }
}

dependencies {

    implementation "org.jetbrains.kotlin:kotlin-stdlib:$kotlin_version"
    implementation 'androidx.core:core-ktx:1.3.2'
    implementation 'androidx.appcompat:appcompat:1.2.0'
    implementation 'com.google.android.material:material:1.3.0'
    implementation 'androidx.constraintlayout:constraintlayout:2.0.4'
    testImplementation 'junit:junit:4.+'
    androidTestImplementation 'androidx.test.ext:junit:1.1.2'
    androidTestImplementation 'androidx.test.espresso:espresso-core:3.3.0'
}