【iOS】UICollectionView基本使用
文章目录
- 前言
- 九宫格类布局
- 使用FlowLayout实现瀑布流
前言
UICollectionView和UICollectionViewController类是iOS6 新引进的API,用于展示集合视图,布局更加灵活,可实现多列布局,用法类似于UITableView和UITableViewController类。- 使用
UICollectionView必须实现UICollectionViewDataSource,UICollectionViewDelegate,UICollectionViewDelegateFlowLayout这三个协议。
UICollectionView是比UITableView更加强大的一个UI控件,有如下几个方面:
- 支持水平和垂直两种方向的布局
- 通过
layout配置方式进行布局 - 类似于
TableView中的cell特性外,CollectionView中的item大小和位置可以自由定义 - 通过
layout布局回调的代理方法,可以动态的定制每个item的大小和collection的大体布局属性 - 更加强大一点,完全自定义一套
layout布局方案,可以实现意想不到的效果
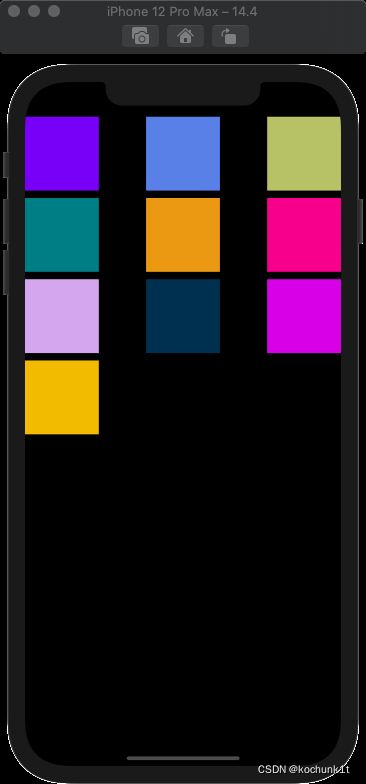
九宫格类布局
- 可以先制作一个最简单的九宫格动画
- (void)viewDidLoad {
    [super viewDidLoad];
    self.view.backgroundColor = [UIColor whiteColor];

    //创建一个layout布局类
    UICollectionViewFlowLayout * layout = [[UICollectionViewFlowLayout alloc] init];
    //设置布局方向为垂直流布局
    layout.scrollDirection = UICollectionViewScrollDirectionVertical;
    //设置每个item的大小为100*100
    layout.itemSize = CGSizeMake(100, 100);
    //创建collectionView 通过一个布局策略layout来创建
    UICollectionView * collect = [[UICollectionView alloc]initWithFrame:self.view.frame collectionViewLayout:layout];
    //代理设置
    collect.delegate = self;
    collect.dataSource = self;
    //注册item类型 这里使用系统的类型
    [collect registerClass:[UICollectionViewCell class] forCellWithReuseIdentifier:@"cellid"];

    [self.view addSubview:collect];
}
这里有一点需要注意,collectionView在完成代理回调前,必须注册一个cell,类似如下:
[collect registerClass:[UICollectionViewCell class] forCellWithReuseIdentifier:@"cellid"];
这和tableView有些类似,又有些不同,因为tableView除了注册cell的方法外,还可以通过临时创建来做:
//tableView在从复用池中取cell的时候,有如下两种方法
//使用这种方式如果复用池中无,是可以返回nil的,我们在临时创建即可
- (nullable __kindof UITableViewCell *)dequeueReusableCellWithIdentifier:(NSString *)identifier;
//6.0后使用如下的方法直接从注册的cell类获取创建,如果没有注册 会崩溃
- (__kindof UITableViewCell *)dequeueReusableCellWithIdentifier:(NSString *)identifier forIndexPath:(NSIndexPath *)indexPath NS_AVAILABLE_IOS(6_0);
- 然后再把协议函数补充完整,也类似于
UITableView,分区个数、每个分区的item个数、返回每个item
//返回分区个数
- (NSInteger)numberOfSectionsInCollectionView:(UICollectionView *)collectionView {
    return 1;
}

//返回每个分区的item个数
- (NSInteger)collectionView:(UICollectionView *)collectionView numberOfItemsInSection:(NSInteger)section {
    return 10;
}

//返回每个item
- (UICollectionViewCell*)collectionView:(UICollectionView *)collectionView cellForItemAtIndexPath:(NSIndexPath *)indexPath {
    UICollectionViewCell* cell = [collectionView dequeueReusableCellWithReuseIdentifier:@"cellid" forIndexPath:indexPath];
    cell.backgroundColor = [UIColor colorWithRed:arc4random()%255/255.0 green:arc4random()%255/255.0 blue:arc4random()%255/255.0 alpha:1];
    return cell;
}
效果如下:
- 同样,如果内容的大小超出一屏,和
tableView类似是可以进行视图滑动的。
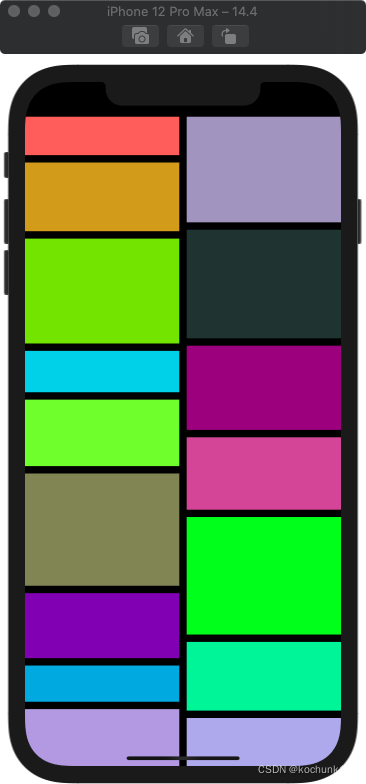
使用FlowLayout实现瀑布流
- 这种布局无疑在app的应用中更加广泛,商品的展示,书架书目的展示,都会倾向于采用这样的布局方式,当然,通过自定义
FlowLayout,我们也很容易实现。
首先,我们新建一个文件继承于UICollectionViewFlowLayout:
@interface MyLayout : UICollectionViewFlowLayout
只添加一个属性,直接让外界将item个数传递进来,我们把重心方法重写布局的方法上:
@interface MyLayout : UICollectionViewFlowLayout
@property (nonatomic, assign) int itemCount;
@end
- 前面说过,
UICollectionViewFlowLayout是一个专门用来管理collectionView布局的类,因此,collectionView在进行UI布局前,会通过这个类的对象获取相关的布局信息,FlowLayout类将这些布局信息全部存放在了一个数组中,数组中是UICollectionViewLayoutAttributes类,这个类是对item布局的具体设置,以后咱们在讨论这个类。 - 总之,
FlowLayout类将每个item的位置等布局信息放在一个数组中,在collectionView布局时,会调用FlowLayout类layoutAttributesForElementsInRect:方法来获取这个布局配置数组。因此,我们需要重写这个方法,返回我们自定义的配置数组,另外,FlowLayout类在进行布局之前,会调用prepareLayout方法,所以我们可以重写这个方法,在里面对我们的自定义配置数据进行一些设置。
简单来说,自定义一个FlowLayout布局类就是两个步骤:
- 设计好我们的布局配置数据
prepareLayout方法中 - 返回我们的配置数组
layoutAttributesForElementsInRect方法中
@implementation MyLayout {
    //这个数组就是我们自定义的布局配置数组
    NSMutableArray * _attributeAttay;
}
//数组的相关设置在这个方法中
//布局前的准备会调用这个方法
- (void)prepareLayout {
    _attributeAttay = [[NSMutableArray alloc] init];
    [super prepareLayout];
    //演示方便 我们设置为静态的2列
    //计算每一个item的宽度
    float WIDTH = ([UIScreen mainScreen].bounds.size.width-self.sectionInset.left-self.sectionInset.right-self.minimumInteritemSpacing)/2;
    //定义数组保存每一列的高度
    //这个数组的主要作用是保存每一列的总高度,这样在布局时,我们可以始终将下一个Item放在最短的列下面
    CGFloat colHight[2] = { self.sectionInset.top,self.sectionInset.bottom };
    //itemCount是外界传进来的item的个数 遍历来设置每一个item的布局
    for (int i=0; i < _itemCount; i++) {
        //设置每个item的位置等相关属性
        NSIndexPath *index = [NSIndexPath indexPathForItem:i inSection:0];
        //创建一个布局属性类,通过indexPath来创建
        UICollectionViewLayoutAttributes * attris = [UICollectionViewLayoutAttributes layoutAttributesForCellWithIndexPath:index];
        //随机一个高度 在40——190之间
        CGFloat hight = arc4random()%150+40;
        //哪一列高度小 则放到那一列下面
        //标记最短的列
        int width = 0;
        if (colHight[0] < colHight[1]) {
            //将新的item高度加入到短的一列
            colHight[0] = colHight[0]+hight+self.minimumLineSpacing;
            width=0;
        } else {
            colHight[1] = colHight[1]+hight+self.minimumLineSpacing;
            width = 1;
        }

        //设置item的位置
        attris.frame = CGRectMake(self.sectionInset.left+(self.minimumInteritemSpacing+WIDTH)*width, colHight[width]-hight-self.minimumLineSpacing, WIDTH, hight);
        [_attributeAttay addObject:attris];
    }

    //设置itemSize来确保滑动范围的正确 这里是通过将所有的item高度平均化,计算出来的(以最高的列位标准)
    if (colHight[0] > colHight[1]) {
        self.itemSize = CGSizeMake(WIDTH, (colHight[0]-self.sectionInset.top)*2/_itemCount-self.minimumLineSpacing);
    } else {
          self.itemSize = CGSizeMake(WIDTH, (colHight[1]-self.sectionInset.top)*2/_itemCount-self.minimumLineSpacing);
    }

}
//这个方法中返回我们的布局数组
- (NSArray <UICollectionViewLayoutAttributes *> *)layoutAttributesForElementsInRect:(CGRect)rect {
    return _attributeAttay;
}


@end
自定义完成FlowLayout后,我们在ViewController中进行使用:
- (void)viewDidLoad {
    [super viewDidLoad];
    // Do any additional setup after loading the view, typically from a nib.
    MyLayout * layout = [[MyLayout alloc]init];
    layout.scrollDirection = UICollectionViewScrollDirectionVertical;
    layout.itemCount = 100;
     UICollectionView * collect  = [[UICollectionView alloc]initWithFrame:self.view.frame collectionViewLayout:layout];
    collect.delegate = self;
    collect.dataSource = self;

    [collect registerClass:[UICollectionViewCell class] forCellWithReuseIdentifier:@"cellid"];

    [self.view addSubview:collect];


}


- (NSInteger)numberOfSectionsInCollectionView:(UICollectionView *)collectionView {
    return 1;
}
- (NSInteger)collectionView:(UICollectionView *)collectionView numberOfItemsInSection:(NSInteger)section {
    return 100;
}
- (UICollectionViewCell *) collectionView:(UICollectionView *)collectionView cellForItemAtIndexPath:(NSIndexPath *)indexPath {
    UICollectionViewCell * cell  = [collectionView dequeueReusableCellWithReuseIdentifier:@"cellid" forIndexPath:indexPath];
    cell.backgroundColor = [UIColor colorWithRed:arc4random()%255/255.0 green:arc4random()%255/255.0 blue:arc4random()%255/255.0 alpha:1];
    return cell;
}
效果如下: