web架构师编辑器内容-拖动元素改变元素的位置和大小的完成
拖动移动元素
改变编辑器的定位系统
我们目前的元素都是按照块级元素直接自上而下的排列在画布中,为了让元素实现精确的定位和调整,我们需要改变这些元素的定位实现。我们需要让这些元素画布区域来进行绝对定位。如果我们有一个元素有这些已经保存的 css 属性,那么它就可以在编辑器,或者是在另外的 H5 端渲染出这样的一个样式。
基本指导思想
交互的最终结果只是修改这些样式而已,比如拖动定位,最终就是在修改 top 和 left 的值而已,那么缩放大小,最终就是在修改 width 和 height 的值而已。
基本分析
1 拖动是在按下鼠标,然后鼠标移动这个过程中发生的。所以首先我们要响应的是鼠标按下按下的时候,也就是 MouseDown 的时候开始运作。
2 在鼠标移动的时候,我们需要将 top,left 的值更新到新的值,这个就是过程的重点。
结合交互图进行分析:可以在线查看,地址为:https://whimsical.com/RTJphPrwzksyotCdA32LQU@VsSo8s35WxESA3XwhpMUni
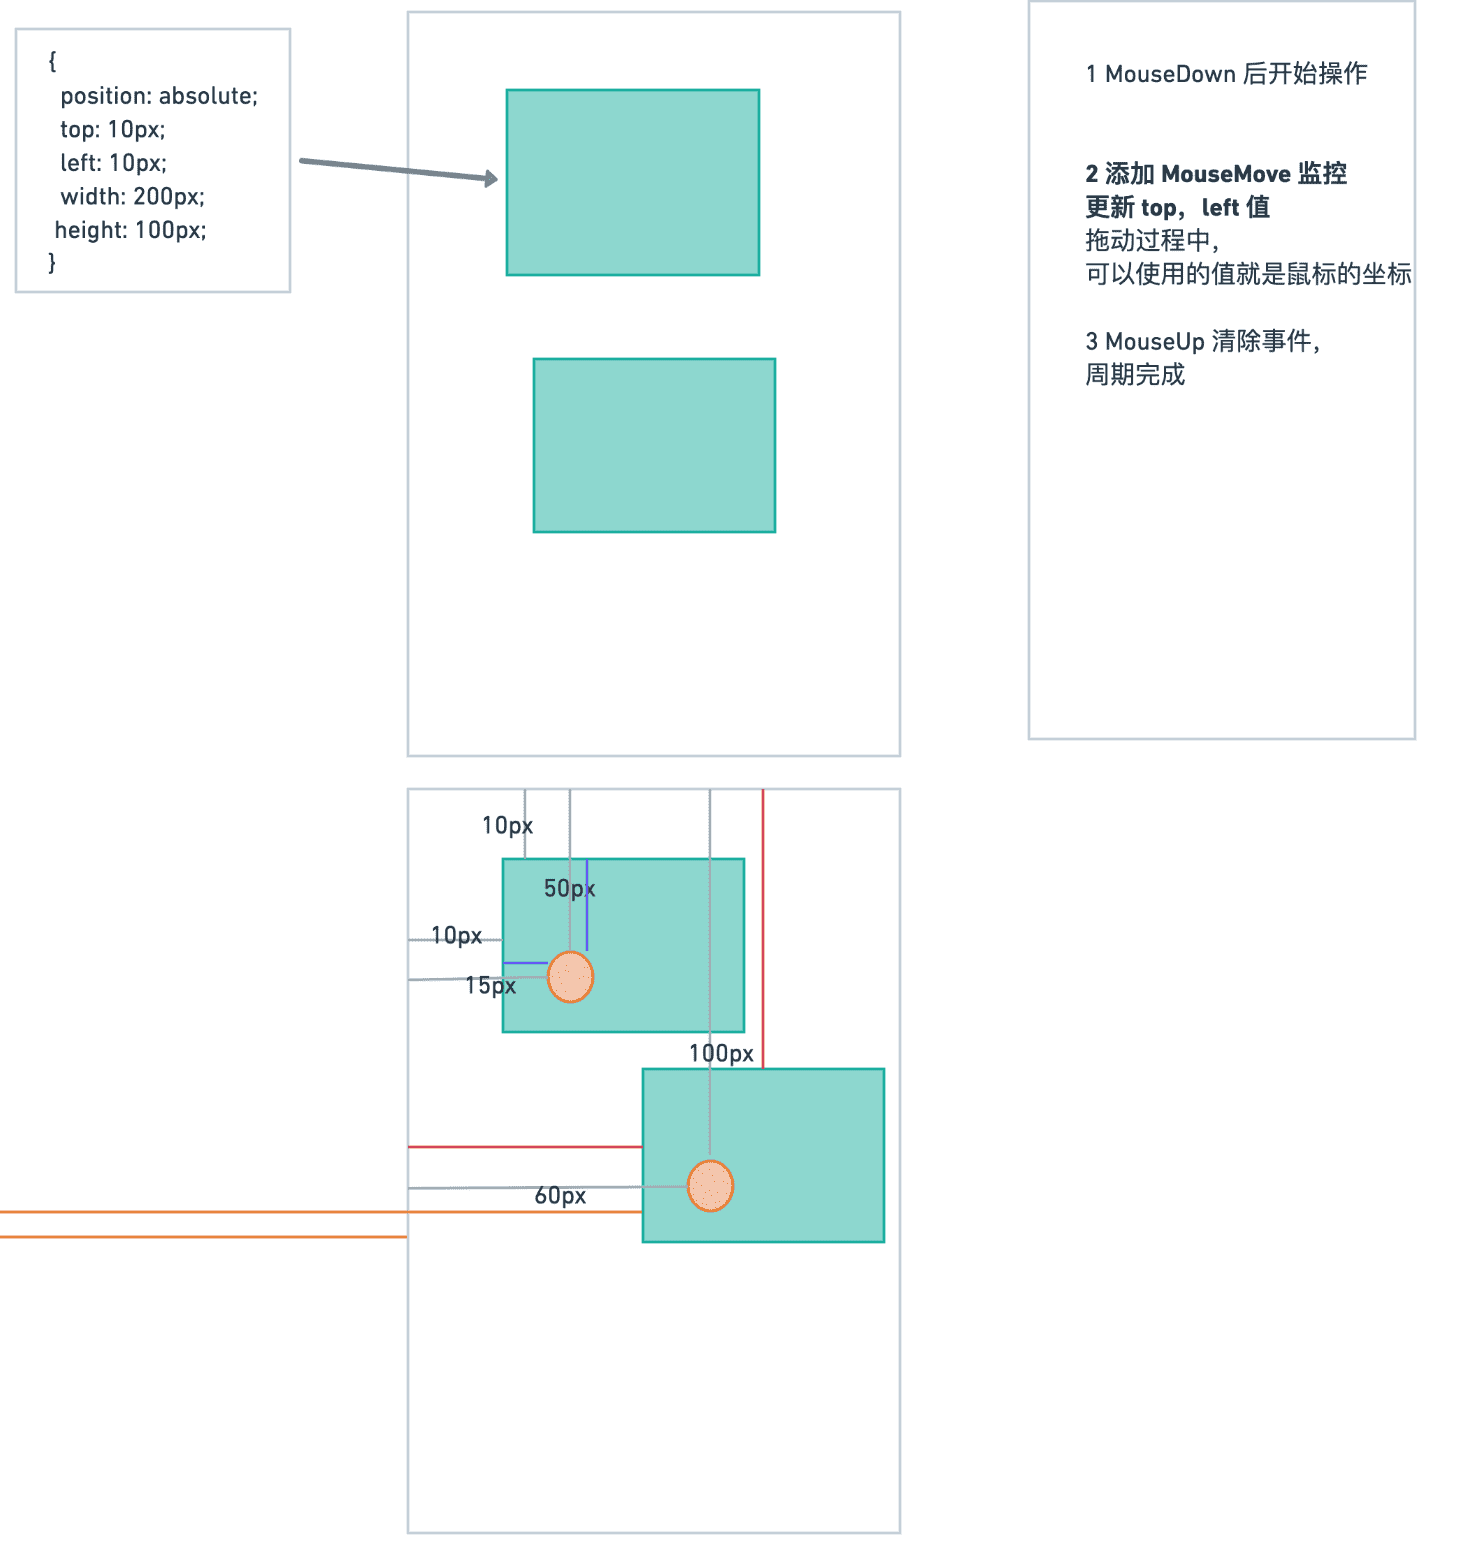
计算鼠标点下去,元素偏移量:
getBoundingClientRect
Element.getBoundingClientRect() 方法返回一个 DOMRect 对象,其提供了元素的大小及其相对于视口的位置。

<template>
  <div class="edit-wrapper"
    ref="editWrapper"
    :style="styles"
    @mousedown="startMove"
    @click="onItemClick(id)" :class="{ active: active, hidden: hidden }">
    <slot></slot>
  </div>
</template>

<script lang="ts">
import { defineComponent, computed, ref } from 'vue'
import { pick } from 'lodash-es'
export default defineComponent({
  props: {
    id: {
      type: String,
      required: true
    },
    active: {
      type: Boolean,
      default: false
    },
    hidden: {
      type: Boolean,
      default: false
    },
    props: {
      type: Object
    }
  },
  emits: ['set-active'],
  setup(props, context) {
    const editWrapper = ref<null | HTMLElement>(null)
    const onItemClick = (id: string) => {
      context.emit('set-active', id)
    }
    const gap = {
      x: 0,
      y: 0
    }
    const styles = computed(() => pick(props.props, ['position', 'top', 'left', 'width', 'height']))
    const startMove = (e: MouseEvent) => {
      const currentElement = editWrapper.value
      if (currentElement) {
        const { left, top } = currentElement.getBoundingClientRect()
        gap.x = e.clientX - left
        gap.y = e.clientY - top
        console.log(gap)
      }
    }
    return {
      onItemClick,
      styles,
      editWrapper,
      startMove
    }
  }
})
</script>

<style>
.edit-wrapper {
  padding: 0px;
  cursor: pointer;
  border: 1px solid transparent;
  user-select: none;
}
.edit-wrapper > * {
  position: static !important;
  width: 100% !important;
  height: 100% !important;
  left: auto !important;
  top: auto !important;
}
.edit-wrapper:hover {
  border: 1px dashed #ccc;
}
.edit-wrapper.hidden {
  display: none;
}
.edit-wrapper.active {
  border: 1px solid #1890ff;
  user-select: none;
  z-index: 1500;
}
</style>
拖动移动实现元素移动:
HTMLElement.offsetTop
HTMLElement.offsetTop 为只读属性,它返回当前元素相对于其 offsetParent 元素的顶部内边距的距离。和getBoundingClientRect有些类似
// EditWrapper.vue
<div
  class="edit-wrapper"
  ref="editWrapper"
  :style="styles"
  :data-component-id="id"
  @mousedown="startMove"
  @click="onItemClick(id)"
  :class="{ active: active, hidden: hidden }"
></div>

// 在移动的过程中,计算top和left的值
const caculateMovePosition = (e: MouseEvent) => {
    // 拿到画布最外层的dom元素(offsetLeft也可以使用Element.getBoundingClientRect())
    // 由于 canvas-area 元素的定位是fixed,所以其offsetParent为null,返回的值和 Element.getBoundingClientRect()是一样的
	const container = document.getElementById('canvas-area') as HTMLElement
	const left = e.clientX - gap.x - container.offsetLeft;
	const top = e.clientY - gap.y - container.offsetTop
	console.log(container.offsetParent);
	console.log(container.offsetLeft, container.getBoundingClientRect().left);
	return {
		left,
		top,
	};
};
const startMove = (e: MouseEvent) => {
	const currentElement = editWrapper.value;
	if (currentElement) {
		const { left, top } = currentElement.getBoundingClientRect();
		gap.x = e.clientX - left;
		gap.y = e.clientY - top;
		console.log(gap);
	}
	const handleMove = (e: MouseEvent) => {
		const { left, top } = caculateMovePosition(e);
		console.log(left, top);
		if (currentElement) {
			currentElement.style.top = top + 'px'
			currentElement.style.left = left + 'px'
		}
	};
	// 鼠标松开的时候,做一些清除的工作
	const handleMouseUp = () => {
		document.removeEventListener('mousemove', handleMove)
	}
	document.addEventListener('mousemove', handleMove);
	document.addEventListener('mouseup', handleMouseUp);
};
这里还是有个问题:松开鼠标的时候,位置恢复到了原来的位置。
原因是我们的数据流是自上而下的,这个坐标值是从上面的属性中props中传递下来的,我们现在是直接在样式中进行修改的,所以当松开鼠标的时候,原来的属性并没有进行修改,就会回到原来的位置。现在需要在松开鼠标的时候,发射一个事件,触发对应的mutation,更新鼠标的坐标值。
拖动移动更新元素属性:
<template>
  <div
    class="edit-wrapper"
    ref="editWrapper"
    :style="styles"
    @mousedown="startMove"
    @click="onItemClick(id)"
    :class="{ active: active, hidden: hidden }"
  >
    <slot></slot>
  </div>
</template>

<script lang="ts">
// EditWrapper.vue
import { defineComponent, computed, ref } from 'vue';
import { pick } from 'lodash-es';
export default defineComponent({
  props: {
    id: {
      type: String,
      required: true,
    },
    active: {
      type: Boolean,
      default: false,
    },
    hidden: {
      type: Boolean,
      default: false,
    },
    props: {
      type: Object,
    },
  },
  emits: ['set-active', 'update-position'],
  setup(props, context) {
    const editWrapper = ref<null | HTMLElement>(null);
    const onItemClick = (id: string) => {
      context.emit('set-active', id);
    };
    const gap = {
      x: 0,
      y: 0,
    };
    const styles = computed(() =>
      pick(props.props, ['position', 'top', 'left', 'width', 'height'])
    );
    const caculateMovePosition = (e: MouseEvent) => {
      const container = document.getElementById('canvas-area') as HTMLElement;
      const left = e.clientX - gap.x - container.offsetLeft;
      const top = e.clientY - gap.y - container.offsetTop;
      return {
        left,
        top,
      };
    };
    // 这里添加这个标识,主要是为了让鼠标只有在移动完成之后才能进行更新,直接在元素上面进行点击,触发一套mouseup,mousedown动作,是不需要更新的。
    let isMoving = false;
    // @mousedown="startMove"
    const startMove = (e: MouseEvent) => {
      const currentElement = editWrapper.value;
      if (currentElement) {
        const { left, top } = currentElement.getBoundingClientRect();
        gap.x = e.clientX - left;
        gap.y = e.clientY - top;
        console.log(gap);
      }
      const handleMove = (e: MouseEvent) => {
        const { left, top } = caculateMovePosition(e);
        isMoving = true;
        console.log(left, top);
        if (currentElement) {
          currentElement.style.top = top + 'px';
          currentElement.style.left = left + 'px';
        }
      };
      const handleMouseUp = (e: MouseEvent) => {
        document.removeEventListener('mousemove', handleMove);
        if (isMoving) {
          const { left, top } = caculateMovePosition(e);
          context.emit('update-position', { left, top, id: props.id });
          isMoving = false;
        }
        // 做清理工作
        nextTick(() => {
  document.removeEventListener('mouseup', handleMouseUp);
});
      };
      document.addEventListener('mousemove', handleMove);
      document.addEventListener('mouseup', handleMouseUp);
    };
    return {
      onItemClick,
      styles,
      editWrapper,
      startMove,
    };
  },
});
</script>

<style>
.edit-wrapper {
  padding: 0px;
  cursor: pointer;
  border: 1px solid transparent;
  user-select: none;
}
.edit-wrapper > * {
  position: static !important;
  width: 100% !important;
  height: 100% !important;
  left: auto !important;
  top: auto !important;
}
.edit-wrapper:hover {
  border: 1px dashed #ccc;
}
.edit-wrapper.hidden {
  display: none;
}
.edit-wrapper.active {
  border: 1px solid #1890ff;
  user-select: none;
  z-index: 1500;
}
</style>
拖动改变大小
根本目的
改变大小最终的目的也是通过一系列的鼠标事件来改变一系列定位的值,上一次我们改变的值只有 top,left,现在还有有 width 和 height。
创建 handler
创建四个点就可以了,分别位于这个图层的四个角上。
创建这四个 handler 应该不是很难,我们只需要创建四个对应的 div,将他们做成圆形,然后让它们使用绝对定位,设置 top,left,right,bottom 值即可,就可以创建出这样的一个样式。
添加事件
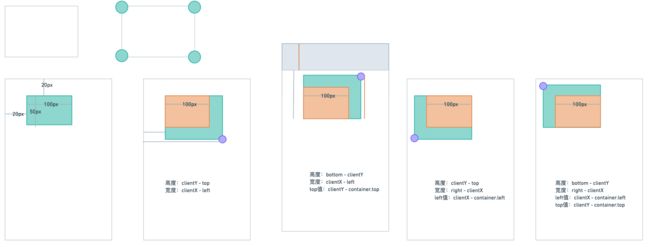
我们分别在四个点,添加 mouseDown,mouseMove,然后到 mouseUp 的一系列事件,完成整个过程。
之前在改变定位的过程中,我们只需要在移动的时候改变 top,left 值即可,现在拖动改变大小要比原来复杂一些,还有 width 和 height 值的修改,同时对于四个角度的拖动,有不同的处理。
请看具体的交互图
拖动改变大小代码实现
- 实现右下方拖拽大小
首先对先择块的样式进行处理,添四个点的css 样式
.edit-wrapper .resizers {
  display: none;
}
.edit-wrapper.active .resizers {
  display: block;
}
.edit-wrapper.active .resizers .resizer {
  width: 10px;
  height: 10px;
  border-radius: 50%;
  background: #fff;
  border: 3px solid #1890ff;
  position: absolute;
}
.edit-wrapper .resizers .resizer.top-left {
  left: -5px;
  top: -5px;
  cursor: nwse-resize;
}
.edit-wrapper .resizers .resizer.top-right {
  right: -5px;
  top: -5px;
  cursor: nesw-resize;
}
.edit-wrapper .resizers .resizer.bottom-left {
  left: -5px;
  bottom: -5px;
  cursor: nesw-resize;
}
.edit-wrapper .resizers .resizer.bottom-right {
  right: -5px;
  bottom: -5px;
  cursor: nwse-resize;
}

- 接下来添加拖动右下脚圆点改区块大小(最简单方法)
// EditWrapper.vue
// 如果不给 resizer添加stop事件,由于冒泡事件机制,所以会冒泡到最外层editWrapper上面,从而触发 startMove事件
<div
  class="edit-wrapper"
  ref="editWrapper"
  :style="styles"
  :data-component-id="id"
  @mousedown="startMove"
  @click="onItemClick(id)"
  :class="{ active: active, hidden: hidden }"
>
  <slot></slot>
  <div class="resizers">
    <div
      class="resizer top-left"
      @mousedown.stop="startResize('top-left')"
    ></div>
    <div
      class="resizer top-right"
      @mousedown.stop="startResize('top-right')"
    ></div>
    <div
      class="resizer bottom-left"
      @mousedown.stop="startResize('bottom-left')"
    ></div>
    <div
      class="resizer bottom-right"
      @mousedown.stop="startResize('bottom-right')
    ></div>
  </div>
</div>
    const startResize = () => {
      const currentElement = editWrapper.value;
      const handleMove = (e: MouseEvent) => {
        if (currentElement) {
          const { left, top } = currentElement.getBoundingClientRect();
          currentElement.style.height = e.clientY - top + 'px';
          currentElement.style.width = e.clientX - left + 'px';
        }
      };
      const handleMouseUp = () => {
        document.removeEventListener('mousemove', handleMove);
      };
      document.addEventListener('mousemove', handleMove);
      document.addEventListener('mouseup', handleMouseUp);
    };
我们已实现右下脚拖动改变
现在就是在其他几个方向重用这个方法进行尺寸改变
type ResizeDirection = 'top-left' | 'top-right' | 'bottom-left' | 'bottom-right'
interface OriginalPositions {
  left: number;
  right: number;
  top: number;
  bottom: number;
}

    const caculateMovePosition = (e: MouseEvent) => {
      const container = document.getElementById('canvas-area') as HTMLElement;
      const left = e.clientX - gap.x - container.offsetLeft;
      const top = e.clientY - gap.y - container.offsetTop;
      return {
        left,
        top,
      };
    };
    const caculateSize = (
      direction: ResizeDirection,
      e: MouseEvent,
      positions: OriginalPositions
    ) => {
      const { clientX, clientY } = e;
      const { left, right, top, bottom } = positions;
      const container = document.getElementById('canvas-area') as HTMLElement;
      const rightWidth = clientX - left;
      const leftWidth = right - clientX;
      const bottomHeight = clientY - top;
      const topHeight = bottom - clientY;
      const topOffset = clientY - container.offsetTop;
      const leftOffset = clientX - container.offsetLeft;
      switch (direction) {
        case 'top-left':
          return {
            width: leftWidth,
            height: topHeight,
            top: topOffset,
            left: leftOffset,
          };
        case 'top-right':
          return {
            width: rightWidth,
            height: topHeight,
            top: topOffset,
          };
        case 'bottom-left':
          return {
            width: leftWidth,
            height: bottomHeight,
            left: leftOffset,
          };
        case 'bottom-right':
          return {
            width: rightWidth,
            height: bottomHeight,
          };
        default:
          break;
      }
    };
    const startResize = (direction: ResizeDirection) => {
      const currentElement = editWrapper.value as HTMLElement;
      const { left, right, top, bottom } =
        currentElement.getBoundingClientRect();
      const handleMove = (e: MouseEvent) => {
        const size = caculateSize(direction, e, { left, right, top, bottom });
        const { style } = currentElement;
        if (size) {
          style.width = size.width + 'px';
          style.height = size.height + 'px';
          if (size.left) {
            style.left = size.left + 'px';
          }
          if (size.top) {
            style.top = size.top + 'px';
          }
        }
      };
      const handleMouseUp = () => {
        document.removeEventListener('mousemove', handleMove);
      };
      document.addEventListener('mousemove', handleMove);
      document.addEventListener('mouseup', handleMouseUp);
    };
- 数据更新
- 将变化数据发射出去:
const handleMouseUp = (e: MouseEvent) => {
    document.removeEventListener('mousemove', handleMove);
    const size = caculateSize(direction, e, { left, right, top, bottom });
    context.emit('update-position', { ...size, id: props.id})
    nextTick(() => {
      document.removeEventListener('mouseup', handleMouseUp)
    })
 };
修改Editor.vue中事件监听
const updatePosition = (data: {
 left: number;
 top: number;
 id: string;
}) => {
 const { id } = data;
 const updatedData = pickBy<number>(data, (v,k) => k !== 'id')
 forEach(updatedData, (v, key) => {
   store.commit('updateComponent', { key, value: v + 'px', id})
 })
};
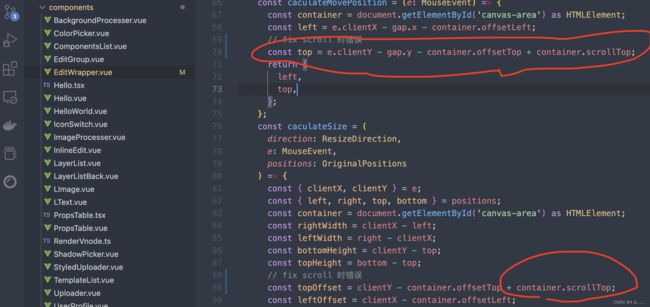
修复有滚动条时的Bug:
在contanier出现滚动条,并且把滚动条滚动到下方,将元素向上拖,元素会出现向上的突然抖动,会造成数据的错误。
最终的效果:
