node.js学习笔记(4)——mongoose连接并操作mongoDB
一、mongoDB
mongoDB是非关系型数据库,存储的单位是文档,可以自定义各种复杂的结构。
mongoDB官网下载链接:(community server)
https://www.mongodb.com/download-center?jmp=nav#community
对于windows系统,可以直接下载msi安装文件一步步安装。安装后可以找到自带的shell应用,然后就可以使用了。

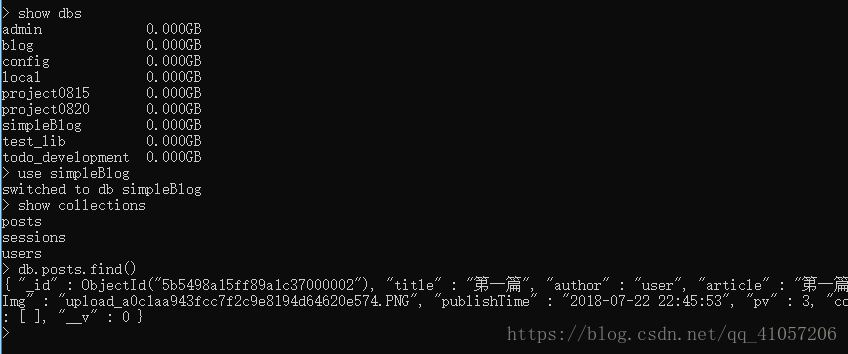
mongoDB和mySQL等数据库一样,进入之后首先要连接数据库,然后选择集合——mongoDB的集合相当于mySQL中的表。之后可以进行操作。以下是进入数据库、进入集合,然后查看所有数据的操作。
附赠:如果遇到了mongodb.exe闪退的问题,在windows系统下可以尝试关掉mongodb服务、进入存放数据的文件夹、删掉.lock文件的方法解决。参考链接:https://blog.csdn.net/erica_1230/article/details/42341017
二、mongoose模块
node.js通常搭配mongoDB使用,而mongoose提供了非常方便的接口操作mongoDB。
mongoose官网:https://mongoosejs.com/
接下来我用一个express项目中用户数据库的例子来介绍mongoose模块的使用
(注:为了方便此处的密码全部是明文存储的,这是个非常不好的习惯)
1. 将mongoose模块写入package.json文件中,然后安装依赖
2. 建立config目录,建立config.js,写入以下内容连接本地数据库:
module.exports = {
    port: 3000,
    mongodb:'mongodb://localhost/blog'
};
端口号的选择:不要和项目端口号一样
3. 建立models目录,用于存放表模型,建立userModel.js,这个文件定义了数据库的连接和集合的结构
var mongoose = require('mongoose');
var config = require('./../config/config');
mongoose.connect(config.mongodb);

var UserSchema = new mongoose.Schema({
    username:String,
    password:String,
    email:String
});

var User = mongoose.model('User', UserSchema);
module.exports = User;
(1)mongoose.connect() 实现了数据库的连接,如果models目录下有多个model文件,只有一个文件进行数据库的链接即可。
(2)new mongoose.Schema建立了一个表,可以定义表的各种属性。数据类型包括String, Number, Array等。mongoDB在创建每个文档的时候会默认创建 _id 属性作为文档的唯一标识。
(3)最后使用module.exports = User导出表接口,便于在别的文件中使用
4. 建立routes目录,用于存放路由。在index.js文件中导入userModel
var User = require('../models/userModel');5. 注册页添加一个用户
var user = new User({
    username: req.body.username,
    password: req.body.password,
    email: req.body.email
});
user.save(function(err){
    if(err){
        console.log(err);
    }
    console.log('注册成功');
}
save方法中可以写回调函数,也可以不写,直接用 user.save() 存入数据库中
6. 登录页查找用户信息
var username = req.body.username;
var password = req.body.password;

//检查用户是否存在
User.findOne({'username':username},function(err,user){
    if(err){
        console.log(err);
        return res.redirect('/');
    }
    //用户不存在
    if(!user){
        console.log("用户名或密码错误");
        return res.redirect('/login');
    }
    //判断密码是否一致
    if(user.password != password){
        console.log("用户名或密码错误");
        return res.redirect('/login');
    }
    //用户名密码都匹配
    console.log("登录成功!");
    res.redirect('/');
});
使用mongoose进行查询操作时,可以使用User.find()或User.findOne(),前者返回的是一个对象数组,后者返回单个元素。对于单个元素可以使用 user==null 这样的判断语句判断是否存在,但对数组不行。
find()方法参数最多可以有四个,分别是查询条件,筛选,排序或限制数量等可选项,以及回调函数。下面是官方文档的一个例子:
MyModel.find({ name: /john/i }, null, { skip: 10 }, function (err, docs) {});三、其他操作
1. 删除数据
使用 findByIdAndRemove() 方法通过 _id 进行删除。第一个参数时id,第二个参数是回调函数,也可以不写
Post.findByIdAndRemove(id,function(err){
    if(err){
        console.log(err);
        return;
    }
    console.log("删除成功!");
})
2. 更改内容
使用update方法进行操作,第一个参数是查询条件,第二个参数是需要被修改的内容
var post = {
    id: req.body.id,
    author: req.session.user,
    title: req.body.title,
    article: req.body.article
};
//修改博客内容
var condition = {"_id":post.id};
var content = {$set: {title:post.title, article:post.article}};
Post.update(condition, content, function(err){
    if(err){
        console.log(err);
        return;
    }
    console.log("更新成功!");
    res.redirect('/article/detail?id=' + post.id);
});
3. 使用 $and 等进行查询
(1)$and 的参数是一个数组,形如 $and: [ condition1, condition2, ... ],数组的各项即各个条件。
(2)$in 的参数是一个数据,但不能是对象数组,而是形如 $in:[1,2,3,4,...]
4. 其他内容可以查看官方文档。
四、项目代码
完整项目代码链接:https://github.com/wql00/NodeTest 是一个参考学习着做的简单博客系统。