C#中WPF实现依赖注入和MVVM,以及服务定位ServiceLocator
最近在想重写架构于是就研究了一套WPF的相关内容,WPF不像MAUI内置了容器,需要我们自己手动添加,于是就有了今天的内容。
首先,我们新建一个.net6.0的WPF项目
- 由于WPF没有内置容器,我们先安装一下依赖注入的nuget包
Microsoft.Extensions.DependencyInjection
点开App.xaml文件,修改为如下
public partial class App : Application
{
/// - 由于我们要使用服务定位模式,所以在主项目上添加一个ServiceLocator.cs类
public class ServiceLocator
{
    private IServiceProvider _serviceProvider;

    public ServiceLocator()
    {
        var serviceCollection = new ServiceCollection();

        _serviceProvider = serviceCollection.BuildServiceProvider();
    }
}
这时我们就使用了容器,等待类型注入,此时我们的依赖注入初步就完成了,下面进行添加MVVM模式
- 安装MVVVM的nuget包
CommunityToolkit.Mvvm
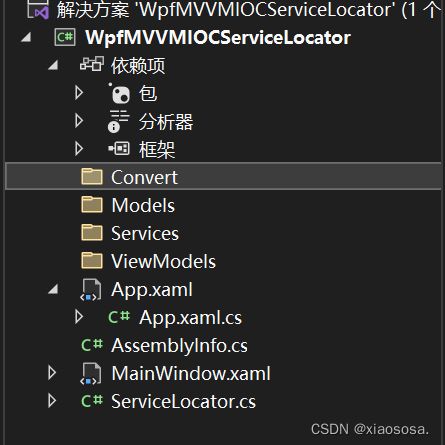
安装完成后,我们开始新建按照MVVM的规则的文件夹,便于我们以后分层
如下图所示
- 在Models文件夹建一个Person类
public class Person
{
    public int Id { get; set; } = 1;
    public string Name { get; set; } = "小米";

}
在ViewModels文件夹建一个MainWindowViewModel类
public class MainWindowViewModel : ObservableObject
{

}
使用MVVM模式的精髓就在于这个接口ObservableObject
MVVM的原理我们这里不做讲解,这里我们只讲怎么使用,优雅且自信
首先声明一下Person类
public partial class MainWindowViewModel : ObservableObject
{
    [ObservableProperty]
    private Person _person;
}
这里的ObservableProperty实际帮我们自动写成了如下,并且class关键词前面要添加partial关键字,我们作为懒人肯定是不能写这么多的
private Person _person;
public Person Person {
    get => _person;
    set=> SetProperty(ref _person, value);
}
这时候我们出现了一个问题,这里我们要用依赖注入,那我们先去Service文件夹新建一个接口和实体类,我姑且叫做DataAccess
代码和结构如下图

public class DataAccess : IDataAccess
{
    public string GetData() => "我是xiaososa";
}
到了这里我们就应该想到既然我们写了服务类和ViewModel类,那我们顺便去注入一下,打开ServiceLocator.cs
public class ServiceLocator
{
    private IServiceProvider _serviceProvider;

    public ServiceLocator()
    {
        var serviceCollection = new ServiceCollection();

        serviceCollection.AddSingleton<IDataAccess, DataAccess>();

        serviceCollection.AddSingleton<MainWindowViewModel>();

        _serviceProvider = serviceCollection.BuildServiceProvider();
    }
}
这样我们就可以让MainWindowViewModel去依赖IDataAccess,回到MainWindowViewModel类进行依赖注入,并填写一个方法让我们的名字改变
public partial class MainWindowViewModel : ObservableObject
{
    private int _num = 1;

    [ObservableProperty]
    private string _personName = $"Person类与我无瓜";

    [ObservableProperty]
    private Person _person;

    [ObservableProperty]
    [NotifyCanExecuteChangedFor(nameof(UpdateCommand))]
    private bool _isEnabled;

    private readonly IDataAccess _dataAccess;

    public MainWindowViewModel(IDataAccess dataAccess)
    {
        Person = new Person();
        _dataAccess = dataAccess;
    }


    [RelayCommand(CanExecute = nameof(CanButtonClick))]
    public async Task UpdateAsync()
    {
        await Task.Delay(500);
        PersonName = $"{_dataAccess.GetData()}=>{_num}";

        Person = new Person() {
            Name = _dataAccess.GetData(),
            Id = ++_num
        };

    }

    private bool CanButtonClick() => IsEnabled;
}
按照我们的预想结果,在勾选IsEnabledde时候我们点击button以后0.5秒后名字会改变,并且id自增,请注意RelayCommand
等同于我们在构造函数和声明内容如下
public MainWindowViewModel(IDataAccess dataAccess)
    {
        _dataAccess = dataAccess;
        UpdateAsyncRelayCommand = new AsyncRelayCommand(UpdateAsync);
    }

public AsyncRelayCommand UpdateAsyncRelayCommand { get; }
- 接下来我们简单的添加几个控件在MainWindow.xaml页面上
<Window x:Class="WpfMVVMIOCServiceLocator.MainWindow"
        xmlns="http://schemas.microsoft.com/winfx/2006/xaml/presentation"
        xmlns:x="http://schemas.microsoft.com/winfx/2006/xaml"
        xmlns:d="http://schemas.microsoft.com/expression/blend/2008"
        xmlns:mc="http://schemas.openxmlformats.org/markup-compatibility/2006"
        xmlns:local="clr-namespace:WpfMVVMIOCServiceLocator"
        mc:Ignorable="d"
        Title="MainWindow" Height="450" Width="800">
    <StackPanel HorizontalAlignment="Center" VerticalAlignment="Center">
        <Label Content="11111111111" FontSize="50" >Label>
        <CheckBox Content="IsEnabled"  FontSize="30" HorizontalAlignment="Center">CheckBox>
        <Label Content="Person类雨我无瓜" FontSize="50" HorizontalAlignment="Center" />
        <Button FontSize="25" Content="我是一个按钮" BorderBrush="Black" BorderThickness="2" Margin="10,10,10,10" HorizontalAlignment="Center" Command="{Binding ShowCommand}" />
    StackPanel>
Window>
效果如下
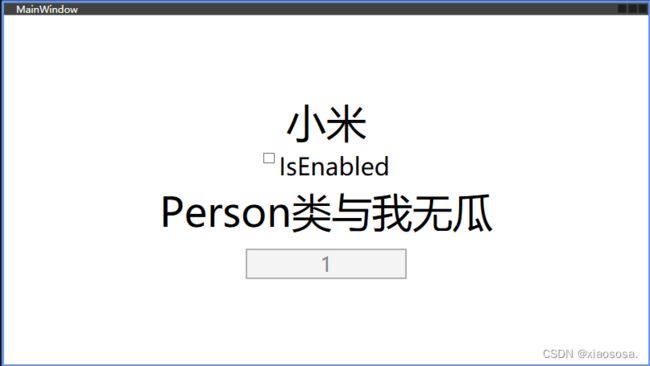
这时候我们就要运用ServicesLocator和MVVM模式,改变他们的显示
让我们先打开ServiceLocator.cs,因为之前我们已经注入过ViewModel了,现在我们声明公开一下MainWindowViewModel
代码如下,添加一个
public MainWindowViewModel? MainWindowViewModel => _serviceProvider.GetService();
private IServiceProvider _serviceProvider;

public MainWindowViewModel? MainWindowViewModel => _serviceProvider.GetService<MainWindowViewModel>();

public ServiceLocator()
{
     var serviceCollection = new ServiceCollection();

     serviceCollection.AddSingleton<IDataAccess, DataAccess>();

     serviceCollection.AddSingleton<MainWindowViewModel>();

     _serviceProvider = serviceCollection.BuildServiceProvider();
 }
优雅的地方来了,这是我们能在Xaml文件下提示感知的关键,让我们先打开App.xaml,添加一下Resources
<Application x:Class="WpfMVVMIOCServiceLocator.App"
             xmlns="http://schemas.microsoft.com/winfx/2006/xaml/presentation"
             xmlns:x="http://schemas.microsoft.com/winfx/2006/xaml"
             xmlns:local="clr-namespace:WpfMVVMIOCServiceLocator"
             StartupUri="MainWindow.xaml">
    <Application.Resources>
        <ResourceDictionary>
            <local:ServiceLocator x:Key="ServiceLocator"/>
        ResourceDictionary>
    Application.Resources>
Application>
然后回到MainWindow.xaml,在Window处添加
DataContext=“{Binding MainWindowViewModel,Source={StaticResource ServiceLocator}}”
这里有一个优雅的写法,当你写到DataContext="{Binding的时候,先按一下空格,然后写一个逗号,在写Source={StaticResource ServiceLocator}}”,后面就可以自动感知到MainWindowViewModel

好了,这次我们就可以绑定值了,将刚才的控件都修改一下,mode我们选择双向绑定,意味着只要值有变化就会通知前台更改值
<StackPanel HorizontalAlignment="Center" VerticalAlignment="Center">
    <Label Content="{Binding Person.Name,Mode=TwoWay}" FontSize="50" HorizontalAlignment="Center" />
    <CheckBox Content="IsEnabled" IsChecked="{Binding IsEnabled}" FontSize="30" HorizontalAlignment="Center"></CheckBox>
    <Label Content="{Binding PersonName,Mode=TwoWay}" FontSize="50" HorizontalAlignment="Center" />
    <Button FontSize="25" Content="{Binding Person.Id,Mode=TwoWay}" Width="200" BorderBrush="Black" BorderThickness="2" Margin="10,10,10,10" HorizontalAlignment="Center" Command="{Binding UpdateCommand}" />
</StackPanel>
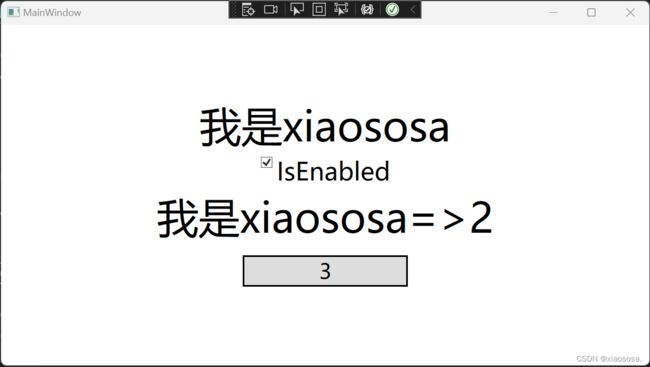
然后让我们启动,这下我们的IOC_MVVM_ServiceLocator就建立好了,需要勾选IsEnabled才可以点击button
效果如下,button按钮的名字总是要比上面多1的,那我们的效果就达到了
好的,我们这次示例就到此为止了,
还有个很严重的问题,假如你们引入MVVM包和依赖注入包会报这个乱码错误蟹变露Exception.ToString0 奸姝楷板窜稿纺人覆?,不是你们的问题,是IDE的锅,建议重新安装组件或者升级,正常情况下是不冲突的

有小伙伴不明白的可以参考以下视频
MVVM:【用 CommunityToolkit.Mvvm 加速 MVVM 开发流程】https://www.bilibili.com/video/BV12x4y177qB?vd_source=b2be7496dbe636cb228643582ce2c4b3
依赖注入:【.NET 6 中 WPF 的依赖注入,包括工厂模式】https://www.bilibili.com/video/BV18V4y177TY?vd_source=b2be7496dbe636cb228643582ce2c4b3
ServiceLocator:【.NET MAUI HelloWorld Part 2】https://www.bilibili.com/video/BV1Gt4y177zA?vd_source=b2be7496dbe636cb228643582ce2c4b3