Qt6 QML Book/初见Qt/Qt 6介绍
Qt 6 Introduction
Qt 6介绍
Qt Quick
Qt Quick is the umbrella term for the user interface technology used in Qt 6. It was introduced in Qt 5 and now expanded for Qt 6. Qt Quick itself is a collection of several technologies:
Qt Quick是Qt 6中使用的用户界面技术的总称。它在Qt 5中被引入,现在扩展到Qt 6。Qt Quick本身是几种技术的集合
- QML - Markup language for user interfaces
- QML -用户界面的标记语言
- JavaScript - The dynamic scripting language
- JavaScript -动态脚本语言
- Qt C++ - The highly portable enhanced c++ library
- Qt C++ -高度可移植的c++增强库
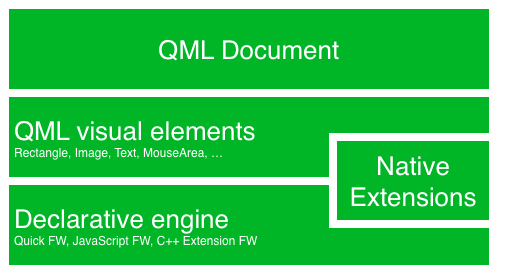
Similar to HTML, QML is a markup language. It is composed of tags, called types in Qt Quick, that are enclosed in curly brackets: Item {}. It was designed from the ground up for the creation of user interfaces, speed and easier reading for developers. The user interface can be enhanced further using JavaScript code. Qt Quick is easily extendable with your own native functionality using Qt C++. In short, the declarative UI is called the front-end and the native parts are called the back-end. This allows you to separate the computing intensive and native operation of your application from the user interface part.
与HTML相似,QML是一种标记语言。它由标签(在Qt Quick中称为类型)组成,这些标签被括在花括号中:Item{}。它的设计初衷是为了创建用户界面,提高开发人员的阅读速度和易用性。可以使用JavaScript代码进一步增强用户界面。Qt Quick可以很容易地使用Qt c++扩展您自己的本地功能。简而言之,声明性UI被称为前端,而本地部分被称为后端。这允许您将应用程序的密集型计算、本地操作与用户界面部分分开。
In a typical project, the front-end is developed in QML/JavaScript. The back-end code, which interfaces with the system and does the heavy lifting, is developed using Qt C++. This allows a natural split between the more design-oriented developers and the functional developers. Typically, the back-end is tested using Qt Test, the Qt unit testing framework, and exported for the front-end developers to use.
在一个典型的项目中,前端是用QML/JavaScript开发的。后端代码使用Qt C++开发,它与系统接口并执行繁重的工作。这允许更面向设计的开发人员和功能开发人员之间的自然分离。通常,后端使用Qt测试(Qt单元测试框架)进行测试,并导出供前端开发人员使用。
Digesting a User Interface
领会用户界面
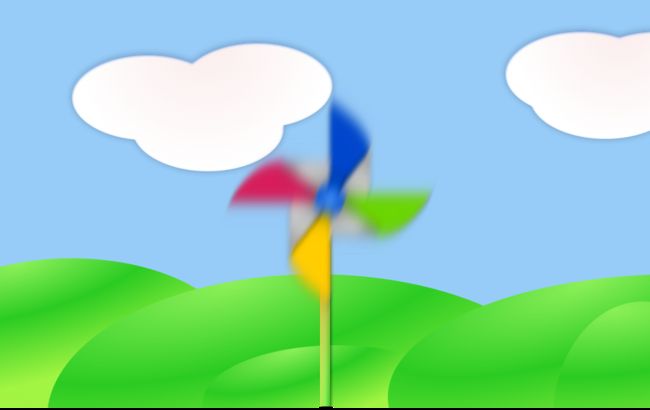
Let’s create a simple user interface using Qt Quick, which showcases some aspects of the QML language. In the end, we will have a paper windmill with rotating blades.
让我们使用Qt Quick创建一个简单的用户界面,它展示了使用QML语言。最后,我们将展示一个有旋转叶片的纸风车。
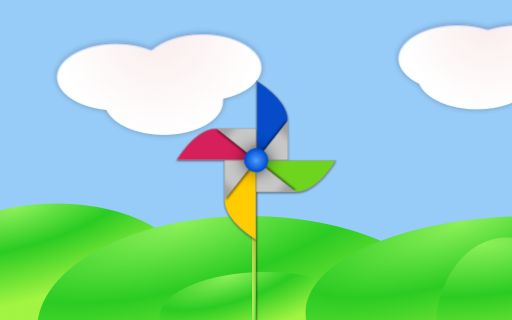
We start with an empty document called main.qml. All our QML files will have the suffix .qml. As a markup language (like HTML), a QML document needs to have one and only one root type. In our case, this is the Image type with a width and height based on the background image geometry:
我们从一个名为main.qml的空文档开始。我们所有的QML文件都将具有.qml后缀。作为一种标记语言(如HTML),QML文件需要且仅需要一个根类型。在我们的例子中,这是基于背景图像的宽度和高度的Image类型
import QtQuick

Image {
    id: root
    source: "images/background.png"
}
As QML doesn’t restrict the choice of type for the root type, we use an Image type with the source property set to our background image as the root.
由于QML没有限制根类型的类型选择,我们使用一个Image类型作为根类型,并将其源属性设置为背景图像。

TIP
注
Each type has properties. For example, an image has the properties width and height, each holding a count of pixels. It also has other properties, such as source. Since the size of the image type is automatically derived from the image size, we don’t need to set the width and height properties ourselves.
每种类型都有属性。例如,图像具有宽度和高度属性,每个图像包含像素数。它还具有其他属性,比如source。由于图像类型的大小是自动从图像大小获取的,我们不需要自己设置宽度和高度属性。
The most standard types are located in the QtQuick module, which is made available by the import statement at the start of the .qml file.
大多数标准类型位于QtQuick模块中,该模块由.qml文件开头的import语句导入。
The id is a special and optional property that contains an identifier that can be used to reference its associated type elsewhere in the document. Important: An id property cannot be changed after it has been set, and it cannot be set during runtime. Using root as the id for the root-type is a convention used in this book to make referencing the top-most type predictable in larger QML documents.
id是一个特殊的可选属性,它包含一个标识符,可用于在文件中的引用它的关联类型。重要提示:id属性不能在设置后更改,也不能在运行时设置。使用root作为根类型的id是本书中使用的一种惯例,以便在较大的QML文件中引用最顶端的类型。
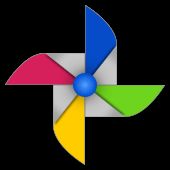
The foreground elements, representing the pole and the pinwheel in the user interface, are included as separate images.
前景元素(用户界面中的杆子和风车)作为单独的图像包括在内。
![]()
We want to place the pole horizontally in the center of the background, but offset vertically towards the bottom. And we want to place the pinwheel in the middle of the background.
我们想把旗杆水平地放在背景的中心,但是垂直地偏移到底部。我们想把风车放在背景中间。
Although this beginners example only uses image types, as we progress you will create more sophisticated user interfaces that are composed of many different types.
虽然这个初学者的示例只使用图像类型,但是随着我们的深入,您将创建由多种不同类型组成的复杂用户界面。
Image {
    id: root
    ...
    Image {
        id: pole
        anchors.horizontalCenter: parent.horizontalCenter
        anchors.bottom: parent.bottom
        source: "images/pole.png"
    }

    Image {
        id: wheel
        anchors.centerIn: parent
        source: "images/pinwheel.png"
    }
    ...
}
To place the pinwheel in the middle, we use a complex property called anchor. Anchoring allows you to specify geometric relations between parent and sibling objects. For example, place me in the center of another type ( anchors.centerIn: parent ). There are left, right, top, bottom, centerIn, fill, verticalCenter and horizontalCenter relations on both ends. Naturally, when two or more anchors are used together, they should complement each other: it wouldn’t make sense, for instance, to anchor a type’s left side to the top of another type.
为了将风车放在中间,我们使用了一个叫做锚(anchor)的复杂属性。锚定允许您指定父对象或兄弟对象之间的几何位置关系。例如,把我放在另一种类型的中心(anchors. centerIn: parent)。在两者间有left, right, top, bottom, centerIn, fill, verticalCenter和horizontalCenter的位置关系。当然,当两个或两个以上的锚点一起使用时,它们应该使用对应布局:例如,将一个类型的左侧锚点到另一个类型的顶部是没有意义的。
For the pinwheel, the anchoring only requires one simple anchor.
对风车来说,锚定只需要一个简单的锚。
TIP
注
Sometimes you will want to make small adjustments, for example, to nudge a type slightly off-center. This can be done with anchors.horizontalCenterOffset or with anchors.verticalCenterOffset. Similar adjustment properties are also available for all the other anchors. Refer to the documentation for a full list of anchors properties.
有时你会想做一些小的调整,例如,让一个类型稍微偏离中心。这也可以通过锚来实现。horizontalCenterOffset或anchors.verticalCenterOffset。类似的调整属性也可用于所有锚点。有关锚点属性的完整列表,请参阅文档。
TIP
注
Placing an image as a child type of our root type (the Image) illustrates an important concept of a declarative language. You describe the visual appearance of the user interface in the order of layers and grouping, where the topmost layer (our background image) is drawn first and the child layers are drawn on top of it in the local coordinate system of the containing type.
将图像作为根类型(image)的子类型说明了声明性语言的一个重要概念。按照层和分组的顺序加载用户界面的视觉外观,首先绘制最顶层(我们的背景图像),然后在包含类型的本地坐标系统中,在其上面绘制子层。
To make the showcase a bit more interesting, let’s make the scene interactive. The idea is to rotate the wheel when the user presses the mouse somewhere in the scene.
为了让展示更有趣,让场景互动。这个想法是当用户在场景中的某个地方按下鼠标时旋转风车。
We use the MouseArea type and make it cover the entire area of our root type.
我们使用MouseArea类型并让它覆盖根类型的整个区域。
Image {
    id: root
    ...
    MouseArea {
        anchors.fill: parent
        onClicked: wheel.rotation += 90
    }
    ...
}
The mouse area emits signals when the user clicks inside the area it covers. You can connect to this signal by overriding the onClicked function. When a signal is connected, it means that the function (or functions) it corresponds to are called whenever the signal is emitted. In this case, we say that when there’s a mouse click in the mouse area, the type whose id is wheel (i.e., the pinwheel image) should rotate by +90 degrees.
当用户在鼠标区域内单击时,鼠标区域会发出信号。您可以通过onClicked函数来处理这个信号。当一个信号被连接时,这意味着它对应的函数(或多个函数)在信号发出时被调用。在本例中,我们看到,当鼠标区域中出现鼠标点击时,其id为wheel的类型(例如,风车图像)应该旋转+90度。
TIP
注
This technique works for every signal, with the naming convention being on + SignalName in title case. Also, all properties emit a signal when their value changes. For these signals, the naming convention is:
这种方法适用于所有信号,命名约定在信号名为signalName情况下,是on+SignalName。而且,当属性的值发生变化时,所有属性都会发出一个信号。对于这些信号,命名约定为:
`on${property}Changed`
For example, if a width property is changed, you can observe it with onWidthChanged: print(width).
例如,如果宽度(width)属性改变了,你可以使用onWidthChanged: print(width)来观察它。
The wheel will now rotate whenever the user clicks, but the rotation takes place in one jump, rather than a fluid movement over time. We can achieve smooth movement using animation. An animation defines how a property change occurs over a period of time. To enable this, we use the Animation type’s property called Behavior. The Behavior specifies an animation for a defined property for every change applied to that property. In other words, whenever the property changes, the animation is run. This is only one of many ways of doing animation in QML.
现在,每当用户单击鼠标时,轮子就会旋转,但旋转发生在一次跳跃中,而不是随时间的缓慢旋转。我们可以使用动画实现平滑的运动。动画定义了属性在一段时间内是如何发生变化的。为此,我们使用动画(Animation)类型的属性Behavior。Behavior为一个已定义的属性指定一个动画,用于应用到该属性的每一次变化。换句话说,每当属性改变时,动画就会运行。这只是在QML中制作动画的方法之一。
Image {
    id: root
    Image {
        id: wheel
        Behavior on rotation {
            NumberAnimation {
                duration: 250
            }
        }
    }
}
Now, whenever the wheel’s rotation property changes, it will be animated using a NumberAnimation with a duration of 250 ms. So each 90-degree turn will take 250 ms, producing a nice smooth turn.
现在,每当车轮的旋转属性发生变化时,它将使用NumberAnimation动画,持续时间为250毫秒。所以每一个90度转弯将花费250毫秒,产生一个平滑的旋转效果。
TIP
注
You will not actually see the wheel blurred. This is just to indicate the rotation. (A blurred wheel is in the assets folder, in case you’d like to experiment with it.)
你不会真的看到风车变模糊了。这只是为了表示风车旋转了。(模糊的示例在assets文件夹中,如果你想测试一下的话。)
Now the wheel looks much better and behaves nicely, as well as providing a very brief insight into the basics of how Qt Quick programming works.
现在风车示例看起来好多了,性能也很好,并且提供了一个非常简单的示例了解Qt Quick编程基础。
示例源码下载