【Nginx】#安装配置及应用场景使用说明
文章目录
- 常见公网DNS服务
- 1.Nginx的安装
-
- 版本区别
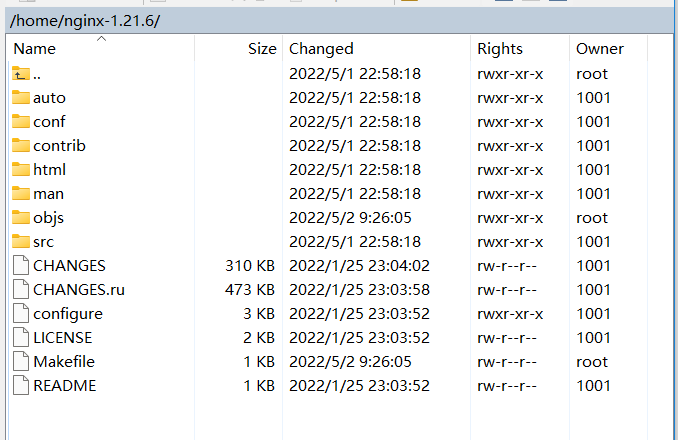
- 解压文件
- 1.1编译安装
- 1.2 启动安装
- 1.3 安装成系统服务
- 2.运行原理
- 3.Nginx配置及应用场景
-
- 3.1最小配置
-
- worker_processes
- worker_connections
- include mime.types;
- default_type application/octet-stream;
- sendfifile on;
- keepalive_timeout 65;
- server
- 3.2虚拟主机
-
- servername匹配规则
- 完整匹配
- 通配符匹配
- 通配符结束匹配
- 正则匹配
- 4.反向代理
- 5.基于反向代理的负载均衡
-
- 负载均衡策略
- 轮询
- weight(权重)
- ip_hash
- least_conn
- url_hash
- fair
- 动静分离
-
- 配置反向代理
- 增加每一个location
-
- 方式一:配置多个location
- 方式二:正则表达式
- 使用一个location
- alias与root
- UrlRewrite
-
- rewrite语法格式及参数语法
常见公网DNS服务
阿里
223.5.5.5
223.6.6.6
腾讯
119.29.29.29
182.254.118.118
百度
180.76.76.76
114DNS
114.114.114.114
114.114.115.115
谷歌
8.8.8.8
8.8.4.4
1.Nginx的安装
版本区别
常用版本分为四大阵营
- Nginx开源版
http://nginx.org/ - Nginx plus 商业版
https://www.nginx.com - openresty
http://openresty.org/cn/ - Tengine
http://tengine.taobao.org
解压文件
地址:https://wwt.lanzouw.com/iN3HA0453evi 密码:amh2
1.1编译安装
./configure --prefix=/usr/local/nginx
make
make install
**如果出现警告或报错 **
提示
[root@192 nginx-1.21.6]# ./configure --prefix=/usr/local/nginx
checking for OS
  + Linux 3.10.0-693.el7.x86_64 x86_64
  checking for C compiler ... not found

    ./configure: error: C compiler cc is not found
- 安装gcc
yum install -y gcc
提示:
./configure: error: the HTTP rewrite module requires the PCRE library.
You can either disable the module by using --without-http_rewrite_module
option, or install the PCRE library into the system, or build the PCRE library
statically from the source with nginx by using --with-pcre=<path> option.
- 安装perl库
yum install -y pcre pcre-devel
提示:
./configure: error: the HTTP gzip module requires the zlib library.
You can either disable the module by using --without-http_gzip_module
option, or install the zlib library into the system, or build the zlib library
statically from the source with nginx by using --with-zlib=<path> option.
- 安装zlib库
yum install -y zlib zlib-devel
- 接下来执行
make
make install
1.2 启动安装
进入安装好的目录 /usr/local/nginx/sbin
./nginx 					启动
./nginx -s stop 	快速停止
./nginx -s quit 	优雅关闭,在退出前完成已经接受的连接请求
./nginx -s reload 重新加载配置
./nginx -t 				检查配置是否正常
1.3 安装成系统服务
- 创建服务脚本
vi /usr/lib/systemd/system/nginx.service
脚本内容:
[Unit]
Description=nginx - web server
After=network.target remote-fs.target nss-lookup.target

[Service]
Type=forking
PIDFile=/usr/local/nginx/logs/nginx.pid
ExecStartPre=/usr/local/nginx/sbin/nginx -t -c /usr/local/nginx/conf/nginx.conf
ExecStart=/usr/local/nginx/sbin/nginx -c /usr/local/nginx/conf/nginx.conf
ExecReload=/usr/local/nginx/sbin/nginx -s reload
ExecStop=/usr/local/nginx/sbin/nginx -s stop
ExecQuit=/usr/local/nginx/sbin/nginx -s quit
PrivateTmp=true

[Install]
WantedBy=multi-user.target
- 重新加载系统服务
systemctl daemon-reload
- 启动服务
systemctl start nginx.service
- 开机启动
systemctl enable nginx.service
[注意:若启动失败 去掉 PIDFile=/usr/local/nginx/logs/nginx.pid ]
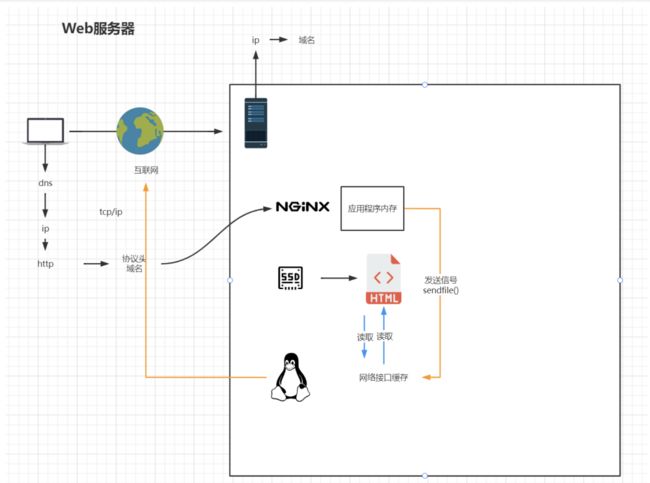
2.运行原理

3.Nginx配置及应用场景
3.1最小配置
worker_processes
worker_processes 1; 默认为1,表示开启一个业务进程
worker_connections
worker_connections 1024; 单个业务进程可接受连接数
include mime.types;
include mime.types; 引入http mime类型(**以 .*后缀文件的处理方式)
default_type application/octet-stream;
default_type application/octet-stream; 如果mime类型没匹配上,默认使用二进制流的方式传输。
sendfifile on;
sendfile on; 使用linux的 sendfile(socket, file, len) 高效网络传输,也就是数据0拷贝。
- 未开启sendfifile

- 开启后
keepalive_timeout 65;
keepalive_timeout 65;
server
server {
        listen       80;		监听端口号
        server_name  localhost;		主机名
        location / {		匹配路径
            root   html;		文件根目录
            index  index.html index.htm;		默认页名称
        }

        error_page   500 502 503 504  /50x.html;		报错编码对应页面
        location = /50x.html {
            root   html;
        }
    }
3.2虚拟主机
原本一台服务器只能对应一个站点,通过虚拟主机技术可以虚拟化成多个站点同时对外提供服务
servername匹配规则
我们需要注意的是server_name匹配分先后顺序,写在前面的匹配上就不会继续往下匹配了。
完整匹配
我们可以在同一server_name中匹配多个域名
server_name ai.test.com www.test.com;
通配符匹配
server_name *.test.com
通配符结束匹配
server_name ai.*;
正则匹配
server_name ~^[0-9]+\.test\.com$;
4.反向代理
proxy_pass http://baidu.com;
location / {
  proxy_pass http://www.baidu.com/;
}
5.基于反向代理的负载均衡
upstream httpd {
  server 192.168.44.102:80;
  server 192.168.43.103:80;
}
负载均衡策略
轮询
默认情况下使用轮询方式,逐一转发,这种方式适用于无状态请求。
weight(权重)
指定轮询几率,weight和访问比率成正比,用于后端服务器性能不均的情况
upstream httpd {
  server 127.0.0.1:8050 weight=10 down;
  server 127.0.0.1:8060 weight=1;
  server 127.0.0.1:8060 weight=1 backup;
}
- down:表示当前的server暂时不参与负载
- weight:默认为1.weight越大,负载的权重就越大。
- backup: 其它所有的非backup机器down或者忙的时候,请求backup机器。
ip_hash
根据客户端的ip地址转发同一台服务器,可以保持回话
least_conn
最少连接访问
url_hash
根据用户访问的url定向转发请求
fair
根据后端服务器响应时间转发请求
动静分离
配置反向代理
location / {
  proxy_pass http://127.0.0.1:8080;
  root html; index index.html index.htm;
}
增加每一个location
方式一:配置多个location
location /css {
    root /usr/local/nginx/static;
    index index.html index.htm;
}
location /images {
    root /usr/local/nginx/static;
    index index.html index.htm;
}
location /js {
    root /usr/local/nginx/static;
    index index.html index.htm;
}
方式二:正则表达式
location ~*/(css|images|json) {
    root /usr/local/nginx/static;
    index index.html index.htm;
}
配置如下:root指定 的目录是location匹配访问的path目录的上一级目录,这个path目录一定要是真实存在root指定目录下的
[root@192 nginx]# tree ./static/
./static/
├── images
│   └── 2.png
└── json
    └── 1.json

使用一个location
使用正则
location 前缀
/ 通用匹配,任何请求都会匹配到。
= 精准匹配,不是以指定模式开头
~ 正则匹配,区分大小写
~* 正则匹配,不区分大小写^~ 非正则匹配,匹配以指定模式开头的location
location匹配顺序
- 多个正则location直接按书写顺序匹配,成功后就不会继续往后面匹配
- 普通(非正则)location会一直往下,直到找到匹配度最高的(最大前缀匹配)
- 当普通location与正则location同时存在,如果正则匹配成功,则不会再执行普通匹配
- 所有类型location存在时,
=匹配 >^~匹配 > 正则匹配 > 普通(最大前缀匹配)
location ~*/(css|img|js) {
  root /usr/local/nginx/static;
  index index.html index.htm;
}
alias与root
location /css {
  alias /usr/local/nginx/static/css;
  index index.html index.htm;
}
root用来设置根目录,而alias在接受请求的时候在路径上不会加上location
- alias指定的目录是准确的,即location匹配访问的path目录下的文件直接是在alias目录下查找的;
- root指定 的目录是location匹配访问的path目录的上一级目录,这个path目录一定要是真实存在root指定目录下的;
- 使用 alias标签的目录块中不能使用rewrite的break(具体原因不明);另外,alias指定的目录后面必须要加上"/"符 号!!
- alias虚拟目录配置中,location匹配的path目录如果后面不带"/“,那么访问的url地址中这个path目录后 面加不加”/“不影响访问,访问时它会自动加上”/“; 但是如果location匹配的path目录后面加上”/“,那么访问的url地 址中这个path目录必须要加上”/“,访问时它不会自动加上”/“。如果不加上”/",访问就会失败!
- root目录配置 中,location匹配的path目录后面带不带"/",都不会影响访问。
UrlRewrite
rewrite语法格式及参数语法
rewrite是实现URL重写的关键指令,根据regex (正则表达式)部分内容, 重定向到replacement,结尾是flag标记。
rewrite
关键字 正则 替代内容 flag标记
关键字:其中关键字error_log不能改变
正则:perl兼容正则表达式语句进行规则匹配
替代内容:将正则匹配的内容替换成replacement
flag标记:rewrite支持的flag标记
rewrite参数的标签段位置: server,location,if
flag标记说明:
- last #本条规则匹配完成后,继续向下匹配新的location URI规则
- break #本条规则匹配完成即终止,不再匹配后面的任何规则
- redirect #返回302临时重定向,浏览器地址会显示跳转后的URL地址
- permanent #返回301永久重定向,浏览器地址栏会显示跳转后的URL地址
实例:
rewrite ^/([0-9]+).html$ /index.jsp?pageNum=$1 break;
1 :匹配第一个规 则 / ( [ 0 − 9 ] + ) . h t m l 1:匹配第一个规则 ^/([0-9]+).html 1:匹配第一个规则/([0−9]+).html: 后面的地址全部伪装为 0-9.html