CAFFE -FCN训练配置过程
在2015年发表于计算机视觉顶会CVPR上的Fully Convolutional Networks for Semantic Segmentation 论文(下文中简称FCN)开创了图像语义分割的新流派。在后来的科研工作者发表学术论文做实验的时候,还常常把自己的实验结果与FCN相比较。笔者在做实验的时候,也去改动并跑了跑FCN的代码,可是问题出现了,笔者的训练并不收敛。
下面是笔者最初的训练prototxt文件:
- name: "fcn8snet"
- layer {
- name: "data"
- type: "ImageData"
- top: "data"
- top: "fake-dlabel"
- include {
- phase: TRAIN
- }
- transform_param {
- mean_file: "fcn8s_cityscapes/fcn_mean.binaryproto"
- #scale: 0.00390625
- }
- image_data_param {
- source: "fcn8s_cityscapes/data/train_img.txt"
- batch_size: 1
- root_folder: "fcn8s_cityscapes/data/train/image/"
- }
- }
- layer {
- name: "label"
- type: "ImageData"
- top: "label"
- top: "fake_llabel"
- include {
- phase: TRAIN
- }
- image_data_param {
- source: "fcn8s_cityscapes/data/train_label.txt"
- batch_size: 1
- root_folder: "fcn8s_cityscapes/data/train/label/"
- is_color: false
- }
- }
- layer {
- name: "conv1_1"
- type: "Convolution"
- bottom: "data"
- top: "conv1_1"
- param {
- lr_mult: 1
- decay_mult: 1
- }
- param {
- lr_mult: 2
- decay_mult: 0
- }
- convolution_param {
- num_output: 64
- pad: 100
- kernel_size: 3
- stride: 1
- }
- }
- layer {
- name: "relu1_1"
- type: "ReLU"
- bottom: "conv1_1"
- top: "conv1_1"
- }
- layer {
- name: "conv1_2"
- type: "Convolution"
- bottom: "conv1_1"
- top: "conv1_2"
- param {
- lr_mult: 1
- decay_mult: 1
- }
- param {
- lr_mult: 2
- decay_mult: 0
- }
- convolution_param {
- num_output: 64
- pad: 1
- kernel_size: 3
- stride: 1
- }
- }
- layer {
- name: "relu1_2"
- type: "ReLU"
- bottom: "conv1_2"
- top: "conv1_2"
- }
- layer {
- name: "pool1"
- type: "Pooling"
- bottom: "conv1_2"
- top: "pool1"
- pooling_param {
- pool: MAX
- kernel_size: 2
- stride: 2
- }
- }
- layer {
- name: "conv2_1"
- type: "Convolution"
- bottom: "pool1"
- top: "conv2_1"
- param {
- lr_mult: 1
- decay_mult: 1
- }
- param {
- lr_mult: 2
- decay_mult: 0
- }
- convolution_param {
- num_output: 128
- pad: 1
- kernel_size: 3
- stride: 1
- }
- }
- layer {
- name: "relu2_1"
- type: "ReLU"
- bottom: "conv2_1"
- top: "conv2_1"
- }
- layer {
- name: "conv2_2"
- type: "Convolution"
- bottom: "conv2_1"
- top: "conv2_2"
- param {
- lr_mult: 1
- decay_mult: 1
- }
- param {
- lr_mult: 2
- decay_mult: 0
- }
- convolution_param {
- num_output: 128
- pad: 1
- kernel_size: 3
- stride: 1
- }
- }
- layer {
- name: "relu2_2"
- type: "ReLU"
- bottom: "conv2_2"
- top: "conv2_2"
- }
- layer {
- name: "pool2"
- type: "Pooling"
- bottom: "conv2_2"
- top: "pool2"
- pooling_param {
- pool: MAX
- kernel_size: 2
- stride: 2
- }
- }
- layer {
- name: "conv3_1"
- type: "Convolution"
- bottom: "pool2"
- top: "conv3_1"
- param {
- lr_mult: 1
- decay_mult: 1
- }
- param {
- lr_mult: 2
- decay_mult: 0
- }
- convolution_param {
- num_output: 256
- pad: 1
- kernel_size: 3
- stride: 1
- }
- }
- layer {
- name: "relu3_1"
- type: "ReLU"
- bottom: "conv3_1"
- top: "conv3_1"
- }
- layer {
- name: "conv3_2"
- type: "Convolution"
- bottom: "conv3_1"
- top: "conv3_2"
- param {
- lr_mult: 1
- decay_mult: 1
- }
- param {
- lr_mult: 2
- decay_mult: 0
- }
- convolution_param {
- num_output: 256
- pad: 1
- kernel_size: 3
- stride: 1
- }
- }
- layer {
- name: "relu3_2"
- type: "ReLU"
- bottom: "conv3_2"
- top: "conv3_2"
- }
- layer {
- name: "conv3_3"
- type: "Convolution"
- bottom: "conv3_2"
- top: "conv3_3"
- param {
- lr_mult: 1
- decay_mult: 1
- }
- param {
- lr_mult: 2
- decay_mult: 0
- }
- convolution_param {
- num_output: 256
- pad: 1
- kernel_size: 3
- stride: 1
- }
- }
- layer {
- name: "relu3_3"
- type: "ReLU"
- bottom: "conv3_3"
- top: "conv3_3"
- }
- layer {
- name: "pool3"
- type: "Pooling"
- bottom: "conv3_3"
- top: "pool3"
- pooling_param {
- pool: MAX
- kernel_size: 2
- stride: 2
- }
- }
- layer {
- name: "conv4_1"
- type: "Convolution"
- bottom: "pool3"
- top: "conv4_1"
- param {
- lr_mult: 1
- decay_mult: 1
- }
- param {
- lr_mult: 2
- decay_mult: 0
- }
- convolution_param {
- num_output: 512
- pad: 1
- kernel_size: 3
- stride: 1
- }
- }
- layer {
- name: "relu4_1"
- type: "ReLU"
- bottom: "conv4_1"
- top: "conv4_1"
- }
- layer {
- name: "conv4_2"
- type: "Convolution"
- bottom: "conv4_1"
- top: "conv4_2"
- param {
- lr_mult: 1
- decay_mult: 1
- }
- param {
- lr_mult: 2
- decay_mult: 0
- }
- convolution_param {
- num_output: 512
- pad: 1
- kernel_size: 3
- stride: 1
- }
- }
- layer {
- name: "relu4_2"
- type: "ReLU"
- bottom: "conv4_2"
- top: "conv4_2"
- }
- layer {
- name: "conv4_3"
- type: "Convolution"
- bottom: "conv4_2"
- top: "conv4_3"
- param {
- lr_mult: 1
- decay_mult: 1
- }
- param {
- lr_mult: 2
- decay_mult: 0
- }
- convolution_param {
- num_output: 512
- pad: 1
- kernel_size: 3
- stride: 1
- }
- }
- layer {
- name: "relu4_3"
- type: "ReLU"
- bottom: "conv4_3"
- top: "conv4_3"
- }
- layer {
- name: "pool4"
- type: "Pooling"
- bottom: "conv4_3"
- top: "pool4"
- pooling_param {
- pool: MAX
- kernel_size: 2
- stride: 2
- }
- }
- layer {
- name: "conv5_1"
- type: "Convolution"
- bottom: "pool4"
- top: "conv5_1"
- param {
- lr_mult: 1
- decay_mult: 1
- }
- param {
- lr_mult: 2
- decay_mult: 0
- }
- convolution_param {
- num_output: 512
- pad: 1
- kernel_size: 3
- stride: 1
- }
- }
- layer {
- name: "relu5_1"
- type: "ReLU"
- bottom: "conv5_1"
- top: "conv5_1"
- }
- layer {
- name: "conv5_2"
- type: "Convolution"
- bottom: "conv5_1"
- top: "conv5_2"
- param {
- lr_mult: 1
- decay_mult: 1
- }
- param {
- lr_mult: 2
- decay_mult: 0
- }
- convolution_param {
- num_output: 512
- pad: 1
- kernel_size: 3
- stride: 1
- }
- }
- layer {
- name: "relu5_2"
- type: "ReLU"
- bottom: "conv5_2"
- top: "conv5_2"
- }
- layer {
- name: "conv5_3"
- type: "Convolution"
- bottom: "conv5_2"
- top: "conv5_3"
- param {
- lr_mult: 1
- decay_mult: 1
- }
- param {
- lr_mult: 2
- decay_mult: 0
- }
- convolution_param {
- num_output: 512
- pad: 1
- kernel_size: 3
- stride: 1
- }
- }
- layer {
- name: "relu5_3"
- type: "ReLU"
- bottom: "conv5_3"
- top: "conv5_3"
- }
- layer {
- name: "pool5"
- type: "Pooling"
- bottom: "conv5_3"
- top: "pool5"
- pooling_param {
- pool: MAX
- kernel_size: 2
- stride: 2
- }
- }
- layer {
- name: "fc6"
- type: "Convolution"
- bottom: "pool5"
- top: "fc6"
- param {
- lr_mult: 1
- decay_mult: 1
- }
- param {
- lr_mult: 2
- decay_mult: 0
- }
- convolution_param {
- num_output: 4096
- pad: 0
- kernel_size: 7
- stride: 1
- }
- }
- layer {
- name: "relu6"
- type: "ReLU"
- bottom: "fc6"
- top: "fc6"
- }
- layer {
- name: "drop6"
- type: "Dropout"
- bottom: "fc6"
- top: "fc6"
- dropout_param {
- dropout_ratio: 0.5
- }
- }
- layer {
- name: "fc7"
- type: "Convolution"
- bottom: "fc6"
- top: "fc7"
- param {
- lr_mult: 1
- decay_mult: 1
- }
- param {
- lr_mult: 2
- decay_mult: 0
- }
- convolution_param {
- num_output: 4096
- pad: 0
- kernel_size: 1
- stride: 1
- }
- }
- layer {
- name: "relu7"
- type: "ReLU"
- bottom: "fc7"
- top: "fc7"
- }
- layer {
- name: "drop7"
- type: "Dropout"
- bottom: "fc7"
- top: "fc7"
- dropout_param {
- dropout_ratio: 0.5
- }
- }
- layer {
- name: "score_fr_cityscapes"
- type: "Convolution"
- bottom: "fc7"
- top: "score_fr"
- param {
- lr_mult: 1
- decay_mult: 1
- }
- param {
- lr_mult: 2
- decay_mult: 0
- }
- convolution_param {
- num_output: 2
- pad: 0
- kernel_size: 1
- weight_filler { type: "gaussian" std: 0.01 }
- bias_filler { type: "constant" value: 0 }
- }
- }
- layer {
- name: "upscore2_cityscapes"
- type: "Deconvolution"
- bottom: "score_fr"
- top: "upscore2"
- param {
- lr_mult: 0
- }
- convolution_param {
- num_output: 2
- bias_term: false
- kernel_size: 4
- stride: 2
- weight_filler { type: "gaussian" std: 0.01 }
- bias_filler { type: "constant" value: 0 }
- }
- }
- layer {
- name: "score_pool4_cityscapes"
- type: "Convolution"
- bottom: "pool4"
- top: "score_pool4"
- param {
- lr_mult: 1
- decay_mult: 1
- }
- param {
- lr_mult: 2
- decay_mult: 0
- }
- convolution_param {
- num_output: 2
- pad: 0
- kernel_size: 1
- weight_filler { type: "gaussian" std: 0.01 }
- bias_filler { type: "constant" value: 0 }
- }
- }
- layer {
- name: "score_pool4c"
- type: "Crop"
- bottom: "score_pool4"
- bottom: "upscore2"
- top: "score_pool4c"
- crop_param {
- axis: 2
- offset: 5
- }
- }
- layer {
- name: "fuse_pool4"
- type: "Eltwise"
- bottom: "upscore2"
- bottom: "score_pool4c"
- top: "fuse_pool4"
- eltwise_param {
- operation: SUM
- }
- }
- layer {
- name: "upscore_pool4_cityscapes"
- type: "Deconvolution"
- bottom: "fuse_pool4"
- top: "upscore_pool4"
- param {
- lr_mult: 0
- }
- convolution_param {
- num_output: 2
- bias_term: false
- kernel_size: 4
- stride: 2
- weight_filler { type: "gaussian" std: 0.01 }
- bias_filler { type: "constant" value: 0 }
- }
- }
- layer {
- name: "score_pool3_cityscapes"
- type: "Convolution"
- bottom: "pool3"
- top: "score_pool3"
- param {
- lr_mult: 1
- decay_mult: 1
- }
- param {
- lr_mult: 2
- decay_mult: 0
- }
- convolution_param {
- num_output: 2
- pad: 0
- kernel_size: 1
- weight_filler { type: "gaussian" std: 0.01 }
- bias_filler { type: "constant" value: 0 }
- }
- }
- layer {
- name: "score_pool3c"
- type: "Crop"
- bottom: "score_pool3"
- bottom: "upscore_pool4"
- top: "score_pool3c"
- crop_param {
- axis: 2
- offset: 9
- }
- }
- layer {
- name: "fuse_pool3"
- type: "Eltwise"
- bottom: "upscore_pool4"
- bottom: "score_pool3c"
- top: "fuse_pool3"
- eltwise_param {
- operation: SUM
- }
- }
- layer {
- name: "upscore8_cityscapes"
- type: "Deconvolution"
- bottom: "fuse_pool3"
- top: "upscore8"
- param {
- lr_mult: 0
- }
- convolution_param {
- num_output: 2
- bias_term: false
- kernel_size: 16
- stride: 8
- weight_filler { type: "gaussian" std: 0.01 }
- bias_filler { type: "constant" value: 0 }
- }
- }
- layer {
- name: "score"
- type: "Crop"
- bottom: "upscore8"
- bottom: "data"
- top: "score"
- crop_param {
- axis: 2
- offset: 31
- }
- }
- layer {
- name: "loss"
- type: "SoftmaxWithLoss"
- bottom: "score"
- bottom: "label"
- top: "loss"
- loss_param {
- ignore_label: 255
- #normalize: false
- }
- }
细心的读者朋友们可以发现,笔者换掉了数据层(换成了自己生成的lmdb文件),并且输出对应的图片以及标签,然后,由于笔者是二分类,因此改掉了原有的带有num_output: 21的卷积层与反卷积层的名字。这样在fine-tune参数模型的时候不会出错(笔者跑的是经过处理的cityscapes数据集)。然后在启动训练的时候,笔者运行了以下的脚本:
- #!/usr/bin/env sh
- set -e
- echo "begin:"
- GLOG_logtostderr=0 GLOG_log_dir=./fcn8s_cityscapes/logs/ \
- ./build/tools/caffe train \
- --solver="fcn8s_cityscapes/solver.prototxt" \
- --weights="fcn8s_cityscapes/fcn8s-heavy-pascal.caffemodel" \
- --gpu=1
- echo "end"
可是,训练过程的输出却由下图所示:
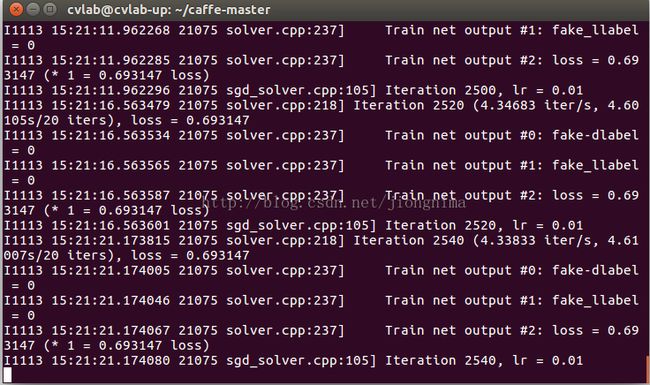
笔者训练了10w次,像素二分类loss一直等于0.693147,很明显不正常。那么,到底是哪里出了问题呢?笔者不由得陷入了冷静分析:
笔者训练使用的prototxt文件(如上所示)是按照官方提供的修改的,对结果有绝对影响的一共有两个地方:
(1) 按照我自己的输出分类数改了6个卷积与反卷积层的名字,这应该是正确的操作,因为不这样做会出错。
(2) 改掉了网络的数据层,当时为了方便,笔者甚至都没有去编译pycaffe,然后就直接使用了预先生成的lmdb文件 并使用data_layer进行数据读取。笔者严重怀疑猫腻出在此处。
于是,笔者进入了fcn代码中自带的solve.py进行查看:
- # surgeries
- interp_layers = [k for k in solver.net.params.keys() if 'up' in k]
- surgery.interp(solver.net, interp_layers)
- def interp(net, layers):
- """
- Set weights of each layer in layers to bilinear kernels for interpolation.
- """
- for l in layers:
- m, k, h, w = net.params[l][0].data.shape
- if m != k and k != 1:
- print 'input + output channels need to be the same or |output| == 1'
- raise
- if h != w:
- print 'filters need to be square'
- raise
- filt = upsample_filt(h)
- net.params[l][0].data[range(m), range(k), :, :] = filt
- def upsample_filt(size):
- """
- Make a 2D bilinear kernel suitable for upsampling of the given (h, w) size.
- """
- factor = (size + 1) // 2
- if size % 2 == 1:
- center = factor - 1
- else:
- center = factor - 0.5
- og = np.ogrid[:size, :size]
- return (1 - abs(og[0] - center) / factor) * \
- (1 - abs(og[1] - center) / factor)
看到这里笔者才恍然大悟,原来,官方自带的solve.py文件中的interp函数中的upsample_filt函数已经对反卷积层参数进行了双线性插值初始化,而在最上面笔者最初使用的.prototxt文件中,笔者只是自己在反卷积层中对参数做了高斯初始化,这是不对的。

到这里,FCN训练不收敛的原因已经完全暴露:在于没有对反卷积层参数做正确的初始化操作。解决方案是,按照官方提供的代码配置程序并使用solve.py运行程序。
那么,该怎么进行FCN训练程序的配置呢?笔者下面以fcn8s配置为例来讲解一下:
在讲解之前先说一句,在配置FCN源码的过程中,博主Darlewo的FCN训练自己的数据集及测试这篇博客对我很有启发,在此对他表示最诚挚的感谢。但是这篇博客笔者认为不是太详细与系统,因此笔者将在本篇博客中详解,下面开始干货。
(0) 配置好caffe并编译完成pycaffe
第0步相信绝大多数读者都已经完成,笔者不再赘述。
(1) 下载FCN源代码并解压。
https://github.com/shelhamer/fcn.berkeleyvision.org
(2) 进入上一步解压后的fcn.berkeleyvision.org-master文件夹,再进入voc-fcn8s文件夹,查看里面的caffemodel-url文件中的链接,并下载训练时需要fine-tune的模型fcn8s-heavy-pascal.caffemodel。
在这里,如果有读者朋友对以上的链接下载不方便的话,也可以下载笔者的百度网盘中的文件,包含源码与fine-tune所需模型。链接:http://pan.baidu.com/s/1dEWT8FR
(3) 针对训练所需的训练集与测试集,准备图像与标签。并且写训练与测试文件txt。
在这一步,笔者想要说的是,大家要准备四样东西:
训练图像与标签
测试图像与标签
训练txt文件,姑且称为train.txt
测试txt文件,姑且称为test.txt
准备的时候要注意以下几点:
第一,训练图片与训练标签的名称要保持一致,格式没有必要保持一致。比如,笔者的训练/测试图像就是train(num).jpg/test(num).jpg,训练的标签就是相应的train(num).png/test(num).png。
笔者的训练图像:

笔者训练图像对应的标签:

第二,对于train.txt文件与test.txt文件,里面只需要记录训练/测试的图像的名称,不要记录后缀格式。这就是为什么图像与标签要在名称上保持一致,因为voc_layers.py文件会根据从txt文件中阅读的文件名去同时读取训练/测试图片与标签。另外,训练/测试图像名顺序不重要。
下面是笔者的train.txt:

顺便分享给大家一个写train.txt和test.txt的脚本文件:
- import numpy as np
- import glob
- import os
- import random
- def main():
- train_dir = "./train/image/"
- test_dir = "./test/image/"
- train_path = "./train.txt"
- test_path = "./test.txt"
- train_images = glob.glob(os.path.join(train_dir, "*.jpg"))
- test_images = glob.glob(os.path.join(test_dir, "*.jpg"))
- train_file = open(train_path, 'a')
- test_file = open(test_path, 'a')
- print(len(train_images))
- print(len(test_images))
- for idx in range(len(train_images)):
- train_name, _ = os.path.splitext(os.path.basename(train_images[idx]))
- train_content = train_name + "\n"
- train_file.write(train_content)
- train_file.close()
- for idx in range(len(test_images)):
- test_name, _ = os.path.splitext(os.path.basename(test_images[idx]))
- test_content = test_name + "\n"
- test_file.write(test_content)
- test_file.close()
- if __name__ == '__main__':
- main()
在data文件夹下新建好train.txt和test.txt空白文件后直接新建并运行上述python脚本即可。
第三,对于train.txt文件和test.txt文件,训练/测试的图像与标签,统一放在一个文件夹下面,而在该文件夹下的路径可以随意配置。只是需要按需修改一下voc_layers.py文件。比如说,笔者的数据文件就是如下所示安排的。
- |-voc-fcn8s
- |-data
- test.txt
- train.txt
- |-test
- |-image
- test_images
- |-label
- test_labels
- |-train
- |-image
- train_images
- |-label
- train_labels
(4)在准备完毕训练与测试的数据和标签之后,我们就可以修改训练文件开始训练了,下面阐述训练文件配置。
1) 首先将fcn.berkeleyvision.org-master文件夹中的surgery.py文件与score.py文件移动到voc-fcn8s文件夹中。
2) 打开voc-fcn8s文件夹下的solve.py文件,按照注释进行修改。
- import sys
- sys.path.append('/home/cvlab/caffe-master/python')#引入sys库并且增加需要的caffe的python路径
- import caffe
- import surgery, score
- import numpy as np
- import os
- import sys
- try:
- import setproctitle
- setproctitle.setproctitle(os.path.basename(os.getcwd()))
- except:
- pass
- weights = './fcn8s-heavy-pascal.caffemodel'#置下载好的用来finetune的模型
- # init
- caffe.set_device(int(1))#设置gpu号,笔者使用的1号gpu跑的,如果只有一块显卡,就是(int(0))
- caffe.set_mode_gpu()
- solver = caffe.SGDSolver('solver.prototxt')#设置solver.prototxt
- solver.net.copy_from(weights)
- # surgeries
- interp_layers = [k for k in solver.net.params.keys() if 'up' in k]#此处埋下伏笔,在修改层名称的时候不要把反卷积层的name中的"up"去掉!
- surgery.interp(solver.net, interp_layers)
- # scoring
- val = np.loadtxt('./data/test.txt', dtype=str)#在这里按照实际路径传入第(3)步写好的test.txt
- for _ in range(25):#可选修改,在这两行按需修改训练的epoch数和每个epoch中的step数,笔者并没有进行修改。
- solver.step(4000)
- score.seg_tests(solver, False, val, layer='score')
在修改solve.py文件的时候,首先就是要在文件的最上端引入caffe的python路径,然后分别设置fine-tune的模型,gpu号和使用的solver.prototxt文件路径。笔者直接将fine-tune模型和solver.prototxt文件放置在voc-fcn8s目录下。然后修改在上一步中写好的test.txt文件路径。注意是传入的测试集对应的test.txt,不是训练集对应的train.txt。最后,可以修改一下训练进行的迭代epoch数和每个epoch中的step数。
3) 修改solver.prototxt文件
- train_net: "/home/cvlab/caffe-master/fcn.berkeleyvision.org-master/voc-fcn8s/train.prototxt"#修改训练prototxt文件路径
- test_net: "/home/cvlab/caffe-master/fcn.berkeleyvision.org-master/voc-fcn8s/val.prototxt"#修改测试prototxt文件路径
- test_iter: 500
- # make test net, but don't invoke it from the solver itself
- test_interval: 999999999
- display: 20
- average_loss: 20
- lr_policy: "fixed"
- # lr for unnormalized softmax
- base_lr: 1e-14
- # high momentum
- momentum: 0.99
- # no gradient accumulation
- iter_size: 1
- max_iter: 100000
- weight_decay: 0.0005
- snapshot: 4000
- snapshot_prefix: "/home/cvlab/caffe-master/fcn.berkeleyvision.org-master/voc-fcn8s/snapshot/train"#修改模型保存路径
- test_initialization: false
4) 修改train.prototxt文件与val.prototxt文件
对每个文件,修改的部分一共有2类地方,第一类就是数据层,下面是笔者的train.prototxt数据层:
- layer {
- name: "data"
- type: "Python"
- top: "data"
- top: "label"
- python_param {
- module: "voc_layers"
- layer: "SBDDSegDataLayer"
- param_str: "{\'sbdd_dir\': \'./data\', \'seed\': 1337, \'split\': \'train\', \'mean\': (72.5249, 82.9668, 73.1944)}"#mean: BGR
- }
- }
顺便附带val.prototxt中的数据层:
- layer {
- name: "data"
- type: "Python"
- top: "data"
- top: "label"
- python_param {
- module: "voc_layers"
- layer: "VOCSegDataLayer"
- param_str: "{\'voc_dir\': \'./data\', \'seed\': 1337, \'split\': \'test\', \'mean\': (72.5249, 82.9668, 73.1944)}"
- }
- }
第二类就是由于我们需要更改最后的分类数,因此需要改动带有num_output: 21的层的name属性。在更改的时候,尤其需要注意一点,因为在上文中提到,数据层需要对反卷积层参数进行初始化,因此在更改反卷积层的名称的时候,不要把"up"字样去掉,比如说笔者就直接在后面加了个"_n",原理详见上文中solve.py代码解析。
- layer {
- name: "upscore2_n"
- type: "Deconvolution"
- bottom: "score_fr"
- top: "upscore2"
- param {
- lr_mult: 0
- }
- convolution_param {
- num_output: 2
- bias_term: false
- kernel_size: 4
- stride: 2
- }
- }
voc_layers.py文件是数据层,该文件协定了训练/测试的时候的数据读取。里面有两个类,一个叫VOCSegDataLayer,用于测试时的数据读取,一个叫SBDDSegDataLayer,用于训练时的数据读取。下面是笔者的voc_layers.py文件:
- import caffe
- import numpy as np
- from PIL import Image
- import random
- class VOCSegDataLayer(caffe.Layer):
- """
- Load (input image, label image) pairs from PASCAL VOC
- one-at-a-time while reshaping the net to preserve dimensions.
- Use this to feed data to a fully convolutional network.
- """
- def setup(self, bottom, top):
- """
- Setup data layer according to parameters:
- - voc_dir: path to PASCAL VOC year dir
- - split: train / val / test
- - mean: tuple of mean values to subtract
- - randomize: load in random order (default: True)
- - seed: seed for randomization (default: None / current time)
- for PASCAL VOC semantic segmentation.
- example
- params = dict(voc_dir="/path/to/PASCAL/VOC2011",
- mean=(104.00698793, 116.66876762, 122.67891434),
- split="val")
- """
- # config
- params = eval(self.param_str)
- self.voc_dir = params['voc_dir']
- self.split = params['split']
- self.mean = np.array(params['mean'])
- self.random = params.get('randomize', True)
- self.seed = params.get('seed', None)
- # two tops: data and label
- if len(top) != 2:
- raise Exception("Need to define two tops: data and label.")
- # data layers have no bottoms
- if len(bottom) != 0:
- raise Exception("Do not define a bottom.")
- # load indices for images and labels
- split_f = '{}/{}.txt'.format(self.voc_dir,
- self.split)#读入val.prototxt中数据层的voc_dir参数与split参数,笔者将test.txt直接放在了voc_dir下面,这样直接就能读取到test.txt文件中的内容
- self.indices = open(split_f, 'r').read().splitlines()#在这里获取test.txt中每一行的值(不带后缀的测试图像/标签名称)
- self.idx = 0
- # make eval deterministic
- if 'train' not in self.split:
- self.random = False
- # randomization: seed and pick
- if self.random:
- random.seed(self.seed)
- self.idx = random.randint(0, len(self.indices)-1)
- def reshape(self, bottom, top):
- # load image + label image pair
- self.data = self.load_image(self.indices[self.idx])
- self.label = self.load_label(self.indices[self.idx])
- # reshape tops to fit (leading 1 is for batch dimension)
- top[0].reshape(1, *self.data.shape)
- top[1].reshape(1, *self.label.shape)
- def forward(self, bottom, top):
- # assign output
- top[0].data[...] = self.data
- top[1].data[...] = self.label
- # pick next input
- if self.random:
- self.idx = random.randint(0, len(self.indices)-1)
- else:
- self.idx += 1
- if self.idx == len(self.indices):
- self.idx = 0
- def backward(self, top, propagate_down, bottom):
- pass
- def load_image(self, idx):
- """
- Load input image and preprocess for Caffe:
- - cast to float
- - switch channels RGB -> BGR
- - subtract mean
- - transpose to channel x height x width order
- """
- im = Image.open('{}/test/image/{}.jpg'.format(self.voc_dir, idx))#读入val.prototxt中数据层的voc_dir参数与test.txt中的某行内容,结合图片路径和图片格式,然后直接就能读取到一张图片,请大家按照自己的测试图片路径配置。
- in_ = np.array(im, dtype=np.float32)
- in_ = in_[:,:,::-1]
- in_ -= self.mean#印证了数据层中mean是按照BGR的顺序从前到后排列的
- in_ = in_.transpose((2,0,1))
- return in_
- def load_label(self, idx):
- """
- Load label image as 1 x height x width integer array of label indices.
- The leading singleton dimension is required by the loss.
- """
- im = Image.open('{}/test/label/{}.png'.format(self.voc_dir, idx))#读入val.prototxt中数据层的voc_dir参数与test.txt中的同一行内容,结合标签路径和标签格式,然后直接就能读取到一张同上文中测试图片对应的标签,请大家按照自己的测试标签路径配置。
- label = np.array(im, dtype=np.uint8)
- label = label[np.newaxis, ...]
- return label
- class SBDDSegDataLayer(caffe.Layer):
- """
- Load (input image, label image) pairs from the SBDD extended labeling
- of PASCAL VOC for semantic segmentation
- one-at-a-time while reshaping the net to preserve dimensions.
- Use this to feed data to a fully convolutional network.
- """
- def setup(self, bottom, top):
- """
- Setup data layer according to parameters:
- - sbdd_dir: path to SBDD `dataset` dir
- - split: train / seg11valid
- - mean: tuple of mean values to subtract
- - randomize: load in random order (default: True)
- - seed: seed for randomization (default: None / current time)
- for SBDD semantic segmentation.
- N.B.segv11alid is the set of segval11 that does not intersect with SBDD.
- Find it here: https://gist.github.com/shelhamer/edb330760338892d511e.
- example
- params = dict(sbdd_dir="/path/to/SBDD/dataset",
- mean=(104.00698793, 116.66876762, 122.67891434),
- split="valid")
- """
- # config
- params = eval(self.param_str)
- self.sbdd_dir = params['sbdd_dir']
- self.split = params['split']
- self.mean = np.array(params['mean'])
- self.random = params.get('randomize', True)
- self.seed = params.get('seed', None)
- # two tops: data and label
- if len(top) != 2:
- raise Exception("Need to define two tops: data and label.")
- # data layers have no bottoms
- if len(bottom) != 0:
- raise Exception("Do not define a bottom.")
- # load indices for images and labels
- split_f = '{}/{}.txt'.format(self.sbdd_dir,
- self.split)#读入train.prototxt中数据层的sbdd_dir参数与split参数,笔者将train.txt直接放在了voc_dir下面,这样直接就能读取到train.txt文件中的内容
- self.indices = open(split_f, 'r').read().splitlines()#在这里获取train.txt中每一行的值(不带后缀的训练图像/标签名称)
- self.idx = 0
- # make eval deterministic
- if 'train' not in self.split:
- self.random = False
- # randomization: seed and pick
- if self.random:
- random.seed(self.seed)
- self.idx = random.randint(0, len(self.indices)-1)
- def reshape(self, bottom, top):
- # load image + label image pair
- self.data = self.load_image(self.indices[self.idx])
- self.label = self.load_label(self.indices[self.idx])
- # reshape tops to fit (leading 1 is for batch dimension)
- top[0].reshape(1, *self.data.shape)
- top[1].reshape(1, *self.label.shape)
- def forward(self, bottom, top):
- # assign output
- top[0].data[...] = self.data
- top[1].data[...] = self.label
- # pick next input
- if self.random:
- self.idx = random.randint(0, len(self.indices)-1)
- else:
- self.idx += 1
- if self.idx == len(self.indices):
- self.idx = 0
- def backward(self, top, propagate_down, bottom):
- pass
- def load_image(self, idx):
- """
- Load input image and preprocess for Caffe:
- - cast to float
- - switch channels RGB -> BGR
- - subtract mean
- - transpose to channel x height x width order
- """
- im = Image.open('{}/train/image/{}.jpg'.format(self.sbdd_dir, idx))#读入train.prototxt中数据层的sdbb_dir参数与train.txt中的某行内容,结合图片路径和图片格式,然后直接就能读取到一张图片,请大家按照自己的训练图片路径配置。
- in_ = np.array(im, dtype=np.float32)
- in_ = in_[:,:,::-1]
- in_ -= self.mean#印证了数据层中mean是按照BGR的顺序从前到后排列的
- in_ = in_.transpose((2,0,1))
- return in_
- #由于笔者的标签是.png格式,因此笔者重写了load_label函数,将.mat换成.png,并将format中的self.voc_dir换成了self.sbdd_dir,从这里可以看到,标签与图片是什么格式的都可以,只要能读取到即可。
- def load_label(self, idx):
- """
- Load label image as 1 x height x width integer array of label indices.
- The leading singleton dimension is required by the loss.
- """
- im = Image.open('{}/train/label/{}.png'.format(self.sbdd_dir, idx))#读入train.prototxt中数据层的sbdd_dir参数与train.txt中的同一行内容,结合标签路径和标签格式,然后直接就能读取到一张同上文中训练图片对应的标签,请大家按照自己的训练标签路径配置。
- label = np.array(im, dtype=np.uint8)
- label = label[np.newaxis, ...]
- return label
- #笔者将原来读取mat的函数注释掉了
- """
- def load_label(self, idx):
- import scipy.io
- mat = scipy.io.loadmat('{}/cls/{}.mat'.format(self.sbdd_dir, idx))
- label = mat['GTcls'][0]['Segmentation'][0].astype(np.uint8)
- label = label[np.newaxis, ...]
- return label
- """
在上面的代码中,读者朋友们可以看到,在数据层中我们写的sbdd_dir/voc_dir只是存放数据的根文件夹名称,split参数是训练/测试的txt文件名。而在voc_layers.py文件中,请读者朋友们注意上面的注释,这两个参数只是为了被当成字符串传入去读取数据集txt文件中的内容或者读取一张图片。这充分说明了,数据存放的格式是可以灵活多变的,只要在voc_layers.py文件中进行相应的配置,满足能读到相应的内容就可以了。
另外,就是在数据层中传入的mean参数是按照BGR的顺序排列的。这可以在voc_layers.py中得到印证,图像被Image.open接口读进来,是RGB格式,然后通道换了顺序,换成了BGR格式,再减去mean,最后,将通道转换回来,又变成了RGB的顺序。因此,在数据层中写均值的时候,应该按照BGR的顺序写。
6) 将修改好的voc_layer.py文件复制到caffe路径下的python文件夹中。
(5) 在voc-fcn8s文件夹下运行solve.py文件,训练开始,很明显地看到loss在慢慢减小,模型训练收敛!
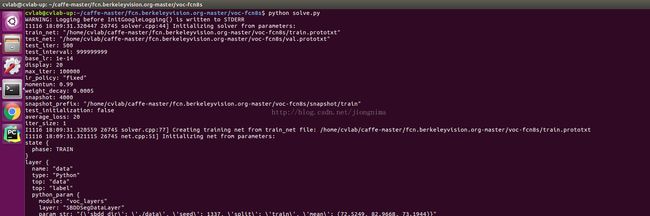
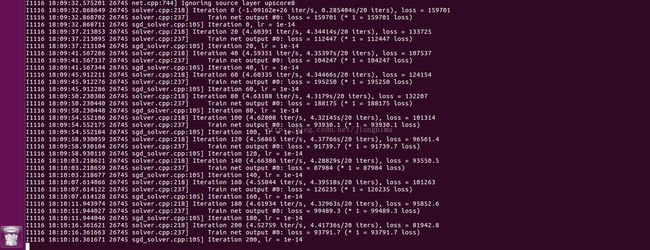
FCN配置训练大功告成!
(6) 对训练生成的模型进行测试
大家最初下载的代码中有一个infer.py文件,该文件可以用来测试我们训练成功的模型,笔者训练了10w次。我们将infer.py复制进voc-fcn8s文件夹中,修改小部分代码参数:
- import numpy as np
- from PIL import Image
- import caffe
- import cv2 #引入cv2库进行模型保存
- # load image, switch to BGR, subtract mean, and make dims C x H x W for Caffe
- im = Image.open('./data/test/image/test912.jpg') #导入测试图片
- in_ = np.array(im, dtype=np.float32)
- in_ = in_[:,:,::-1]
- in_ -= np.array((72.5249, 82.9668, 73.1944)) #修改均值参数
- in_ = in_.transpose((2,0,1))
- # load net
- net = caffe.Net('./deploy_cityscapes.prototxt', './snapshot/train_iter_100000.caffemodel', caffe.TEST) #传入训练获得的模型
- # shape for input (data blob is N x C x H x W), set data
- net.blobs['data'].reshape(1, *in_.shape)
- net.blobs['data'].data[...] = in_
- # run net and take argmax for prediction
- net.forward()
- out = net.blobs['score'].data[0].argmax(axis=0)
- result = np.expand_dims(np.array((-255.) * (out-1.)).astype(np.float32), axis = 2) #加了两行代码保存图片
- cv2.imwrite("result.png", result)
我们的测试图片是:


可见在文件夹下生成了测试结果图result.png:

result.png:

测试程序运行无误。
到这里,FCN配置说明就接近尾声了,笔者写得比较详尽,希望能对各位读者朋友有帮助。遇到困难,还是那句老话:多读源码,冷静分析,笔者相信绝大多数技术问题会迎刃而解。
欢迎阅读笔者后续博客,各位读者朋友的支持与鼓励是我最大的动力!
written by jiong
沉舟侧畔千帆过,病树前头万木春