Nodejs+express后端学习笔记(1)
1 Node.js安装
1、下载安装包:进入官网(https://nodejs.org/en),下载左侧的稳定版。

2、选择安装位置,不用勾选自动安装必要工具。
其他都默认Next。

配置环境,具体参考本文章:
https://blog.csdn.net/WHF__/article/details/129362462
2 Node.js使用
nodejs用来开发Web服务器(后端)。本文使用Visual Studio Code进行编写和调试。
2.1 REPL环境使用
命令行状态下输入:node,就可以进入。
可以进行简单的函数编写和计算。
1、输入函数:
> function add(a,b){
	return a+b;
}
> add(1,2)
会输出3。

2、输入调试:
console.log("hello")

2.2 基本知识、程序运行方法
1、JS文件的执行方式:js单线程执行,有异步任务,同步任务。
2、模块、包与commonjs规范:
- 内置(Nodejs自带)
- 第三方模块(安装在node-modules文件夹中)
-
- npm
-
- npm install 模块名 --save
-
- npm uninstall 模块名
- 自定义(项目里独立的js文件,根据commonjs规范定义)
3、运行js代码:node ****.js。
2.3 第一个js文件
1、console
新建一个文件夹,在文件夹内新建helloworld.js文件,文件内容如下:
//helloworld.js
console.log("hello, world!");
运行代码,在终端控制台输入:node helloworld.js,程序将会反馈出hello, world!。

2、function函数定义和调用
代码如下:
console.log("hello, world!");

function add(a,b){
    return a+b;
}

console.log(add(1,2));
控制台输入输出:
PS G:\Visual Studio\Nodejs_Project\nodejs_test> node .\helloworld.js
hello, world!
3
2.4 外部js文件导入
如果要使helloworld.js文件能够引用其他js文件,需要使用require函数。
1、在同级文件夹下新建utils.js文件,文件内容如下:
function add(a,b){
    return a+b;
}
function about(){
    return "服务器";
}
const name = "utils"

module.exports = {
    add,
    about,
    msg:"你好",
    name,
}
文件内能够定义变量、函数,并通过module.exports引出,以便其他文件调用。
2、文件引入:
在helloworld.js文件中,使用require函数引入utils.js文件,然后调用文件内的参数,具体代码如下:
const util = require('./utils.js');

console.log("hello, world!");

console.log(util);
console.log(util.add(1,2));
console.log(util.about());
console.log(util.msg);
console.log(util.name);
3、代码运行:
PS G:\Visual Studio\Nodejs_Project\nodejs_test> node .\helloworld.js
hello, world!
{
add: [Function: add],
about: [Function: about],
msg: ‘你好’,
name: ‘utils’
}
3
服务器
你好
utils
2.5 export导出方法
1、导出对象
module.exports = {
	add,
	about,
	msg,
	...
}
2、导出值/属性
module.exports.add = add;
module.exports.about = about;
module.exports.msg = msg;
...
3、导出
export.add = add;
export about = about;
...
2.6 fs库使用、同步异步
1、fs库使用:如果要使用fs,管理文件系统。
直接const fs = require('fs')。
有同步和异步的读取方法,两者都会按照顺序执行程序,但同步方法必须阻塞程序,等到数据读取出来,再继续执行。而异步方法则不会阻塞住程序,而是另外开一个回调函数(类似于中断处理函数),先执行下方代码,等到数据读取出来,再调用回调函数。因此,同步和异步的数据的呈现顺序会出现差异。代码如下:
const fs = require('fs');       // 文件系统模块

console.log("-------------------------------")
// 异步读取,函数运行和读取到值的时间不同,读取到值之后,再调用function
console.log("a1");
fs.readFile("./text1.txt", "utf-8", function(error, res) {
    if(error){
        console.log(error);
        return;
    }
    console.log(res);
});
console.log("b1");
console.log("c1");

// 同步读取文件,读取到文件之间把值给data
console.log("-------------------------------")
console.log("a2");
const data = fs.readFileSync("./text2.txt", "utf-8");
console.log(data);
console.log("b2");
console.log("c2");
代码运行如下,可以发现异步读取的函数输出结果不是按照顺序来的,但这种方法对于网络请求来说非常重要,能够避免因为网络速度较慢造成程序长时间阻塞。
-------------------------------
a1
b1
c1
-------------------------------
a2
text2
b2
c2
text1
2、异步方法也可以使用这种方式:相当于设置一个回调函数,等文件读取完成后调用回调函数。
function readFileCompletedHandle(error, res) {
    if(error){
        console.log(error);
        return;
    }
    console.log(res);
}

fs.readFile("./text1.txt", "utf-8", readFileCompletedHandle);
2.7 更多官方库
链接:
https://nodejs.p2hp.com/api/v19/documentation/
3 express框架
3.1 初始化工程
使用命令npm init来创建新工程。里面的设置全部默认,设置完成后会出现一个package.json文件。
//package.json
{
  "name": "nodejs_test",
  "version": "1.0.0",
  "description": "",
  "main": "helloworld.js",
  "scripts": {
    "test": "echo \"Error: no test specified\" && exit 1"
  },
  "author": "",
  "license": "ISC"
}
3.2 npm
进入npm官网,查找需要的第三方函数库,比如gulp、express、mqtt等。
链接:
https://npm.p2hp.com/
3.3 引入express
在项目文件夹下,输入命令:
npm add express
然后项目中就会安装各种依赖包。

3.4 http构建服务器
新建http_demo.js文件,代码如下:
// http_demo.js
var http = require('http')

// 通过http模块,创建web应用
var app = http.createServer((req,res) => {
    res.writeHead(200,{"ContentType":"text/plain"});
    res.end("hello world");
});

// 通过监听端口启动
app.listen(3000,'localhost');
console.log("http://localhost:3000");
运行程序,启动服务器,终端输入:
node http_demo.js
可以看到程序输出:
http://localhost:3000
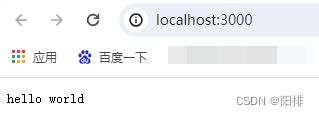
进入该网址,就可以看到:
如果想要停止服务器运行,使用Ctrl+C组合键关闭。
3.5 express构建服务器
express对http库进行了封装。
新建app.js文件,代码如下:
// 导入express
const express = require("express");

const app = express()

app.get('/',(req,res)=>{
    res.send('Hello World Express!');
})

app.listen(3000,()=>{
    console.log("Express app at: http://localhost:3000");
})
运行程序:
node app.js
得到输出:
Express app at: http://localhost:3000
进入网页:

4 express路由
4.1 get、post、put、delete四种请求
app.js代码如下:
// 导入express
const express = require("express");

const app = express()

// get请求
app.get('/',(req,res)=>{
    res.send('Get Express!');
})
// post请求
app.post('/',(req,res)=>{
    res.send('Post Express!');
})
// put请求
app.put('/',(req,res)=>{
    res.send('Put Express!');
})
// delete请求
app.delete('/',(req,res)=>{
    res.send('delete Express!');
})

app.listen(3000,()=>{
    console.log("Express app at: http://localhost:3000");
})
输入node app.js运行服务器。
浏览器能够看到Get Express!。

下载Postman验证其他请求。
参考链接: https://blog.csdn.net/qq_37591637/article/details/88655294
输入网址:http://localhost:3000,左侧选择get、post、put、delete请求。点击Send,在底部就可以查看服务器返回的数据。

2、发送JSON格式数据:
//app.js
// get请求
app.get('/',(req,res)=>{
    res.send({"name":"小美","age":"18","message":"刚满十八岁~"});    // json格式数据
})
保存后重启服务器,刷新网页,可以看到:

postman也可以获得数据:

重启服务器比较麻烦,因此以下可以采用热部署。
4.2 热部署 nodemon
1、安装nodemon:
命令行输入:
npm install nodemon -d -g
-d的意思是作为依赖,可以自动添加到package.json中。
-g的意思是全局安装。
2、在package.json的script中修改:
"scripts": {
    "test": "echo \"Error: no test specified\" && exit 1",
	"start": "nodemon app.js"
  },
3、使用npm start命令来启动服务器。

修改并保存app.js内的数据:
// get请求
app.get('/',(req,res)=>{
    // res.send('Get Express!');
    res.send({"name":"小兰","age":"16","message":"刚满十六岁~"});    // json格式数据
})
刷新浏览器,不用重启服务器,就可以看到返回数据的变化。

注意:如果出现nodemon : 无法将“nodemon”项识别为 cmdlet、函数、脚本文件或可运行程序的名称。请检查名称的拼写,如果包括路径,请确保路径正确,然后再 试一次。问题的另外一个解决方法:
https://blog.csdn.net/yan_danfeng/article/details/109306687
4.3 路由模块化
将多个请求放置到其他文件。
新建router-demo.js,将部分app.js的代码移植到文件内,需要创建router对象,并在最后使用module.exports导出。
var express = require("express");

// 创建router对象
var router = express.Router();

// get请求
router.get('/',(req,res)=>{
    res.send({"name":"小兰","age":"16","message":"刚满十六岁~"});    // json格式数据
})
// post请求
router.post('/',(req,res)=>{
    res.send('Post Express!');
})
// put请求
router.put('/',(req,res)=>{
    res.send('Put Express!');
})
// delete请求
router.delete('/',(req,res)=>{
    res.send('delete Express!');
})

module.exports = router;
app.js修改为:
// 导入 express
const express = require("express");
const router = require("./router-demo");
const app = express();
// 绑定路由
app.use(router);

app.listen(3000,()=>{
    console.log("Express app at: http://localhost:3000");
})
重启服务器,可以看到服务依旧可以使用。
5 express中间件
5.1 修改状态Status
如果要get先返回状态(201),可以使用:
router.get('/',(req,res)=>{
    res.stauts(201).send({"name":"小兰","age":"16","message":"刚满十六岁~"});    // json格式数据
})
postman再次send以下,可以发现状态变化,从200变成201。

5.2 修改头部Headers
.set()可以组装头部,.end()表示一次响应的结束。
// get请求
router.get('/',(req,res)=>{
    res.set({"aHeader":"bHeader"});
    res.status(201).send({"name":"小兰","age":"16","message":"刚满十六岁~"});    // json格式数据
    res.end();
})
可以发现Headers内数据变化。

5.3 修改路径
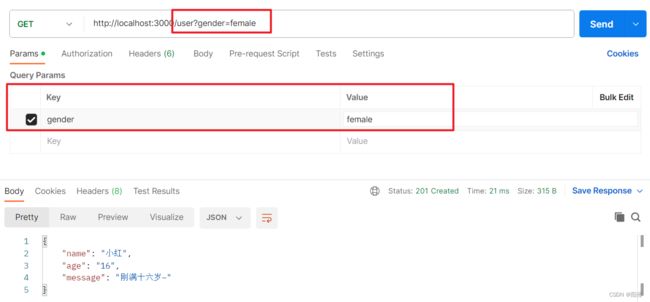
如果从http://localhost:3000/user发送Get请求。
则可以修改app.js中绑定路由的参数,前面加上路径。
app.use('/user',router);
postman结果如下:依旧可以正常工作。

5.4 服务器读取请求
1、修改router-demo.js内get请求的函数:
var express = require("express");


// 创建router对象
var router = express.Router();

// get请求
router.get('/',(req,res)=>{
    // 请求对象
    console.log("req请求",req);

    // 响应对象
    res.set({"aHeader":"bHeader"});
    res.status(201).send({"name":"小红","age":"16","message":"刚满十六岁~"});    // json格式数据
    res.end();
})
// post请求
router.post('/',(req,res)=>{
    res.send('Post Express!');
})
// put请求
router.put('/',(req,res)=>{
    res.send('Put Express!');
})
// delete请求
router.delete('/',(req,res)=>{
    res.send('delete Express!');
})

module.exports = router;
使用浏览器/postman发送一次请求,在VS Code的终端能够看到服务器的console.log调试信息,可以发现非常的长。
req请求 <ref *2> IncomingMessage {
  _readableState: ReadableState {
    highWaterMark: 16384,
    buffer: BufferList { head: null, tail: null, length: 0 },
    length: 0,
    pipes: [],
    awaitDrainWriters: null,
    [Symbol(kState)]: 1185840
  },
  ...
  [Symbol(kHeadersCount)]: 28,
  [Symbol(kTrailers)]: null,
  [Symbol(kTrailersCount)]: 0
}
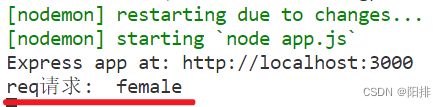
2、如果浏览器/postman发送了参数:
服务器读取方法如下:req.query.*****,*****是params中的Key值,输出的是value。
// get请求
router.get('/',(req,res)=>{
    // 请求对象
    console.log("req请求: ",req.query.gender);

    // 响应对象
    res.set({"gender":req.query.gender});
    res.status(201).send({"name":"小红","age":"16","message":"刚满十六岁~"});    // json格式数据
    res.end();
})
服务器控制台可以看到:
postman可以看到:
