Superset服务安装
文章目录
- Superset概述
- Superset应用场景
- Superset安装及使用
-
- 安装Python环境
- 安装Miniconda
-
- 下载Miniconda(Python3版本)
- 安装Miniconda
- 取消每次登陆自动激活`conda base`环境
- 创建Python3.7(Superset)环境
-
- 配置conda国内镜像
- 创建`Superset`环境
- 激活`Superset`环境
- 查看python版本
- Superset部署
-
- 安装依赖
- 安装Superset
-
- 可能遇到的异常
- 创建管理员用户
- Superset初始化
- 启动Superset
- Superset启停脚本
- Superset使用
-
- MySQL数据源
-
- 安装MySQL依赖
-
- 重启Superset
- MySQL数据源配置
-
- Database 配置
- Table配置
- 创建图表
- 创建仪表盘
- 使用SQL查询后以表格形式展示
- 系统嵌入
Superset概述
Apache Superset是一个开源的、现代的、轻量级BI分析工具,能够对接多种数据源、拥有丰富的图表展示形式、支持自定义仪表盘,且拥有友好的用户界面,十分易用。
Superset应用场景
由于Superset能够对接常用的大数据分析工具,如Hive、Kylin、Druid等,且支持自定义仪表盘,故可作为数仓的可视化工具。
Superset安装及使用
Superset官网地址:http://superset.apache.org/
Superset文档地址:https://superset.apache.org/docs/intro
安装Python环境
Superset是由Python语言编写的Web应用,要求Python3.7的环境。
安装Miniconda
因为目前我们服务器 Python默认版本都是2.x,我们需要一个独立环境安装3.7供Superset使用,conda是一个比较好的选择。
conda是一个开源的包、环境管理器,可以用于在同一个机器上安装不同Python版本的软件包及其依赖,并能够在不同的Python环境之间切换,Anaconda包括Conda、Python以及一大堆安装好的工具包,比如:numpy、pandas等,Miniconda包括Conda、Python。
此处,我们不需要如此多的工具包,故选择MiniConda。
下载Miniconda(Python3版本)
下载链接:
https://repo.anaconda.com/miniconda/Miniconda3-latest-Linux-x86_64.sh
其他版本可以查看:https://repo.anaconda.com/miniconda/
安装Miniconda
执行安装脚本
sh Miniconda3-latest-Linux-x86_64.sh
按回车继续
Welcome to Miniconda3 py39_4.11.0

In order to continue the installation process, please review the license
agreement.
Please, press ENTER to continue
>>>
空格翻阅安装条款

同意条款,输入yes
Do you accept the license terms? [yes|no]
[no] >>>
输入安装目录
Miniconda3 will now be installed into this location:
/root/miniconda3

  - Press ENTER to confirm the location
  - Press CTRL-C to abort the installation
  - Or specify a different location below

[/root/miniconda3] >>>
运行初始化conda,输入yes
installation finished.
Do you wish the installer to initialize Miniconda3
by running conda init? [yes|no]
[no] >>>
取消每次登陆自动激活conda base环境
现在每次登陆该服务器会自动自动进入base环境

刚刚在安装完成时会提示下面一句话
If you'd prefer that conda's base environment not be activated on startup,
   set the auto_activate_base parameter to false:

conda config --set auto_activate_base false
我们执行conda config --set auto_activate_base false就是取消自动进入
[root@r-wb-18 software]# conda config --set auto_activate_base false
-bash: conda: 未找到命令
如果提示未找到,我们引用一下环境变量即可 source ~/.bashrc
创建Python3.7(Superset)环境
配置conda国内镜像
conda config --add channels https://mirrors.tuna.tsinghua.edu.cn/anaconda/pkgs/free

conda config --add channels https://mirrors.tuna.tsinghua.edu.cn/anaconda/pkgs/main

conda config --set show_channel_urls yes
创建Superset环境
conda create --name superset python=3.7
或者使用--channel指定国内源
conda create --name superset python=3.8 --channel https://mirrors.tuna.tsinghua.edu.cn/anaconda/pkgs/free/
遇到需要安装组件同意安装
说明:conda环境管理常用命令
创建环境:conda create -n env_name
查看所有环境:conda info --envs
删除一个环境:conda remove -n env_name --all
安装完成提示:
#
# To activate this environment, use
#
#     $ conda activate superset
#
# To deactivate an active environment, use
#
#     $ conda deactivate
conda activate superset 进入我们创建的superset环境
conda deactivate退出
激活Superset环境
conda activate superset
激活后效果如下
[root@r-wb-18 ~]# conda activate superset
(superset) [root@r-wb-18 ~]#
退出Superset环境
conda deactivate
查看python版本
(superset) [root@r-wb-18 ~]# python
Python 3.7.11 (default, Jul 27 2021, 14:32:16)
[GCC 7.5.0] :: Anaconda, Inc. on linux
Type "help", "copyright", "credits" or "license" for more information.
>>>
Superset部署
**注意:**执行部署前需要进入我们刚刚创建的环境conda activate superset
安装依赖
安装Superset之前,需安装以下所需依赖
yum install -y gcc gcc-c++ libffi-devel python-devel python-pip python-wheel python-setuptools openssl-devel cyrus-sasl-devel openldap-devel
安装Superset
-
安装(更新)
setuptools和pippip install --upgrade setuptools pip -i https://pypi.douban.com/simple/ -
安装Superset
pip install apache-superset -i https://pypi.douban.com/simple/说明:-i 的作用是指定镜像,这里选择国内镜像
注:如果遇到网络错误导致不能下载,可尝试更换镜像
pip install apache-superset --trusted-host https://repo.huaweicloud.com -i https://repo.huaweicloud.com/repository/pypi/simple -
初始化Superset数据库
superset db upgrade
可能遇到的异常
-
异常1:
ImportError: cannot import name 'soft_unicode' from 'markupsafe' (/opt/software/miniconda3/envs/superset/lib/python3.7/site-packages/markupsafe/__init__.py)解决方法:
执行
python -m pip install markupsafe==2.0.1后重新执行superset db upgrade参考:https://github.com/pallets/markupsafe/issues/284
-
异常2:
AttributeError: module 'sqlparse.keywords' has no attribute 'FLAGS'降低版本
pip install sqlparse=='0.4.3' -i http://mirrors.aliyun.com/pypi/simple/ --trusted-host mirrors.aliyun.com -
异常3:
Error: Could not locate a Flask application. You did not provide the "FLASK_APP" environment variable, and a "wsgi.py" or "app.py" module was not found in the current directory.执行
export FLASK_APP=superset并在环境变量中添加
vim /etc/profile export FLASK_APP=superset -
异常4
--------------------------------------------------------------------------------
                                    WARNING
--------------------------------------------------------------------------------
A Default SECRET_KEY was detected, please use superset_config.py to override it.
Use a strong complex alphanumeric string and use a tool to help you generate
a sufficiently random sequence, ex: openssl rand -base64 42
--------------------------------------------------------------------------------
--------------------------------------------------------------------------------
Refusing to start due to insecure SECRET_KEY
解决方法:
随便在一个目录下。输入vim superset_config.py增加配置文件
(注意!!! superset_config.py文件原先是没有的,得自己创建)
在superset_config.py文件下添加以下内容
# Superset specific config
# SS 相关的配置
# 行数限制 5000 行
ROW_LIMIT = 5000

# 网站服务器端口 8088,该端口被Hadoop占用,改为其他端口比如18088
SUPERSET_WEBSERVER_PORT = 8088

# Flask App Builder configuration
# Your App secret key will be used for securely signing the session cookie
# and encrypting sensitive information on the database
# Make sure you are changing this key for your deployment with a strong key.
# You can generate a strong key using `openssl rand -base64 42`
# Flask 应用构建器配置
# 应用密钥用来保护会话 cookie 的安全签名
# 并且用来加密数据库中的敏感信息
# 请确保在你的部署环境选择一个强密钥
# 可以使用命令 openssl rand -base64 42 来生成一个强密钥

SECRET_KEY = "ZT2uRVAMPKpVkHM/QA1QiQlMuUgAi7LLo160AHA99aihEjp03m1HR6Kg"

# The SQLAlchemy connection string to your database backend
# This connection defines the path to the database that stores your
# superset metadata (slices, connections, tables, dashboards, ...).
# Note that the connection information to connect to the datasources
# you want to explore are managed directly in the web UI
# SQLAlchemy 数据库连接信息
# 这个连接信息定义了 SS 元数据库的路径(切片、连接、表、数据面板等等)
# 注意:需要探索的数据源连接及数据库连接直接通过网页界面进行管理
#SQLALCHEMY_DATABASE_URI = 'sqlite:path/to/superset.db'

# Flask-WTF flag for CSRF
# 跨域请求攻击标识
WTF_CSRF_ENABLED = True

# Add endpoints that need to be exempt from CSRF protection
# CSRF 白名单
WTF_CSRF_EXEMPT_LIST = []

# A CSRF token that expires in 1 year
# CSFR 令牌过期时间 1 年
WTF_CSRF_TIME_LIMIT = 60 * 60 * 24 * 365

# Set this API key to enable Mapbox visualizations
# 接口密钥用来启用 Mapbox 可视化
MAPBOX_API_KEY = ''
添加之后,在/etc/profile 文件中加入以下命令:,然后生效以下配置或者重启一下大数据环境即可
export SUPERSET_CONFIG_PATH=/app/superset_config.py
添加后source /etc/profile刷新一下环境变量
- 异常5:
ModuleNotFoundError: No module named 'marshmallow_enum'
解决方法
pip install marshmallow_enum -i http://mirrors.aliyun.com/pypi/simple/ --trusted-host mirrors.aliyun.com
参考:https://blog.csdn.net/m0_58195451/article/details/134148085
创建管理员用户
superset fab create-admin
**说明:**flask是一个python web框架,Superset使用的就是flask
添加创建账号信息
2022-03-18 11:22:47,189:INFO:superset.utils.screenshots:No PIL installation found
Username [admin]: jast
User first name [admin]: jast
User last name [user]: zhang
Email [[email protected]]: [email protected]
Password:
Repeat for confirmation:
Recognized Database Authentications.
Admin User jast created.
Superset初始化
superset init
启动Superset
-
安装gunicorn
pip install gunicorn -i https://pypi.douban.com/simple/说明:gunicorn是一个Python Web Server,可以和java中的TomCat类比
-
启动Superset
gunicorn --workers 5 --timeout 120 --bind 192.168.60.18:18888 "superset.app:create_app()" --daemon说明:
–workers:指定进程个数
–timeout:worker进程超时时间,超时会自动重启
–bind:绑定本机地址,即为Superset访问地址
–daemon:后台运行 -
登录Superset
访问
http://192.168.60.18:18888,使用我们刚刚创建的管理员用户登录

-
停止Superset
ps -ef | awk '/superset/ && !/awk/{print $2}' | xargs kill -9
Superset启停脚本
#!/bin/bash

superset_status(){
    result=`ps -ef | awk '/gunicorn/ && !/awk/{print $2}' | wc -l`
    if [[ $result -eq 0 ]]; then
        return 0
    else
        return 1
    fi
}
superset_start(){
        source ~/.bashrc
        superset_status >/dev/null 2>&1
        if [[ $? -eq 0 ]]; then
            conda activate superset ; gunicorn --workers 5 --timeout 120 --bind 192.168.60.18:8787 --daemon 'superset.app:create_app()'
        else
            echo "superset正在运行"
        fi

}

superset_stop(){
    superset_status >/dev/null 2>&1
    if [[ $? -eq 0 ]]; then
        echo "superset未在运行"
    else
        ps -ef | awk '/gunicorn/ && !/awk/{print $2}' | xargs kill -9
    fi
}


case $1 in
    start )
        echo "启动Superset"
        superset_start
    ;;
    stop )
        echo "停止Superset"
        superset_stop
    ;;
    restart )
        echo "重启Superset"
        superset_stop
        superset_start
    ;;
    status )
        superset_status >/dev/null 2>&1
        if [[ $? -eq 0 ]]; then
            echo "superset未在运行"
        else
            echo "superset正在运行"
        fi
esac
Superset使用
MySQL数据源
安装MySQL依赖
conda install mysqlclient
说明:对接不同的数据源,需安装不同的依赖,以下地址为官网说明
https://superset.apache.org/docs/databases/installing-database-drivers
官方介绍是使用的pip方法安装,我们替换成conda防止兼容性产生;官方说明:pip install mysqlclient;
数据库连接方法:mysql://

重启Superset
superset restart
MySQL数据源配置
Database 配置
-
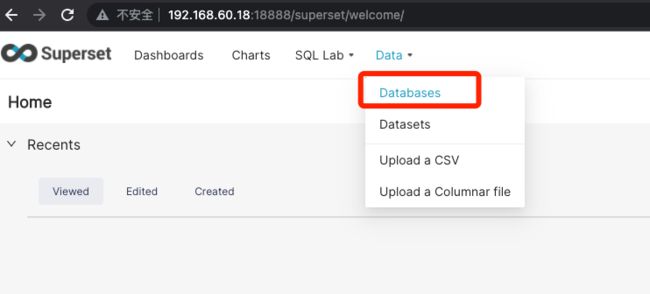
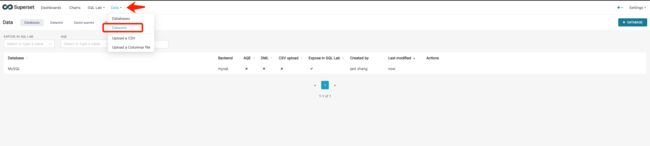
点击Data->Databases
-
点击添加数据源

-
填写数据库 连接信息

-
创建成功

Table配置
-
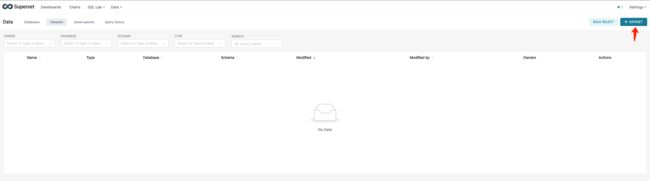
Data -> Datasets
-
点击 DATASET
-
选择表


创建图表
-
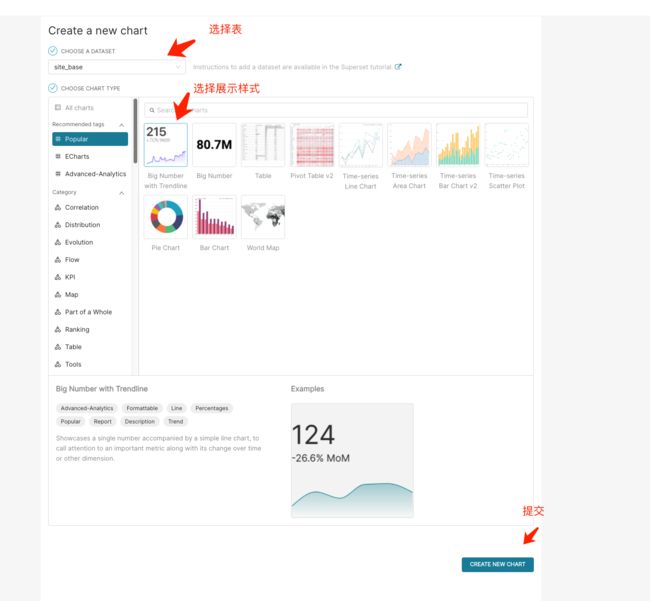
点击Charts -> CHART

-
选择表和需要展示的图
-
配置统计说明
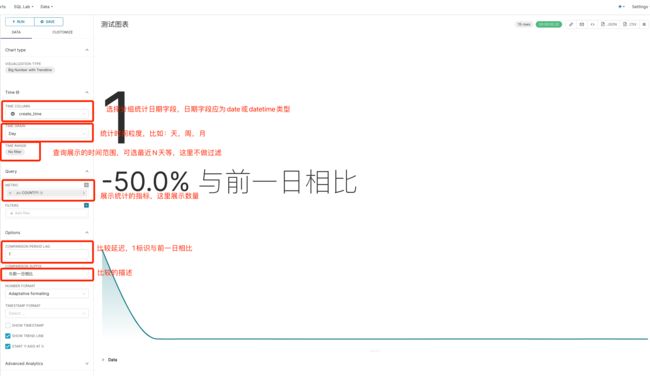

-
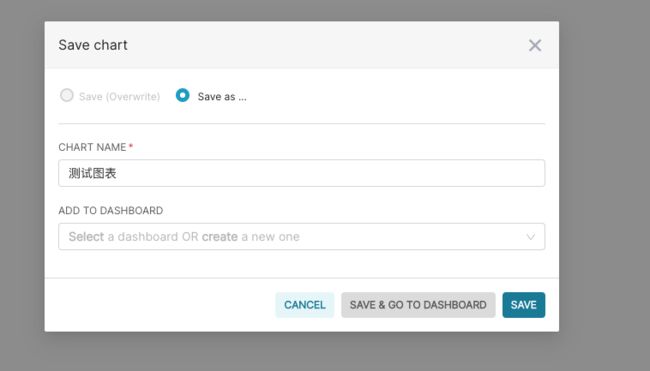
保存

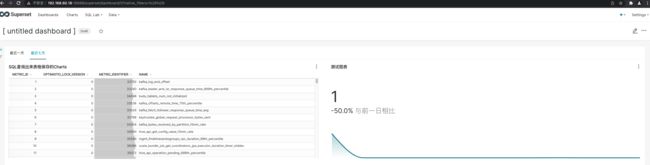
创建仪表盘
-
Dashboards -> DASHBOARDS

-
托拉拽设置仪表盘
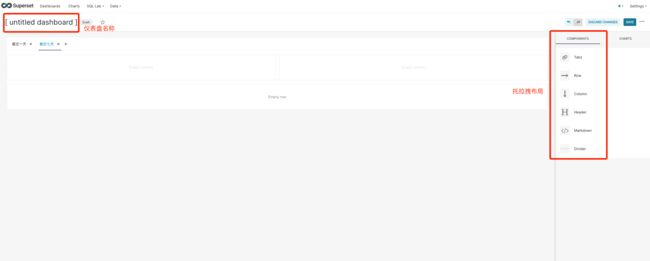
-
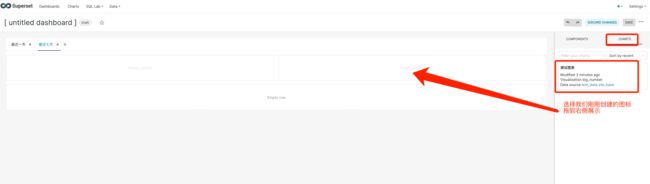
将图标拖到展示区域
-
查看结果

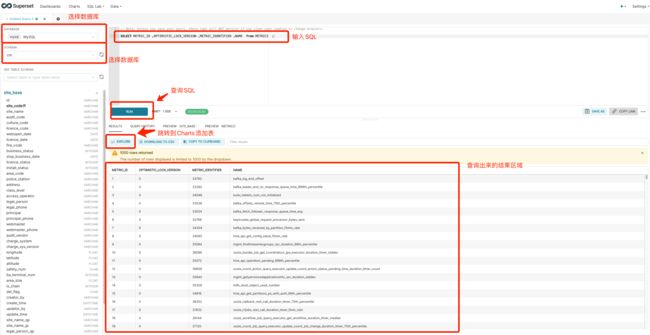
使用SQL查询后以表格形式展示
-
SQL Lab -> SQL Editor

-
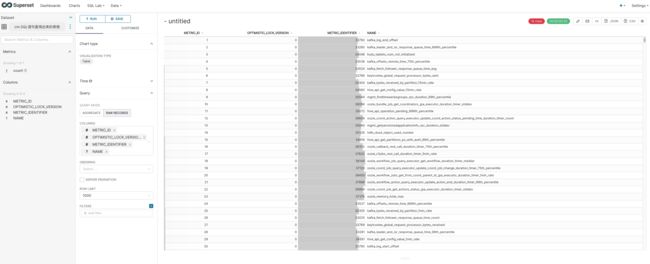
查询SQL,点击EXPLORE,并跳转到Charts
-
保存查询,并自定义命名

-
直接导出了Charts并设置好了字段,我们可以在此基础上进行修改
-
保存为Charts

-
在仪表盘添加Charts

-
查看结果
-
中文表头设置
也可以在查询sql时指定中文表明,在展示时候就自动显示成别名了

系统嵌入
https://www.shuzhiduo.com/A/obzbQP1ydE/