Java经典框架之Shiro
Shiro
Java 是第一大编程语言和开发平台。它有助于企业降低成本、缩短开发周期、推动创新以及改善应用服务。如今全球有数百万开发人员运行着超过 51 亿个 Java 虚拟机,Java 仍是企业和开发人员的首选开发平台。
课程内容的介绍
1. Shiro简介
2. Shiro的基本应用
3. Shiro高级应用
官网:http://shiro.apache.org
一、Shiro简介
Apache Shiro是一个强大且易用的Java安全框架,执行身份验证、授权、密码和会话管理。使用Shiro 的易于理解的API,您可以快速、轻松地获得任何应用程序,从最小的移动应用程序到最大的网络和企业应用程序。
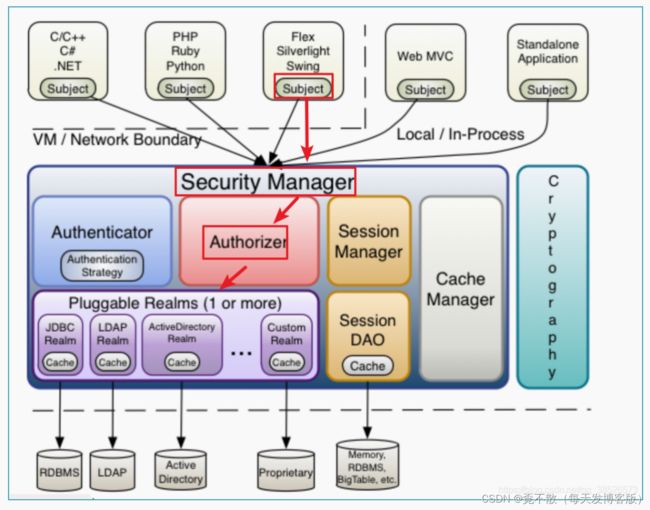
1. 框架图说明
官网架构说明:http://shiro.apache.org/architecture.html
1.1 从外部查看shiro框架
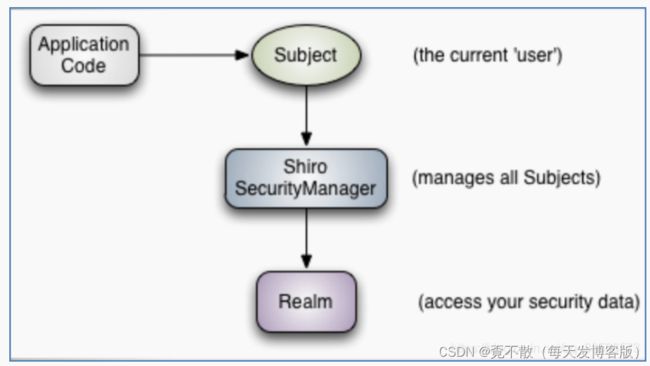
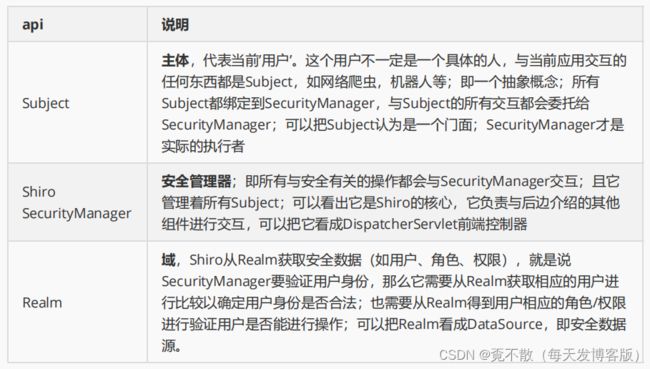
应用代码直接交互的对象是Subject,也就是说Shiro的对外API核心就是Subject。
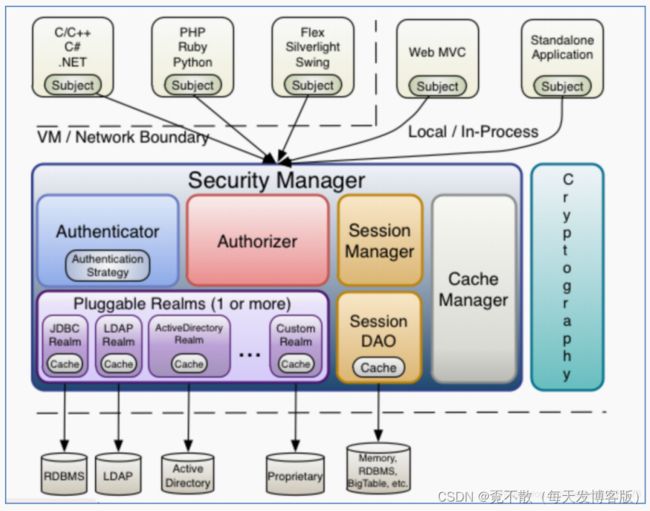
1.2 内部结构框架

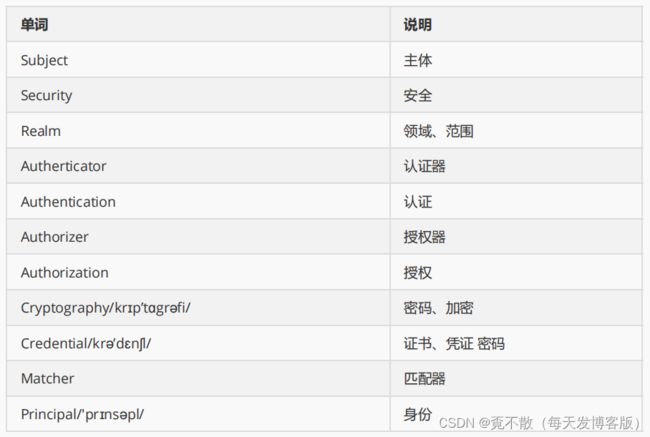
1.3 常见单词说明
2.Shiro的入门案例
http://shiro.apache.org/tutorial.html
2.1 添加相关的依赖
    4.0.0

    com.bobo
    ShiroDemo01
    1.0-SNAPSHOT


            org.apache.shiro
            shiro-core
            1.1.0


            org.slf4j
            slf4j-simple
            1.6.1
            test


            junit
            junit
            4.12
            test


            commons-logging
            commons-logging
            1.2
2.2 创建ini文件
初次使用我们可以将系统的账号信息配置在ini文件中,减少入门的难度。
[users]
root=123456
# 账号是root,密码是123456
2.3 测试代码
package com.bobo.shiro.test;
import org.apache.shiro.SecurityUtils;
import org.apache.shiro.authc.AuthenticationToken;
import org.apache.shiro.authc.UsernamePasswordToken;
import org.apache.shiro.config.IniSecurityManagerFactory;
import org.apache.shiro.mgt.SecurityManager;
import org.apache.shiro.subject.Subject;
import org.apache.shiro.util.Factory;
public class Test01 {
/**
* Shiro的入门案例
* 账号密码是定义在ini文件中的
* @param args
*/
public static void main(String[] args) {
// 1.获取一个SecurityManager工厂对象
Factory factory = new IniSecurityManagerFactory("classpath:shiro.ini");
// 2.通过SecurityManager工厂对象创建SecurityManager对象
SecurityManager securityManager = factory.getInstance();
// 3.将SecurityManager对象添加到当前的运行环境中去
SecurityUtils.setSecurityManager(securityManager);
// 4.获取Subject对象
Subject subject = SecurityUtils.getSubject();
// 5.获取用户提交的要认证的账号密码
String userName = "root";
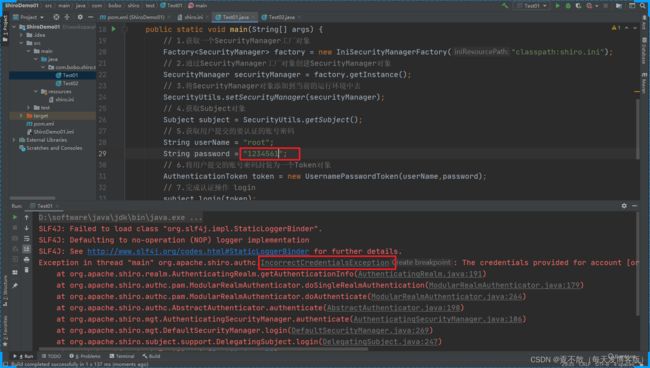
String password = "1234561";
// 6.将用户提交的账号密码封装为一个Token对象
AuthenticationToken token = new UsernamePasswordToken(userName,password);
// 7.完成认证操作 login
subject.login(token);
// 8.获取认证状态
System.out.println(subject.isAuthenticated());
}
}
2.4 测试效果
账号错误,抛UnknownAccountException异常。

密码出错,抛IncorrectCredentialsException异常。
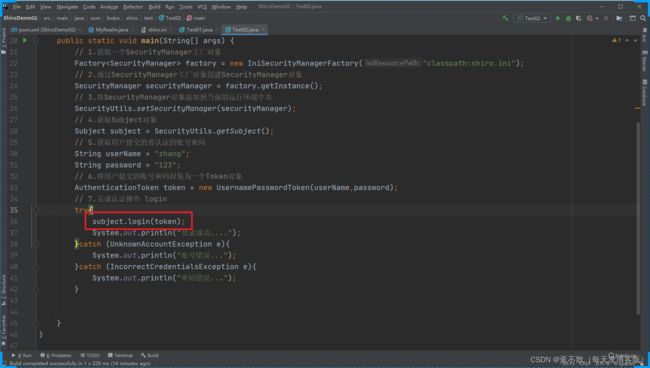
账号密码都正确会正常执行,基于以上特点我们可以将代码结构修改为如下。
package com.bobo.shiro.test;

import org.apache.shiro.SecurityUtils;
import org.apache.shiro.authc.AuthenticationToken;
import org.apache.shiro.authc.IncorrectCredentialsException;
import org.apache.shiro.authc.UnknownAccountException;
import org.apache.shiro.authc.UsernamePasswordToken;
import org.apache.shiro.config.IniSecurityManagerFactory;
import org.apache.shiro.mgt.SecurityManager;
import org.apache.shiro.subject.Subject;
import org.apache.shiro.util.Factory;

public class Test02 {

    /**
     * Shiro的入门案例
     *    账号密码是定义在ini文件中的
     * @param args
     */
    public static void main(String[] args) {
        // 1.获取一个SecurityManager工厂对象
        Factory factory = new IniSecurityManagerFactory("classpath:shiro.ini");
        // 2.通过SecurityManager工厂对象创建SecurityManager对象
        SecurityManager securityManager = factory.getInstance();
        // 3.将SecurityManager对象添加到当前的运行环境中去
        SecurityUtils.setSecurityManager(securityManager);
        // 4.获取Subject对象
        Subject subject = SecurityUtils.getSubject();
        // 5.获取用户提交的要认证的账号密码
        String userName = "root1";
        String password = "123456";
        // 6.将用户提交的账号密码封装为一个Token对象
        AuthenticationToken token = new UsernamePasswordToken(userName,password);
        // 7.完成认证操作 login
        try{
            subject.login(token);
            System.out.println("登录成功....");
        }catch (UnknownAccountException e){
            System.out.println("账号错误...");
        }catch (IncorrectCredentialsException e){
            System.out.println("密码错误...");
        }


    }
}
二、Shiro的基本应用
1.自定义Realm
前面的案例是通过在ini文件中配置账号密码来实现的,显然这种方式并没有太多的通用性,结合实际的开发情况我们来介绍下自定义Realm的实现。
1.1 创建Realm
package com.bobo.shiro.realm;

import org.apache.shiro.authc.*;
import org.apache.shiro.authz.AuthorizationInfo;
import org.apache.shiro.realm.AuthorizingRealm;
import org.apache.shiro.subject.PrincipalCollection;

/**
 * 自定义的Realm
 */
public class MyRealm extends AuthorizingRealm {


    /**
     *  认证操作
     * @param authenticationToken
     * @return
     * @throws AuthenticationException
     */
    @Override
    protected AuthenticationInfo doGetAuthenticationInfo(AuthenticationToken authenticationToken)
            throws AuthenticationException {
        UsernamePasswordToken token = (UsernamePasswordToken) authenticationToken;
        String userName = token.getUsername();
        String password = new String(token.getPassword());
        System.out.println("登录的账号密码是:" + userName + "  " + password);
        // 通过JDBC操作和数据库中的账号密码匹配
        if("zhang".equals(userName) ){
            // 账号正确 假设查询出的zhang的密码是 123
            AuthenticationInfo info =
                    new SimpleAuthenticationInfo(userName,"123","myrealm");
            return info;
        }
        return null;
    }

    /**
     * 授权操作
     * @param principalCollection
     * @return
     */
    @Override
    protected AuthorizationInfo doGetAuthorizationInfo(PrincipalCollection principalCollection) {
        return null;
    }
}
1.2 设置自定义Realm
将我们创建的自定义的Realm添加到ini配置文件中。
[main]
# 自定义Realm
customeRealm=com.bobo.shiro.realm.MyRealm
# 将自定义的Realm设置到SecurityManager中
securityManager.realms=$customeRealm
1.3 测试代码
测试代码和前面的案例是一样的,不用改变。
package com.bobo.shiro.test;

import org.apache.shiro.SecurityUtils;
import org.apache.shiro.authc.AuthenticationToken;
import org.apache.shiro.authc.IncorrectCredentialsException;
import org.apache.shiro.authc.UnknownAccountException;
import org.apache.shiro.authc.UsernamePasswordToken;
import org.apache.shiro.config.IniSecurityManagerFactory;
import org.apache.shiro.mgt.SecurityManager;
import org.apache.shiro.subject.Subject;
import org.apache.shiro.util.Factory;

public class Test02 {

    /**
     * Shiro的入门案例
     *    账号密码是定义在ini文件中的
     * @param args
     */
    public static void main(String[] args) {
        // 1.获取一个SecurityManager工厂对象
        Factory factory = new IniSecurityManagerFactory("classpath:shiro.ini");
        // 2.通过SecurityManager工厂对象创建SecurityManager对象
        SecurityManager securityManager = factory.getInstance();
        // 3.将SecurityManager对象添加到当前的运行环境中去
        SecurityUtils.setSecurityManager(securityManager);
        // 4.获取Subject对象
        Subject subject = SecurityUtils.getSubject();
        // 5.获取用户提交的要认证的账号密码
        String userName = "zhang";
        String password = "123";
        // 6.将用户提交的账号密码封装为一个Token对象
        AuthenticationToken token = new UsernamePasswordToken(userName,password);
        // 7.完成认证操作 login
        try{
            subject.login(token);
            System.out.println("登录成功....");
        }catch (UnknownAccountException e){
            System.out.println("账号错误...");
        }catch (IncorrectCredentialsException e){
            System.out.println("密码错误...");
        }


    }
}
2.认证流程分析
入口是测试代码中的login方法。
进入DelegatingSubject的login方法中。
public void login(AuthenticationToken token) throws AuthenticationException {
    this.clearRunAsIdentities();
    // 进入securityManager的login方法中
    Subject subject = this.securityManager.login(this, token);
    // 认证完成后的操作....
    String host = null;
    PrincipalCollection principals;
    if (subject instanceof DelegatingSubject) {
        DelegatingSubject delegating = (DelegatingSubject)subject;
        principals = delegating.principals;
        host = delegating.host;
    } else {
        principals = subject.getPrincipals();
    }
    if (principals != null && !principals.isEmpty()) {
        this.principals = principals;
        this.authenticated = true;
        if (token instanceof HostAuthenticationToken) {
            host = ((HostAuthenticationToken)token).getHost();
        }
        if (host != null) {
            this.host = host;
        }
        Session session = subject.getSession(false);
        if (session != null) {
            this.session = this.decorate(session);
            this.runAsPrincipals = this.getRunAsPrincipals(this.session);
        } else {
            this.session = null;
        }
        ThreadContext.bind(this);
    } else {
        String msg = "Principals returned from securityManager.login( token ) returned a null or empty value. This value must be non null and populated with one or more elements.";
        throw new IllegalStateException(msg);
    }
}
进入DefaultSecurityManager的login方法中。
public Subject login(Subject subject, AuthenticationToken token) throws AuthenticationException {
    AuthenticationInfo info;
    try {
        // 关键方法 认证方法
        info = this.authenticate(token);
    } catch (AuthenticationException var7) {
        AuthenticationException ae = var7;
        try {
            this.onFailedLogin(token, ae, subject);
        } catch (Exception var6) {
            if (log.isInfoEnabled()) {
                log.info("onFailedLogin method threw an exception. Logging and propagating original AuthenticationException.", var6);
            }
        }
        throw var7;
    }
    Subject loggedIn = this.createSubject(token, info, subject);
    this.bind(loggedIn);
    this.onSuccessfulLogin(token, info, loggedIn);
    return loggedIn;
}
进入AbstractAuthenticator的authenticate方法中。
public final AuthenticationInfo authenticate(AuthenticationToken token) throws AuthenticationException {
    if (token == null) {
        throw new IllegalArgumentException("Method argumet (authentication token) cannot be null.");
    } else {
        log.trace("Authentication attempt received for token [{}]", token);
        AuthenticationInfo info;
        try {
            // 关键代码 完成认证
            info = this.doAuthenticate(token);
            if (info == null) {
                String msg = "No account information found for authentication token [" + token + "] by this " + "Authenticator instance.Please check that it is configured correctly.";
                throw new AuthenticationException(msg);
            }
        } catch (Throwable var8) {
            AuthenticationException ae = null;
            if (var8 instanceof AuthenticationException) {
                ae = (AuthenticationException)var8;
            }
            if (ae == null) {
                String msg = "Authentication failed for token submission [" + token + "]. Possible unexpected " + "error? (Typical or expected login exceptions should extend from AuthenticationException).";
                ae = new AuthenticationException(msg, var8);
            }
            try {
                this.notifyFailure(token, ae);
            } catch (Throwable var7) {
                if (log.isWarnEnabled()) {
                    String msg = "Unable to send notification for failed authentication attempt - listener error?. Please check your AuthenticationListener implementation(s). Logging sending exception and propagating original AuthenticationException instead...";
                    log.warn(msg, var7);
                }
            }
            throw ae;
        }
        log.debug("Authentication successful for token [{}]. Returned account [{}]", token, info);
        this.notifySuccess(token, info);
        return info;
    }
}
然后进入ModularRealmAuthenticator里面的doAuthenticate方法中。
protected AuthenticationInfo doAuthenticate(AuthenticationToken authenticationToken) throws AuthenticationException {
    this.assertRealmsConfigured();
    // 获取到自定义的realm
    Collection realms = this.getRealms();
    // 判断是否进入单域还是多域验证
    return realms.size() == 1 ?
    this.doSingleRealmAuthentication((Realm)realms.iterator().next(),authenticationToken) : this.doMultiRealmAuthentication(realms,authenticationToken);
}
进入doSingleRealmAuthentication方法中。
protected AuthenticationInfo doSingleRealmAuthentication(Realm realm,AuthenticationToken token) {
    if (!realm.supports(token)) {
        String msg = "Realm [" + realm + "] does not support authentication token [" + token + "]. Please ensure that the appropriate Realm implementation is " + "configured correctly or that the realm accepts AuthenticationTokens of this type.";
        throw new UnsupportedTokenException(msg);
    } else {
        // 具体的验证操作
        AuthenticationInfo info = realm.getAuthenticationInfo(token);
        if (info == null) {
            String msg = "Realm [" + realm + "] was unable to find account data for the " + "submitted AuthenticationToken [" + token + "].";
            // 这是我们熟悉的异常,账号错误的异常信息
            throw new UnknownAccountException(msg);
        } else {
            return info;
        }
    }
}
进入AuthenticatingRealm中的getAuthenticationInfo方法中。
public final AuthenticationInfo getAuthenticationInfo(AuthenticationToken token) throws AuthenticationException {
    // 其实就是会执行我们自定义的MyRealm中的认证方法
    AuthenticationInfo info = this.doGetAuthenticationInfo(token);
    if (info == null) {
        if (log.isDebugEnabled()) {
            String msg = "No authentication information found for submitted authentication token [" + token + "]. " + "Returning null.";
            log.debug(msg);
        }
        return null;
    } else {
        CredentialsMatcher cm = this.getCredentialsMatcher();
        if (cm != null) {
            // 密码匹配
            if (!cm.doCredentialsMatch(token, info)) {
                String msg = "The credentials provided for account [" + token + "] did not match the expected credentials.";
                // 密码错误 抛出的异常信息
                throw new IncorrectCredentialsException(msg);
            } else {
                return info;
            }
        } else {
            throw new AuthenticationException("A CredentialsMatcher must be configured in order to verify credentials during authentication. If you do not wish for credentials to be examined, you can configure an " + AllowAllCredentialsMatcher.class.getName() + " instance.");
        }
    }
}
3.加密
加密,是以某种特殊的算法改变原有的信息数据,使得未授权的用户即使获得了已加密的信息,但因不知解密的方法,仍然无法了解信息的内容(123456 --> (123456*1000+1000)+"abc" -->123457000abc)
3.1 概念
数据加密的基本过程就是对原来为明文的文件或数据按某种算法进行处理,使其成为不可读的一段代码,通常称为"密文",使其只能在输入相应的密钥之后才能显示出本来内容,通过这样的途径来达到保护数据不被非法人窃取、阅读的目的。该过程的逆过程为解密,即将该编码信息转化为其原来数据的过程。
3.2 加密分类
对称加密
双方使用的同一个密钥,既可以加密又可以解密,这种加密方法称为对称加密,也称为单密钥加密。
非对称加密
一对密钥由公钥和私钥组成(可以使用很多对密钥)。私钥解密公钥加密数据,公钥解密私钥加密数据(私钥公钥可以互相加密解密)。
3.3 加密算法分类
单向加密
单向加密是不可逆的,也就是只能加密,不能解密。通常用来传输类似用户名和密码,直接将加密后的数据提交到后台,因为后台不需要知道用户名和密码,可以直接将收到的加密后的数据存储到数据库。
双向加密
通常分为对称性加密算法和非对称性加密算法,对于对称性加密算法,信息接收双方都需事先知道密匙和加解密算法且其密匙是相同的,之后便是对数据进行 加解密了。非对称算法与之不同,发送双方A,B事先均生成一堆密匙,然后A将自己的公有密匙发送给B,B将自己的公有密匙发送给A,如果A要给B发送消 息,则先需要用B的公有密匙进行消息加密,然后发送给B端,此时B端再用自己的私有密匙进行消息解密,B向A发送消息时为同样的道理。
3.4 常见算法

3.5 MD5加密
MD5应该算是一个应用非常广泛的一种加密方式。是一种单向加密,不可逆的加密算法。
package com.bobo.shiro.md5;

import org.apache.shiro.crypto.hash.Md5Hash;

public class Md5Demo01 {

    /**
     * MD5算法的使用
     * @param args
     */
    public static void main(String[] args) {
        // 单个信息加密
        Md5Hash md5Hash = new Md5Hash("123456");
        System.out.println(md5Hash);
        // 加密添加盐值 增大破解难度
        md5Hash = new Md5Hash("123456","123");
        System.out.println(md5Hash);
        // 加密添加盐值 及增加迭代次数
        md5Hash = new Md5Hash("123456","123",1024);
        System.out.println(md5Hash);
    }
}
输出结果
e10adc3949ba59abbe56e057f20f883e
1e191d851b3b49a248f4ea62f6b06410
b2793335f43645fd8e00c7d18e14e05f
盐值的作用
使用MD5存在一个问题,相同的password生成的hash值是相同的,如果两个用户设置了相同的密码,那么数据库中会存储两个相同的值,这是极不安全的,加Salt可以在一定程度上解决这一问题,所谓的加Salt方法,就是加点‘佐料’。其基本想法是这样的,当用户首次提供密码时(通常是注册时)由系统自动往这个密码里撒一些‘佐料’,然后在散列,而当用户登录时,系统为用户提供的代码上撒上相同的‘佐料’,然后散列,再比较散列值,来确定密码是否正确。
加盐的原理:
给原文加入随机数生成新的MD5的值。
3.6 Shiro中使用MD5
首先我们需要在认证的方法中修改密码相关信息。
package com.bobo.shiro.realm;

import org.apache.shiro.authc.*;
import org.apache.shiro.authz.AuthorizationInfo;
import org.apache.shiro.realm.AuthorizingRealm;
import org.apache.shiro.subject.PrincipalCollection;
import org.apache.shiro.util.SimpleByteSource;

/**
 * 自定义的Realm
 */
public class MyRealm extends AuthorizingRealm {


    /**
     *  认证操作
     * @param authenticationToken
     * @return
     * @throws AuthenticationException
     */
    @Override
    protected AuthenticationInfo doGetAuthenticationInfo(AuthenticationToken authenticationToken)
            throws AuthenticationException {
        UsernamePasswordToken token = (UsernamePasswordToken) authenticationToken;
        String userName = token.getUsername();
        String password = new String(token.getPassword());
        System.out.println("登录的账号密码是:" + userName + "  " + password);
        // 通过JDBC操作和数据库中的账号密码匹配
        if("zhang".equals(userName) ){
            // 账号正确 假设查询出的zhang的密码是 123
            String pwd = "b2793335f43645fd8e00c7d18e14e05f";
            String salt = "123";
            AuthenticationInfo info =
                    new SimpleAuthenticationInfo(userName
                            ,pwd
                            ,new SimpleByteSource(salt) // salt
                            ,"myrealm" // 自定义的 this 名称
                    );
            return info;
        }
        return null;
    }

    /**
     * 授权操作
     * @param principalCollection
     * @return
     */
    @Override
    protected AuthorizationInfo doGetAuthorizationInfo(PrincipalCollection principalCollection) {
        return null;
    }
}
修改ini配置文件
[main]
# 定义凭证匹配器
credentialsMathcher=org.apache.shiro.authc.credential.HashedCredentialsMatcher
# 散列的算法
credentialsMathcher.hashAlgorithmName=md5
# 散列迭代的次数
credentialsMathcher.hashIterations=1024
# 自定义Realm
customeRealm=com.bobo.shiro.realm.MyRealm
customeRealm.credentialsMatcher=$credentialsMathcher
# 将自定义的Realm设置到SecurityManager中
securityManager.realms=$customeRealm
测试代码没有变化。
4.授权
4.1 概念
授权,又称作为访问控制,是对资源的访问管理的过程,即对于认证通过的用户,授予他可以访问某些资源的权限。
授权的方式
shiro支持三种方式的授权:
代码触发
通过写if/else 授权代码块完成。
Subject subject = SecurityUtils.getSubject();
if(subject.hasRole(“admin”)) {
    //有权限
} else {
    //无权限
}
123456
注解触发
通过在执行的Java方法上放置相应的注解完成。
@RequiresRoles("admin")
public void hello() {
    //有权限
}
1234
标签触发
在JSP/GSP 页面通过相应的标签完成。
123 注意本文先讲代码触发,后面两种情况再后面案例中使用讲解。
授权流程图

4.2 简单授权的实现
我们需要在ini配置文件中配置相关的用户对应的角色和相关的权限信息。
[users]
root=123456,role1,role2
# 账号是root,密码是123456 具有的角色是 role1,role2

[roles]
# 角色role1具有的权限
role1=user:create,user:update
role2=user:query,user:create
role3=user:delete,user:query
然后在测试代码的认证成功后做权限的管理操作。
package com.bobo.shiro.test;

import org.apache.shiro.SecurityUtils;
import org.apache.shiro.authc.AuthenticationToken;
import org.apache.shiro.authc.IncorrectCredentialsException;
import org.apache.shiro.authc.UnknownAccountException;
import org.apache.shiro.authc.UsernamePasswordToken;
import org.apache.shiro.config.IniSecurityManagerFactory;
import org.apache.shiro.mgt.SecurityManager;
import org.apache.shiro.subject.Subject;
import org.apache.shiro.util.Factory;

import java.util.Arrays;

public class Test02 {

    /**
     * Shiro的入门案例
     *    账号密码是定义在ini文件中的
     * @param args
     */
    public static void main(String[] args) {
        // 1.获取一个SecurityManager工厂对象
        Factory factory = new IniSecurityManagerFactory("classpath:shiro.ini");
        // 2.通过SecurityManager工厂对象创建SecurityManager对象
        SecurityManager securityManager = factory.getInstance();
        // 3.将SecurityManager对象添加到当前的运行环境中去
        SecurityUtils.setSecurityManager(securityManager);
        // 4.获取Subject对象
        Subject subject = SecurityUtils.getSubject();
        // 5.获取用户提交的要认证的账号密码
        String userName = "root";
        String password = "123456";
        // 6.将用户提交的账号密码封装为一个Token对象
        AuthenticationToken token = new UsernamePasswordToken(userName,password);
        // 7.完成认证操作 login
        try{
            subject.login(token);
            System.out.println("登录成功....");
            // 做角色的验证操作
            System.out.println("认证状态:"+subject.isAuthenticated());
            System.out.println("是否具有role1角色:"+subject.hasRole("role1"));
            System.out.println("是否具有role3角色:"+subject.hasRole("role3"));
            boolean[] types = subject.hasRoles(Arrays.asList("role1", "role2", "role3"));
            System.out.println(Arrays.toString(types));
            System.out.println(subject.getPrincipal()+"是否具有role1和role2两个角色:"
                    + subject.hasAllRoles(Arrays.asList("role1","role2")));
            System.out.println(subject.getPrincipal()+"是否具有role1和role3两个角色:"
                    + subject.hasAllRoles(Arrays.asList("role1","role3")));
            // check开头的方法校验不通过会抛出对应异常
            subject.checkRole("role1");
            // 做权限的验证
            System.out.println(subject.getPrincipal()+"是否具有user:create权限:"+
                    subject.isPermitted("user:create"));
            System.out.println(subject.getPrincipal()+"是否具有user:delete权限:"+
                    subject.isPermitted("user:delete"));
            // check开头的校验方法不通过同样抛出异常信息
            subject.checkPermission("user:delete");

        }catch (UnknownAccountException e){
            System.out.println("账号错误...");
        }catch (IncorrectCredentialsException e){
            System.out.println("密码错误...");
        }


    }
}
输出的结果信息
登录成功....
认证状态:true
是否具有role1角色:true
是否具有role3角色:false
[true, true, false]
root是否具有role1和role2两个角色:true
root是否具有role1和role3两个角色:false
root是否具有user:create权限:true
root是否具有user:delete权限:false
Exception in thread "main" org.apache.shiro.authz.UnauthorizedException: Subject does not have permission [user:delete]
    at
org.apache.shiro.authz.ModularRealmAuthorizer.checkPermission(ModularRealmAuthorizer.java:321)
    at
org.apache.shiro.mgt.AuthorizingSecurityManager.checkPermission(AuthorizingSecurityManager.java:137)
    at
org.apache.shiro.subject.support.DelegatingSubject.checkPermission(DelegatingSubject.java:198)
    at com.bobo.shiro.test.Test02.main(Test02.java:57)
4.3 自定义Realm中实现授权操作
上面的案例我们是将用户的权限配置在ini文件中的,实际开发中用户关联的权限信息会非常的复杂,我们一般都是设置在关系型数据库中,因此我们也要考虑相关的实现,在自定义的Realm中重写AuthorizationInfo方法。
    /**
     * 授权操作
     *    认证成功后会执行的授权方法
     *    要注意的是 doGetAuthorizationInfo方法的形参的实际数据是
     *    认证方法中返回的 SimpleAuthenticationInfo中的第一个参数
     * @param principalCollection
     * @return
     */
    @Override
    protected AuthorizationInfo doGetAuthorizationInfo(PrincipalCollection principalCollection) {
        // 获取到当前登录的账号
        String userName = principalCollection.getPrimaryPrincipal().toString();
        System.out.println("当前登录的账号是:" + userName);
        // 根据登录的账号去数据库中查询对应的角色和权限信息
        SimpleAuthorizationInfo info = new SimpleAuthorizationInfo();
        info.addRole("role1");
        info.addRole("role2");
        info.addStringPermission("user:create");
        info.addStringPermission("user:update");
        return info;
    }
配置文件中关联自定义Realm即可。
[main]
# 自定义Realm
customeRealm=com.bobo.shiro.realm.MyRealm
# 将自定义的Realm设置到SecurityManager中
securityManager.realms=$customeRealm
测试代码和之前是一样的。
package com.bobo.shiro.test;

import org.apache.shiro.SecurityUtils;
import org.apache.shiro.authc.AuthenticationToken;
import org.apache.shiro.authc.IncorrectCredentialsException;
import org.apache.shiro.authc.UnknownAccountException;
import org.apache.shiro.authc.UsernamePasswordToken;
import org.apache.shiro.config.IniSecurityManagerFactory;
import org.apache.shiro.mgt.SecurityManager;
import org.apache.shiro.subject.Subject;
import org.apache.shiro.util.Factory;

import java.util.Arrays;

public class Test02 {

    /**
     * Shiro的入门案例
     *    账号密码是定义在ini文件中的
     * @param args
     */
    public static void main(String[] args) {
        // 1.获取一个SecurityManager工厂对象
        Factory factory = new IniSecurityManagerFactory("classpath:shiro.ini");
        // 2.通过SecurityManager工厂对象创建SecurityManager对象
        SecurityManager securityManager = factory.getInstance();
        // 3.将SecurityManager对象添加到当前的运行环境中去
        SecurityUtils.setSecurityManager(securityManager);
        // 4.获取Subject对象
        Subject subject = SecurityUtils.getSubject();
        // 5.获取用户提交的要认证的账号密码
        String userName = "zhang";
        String password = "123";
        // 6.将用户提交的账号密码封装为一个Token对象
        AuthenticationToken token = new UsernamePasswordToken(userName,password);
        // 7.完成认证操作 login
        try{
            subject.login(token);
            System.out.println("登录成功....");
            // 做角色的验证操作
            System.out.println("认证状态:"+subject.isAuthenticated());
            System.out.println("是否具有role1角色:"+subject.hasRole("role1"));
            System.out.println("是否具有role3角色:"+subject.hasRole("role3"));
            boolean[] types = subject.hasRoles(Arrays.asList("role1", "role2", "role3"));
            System.out.println(Arrays.toString(types));
            System.out.println(subject.getPrincipal()+"是否具有role1和role2两个角色:"
                    + subject.hasAllRoles(Arrays.asList("role1","role2")));
            System.out.println(subject.getPrincipal()+"是否具有role1和role3两个角色:"
                    + subject.hasAllRoles(Arrays.asList("role1","role3")));
            // check开头的方法校验不通过会抛出对应异常
            subject.checkRole("role1");
            // 做权限的验证
            System.out.println(subject.getPrincipal()+"是否具有user:create权限:"+
                    subject.isPermitted("user:create"));
            System.out.println(subject.getPrincipal()+"是否具有user:delete权限:"+
                    subject.isPermitted("user:delete"));
            // check开头的校验方法不通过同样抛出异常信息
            subject.checkPermission("user:delete");
        }catch (UnknownAccountException e){
            System.out.println("账号错误...");
        }catch (IncorrectCredentialsException e){
            System.out.println("密码错误...");
        }


    }
}
效果
登录的账号密码是:zhang 123
登录成功....
认证状态:true
当前登录的账号是:zhang
是否具有role1角色:true
当前登录的账号是:zhang
是否具有role3角色:false
当前登录的账号是:zhang
当前登录的账号是:zhang
当前登录的账号是:zhang
[true, true, false]
当前登录的账号是:zhang
当前登录的账号是:zhang
zhang是否具有role1和role2两个角色:true
当前登录的账号是:zhang
当前登录的账号是:zhang
zhang是否具有role1和role3两个角色:false
当前登录的账号是:zhang
当前登录的账号是:zhang
zhang是否具有user:create权限:true
当前登录的账号是:zhang
zhang是否具有user:delete权限:false
当前登录的账号是:zhang
Exception in thread "main" org.apache.shiro.authz.UnauthorizedException: Subject does not have permission [user:delete]
    at
org.apache.shiro.authz.ModularRealmAuthorizer.checkPermission(ModularRealmAuthorizer.java:321)
    at
org.apache.shiro.mgt.AuthorizingSecurityManager.checkPermission(AuthorizingSecurityManager.java:137)
    at
org.apache.shiro.subject.support.DelegatingSubject.checkPermission(DelegatingSubject.java:198)
    at com.bobo.shiro.test.Test02.main(Test02.java:58)
三、Shiro的高级应用
基于前面所学的内容我们搭建的项目结构是SSM(SpringMVC+Spring+MyBatis)来实现的,所以Shiro的常见的一种使用方式就是在SSM环境做权限管理,所以首先我们需要搭建一个SSM框架项目。
CREATE TABLE `t_user_new` (
    `id` int NOT NULL AUTO_INCREMENT,
    `username` varchar(30) NOT NULL,
    `password` varchar(100) DEFAULT NULL,
    `salt` varchar(100) DEFAULT NULL,
    PRIMARY KEY (`id`)
) ENGINE=InnoDB DEFAULT CHARSET=utf8mb4 COLLATE=utf8mb4_0900_ai_ci
准备好一个SSM项目。
1.SSM项目整合Shiro
1.1 添加相关的依赖
    org.apache.shiro
    shiro-spring
    1.5.3
1.2 在web.xml中配置
我们需要在web.xml文件中配置Shiro的过滤器。
  Archetype Created Web Application


    contextConfigLocation
    classpath:applicationContext-*.xml


    org.springframework.web.context.ContextLoaderListener


    springmvc
    org.springframework.web.servlet.DispatcherServlet


      contextConfigLocation
      classpath:spring-mvc.xml


    springmvc

    /


    encodingFilter
    org.springframework.web.filter.CharacterEncodingFilter

      encoding
      UTF-8


      forceRequestEncoding
      true


      forceResponseEncoding
      true


    encodingFilter
    /*


    default
    *.html


    default
    *.css


    default
    *.js


    default
    *.jpg


    default
    *.png


    shiroFilter
    org.springframework.web.filter.DelegatingFilterProxy


      targetFilterLifecycle
      true


      targetBeanName
      shiro


    shiroFilter
    /*
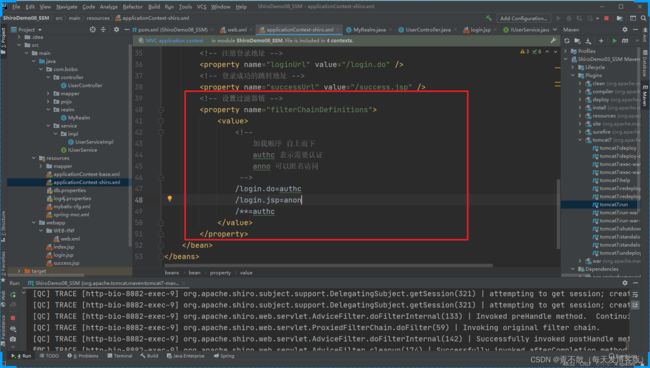
1.3 添加shiro配置文件
我们也需要将Shiro中的相关对象添加到Spring容器中,我们可以直接在Spring的配置文件中设置,也可以专门为Shiro添加一个Spring 配置文件,为了更加直观,我们单独添加一个配置文件。
                /login.do=authc
                /**=anon
1.4 完善认证的代码
完善自定义Realm中的认证流程。
package com.bobo.realm;

import com.bobo.pojo.User;
import com.bobo.service.IUserService;
import org.apache.shiro.authc.*;
import org.apache.shiro.authz.AuthorizationInfo;
import org.apache.shiro.authz.SimpleAuthorizationInfo;
import org.apache.shiro.realm.AuthorizingRealm;
import org.apache.shiro.subject.PrincipalCollection;
import org.apache.shiro.util.SimpleByteSource;
import org.springframework.beans.factory.annotation.Autowired;

public class MyRealm  extends AuthorizingRealm {

    @Autowired
    private IUserService userService;


    /***
     * 认证方法
     * @param authenticationToken
     * @return
     * @throws AuthenticationException
     */
    @Override
    protected AuthenticationInfo doGetAuthenticationInfo(AuthenticationToken authenticationToken) throws AuthenticationException {
        UsernamePasswordToken token = (UsernamePasswordToken) authenticationToken;

        User user = userService.login(token.getUsername());
        if(user == null){
            return null;
        }

        return new SimpleAuthenticationInfo(user
                ,user.getPassword()
                ,new SimpleByteSource(user.getSalt())
                ,"myRealm"
        );
    }


    /**
     * 授权方法
     * @param principalCollection
     * @return
     */
    @Override
    protected AuthorizationInfo doGetAuthorizationInfo(PrincipalCollection principalCollection) {
        User user = (User) principalCollection.getPrimaryPrincipal();
        System.out.println("--->" + user.getUsername());
        SimpleAuthorizationInfo info = new SimpleAuthorizationInfo();
        info.addRole("admin");
        info.addRole("root");
        return info;
    }
}
1.5 完善Controller功能
package com.bobo.controller;

import com.bobo.pojo.User;
import com.bobo.service.IUserService;
import org.apache.shiro.web.filter.authc.FormAuthenticationFilter;
import org.springframework.beans.factory.annotation.Autowired;
import org.springframework.stereotype.Controller;
import org.springframework.ui.Model;
import org.springframework.web.bind.annotation.GetMapping;
import org.springframework.web.bind.annotation.RequestMapping;
import org.springframework.web.bind.annotation.ResponseBody;
import org.springframework.web.bind.annotation.RestController;

import javax.servlet.http.HttpServletRequest;
import java.util.List;

@Controller
public class UserController {

    @Autowired
    private IUserService service;

    @GetMapping("/user/query")
    @ResponseBody
    public String query(){
        return service.query(new User()).toString();
    }

    /**
     * 本方法是Realm认证失败后会进入的方法
     * @param model
     * @param request
     * @return
     */
    @RequestMapping("/login.do")
    public String login(Model model, HttpServletRequest request){
        // 当认证失败的时候会将失败信息保存的request对应的属性中
        Object obj = request.getAttribute(FormAuthenticationFilter.DEFAULT_ERROR_KEY_ATTRIBUTE_NAME);
        System.out.println("错误信息:" + obj);
        return "/login.jsp";
    }

}
1.6 登录页面
<%--
Created by IntelliJ IDEA.
User: dpb
Date: 2021/2/19
Time: 20:31
To change this template use File | Settings | File Templates.
--%>
<%@ page contentType="text/html;charset=UTF-8" language="java" %>
Title
1.7 测试
账号错误

密码错误

账号密码都正确就可以正常访问了。

认证操作成功后就不会在去做认证操作了。同一个会话只会认证一次,如果要退出,需要显示的注销或者关闭浏览器。
1.8 注销功能
@RequestMapping("/logout.do")
public void logout(){
    SecurityUtils.getSubject().logout();
}
2. Shiro的认证流程
在SSM框架中Spring整合了Shiro,那么具体的实现流程是怎么样的?首先注意配置文件中我们有配置过滤器链。

内置过滤器

Shiro整合Spring的认证流程图

3.授权管理
使用注解的方式使用权限,那么我们需要AOP的支持。
    org.springframework
    spring-aspects
    ${spring.version}
在SpringMVC的配置文件中添加Shiro的注解支持。
给登录成功的用户授权。
    /**
     * 授权方法
     * @param principalCollection
     * @return
     */
    @Override
    protected AuthorizationInfo doGetAuthorizationInfo(PrincipalCollection principalCollection) {
        User user = (User) principalCollection.getPrimaryPrincipal();
        System.out.println("--->" + user.getUsername());
        SimpleAuthorizationInfo info = new SimpleAuthorizationInfo();
        info.addRole("admin");
        info.addRole("root");
        return info;
    }
3.1 注解方式的使用
我们在需要对用户请求权限进行校验的方法头部添加对应的注解即可。
package com.bobo.controller;
import org.apache.shiro.authz.annotation.Logical;
import org.apache.shiro.authz.annotation.RequiresRoles;
import org.springframework.web.bind.annotation.GetMapping;
import org.springframework.web.bind.annotation.RequestMapping;
import org.springframework.web.bind.annotation.RestController;
@RestController
@RequestMapping("/order")
public class OrderController {
@RequiresRoles(value = {"admin"},logical = Logical.AND)
@GetMapping("/query")
public String query(){
return "query ... ";
}
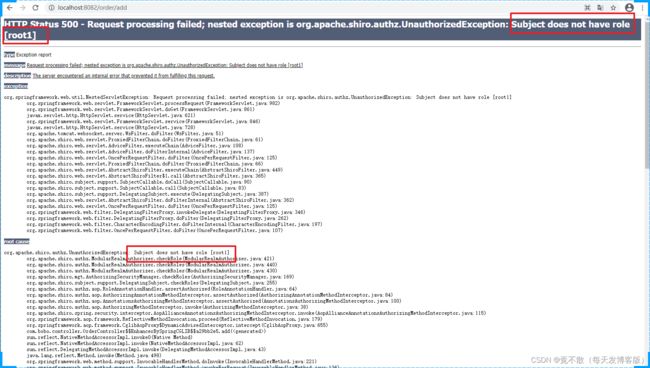
@RequiresRoles(value = {"root","root1"},logical = Logical.AND)
@GetMapping("/add")
public String add(){
return "add ... ";
}
@RequiresRoles(value = {"root","root1"},logical = Logical.OR)
@GetMapping("/update")
public String update(){
return "update ... ";
}
@GetMapping("/delete")
public String delete(){
return "delete ... ";
}
}
没有访问权限的请求http://localhost:8082/order/add提交后会提示没有权限的错误。
3.2 自定义未授权页面
当用户提交的请求没有权限的时候,系统默认的提示是500错误,这种效果体验肯定是不好的,这时我们可以自定义一个用户容易接受的错误页面,具体步骤如下。
<%--
  Created by IntelliJ IDEA.
  User: dpb
  Date: 2021/2/21
  Time: 14:06
  To change this template use File | Settings | File Templates.
--%>
<%@ page contentType="text/html;charset=UTF-8" language="java" %>


    Title


    您没有访问当前请求的权限!请联系系统管理员:xxxxxxxxx
q
在SpringMVC的配置文件中配置异常映射信息。
redirect:/unauthorized.jsp
然后访问测试即可

3.3 Shiro标签使用
首先我们需要引入Shiro的标签库。
<%@taglib prefix="shiro" uri="http://shiro.apache.org/tags" %> 然后就是标签的使用
<%--
Created by IntelliJ IDEA.
User: dpb
Date: 2021/2/21
Time: 14:16
To change this template use File | Settings | File Templates.
--%>
<%@ page contentType="text/html;charset=UTF-8" language="java" %>
<%@taglib prefix="shiro" uri="http://shiro.apache.org/tags" %>
Title
用户管理
查询用户
添加用户
更新用户
删除用户
测试

3.4 shiro标签说明
shiro:authenticated
表示已认证通过。
123 说明:只有已通过用户认证,但不是通过记住我(remember me)浏览才会看到标签内的内容。
shiro:guest
请登录
123 说明:只有是没有登录过,以游客的身份浏览才会看到标签内的内容。
shiro:hashRole
表示拥有某一角色。
123 说明:只有成功登录后,且具有admin角色的用户才可以看到标签内的容,name属性中只能填写一个角色的名称。
shiro:hasAnyRoles
表示拥有多个角色中的一个即可。
123 说明:只有成功登录后,且具有admin或者user角色的用户才会看到标签内的内容;name属性中可以填写多个角色名称,以逗号(,)分隔。
shiro:hasPermission
表示拥有某一权限。
123 说明:只有成功登录后,且具有admin:add权限的用户才可以看到标签内的内容,name属性中只能填写一个权限的名称。
shiro:lacksRole
表示不拥有某一角色。
123 说明:只有成功登录后,且不具有admin角色的用户才可以看到标签内的内容,name属性中只能填写一个角色的名称。
shiro:lacksPermission
表示不拥有某一权限。
123 说明:只有成功登录后,且不具有admin:delete权限的用户才可以看到标签内的内容,name属性中只能填写一个权限的名称。
shiro:notAuthenticated
表示没有通过验证。
123 说明:只有没有通过验证的才可以看到标签内的内容,包括通过记住我(remember me)登录的。
shiro:principal
表示用户的身份。
取值取的是你登录的时候,在Realm 实现类中的new SimpleAuthenticationInfo(第一个参数,…) 放的第一个参数。

1. 如果第一个放的是username或者是一个值 ,那么就可以直接用。
1. 如果第一个参数放的是对象,比如放User 对象。那么如果要取其中某一个值,可以通过property属性来指定。
shiro:user
表示已登录。
退出
4. 缓存管理
4.1 为什么要使用缓存
在没有使用缓存的情况下,我们每次发送请求都会调用一次doGetAuthorizationInfo方法来进行用户的授权操作,但是我们知道,一个用户具有的权限一般不会频繁的修改,也就是每次授权的内容都是一样的,所以我们希望在用户登录成功的第一次授权成功后将用户的权限保存在缓存中,下一次请求授权的话就直接从缓存中获取,这样效率会更高一些。
4.2 使用Ehcache来实现缓存
引入jar包
    org.apache.shiro
    shiro-spring
    1.2.3


    org.apache.shiro
    shiro-ehcache
    1.2.3


    net.sf.ehcache
    ehcache-core
    2.5.0
添加ehcache的配置文件。
在Shiro配置文件中添加缓存信息。