Linux系统升级及内核版本升级
一、背景

工作中有时会遇到系统版本过旧,无法满足安全扫描后的安全要求,系统漏洞数量多,处理难度较大,这时,我们就需要升级OS或Linux内核版本;
Linux 内核版本分为主线(mailine)、稳定版(stable )和长期版本(longterm或LTS)。所有内核版本都可以在内核开发官方网站上获取。其中,rc版本为候选版(RC),开发版本可供公众测试

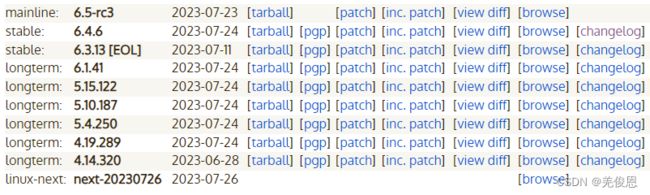
**主线版本(kernel-ml)**代表整个 Linux 内核的一个树干,新的主线版本每 2-3 个月发布一次,所有的新功能及特性都将会包含主线版本中。
稳定内核则是在主线版本中,被认为是稳定的那些。稳定内核的任何错误修复都将从主线树中继承,也就是主线内核出现的任何错误 (包括之前的任何旧版本内核的错误和 BUG) 在得到修复之后才会被指定为稳定内核,所以在通常情况下,稳定内核既有内核新功能,同时 BUG 也是最少的内核版本。稳定内核的更新发布依赖于主线内核 (直到下一个主线内核可用),稳定的内核更新是根据需要发布的,通常是每 3 个月。而对于长期文档内核版本,通常提供几个长期维护内核版本,用于较早的内核树错误修复后的更新。这些内核只应用重要的错误修复,通常不会有非常频繁的更新。
主线、稳定和长期都是活动内核版本,由 Linus Torvalds 及 Linux 内核组织维护和发布。 而我们平时所使用的 Linux 发行版的内核都为分发(第三方)内核,许多 Linux 发行版都提供自己的长期维护(Lts)内核版本,这些内核可能是也可能不是基于内核开发人员维护的。因此分发版本的内核版本由发行版的厂商决定并有自己的维护周期,通常由分发版更新时一起发布,其中的ml就是最新的版本。
附录:内核版本历史回顾:
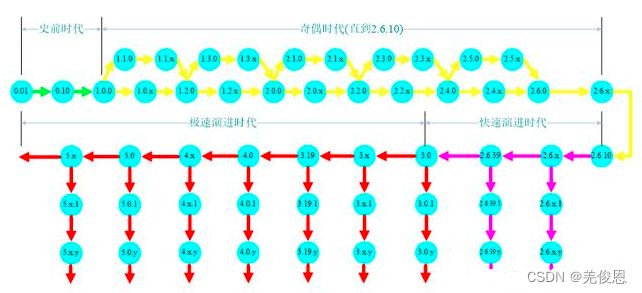
在2.6x版本以前,torvalds将内核的发展方向分为两类,并根据这两类内核的发展分别给予不同的内核编号,主、次版本为奇数:开发中版本,比如2.5.xx;主、次版本为偶数:稳定版本,比如2.6.xx;不过,这种奇数、偶数的编号格式在3.0版本推出之后就不再使用了。从3.0版本开始,内核主要依据主线版本来开发,开发完毕会往下一个版本进行。参看参看3.x Linux内核:https://github.com/torvalds/linux/tree/2b09d5d364986f724f17001ccfe4126b9b43a0be/drivers;通常新一版的主线版本在2-3个月会被提出,新的主线版本,会加入新功能重新发布。现在最新的主线版本已经是6.4.6版了。
Linux内核从最初发布的0.01版直到4.4.x版,经历了“史前时代”“奇偶时代”“快速演进时代”和“极速演进时代”四个阶段;在快速演进阶段,内核版本号的a.b一直保持为2.6没变,完全可以合二为一。与此同时,参与Linux内核开发的个人与单位越来越多,开始进入极速演进时代。在这个阶段,版本号回归a.b.c表示法,a为主版本号,b为次版本号,c为修订号;次版本号b的升级既包括新特性引入,也包括缺陷修订(Bugfix),修订号c的升级只包括Bugfix。在代码仓库管理上,有主线仓库(Mainline)、稳定仓库(Stable)、未来仓库(Linux-next)和子系统仓库(Subsystem,如Linux-mips)4大类。主线仓库是最重要的仓库,其升级规则是在次版本号上面升级演进,两个正式版之间会发布若干个候选版(RC版),比如:3.0→3.1rc1→3.1-rcN→3.1→3.2rc1;稳定仓库基于主线仓库的正式版产生,在修订号上面升级演进,如3.0.x稳定分支仓库中的版本演进关系为:3.0→3.0.1→3.0.2→3.0.3→3.0.N→……;稳定仓库的代码变更全都是缺陷修订(Bugfix),不引入新的特征。未来仓库的版本命名规则是日期,如next-20151212。未来仓库会不定期合并主线仓库的代码,将其作为新一轮添加特性的基础(Base)代码。
长期维护稳定版版(Long Term Stable,LTS),实际上是一种特殊的稳定版本(Stable)。普通的Stable版本的维护时间为3个月左右,因此当Mainline仓库中下一版的正式版发布,上一版的Stable分支就不再继续升级(EOL,End Of Life)。而LTS版本的维护时间为2年左右,也可能更长。同时维护的LTS版本为5个左右,最近的显示有6个 LTS,e当一个新的LTS版本被选中时,一般最老的LTS就不再继续升级(EOL)。官方选择长期维护稳定版本的依据大致有几点:具有里程碑意义(如3.0),是过去一段时间内引入的新特性的集大成者,或者是被Redhat、Debian等著名发行版采用的版本。曾经被选为长期维护版本的内核有:2.6.16.x、2.6.27.x、2.6.32.x、2.6.33.x、2.6.34.x、2.6.35.x、3.0.x、3.2.x、3.4.x、3.10.x、3.12.x、3.14.x、3.16.x、3.18.x、4.1.x、4.4.x、4.9.x、4.14.x、4.19.x和5.4.x。
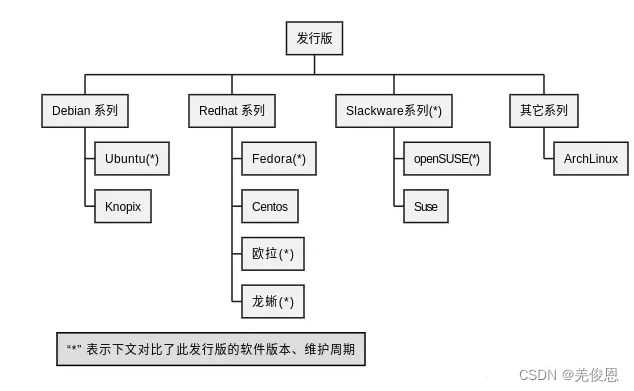
注:内核3.10就是一个长期维护版本,这个版本的程序代码会被持续维护很长时间,若程序代码有bug或其他问题,内核程序维护者会持续进行程序代码的更新维护。对于国内的龙蜥操作系统(Anolis OS),其附带2个内核版本分别为:RHCK(RHEL Compatible Kernel,RHEL 兼容内核)和 ANCK(Anolis Cloud Kernel,Anolis 云内核)
相关资源:Fedora Linux Release Life Cycle、openSUSE:发行计划、Ubuntu release cycle、slackware Linux、openanolis、Anolis OS 内核版本策略、openEuler社区版本生命周期管理规范、fedora docker、debian d
二、升级操作
我们一般使用安装新内核来完成升级而非直接升级内核,安装新内核不会覆盖旧内核,而升级会导致新内核直接替换旧内核,可能会导致系统无法启动,安装也可以让我们在升级后有回滚的选择,确认正常后再删除老内核,。
2.1、升级前确认
内核版本:uname -r或-a
当前使用的版本:awk -F’ ‘$1=="menuentry " {print i++ " : " $2}’ /etc/grub2.cfg

OS发行版本:
cat /proc/version
cat /etc/redhat-release
cat /etc/issue
或者
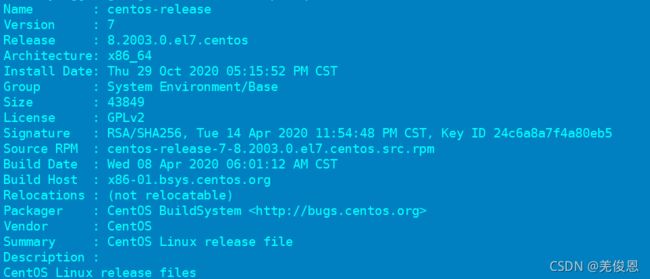
rpm -qi centos-release
升级建议: 先升级到小版本最新,再升级大版本;另外3.0以上内核引入签名机制
2.2、 redhat/CentOS系统
1)最简单如果操作系统联网的话,执行:yum update; 执行后,系统会检测是否有可升级的程序,如果有,则会列出详细的升级项,并询问你是否升级,确认后,退出当前命令,执行yum -y update自动升级。注:这种在线升级,往往只能实现内核版本的小版本升级。
2)图像界面的OS,可点击菜单“系统”-“管理”-“软件更新”,利用系统自带的系统更新界面更新。之后,系统会自动扫描是否有可用的更新。如果有,则会在屏幕上列出。
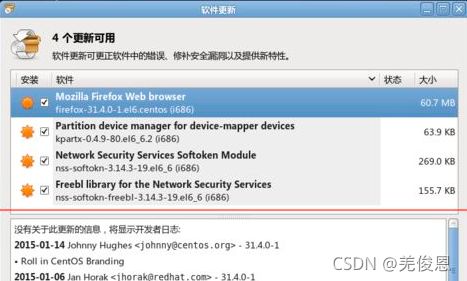
按需安装即可,yum方式更新内核的优点是:快捷方便,成功率高。
3)如果你有自己的yum源:
1> yum makecache //更新软件包列表,源信息
也可使用以下yum源:
rpm -ivh http://www.elrepo.org/elrepo-release-7.0-3.el7.elrepo.noarch.rpm
或
yum install https://www.elrepo.org/elrepo-release-7.el7.elrepo.noarch.rpm
上面命令可能会因网速的问题报错,可先下载下来:
wget https://www.elrepo.org/elrepo-release-7.el7.elrepo.noarch.rpm
rpm -ivh elrepo-release-7.el7.elrepo.noarch.rpm

rpm --import https://www.elrepo.org/RPM-GPG-KEY-elrepo.org  //导入el源的秘钥
linux8的:
yum install https://www.elrepo.org/elrepo-release-8.el8.elrepo.noarch.rpm
更多详见官网;
2>yum list available //查看可安装的内核版本
yum list kernel --showduplicates // 查看 yum 可升级的内核版本,有需要的版本可以直接执行 update 升级
yum --enablerepo=“elrepo-kernel” list --showduplicates | sort -r | grep kernel-ml.x86_64
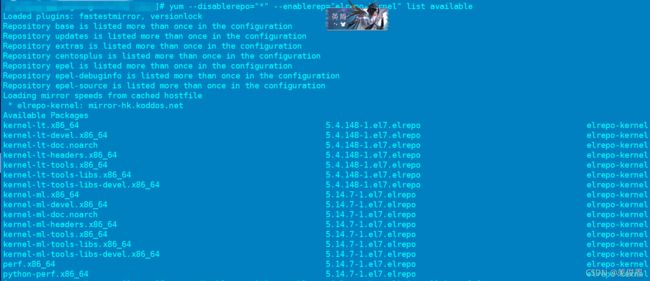
yum --disablerepo=“*” --enablerepo=“elrepo-kernel” list available

注:lt为长期稳定了能,ml为主线产品,这里我们选lt版;
现场实际:
yum --disablerepo=“*” --enablerepo=“elrepo-kernel” list available
yum --disablerepo=“*” --enablerepo=“elrepo-kernel” install kernel-lt -y
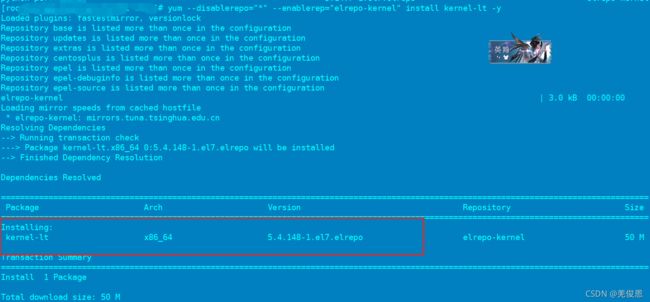
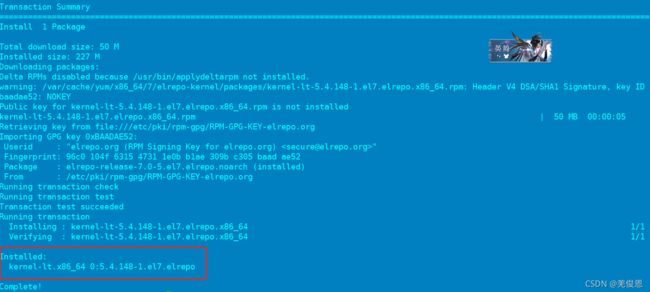
安装完成验证:
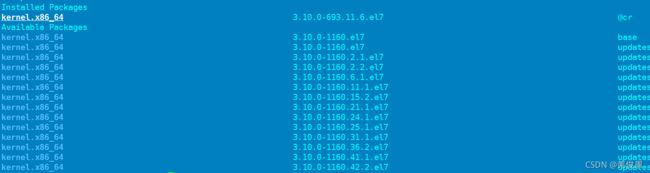
awk -F\' '$1=="menuentry " {print i++ ":" $2}' /etc/grub2.cfg //查看现有内核启动顺序
- 1

注:执行yum list kernel和uname -r看到的还是当前OS使用的kernel版本;从上图我们可以看到新旧版本都存在,是随时可以切换的。
3>更新安装:
yum --disablerepo=* --enablerepo=elrepo install -y kernel-lt //禁用其他源只用elrepo安装新内核
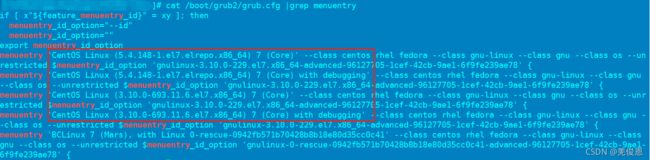
4> 更新完成后,查看当前OS启动所用内核版本,执行:
cat /boot/grub2/grub.cfg |grep menuentry

现场实际更新完成后,就可以看到新的内核版本已经加入到启动列表里了:
5>设置操作系统从新内核启动
grub2-set-default “CentOS Linux (4.4.221-1.el7.elrepo.x86_64) 7 (Core)” //替换为升级后的内核信息,安装对应格式编写,即uname -a显示的:

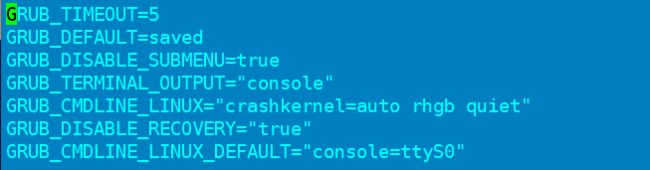
或者:
vi /etc/default/grub //增加GRUB_DEFAULT=0。指定GRUB 初始化页面的第一个内核将作为默认内核。如果不管用,请编辑/etc/grub2.cfg配置文件,修改set_default=你的启动顺序,0表示第一个;正常无需修改。
再执行:grub2-mkconfig -o /boot/grub2/grub.cfg //用新的内核信息生成grub启动文件

6>查看内核启动项是否修改
grub2-editenv list

确认后重启完成升级。
Ubuntu的参考:https://www.cnblogs.com/Older-Driver-of-Newer/p/7077150.html
2.3、只升级内核(无网)
可进入官网离线下载要升级的内核包:
最新稳定版5.14.7:wget https://cdn.kernel.org/pub/linux/kernel/v5.x/linux-5.14.7.tar.xz;可单击进入此查看包的内容。
也可以去git上下载,单击进入;对应的ubuntu,进入。
wget http://mirror.centos.org/centos/7/os/x86_64/Packages/kernel-3.10.0-1160.el7.x86_64.rpm
也可以去https://mirrors.edge.kernel.org/pub/linux/kernel/下找对应版本的内核。
注:生产环境中不推荐编译安装。
#依赖
yum install -y gcc make git ctags ncurses-devel openssl-devel
yum install -y bison flex elfutils-libelf-devel bc
#获取源码
wget https://mirror.tuna.tsinghua.edu.cn/kernel/vxxx.tar.xz
tar -xvf linux-5.14.7.tar.xz
mkdir /usr/local/src
mv  ./linux-5.14.7 /usr/local/src  //或直接解压时-C 指定
yum install ncurses-devel       #升级ncurses,ncurses是字符终端下屏幕控制的基本库
make clean && make mrporper //清理内核源代码树(清理垃圾信息),Make distclean:删除mrproper+编辑文件和补丁文件
cp /boot/config-'uname -r' /usr/src/kernels/ linux-5.14.7/.config  #使用原来的配置文件
make menuconfig  //配置内核以及内核模块
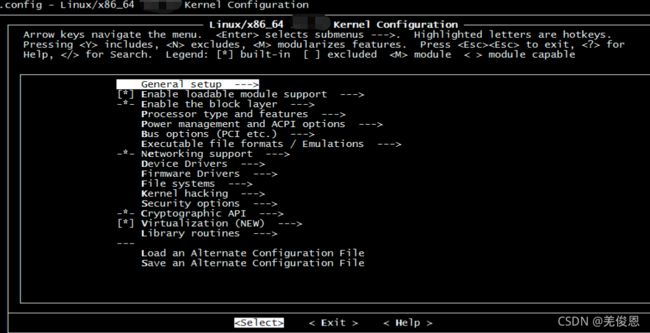
(输入y选中,M编译为模块)
a、General setup→[*] enable deprecated sysfs features to support old userspace tools
b、Processor type and features→HighMemory Support。
c、找到以下选中选项并选中:
networking support → networking options → network packet filtering framework(netfilter)
(1)Corenetfilter configuration
. 勾中"Netfilter connection tracking support" -m state相关模块是依赖它的,不选则没有。
. 将netbios name service protocal support(new) 编译成模块,不然后面升级iptables后启动时会出错
. 勾中"Netfilter Xtables support (required for ip_tables)"
(2)IP: Netfilter Configuration
. 将 “IPv4 connection tracking support (require for NAT)” 编译成模块。
. 勾中IP tables support (required for filtering/masq/NAT) 。
. 将 “Full NAT” 下的 “MASQUERADE target support” 和 “REDIRECT target support” 编译成模块
编译并安装内核: 确保以下每一步没有显示 error 的字样,如果任何一步报错都要退回到 make mrproper 重来
make clean       		// 清除下内核编译的目标文件
make dep				//生成依赖性关系
make bzImage    		// 生成新内核文件
make modules    		// 编译内核模块
make modules_install    // 安装内核模块
make install            // 安装内核
vi /etc/grub.conf  		//验证,查看是否有新的内核启动项生成
ls /boot   				//查看是否有新的内核文件vmlinuz生成
修改grub2配置文件,配置从新内核启动,参考上文步骤5;
重启:shutdown -r “now”
验证:uname -rs //参考
rpm -qa|grep kernel
yum remove kernel-3.xxxx
2.4、内核包说明
kernel
Linux 内核软件包,包含单、多核和多处理器系统的内核,是任何 Linux 操作系统的核心,单处理器的系统仅需安装内核包。内核处理操作系统的基本功能: 内存分配、进程分配、设备输入和输出等
kernel-devel
包含提供足够的针对内核软件包构建模块的内核头文件和 makefile 文件
kernel-headers
包含指定 Linux 内核、用户空间库文件和程序之间指定接口的 C 头文件。头文件定义了构建大多数标准程序所需的结构和常量,也是重建 glibc 软件包所必需的
kernel-doc
包含来自内核源代码的文档文件。各种关于 Linux 内核和设备以及驱动程序的信息都记录在这些文件当中
kernel-firmware
包含对于某些设备及其操作的固件信息文件
kernel-debug
包含许多对于内核 debug 诊断和调试的启用选项,只有当我们需要尝试收集额外的内核错误信息时才应该安装它。它是以牺牲性能为代价
kernel-debug-devel
包含内核 debug 诊断和调试的启用选项,以牺牲性能为代价
2.5、Ubuntu 内核升级
环境:Ubuntu 18.04
1)检查当前OS内核版本:sudo dpkg -l | grep linux-image,注意架构这里是amd64

2)查看本地可用的内核升级版本
#generic表示通用版内核。lowlatency表示低延迟内核。我们一般选择通用版内核
sudo apt-cache search linux-image|grep generic

#升级
sudo apt-get install linux-image-$(uname -r)-generic
或:联网的话直接升级当前系统所有软件包和内核,升级前先更新升级的软件包和内核明细表,执行
sudo apt update

#完成后
apt list --upgradable  //查看哪些软件包需要升级

#升级系统所有的软件包
sudo apt upgrade -y
#重新登录系统,再次检查可升级包
sudo reboot

sudo apt list --upgradeable
//如果执行命令的结果为:Listing… Done,就说明系统组件已经是最新的,没有需要更新的软件。
或离线安装:用wget分别下载4个generic版本的内核文件
wget --no-check-certificate https://kernel.ubuntu.com/~kernel-ppa/mainline/v5.16.15/amd64/linux-headers-5.16.15-051615-generic_5.16.15-051615.202203161444_amd64.deb
wget --no-check-certificate https://kernel.ubuntu.com/~kernel-ppa/mainline/v5.16.15/amd64/linux-headers-5.16.15-051615_5.16.15-051615.202203161444_all.deb
wget --no-check-certificate https://kernel.ubuntu.com/~kernel-ppa/mainline/v5.16.15/amd64/linux-image-unsigned-5.16.15-051615-generic_5.16.15-051615.202203161444_amd64.deb
wget --no-check-certificate https://kernel.ubuntu.com/~kernel-ppa/mainline/v5.16.15/amd64/linux-modules-5.16.15-051615-generic_5.16.15-051615.202203161444_amd64.deb
#安装
sudo dpkg -i *.deb
sudo dpkg --auto-deconfigure -i *.deb //交互式安装
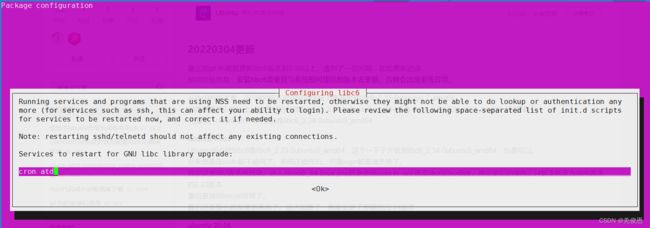
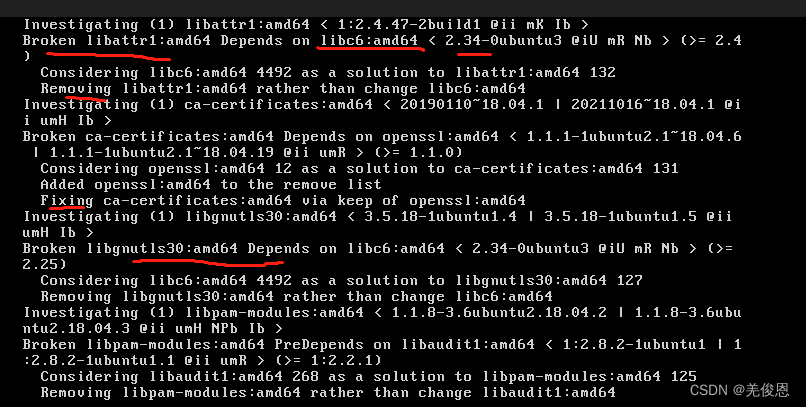
#报错如下
dpkg: dependency problems prevent configuration of linux-headers-5.16.15-051615-generic:
linux-headers-5.16.15-051615-generic depends on libc6 (>= 2.34); however:
Version of libc6:amd64 on system is 2.27-3ubuntu1.2.
linux-headers-5.16.15-051615-generic depends on libssl3 (>= 3.0.0~~alpha1); however:
Package libssl3 is not installed.
dpkg: error processing package linux-headers-5.16.15-051615-generic (--install):
#验证
apt-cache depends linux-headers-5.16.15-051615-generic
注意:Ubuntu内核升级到v5.13或v5.15时,需要升级libc和开发工具gcc,版本 >= 2.34:
apt list | grep libgcc | grep installed

ldd --version  //输出如下
ldd (Ubuntu GLIBC 2.27-3ubuntu1.2) 2.27

getconf GNU_LIBC_VERSION  //输出如下
glibc 2.27

find / -name libc-2.27.so //输出如下
/lib/x86_64-linux-gnu/libc-2.27.so

strings /lib/x86_64-linux-gnu/libc-2.27.so | grep GLIBC  //如果没有,安装sudo apt-get install binutils

//以下命令有坑,请看完测试正常后再执行
wget -q http://archive.ubuntu.com/ubuntu/pool/main/g/glibc/libc6_2.34-0ubuntu3_amd64.deb
wget -q http://archive.ubuntu.com/ubuntu/pool/main/g/glibc/libc-bin_2.34-0ubuntu3_amd64.deb
wget -q http://ports.ubuntu.com/pool/main/g/glibc/locales_2.34-0ubuntu3_all.deb
sudo dpkg --auto-deconfigure -i *.deb

#报错:
dpkg: error processing archive libc6_2.34-0ubuntu3_amd64.deb (--install):
 installing libc6:amd64 would break locales, and
 deconfiguration is not permitted (--auto-deconfigure might help)
(Reading database ... 139800 files and directories currently installed.)
Preparing to unpack libc-bin_2.34-0ubuntu3_amd64.deb ...
Unpacking libc-bin (2.34-0ubuntu3) over (2.27-3ubuntu1.2) ...
dpkg: dependency problems prevent configuration of libc-bin:
 libc-bin depends on libc6 (>> 2.34); however:
  Version of libc6:amd64 on system is 2.27-3ubuntu1.2.

dpkg: error processing package libc-bin (--install):
 dependency problems - leaving unconfigured
Processing triggers for man-db (2.8.3-2ubuntu0.1) ...
Errors were encountered while processing:
 libc6_2.34-0ubuntu3_amd64.deb
 libc-bin

#生产环境备份镜像后再执行如下命令
dpkg --auto-deconfigure -i libc6_2.34-0ubuntu3_amd64.deb
执行完上述,死机了
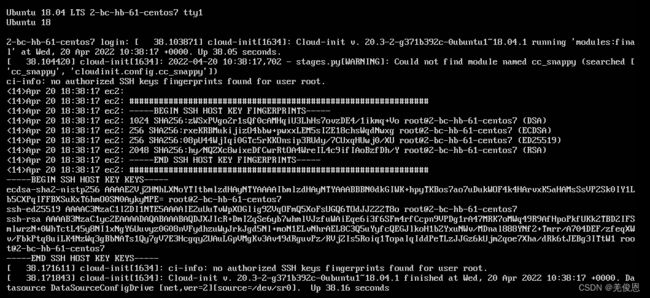

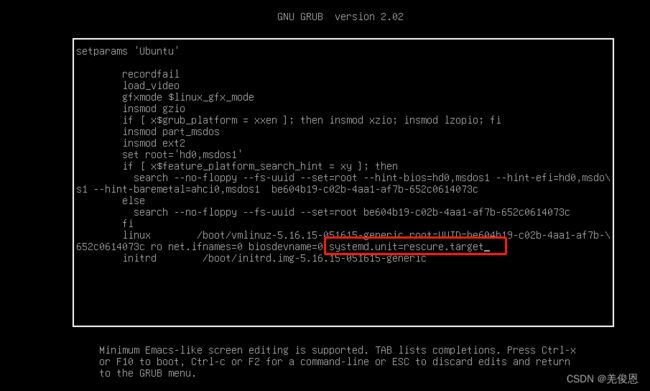
重启主机:发现主机无法登录,无法弹出认证(输入密码的响应),重启按ESC键,然后e键访问grub菜单,找到linux开头的行,ctrl+e键导航到行尾,编辑:systemd.unit=rescue.target或systemd.unit=emergency.target,按ctrl + x重启进入救援/紧急模式;

说明:
1、救援模式(即单用户模式)等效于使用 SysV 作为默认的服务器管理器的单用户(single user)模式。在救援模式中,将挂载所有的本地文件系统,将仅启动一些重要的服务。但是,不会启动一般的服务(例如,网络服务)。救援模式在不能正常引导系统的情况下很有用。
2、紧急模式中,不会启动任何的东西。不会启动服务、不会挂载挂载点、不会建立套接字、什么都不会启动。你将所拥有的只是一个原始的 shell。紧急模式多适用于调试目的。
mount -o remount,rw /
cd /mnt/sysimage/lib64    //救援模式进入到要修复系统的lib64目录
rm -rf *2.34*             //此操作会删除所有与2.34版本glibc的文件
cd /                      //回到rescue自带系统的目录
mkdir media                               //创建目录
mount /dev/cdrom /media                   //挂载光盘
cd /media/Packages               //进入到rpm包的目录
rpm -ivh --force --root=/mnt/sysimage glibc-*     //安装与glibc有关的rpm包
systemctl reboot
针对以上Ubuntu内核升级到v5.13或v5.15时,需要升级libc和开发工具gcc,版本 >= 2.34:,我们先升级glibc,升级lic6到2.34,但需特别注意:不要在运行中的系统上安装 Glibc,否则将会导致系统崩溃,至少应当将新 Glibc 安装到其他的单独目录,以保证不覆盖当前正在使用的 Glibc ,且强烈建议你使用非 root 身份编译和测试 Glibc。
先检查当前的lib版本(Ubuntu 18.04.3 LTS):glibc 2.27-3ubuntu1.6
ll /usr/lib/x86_64-linux-gnu/libc.so.6
lrwxrwxrwx 1 root root 12 Dec 16  2020 /usr/lib/x86_64-linux-gnu/libc.so.6 -> libc-2.27.so*

apt install binutils -y
cd /usr/lib/x86_64-linux-gnu/

strings /lib/x86_64-linux-gnu/libc-2.27.so | grep GLIBC  //查看当前lib库支持的GLIBC版本号,如果没有,安装sudo apt-get install binutils

less /etc/ld.so.conf.d/libc.conf //输出如下
# libc default configuration
/usr/local/lib


wget http://mirrors.aliyun.com/gnu/libc/glibc-2.34.tar.gz

tar zxvf glibc-2.34.tar.gz
cd glibc-2.34/
mkdir build
cd build
../configure  --prefix=/usr --disable-profile --enable-add-ons --with-headers=/usr/include --with-binutils=/usr/bin //Linux文件系统标准要求基本库必须位于 /lib 目录并且必须与根目录在同一个分区上,但是 /usr 可以在其他分区甚至是其他磁盘上。因此,如果指定 --prefix=/usr ,那么基本库部分将自动安装到 /lib 目录下,而非基本库部分则会自动安装到 /usr/lib 目录中。但是如果保持默认值或指定其他目录,那么所有组件都间被安装到PREFIX目录下。--disable-shared不编译共享库(即使平台支持)。在支持 ELF 并且使用 GNU 连接器的系统上默认为 --enable-shared;--disable-profile禁用 profiling 信息相关的库文件编译。

make check stop-on-test-failure=y
make -j4
make install   //非常危险,请提前快照,现场导致ubuntu系统所有命令无法使用了,更多参看https://sourceware.org/glibc/wiki/Testing/Builds

#如果需要降版本,或修改版本的话,执行
sudo apt --fix-broken install libc6=2.27-3ubuntu1 libc-bin=2.27-3ubuntu1 //按照提示安装合适的版本

apt install aptitude  //解决依赖包
The following additional packages will be installed:
  aptitude-common libboost-filesystem1.65.1 libboost-iostreams1.65.1 libboost-system1.65.1 libcgi-fast-perl libcgi-pm-perl libclass-accessor-perl
  libcwidget3v5 libencode-locale-perl libfcgi-perl libhtml-parser-perl libhtml-tagset-perl libhttp-date-perl libhttp-message-perl libio-html-perl
  libio-string-perl liblwp-mediatypes-perl libparse-debianchangelog-perl libsigc++-2.0-0v5 libsub-name-perl libtimedate-perl liburi-perl
  libxapian30
Suggested packages:
  aptitude-doc-en | aptitude-doc apt-xapian-index debtags libcwidget-dev libdata-dump-perl libhtml-template-perl libxml-simple-perl libwww-perl
  xapian-tools
The following NEW packages will be installed:
  aptitude aptitude-common libboost-filesystem1.65.1 libboost-iostreams1.65.1 libboost-system1.65.1 libcgi-fast-perl libcgi-pm-perl
  libclass-accessor-perl libcwidget3v5 libencode-locale-perl libfcgi-perl libhtml-parser-perl libhtml-tagset-perl libhttp-date-perl
  libhttp-message-perl libio-html-perl libio-string-perl liblwp-mediatypes-perl libparse-debianchangelog-perl libsigc++-2.0-0v5 libsub-name-perl
  libtimedate-perl liburi-perl libxapian30
……
Processing triggers for libc-bin (2.27-3ubuntu1.6) ...

aptitude install 软件包
apt install -f 软件包  //处理提示“unmet dependencies”
apt autoremove

apt install gcc make bison m4 cmake g++ -y   //否则无法编译
……
The following packages were automatically installed and are no longer required:
  linux-headers-4.15.0-118 linux-headers-4.15.0-118-generic linux-headers-4.15.0-167 linux-headers-4.15.0-167-generic linux-headers-4.15.0-20
  linux-headers-4.15.0-20-generic linux-image-4.15.0-118-generic linux-image-4.15.0-167-generic linux-image-4.15.0-20-generic
  linux-modules-4.15.0-118-generic linux-modules-4.15.0-167-generic linux-modules-4.15.0-20-generic linux-modules-extra-4.15.0-118-generic
  linux-modules-extra-4.15.0-167-generic linux-modules-extra-4.15.0-20-generic
Use 'apt autoremove' to remove them.
The following additional packages will be installed:
  cpp cpp-7 gcc-7 gcc-7-base libasan4 libatomic1 libbison-dev libc-dev-bin libc6-dev libcc1-0 libcilkrts5 libgcc-7-dev libgomp1 libisl19 libitm1
  liblsan0 libmpc3 libmpx2 libquadmath0 libtsan0 libubsan0 linux-libc-dev m4 manpages-dev
Suggested packages:
  bison-doc cpp-doc gcc-7-locales gcc-multilib autoconf automake libtool flex gdb gcc-doc gcc-7-multilib gcc-7-doc libgcc1-dbg libgomp1-dbg
  libitm1-dbg libatomic1-dbg libasan4-dbg liblsan0-dbg libtsan0-dbg libubsan0-dbg libcilkrts5-dbg libmpx2-dbg libquadmath0-dbg glibc-doc m4-doc
  make-doc
The following NEW packages will be installed:
  bison cpp cpp-7 gcc gcc-7 gcc-7-base libasan4 libatomic1 libbison-dev libc-dev-bin libc6-dev libcc1-0 libcilkrts5 libgcc-7-dev libgomp1 libisl19
  libitm1 liblsan0 libmpc3 libmpx2 libquadmath0 libtsan0 libubsan0 linux-libc-dev m4 make manpages-dev
0 upgraded, 27 newly installed, 0 to remove and 1 not upgraded.
Need to get 29.1 MB of archives.
After this operation, 105 MB of additional disk space will be used.
Get:1 https://mirrors.aliyun.com/ubuntu bionic/main amd64 m4 amd64 1.4.18-1 [197 kB]
Get:2 https://mirrors.aliyun.com/ubuntu bionic/main amd64 libbison-dev amd64 2:3.0.4.dfsg-1build1 [339 kB]
Get:3 https://mirrors.aliyun.com/ubuntu bionic/main amd64 bison amd64 2:3.0.4.dfsg-1build1 [266 kB]
Get:4 https://mirrors.aliyun.com/ubuntu bionic-updates/main amd64 gcc-7-base amd64 7.5.0-3ubuntu1~18.04 [18.3 kB]
Get:5 https://mirrors.aliyun.com/ubuntu bionic/main amd64 libisl19 amd64 0.19-1 [551 kB]
Get:6 https://mirrors.aliyun.com/ubuntu bionic/main amd64 libmpc3 amd64 1.1.0-1 [40.8 kB]
Get:7 https://mirrors.aliyun.com/ubuntu bionic-updates/main amd64 cpp-7 amd64 7.5.0-3ubuntu1~18.04 [8,591 kB]
Get:8 https://mirrors.aliyun.com/ubuntu bionic-updates/main amd64 cpp amd64 4:7.4.0-1ubuntu2.3 [27.7 kB]
Get:9 https://mirrors.aliyun.com/ubuntu bionic-updates/main amd64 libcc1-0 amd64 8.4.0-1ubuntu1~18.04 [39.4 kB]
Get:10 https://mirrors.aliyun.com/ubuntu bionic-updates/main amd64 libgomp1 amd64 8.4.0-1ubuntu1~18.04 [76.5 kB]
Get:11 https://mirrors.aliyun.com/ubuntu bionic-updates/main amd64 libitm1 amd64 8.4.0-1ubuntu1~18.04 [27.9 kB]
Get:12 https://mirrors.aliyun.com/ubuntu bionic-updates/main amd64 libatomic1 amd64 8.4.0-1ubuntu1~18.04 [9,192 B]
Get:13 https://mirrors.aliyun.com/ubuntu bionic-updates/main amd64 libasan4 amd64 7.5.0-3ubuntu1~18.04 [358 kB]
Get:14 https://mirrors.aliyun.com/ubuntu bionic-updates/main amd64 liblsan0 amd64 8.4.0-1ubuntu1~18.04 [133 kB]
Get:15 https://mirrors.aliyun.com/ubuntu bionic-updates/main amd64 libtsan0 amd64 8.4.0-1ubuntu1~18.04 [288 kB]
Get:16 https://mirrors.aliyun.com/ubuntu bionic-updates/main amd64 libubsan0 amd64 7.5.0-3ubuntu1~18.04 [126 kB]
Get:17 https://mirrors.aliyun.com/ubuntu bionic-updates/main amd64 libcilkrts5 amd64 7.5.0-3ubuntu1~18.04 [42.5 kB]
Get:18 https://mirrors.aliyun.com/ubuntu bionic-updates/main amd64 libmpx2 amd64 8.4.0-1ubuntu1~18.04 [11.6 kB]
Get:19 https://mirrors.aliyun.com/ubuntu bionic-updates/main amd64 libquadmath0 amd64 8.4.0-1ubuntu1~18.04 [134 kB]
Get:20 https://mirrors.aliyun.com/ubuntu bionic-updates/main amd64 libgcc-7-dev amd64 7.5.0-3ubuntu1~18.04 [2,378 kB]
Get:21 https://mirrors.aliyun.com/ubuntu bionic-updates/main amd64 gcc-7 amd64 7.5.0-3ubuntu1~18.04 [9,381 kB]
64% [21 gcc-7 4,282 kB/9,381 kB 46%]                                                                                              47.0 kB/s 3min 56s

Get:22 https://mirrors.aliyun.com/ubuntu bionic-updates/main amd64 gcc amd64 4:7.4.0-1ubuntu2.3 [5,184 B]
Get:23 https://mirrors.aliyun.com/ubuntu bionic-updates/main amd64 libc-dev-bin amd64 2.27-3ubuntu1.6 [71.9 kB]
Get:24 https://mirrors.aliyun.com/ubuntu bionic-proposed/main amd64 linux-libc-dev amd64 4.15.0-189.200 [982 kB]
Get:25 https://mirrors.aliyun.com/ubuntu bionic-updates/main amd64 libc6-dev amd64 2.27-3ubuntu1.6 [2,587 kB]
Get:26 https://mirrors.aliyun.com/ubuntu bionic/main amd64 make amd64 4.1-9.1ubuntu1 [154 kB]
Get:27 https://mirrors.aliyun.com/ubuntu bionic/main amd64 manpages-dev all 4.15-1 [2,217 kB]
Fetched 29.1 MB in 11min 10s (43.3 kB/s)
Selecting previously unselected package m4.
(Reading database ... 176417 files and directories currently installed.)
Preparing to unpack .../00-m4_1.4.18-1_amd64.deb ...
Unpacking m4 (1.4.18-1) .........................................................................................................................]
Selecting previously unselected package libbison-dev:amd64.......................................................................................]
Preparing to unpack .../01-libbison-dev_2%3a3.0.4.dfsg-1build1_amd64.deb ...
Unpacking libbison-dev:amd64 (2:3.0.4.dfsg-1build1) ...
Selecting previously unselected package bison....................................................................................................]
Preparing to unpack .../02-bison_2%3a3.0.4.dfsg-1build1_amd64.deb ...
Unpacking bison (2:3.0.4.dfsg-1build1) ..........................................................................................................]
Selecting previously unselected package gcc-7-base:amd64.........................................................................................]
Preparing to unpack .../03-gcc-7-base_7.5.0-3ubuntu1~18.04_amd64.deb ...
Unpacking gcc-7-base:amd64 (7.5.0-3ubuntu1~18.04) ...............................................................................................]
Selecting previously unselected package libisl19:amd64...........................................................................................]
Preparing to unpack .../04-libisl19_0.19-1_amd64.deb ...
Unpacking libisl19:amd64 (0.19-1) ...............................................................................................................]
Selecting previously unselected package libmpc3:amd64............................................................................................]
Preparing to unpack .../05-libmpc3_1.1.0-1_amd64.deb ...
Unpacking libmpc3:amd64 (1.1.0-1) ...
Selecting previously unselected package cpp-7....................................................................................................]
Preparing to unpack .../06-cpp-7_7.5.0-3ubuntu1~18.04_amd64.deb ...
Unpacking cpp-7 (7.5.0-3ubuntu1~18.04) ...
Selecting previously unselected package cpp......................................................................................................]
Preparing to unpack .../07-cpp_4%3a7.4.0-1ubuntu2.3_amd64.deb ...
Unpacking cpp (4:7.4.0-1ubuntu2.3) ..............................................................................................................]
Selecting previously unselected package libcc1-0:amd64...........................................................................................]
Preparing to unpack .../08-libcc1-0_8.4.0-1ubuntu1~18.04_amd64.deb ...
Unpacking libcc1-0:amd64 (8.4.0-1ubuntu1~18.04) .................................................................................................]
Selecting previously unselected package libgomp1:amd64...........................................................................................]
Preparing to unpack .../09-libgomp1_8.4.0-1ubuntu1~18.04_amd64.deb ...
Unpacking libgomp1:amd64 (8.4.0-1ubuntu1~18.04) .................................................................................................]
Selecting previously unselected package libitm1:amd64............................................................................................]
Preparing to unpack .../10-libitm1_8.4.0-1ubuntu1~18.04_amd64.deb ...
Unpacking libitm1:amd64 (8.4.0-1ubuntu1~18.04) ...
Selecting previously unselected package libatomic1:amd64.........................................................................................]
Preparing to unpack .../11-libatomic1_8.4.0-1ubuntu1~18.04_amd64.deb ...
Unpacking libatomic1:amd64 (8.4.0-1ubuntu1~18.04) ...............................................................................................]
Selecting previously unselected package libasan4:amd64...........................................................................................]
Preparing to unpack .../12-libasan4_7.5.0-3ubuntu1~18.04_amd64.deb ...
Unpacking libasan4:amd64 (7.5.0-3ubuntu1~18.04) ...#.............................................................................................]
Selecting previously unselected package liblsan0:amd64...........................................................................................]
Preparing to unpack .../13-liblsan0_8.4.0-1ubuntu1~18.04_amd64.deb ...
Unpacking liblsan0:amd64 (8.4.0-1ubuntu1~18.04) ...####..........................................................................................]
Selecting previously unselected package libtsan0:amd64.#.........................................................................................]
Preparing to unpack .../14-libtsan0_8.4.0-1ubuntu1~18.04_amd64.deb ...
Unpacking libtsan0:amd64 (8.4.0-1ubuntu1~18.04) ...#######.......................................................................................]
Selecting previously unselected package libubsan0:amd64.####.....................................................................................]
Preparing to unpack .../15-libubsan0_7.5.0-3ubuntu1~18.04_amd64.deb ...
Unpacking libubsan0:amd64 (7.5.0-3ubuntu1~18.04) ...
Selecting previously unselected package libcilkrts5:amd64.####...................................................................................]
Preparing to unpack .../16-libcilkrts5_7.5.0-3ubuntu1~18.04_amd64.deb ...
Unpacking libcilkrts5:amd64 (7.5.0-3ubuntu1~18.04) ...#########..................................................................................]
Selecting previously unselected package libmpx2:amd64.###########................................................................................]
Preparing to unpack .../17-libmpx2_8.4.0-1ubuntu1~18.04_amd64.deb ...
Unpacking libmpx2:amd64 (8.4.0-1ubuntu1~18.04) ...################...............................................................................]
Selecting previously unselected package libquadmath0:amd64.#########.............................................................................]
Preparing to unpack .../18-libquadmath0_8.4.0-1ubuntu1~18.04_amd64.deb ...
Unpacking libquadmath0:amd64 (8.4.0-1ubuntu1~18.04) ...##############............................................................................]
Selecting previously unselected package libgcc-7-dev:amd64.###########...........................................................................]
Preparing to unpack .../19-libgcc-7-dev_7.5.0-3ubuntu1~18.04_amd64.deb ...
Unpacking libgcc-7-dev:amd64 (7.5.0-3ubuntu1~18.04) ...#################.........................................................................]
Selecting previously unselected package gcc-7.############################.......................................................................]
Preparing to unpack .../20-gcc-7_7.5.0-3ubuntu1~18.04_amd64.deb ...
Unpacking gcc-7 (7.5.0-3ubuntu1~18.04) ...
Selecting previously unselected package gcc.################################.....................................................................]
Preparing to unpack .../21-gcc_4%3a7.4.0-1ubuntu2.3_amd64.deb ...
Unpacking gcc (4:7.4.0-1ubuntu2.3) ...#######################################....................................................................]
Selecting previously unselected package libc-dev-bin.##########################..................................................................]
Preparing to unpack .../22-libc-dev-bin_2.27-3ubuntu1.6_amd64.deb ...
Unpacking libc-dev-bin (2.27-3ubuntu1.6) ...####################################.................................................................]
Selecting previously unselected package linux-libc-dev:amd64.####################................................................................]
Preparing to unpack .../23-linux-libc-dev_4.15.0-189.200_amd64.deb ...
Unpacking linux-libc-dev:amd64 (4.15.0-189.200) ...################################..............................................................]
Selecting previously unselected package libc6-dev:amd64.############################.............................................................]
Preparing to unpack .../24-libc6-dev_2.27-3ubuntu1.6_amd64.deb ...
Unpacking libc6-dev:amd64 (2.27-3ubuntu1.6) ...#######################################...........................................................]
Selecting previously unselected package make.###########################################.........................................................]
Preparing to unpack .../25-make_4.1-9.1ubuntu1_amd64.deb ...
Unpacking make (4.1-9.1ubuntu1) ...
Selecting previously unselected package manpages-dev.#####################################.......................................................]
Preparing to unpack .../26-manpages-dev_4.15-1_all.deb ...
Unpacking manpages-dev (4.15-1) ...########################################################......................................................]
Setting up libquadmath0:amd64 (8.4.0-1ubuntu1~18.04) ...#####################################....................................................]
Setting up libgomp1:amd64 (8.4.0-1ubuntu1~18.04) ...###########################################..................................................]
Setting up libatomic1:amd64 (8.4.0-1ubuntu1~18.04) ...###########################################................................................]
Setting up libcc1-0:amd64 (8.4.0-1ubuntu1~18.04) ...##############################################...............................................]
Setting up make (4.1-9.1ubuntu1) ...#################################################################............................................]
Setting up libtsan0:amd64 (8.4.0-1ubuntu1~18.04) ...##################################################...........................................]
Setting up linux-libc-dev:amd64 (4.15.0-189.200) ...####################################################.........................................]
Setting up m4 (1.4.18-1) ...#############################################################################........................................]
Setting up liblsan0:amd64 (8.4.0-1ubuntu1~18.04) ...########################################################.....................................]
Setting up gcc-7-base:amd64 (7.5.0-3ubuntu1~18.04) ...#######################################################....................................]
Setting up libmpx2:amd64 (8.4.0-1ubuntu1~18.04) ...#############################################################.................................]
Setting up libbison-dev:amd64 (2:3.0.4.dfsg-1build1) ...#########################################################................................]
Setting up libmpc3:amd64 (1.1.0-1) ...##############################################################################.............................]
Setting up libc-dev-bin (2.27-3ubuntu1.6) ...########################################################################............................]
Setting up bison (2:3.0.4.dfsg-1build1) ...############################################################################..........................]
update-alternatives: using /usr/bin/bison.yacc to provide /usr/bin/yacc (yacc) in auto mode
Setting up manpages-dev (4.15-1) ...#####################################################################################........................]
Setting up libc6-dev:amd64 (2.27-3ubuntu1.6) ...###########################################################################......................]
Setting up libitm1:amd64 (8.4.0-1ubuntu1~18.04) ...##########################################################################....................]
Setting up libisl19:amd64 (0.19-1) ...#########################################################################################..................]
Setting up libasan4:amd64 (7.5.0-3ubuntu1~18.04) ...#############################################################################................]
Setting up libcilkrts5:amd64 (7.5.0-3ubuntu1~18.04) ...###########################################################################...............]
Setting up libubsan0:amd64 (7.5.0-3ubuntu1~18.04) ...###############################################################################.............]
Setting up libgcc-7-dev:amd64 (7.5.0-3ubuntu1~18.04) ...#############################################################################............]
Setting up cpp-7 (7.5.0-3ubuntu1~18.04) ...#############################################################################################.........]
Setting up cpp (4:7.4.0-1ubuntu2.3) ...##################################################################################################........]
Setting up gcc-7 (7.5.0-3ubuntu1~18.04) ...#################################################################################################.....]
Setting up gcc (4:7.4.0-1ubuntu2.3) ...######################################################################################################....]
Processing triggers for man-db (2.8.3-2ubuntu0.1) ...###########################################################################################.]
Processing triggers for install-info (6.5.0.dfsg.1-2) ...
Processing triggers for libc-bin (2.27-3ubuntu1.6) ...
……
Unpacking cmake (3.10.2-1ubuntu2.18.04.2) ...
……
Unpacking g++ (4:7.4.0-1ubuntu2.3) ...###################################........................................................................]
Setting up libstdc++-7-dev:amd64 (7.5.0-3ubuntu1~18.04) ...##############################........................................................]
Setting up g++-7 (7.5.0-3ubuntu1~18.04) ...##############################################################........................................]
Setting up g++ (4:7.4.0-1ubuntu2.3) ...


gcc --version  //输出如下
gcc (Ubuntu 7.5.0-3ubuntu1~18.04) 7.5.0

apt-get install g++  //报错如下
The following packages have unmet dependencies:
 g++ : Depends: g++-7 (>= 7.4.0-1~) but it is not going to be installed

vim /etc/apt/sources.list  //编辑apt源,源里的事bionic(ubuntu18.04的),后实际重装系统后为Ubuntu 20.04.3,修改如下
%s/bionic/focal/g

apt-get update  //待完成后,执行
apt install g++ -y

g++ --version		//输出如下
g++ (Ubuntu 7.5.0-3ubuntu1~18.04) 7.5.0


../configure  --prefix=/usr -disable-profile --enable-add-ons --with-headers=/usr/include --with-binutils=/usr/bin //输出如下,注意--with-headers=/usr/include会导致上述内核环境编译报fata错误
……
checking installed Linux kernel header files... 3.2.0 or later
checking for kernel header at least 3.2.0... ok
checking for symlinks in /usr/include... ok
running configure fragment for sysdeps/gnu
running configure fragment for sysdeps/x86_64
checking for AVX512DQ support in assembler... yes
checking for AVX512 support... yes
checking -mprefer-vector-width=128... no
checking for Intel MPX support... yes
running configure fragment for sysdeps/x86
checking for linker x86 ISA level support... no
checking whether -fPIC is default... yes
checking whether -fPIE is default... yes
configure: creating ./config.status
config.status: creating config.make
config.status: creating Makefile
config.status: creating config.h
config.status: executing default commands

#修改如下,重新编译
../configure  --prefix=/root/glibc2.34

make -j4  //输出如下
……
home/glibc-2.34/build/csu/crtn.o
make[2]: Leaving directory '/home/glibc-2.34/elf'
make[1]: Leaving directory '/home/glibc-2.34'

#make install  //编译到当前glib库的其他目录,可安装成功,输出如下
……
gawk '/\.gnu\.glibc-stub\./ { \
	  sub(/\.gnu\.glibc-stub\./, "", $2); \
	  stubs[$2] = 1; } \
	END { for (s in stubs) print "#define __stub_" s }' > /home/glibc-2.34/build/elf/stubsT
mv -f /home/glibc-2.34/build/elf/stubsT /home/glibc-2.34/build/elf/stubs
make[2]: Leaving directory '/home/glibc-2.34/elf'
(sed '/^@/d' include/stubs-prologue.h; LC_ALL=C sort /home/glibc-2.34/build/csu/stubs /home/glibc-2.34/build/iconv/stubs /home/glibc-2.34/build/locale/stubs /home/glibc-2.34/build/localedata/stubs /home/glibc-2.34/build/iconvdata/stubs /home/glibc-2.34/build/assert/stubs /home/glibc-2.34/build/ctype/stubs /home/glibc-2.34/build/intl/stubs /home/glibc-2.34/build/catgets/stubs /home/glibc-2.34/build/math/stubs /home/glibc-2.34/build/setjmp/stubs /home/glibc-2.34/build/signal/stubs /home/glibc-2.34/build/stdlib/stubs /home/glibc-2.34/build/stdio-common/stubs /home/glibc-2.34/build/libio/stubs /home/glibc-2.34/build/dlfcn/stubs /home/glibc-2.34/build/nptl/stubs /home/glibc-2.34/build/rt/stubs /home/glibc-2.34/build/malloc/stubs /home/glibc-2.34/build/string/stubs /home/glibc-2.34/build/wcsmbs/stubs /home/glibc-2.34/build/timezone/stubs /home/glibc-2.34/build/time/stubs /home/glibc-2.34/build/dirent/stubs /home/glibc-2.34/build/grp/stubs /home/glibc-2.34/build/pwd/stubs /home/glibc-2.34/build/posix/stubs /home/glibc-2.34/build/io/stubs /home/glibc-2.34/build/termios/stubs /home/glibc-2.34/build/resource/stubs /home/glibc-2.34/build/misc/stubs /home/glibc-2.34/build/socket/stubs /home/glibc-2.34/build/sysvipc/stubs /home/glibc-2.34/build/gmon/stubs /home/glibc-2.34/build/gnulib/stubs /home/glibc-2.34/build/wctype/stubs /home/glibc-2.34/build/manual/stubs /home/glibc-2.34/build/shadow/stubs /home/glibc-2.34/build/gshadow/stubs /home/glibc-2.34/build/po/stubs /home/glibc-2.34/build/argp/stubs /home/glibc-2.34/build/conform/stubs /home/glibc-2.34/build/debug/stubs /home/glibc-2.34/build/mathvec/stubs /home/glibc-2.34/build/support/stubs /home/glibc-2.34/build/crypt/stubs /home/glibc-2.34/build/nptl_db/stubs /home/glibc-2.34/build/inet/stubs /home/glibc-2.34/build/resolv/stubs /home/glibc-2.34/build/nss/stubs /home/glibc-2.34/build/hesiod/stubs /home/glibc-2.34/build/sunrpc/stubs /home/glibc-2.34/build/nis/stubs /home/glibc-2.34/build/nscd/stubs /home/glibc-2.34/build/login/stubs /home/glibc-2.34/build/elf/stubs) > /home/glibc-2.34/build/stubs.h
if test -r /root/glibc2.34/include/gnu/stubs-64.h && cmp -s /home/glibc-2.34/build/stubs.h /root/glibc2.34/include/gnu/stubs-64.h; \
then echo 'stubs.h unchanged'; \
else /usr/bin/install -c -m 644 /home/glibc-2.34/build/stubs.h /root/glibc2.34/include/gnu/stubs-64.h; fi
rm -f /home/glibc-2.34/build/stubs.h
test ! -x /home/glibc-2.34/build/elf/ldconfig || LC_ALL=C \
  /home/glibc-2.34/build/elf/ldconfig  \
			/root/glibc2.34/lib /root/glibc2.34/lib
make[1]: Leaving directory '/home/glibc-2.34'

ls ../glibc2.34/	//如下所示
bin  etc  include  lib  libexec  sbin  share  var


strings /root/glibc2.34/lib/libc.so.6|grep GLIBC_2.34|head -1  //如下所示
GLIBC_2.34


#临时修改环境变量,但不要在/etc/profile文件里直接修改,并source使之生效,否则会导致很多shell命令执行不了
export LD_LIBRARY_PATH=/root/glibc2.34/lib
echo $LD_LIBRARY_PATH	//验证,如下所示
/root/glibc2.34/lib

#修改源libc.so.6的软链接来源,由之前的libc-2.27.so修改为libc-2.34.so
file /root/glibc2.34/lib/libc.so.6
/root/glibc2.34/lib/libc.so.6: ELF 64-bit LSB shared object, x86-64, version 1 (GNU/Linux), dynamically linked, interpreter /root/glibc2.34/lib/ld-linux-x86-64.so.2, BuildID[sha1]=a0e520defc6900092c41b402309adc5827f2464f, for GNU/Linux 3.2.0, with debug_info, not stripped
cp /root/glibc2.34/lib/libc.so.6 /root/glibc2.34/lib/libc-2.34.so
strings /root/glibc2.34/lib/libc-2.34.so|grep GLIBC_2.34|head -1
cp /root/glibc2.34/lib/libc-2.34.so /lib/x86_64-linux-gnu
cp /root/glibc2.34/lib/libcrypt.so.1 /lib/x86_64-linux-gnu/
strings  /lib/x86_64-linux-gnu/libc-2.34.so|grep GLIBC_2.34|head -1
unlink ./libc.so.6
export LD_LIBRARY_PATH=/root/glibc2.34/lib
LD_PRELOAD=./libc-2.27.so ln -s ./libc-2.27.so ./libc.so.6
LD_PRELOAD=./libc-2.27.so strings ./libc.so.6 |grep GLIBC_2.34|head -1  //报错
grep: relocation error: /lib/x86_64-linux-gnu/libpthread.so.0: symbol __libc_vfork version GLIBC_PRIVATE not defined in file libc.so.6 with link time reference
Segmentation fault (core dumped)

ll /lib/x86_64-linux-gnu/libpthread.so.0
lrwxrwxrwx 1 root root 18 May  3 18:19 /lib/x86_64-linux-gnu/libpthread.so.0 -> libpthread-2.27.so*

unlink libpthread.so.0
unlink libc.so.6
export LD_LIBRARY_PATH=/root/glibc2.34/lib
LD_PRELOAD=./libc-2.27.so ln -s ./libc-2.34.so ./libc.so.6
LD_PRELOAD=./libc-2.27.so ln -s ./libc-2.34.so ./libpthread.so.0
ldconfig    //报错如下
Segmentation fault (core dumped)

#恢复
LD_PRELOAD=./libc-2.27.so ldconfig -l -v ./libc-2.27.so
	libc.so.6 -> libc-2.27.so (changed)

/root/glibc2.34/sbin/ldconfig -v -l /root/glibc2.34/lib/libc.so.6
	libc.so.6 -> libc.so.6
root@2-bc-hb-61-Ubuntu:/lib/x86_64-linux-gnu# ldconfig -v
ldconfig: Can't stat /root/glibc2.34/lib64: No such file or directory
ldconfig: Can't stat /root/glibc2.34/libx32: No such file or directory
/root/glibc2.34/lib: (from <builtin>:0)
	libdl.so.2 -> libdl.so.2
	libcrypt.so.1 -> libcrypt.so.1
	libc_malloc_debug.so.0 -> libc_malloc_debug.so.0
	libnss_hesiod.so.2 -> libnss_hesiod.so.2
	libnss_db.so.2 -> libnss_db.so.2
	libthread_db.so.1 -> libthread_db.so.1
	libnss_files.so.2 -> libnss_files.so.2
	libanl.so.1 -> libanl.so.1
	libm.so.6 -> libm.so.6
	libmemusage.so -> libmemusage.so
	libutil.so.1 -> libutil.so.1
	librt.so.1 -> librt.so.1
	libpcprofile.so -> libpcprofile.so
	ld-linux-x86-64.so.2 -> ld-linux-x86-64.so.2
	libnss_dns.so.2 -> libnss_dns.so.2
	libmvec.so.1 -> libmvec.so.1
	libSegFault.so -> libSegFault.so
	libpthread.so.0 -> libpthread.so.0
	libc.so.6 -> libc.so.6
	libnss_compat.so.2 -> libnss_compat.so.2
	libnsl.so.1 -> libnsl.so.1
	libBrokenLocale.so.1 -> libBrokenLocale.so.1
	libresolv.so.2 -> libresolv.so.2


#ldd --version
ldd (Ubuntu GLIBC 2.34-0ubuntu3) 2.34
Copyrig/lib/x86_64-linux-gnuht (C) 2021 Free Software Foundation, Inc

#继续,如非必要,不执行;因为系统很多命令依赖与glibc库
make install  //默认,编译到到当前正使用的glib库目录下,执行安装时报错如下,应执行make install /home/glic/
……
Inconsistency detected by ld.so: dl-call-libc-early-init.c: 37: _dl_call_libc_early_init: Assertion `sym != NULL' failed!

#之后系统内所有命令运行都会报上述错误,无法执行任何命令了
#修改如下
make install /home/glic/  //报错
……
mv -f /lib64/ld-linux-x86-64.so.2.new /lib64/ld-linux-x86-64.so.2
.././scripts/mkinstalldirs /usr/lib64/audit
Inconsistency detected by ld.so: dl-call-libc-early-init.c: 37: _dl_call_libc_early_init: Assertion `sym != NULL' failed!  //相关经验已表明,这是Ubuntu 16-20.04 (LTS)系统bug
Makefile:156: recipe for target '/usr/lib64/audit/sotruss-lib.so' failed
make[2]: *** [/usr/lib64/audit/sotruss-lib.so] Error 127
make[2]: Leaving directory '/home/glibc-2.34/elf'
Makefile:478: recipe for target 'elf/subdir_install' failed
make[1]: *** [elf/subdir_install] Error 2
make[1]: Leaving directory '/home/glibc-2.34'
Makefile:12: recipe for target 'install' failed
make: *** [install] Error 2

apt install autoconf automake autotools-dev curl python3 libmpc-dev libmpfr-dev libgmp-dev gawk build-essential bison flex texinfo gperf libtool patchutils bc zlib1g-dev libexpat-dev
3)卸载旧内核
sudo apt-get purge linux-image-xxx-generic

#或安装byobu来删除旧内核
sudo apt install byobu -y
sudo purge-old-kernels  //默认情况下,byobu将在系统上至少保留2个内核版本,以确保在第一个失败时具有备用内核。
purge-old-kernels --keep 1 -q  //自动更新grub,保留唯一一个(最新的)内核
4)更新 grub
sudo update-grub
sudo reboot

dpkg -l | grep linux-image
5)其他
sudo apt-get autoclean  清理已下载过期的安装包
sudo apt-get clean      清理已下载的安装包
du -sh /var/cache/apt/archives   //包缓存所占用的硬盘空间
apt-get dist-upgrade //更新整个系统到最新的发行版,会删除其他包
apt-get remove 软件包名称 //删除已安装的软件包(保留配置文件)
apt-get –purge remove 软件包名称 //删除已安装包(不保留配置文件)
apt-get autoremove //删除为了满足其他软件包的依赖而安装的,但现在不再需要的软件包
三、附录:
3.1、包升级命令

1)配置yum更新源
/etc/yum.repos.d目录下新建主机的yum源,.repos文件中,repositoryid:指定一个仓库,name指定仓库名称, baseurl:指定仓库的URL,mirrorlist指定仓库的镜像站点,enable是否启用本仓库,gpgcheck是否检查软件包的GPG签名,gpgkey:指定GPG签名文件的URL。
2)加速yum配置:
vim /etc/yum.conf  //配置如下

proxy=代理ip:端口
proxy_username=代理服务器的用户名
proxy_password=代理服务器密码

yum install yum-fastestmirror  //让yum自动选择最快的镜像服务器
3)Yum常用命令
【centos区分】
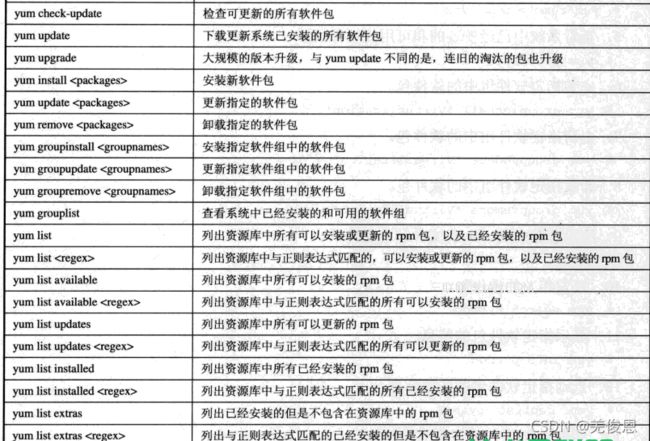
# 升级所有包,改变软件设置和系统设置,系统版本和内核都升级。
yum -y update
# 升级所有包,不改变软件设置和系统设置,系统版本升级,内核不改变。
yum -y upgrade
【ubuntu】:
sudo apt update:只检查更新源里的软件版本列表,不更新(已安装的软件包是否有可用的更新,给出汇总报告)
sudo apt upgrade 软件包名:更新已安装的软件包
sudo apt-get install/delete package
sudo apt-get -f install #修复安装
sudo apt-get dist-upgrade #升级系统
sudo apt-get upgrade #更新已安装的包
sudo apt-get source package #下载该包的源代码
sudo apt-get build-dep package #安装相关的编译环境
sudo apt-get clean && sudo apt-get autoclean #清理无用的包
注:apt-get 用来安装软件、更新源、也可以用来更新自Ubuntu(https://launchpad.net/ubuntu)的典型依赖包,典型安装即意味着它只是安装(最新发布的,或最近一个的)单一版本,并且我们不能决定我们要安装的依赖包的版本或选择它之前的版本。
#python依赖包安装
sudo apt-get install python-pip python-dev build-essential
sudo pip install --upgrade pip
sudo pip install 包名 //用来安装来自PyPI(https://www.python.org/)的python所有的依赖包,并且可以选择安装任何在PyPI上已上传的先前版本的依赖包,包括python相关的包和第三方包以及各种版本;
sudo pip list 列出所有的库
sudo pip show torch 查看库的信息
#安装python库
sudo apt-get install python-numpy
sudo apt-get install python-scipy
sudo apt-get install python-matplotlib
sudo apt-get install python-pip
#卸载
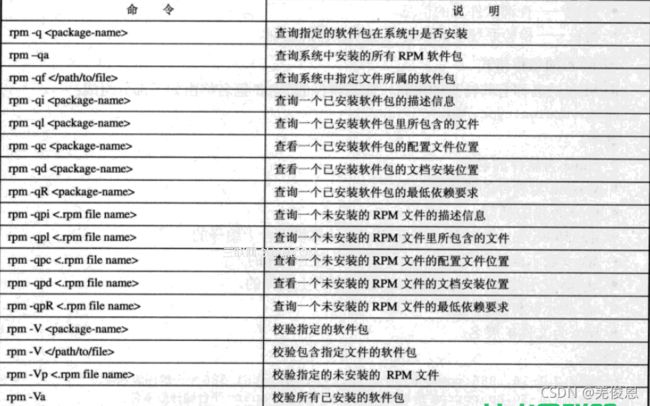
rpm -e software.rpm(卸载);
rpm -e --nodeps 包名 (强制卸载)
rpm –U software.rpm(升级形式安装);
3.2、ubuntu更换安装源
lsb_release -a
No LSB modules are available.
Distributor ID:	Ubuntu
Description:	Ubuntu 18.04.5 LTS
Release:	18.04
Codename:	bionic


grep -Ev '^#|#$' /etc/apt/sources.list  //系统默认源,现场访问报104错误,无法访问archive.ubuntu.com的80端口

deb http://archive.ubuntu.com/ubuntu bionic main restricted

deb http://archive.ubuntu.com/ubuntu bionic-updates main restricted

deb http://archive.ubuntu.com/ubuntu bionic universe
deb http://archive.ubuntu.com/ubuntu bionic-updates universe

deb http://archive.ubuntu.com/ubuntu bionic multiverse
deb http://archive.ubuntu.com/ubuntu bionic-updates multiverse

deb http://archive.ubuntu.com/ubuntu bionic-backports main restricted universe multiverse


deb http://security.ubuntu.com/ubuntu bionic-security main restricted
deb http://security.ubuntu.com/ubuntu bionic-security universe
deb http://security.ubuntu.com/ubuntu bionic-security multiverse

sudo vim /etc/apt/sources.list  //配置国内的源


sudo apt-get update
sudo apt-get upgrade
1)阿里云源
deb http://mirrors.aliyun.com/ubuntu/ bionic main restricted universe multiverse
deb-src http://mirrors.aliyun.com/ubuntu/ bionic main restricted universe multiverse

deb http://mirrors.aliyun.com/ubuntu/ bionic-security main restricted universe multiverse
deb-src http://mirrors.aliyun.com/ubuntu/ bionic-security main restricted universe multiverse

deb http://mirrors.aliyun.com/ubuntu/ bionic-updates main restricted universe multiverse
deb-src http://mirrors.aliyun.com/ubuntu/ bionic-updates main restricted universe multiverse

deb http://mirrors.aliyun.com/ubuntu/ bionic-proposed main restricted universe multiverse
deb-src http://mirrors.aliyun.com/ubuntu/ bionic-proposed main restricted universe multiverse

deb http://mirrors.aliyun.com/ubuntu/ bionic-backports main restricted universe multiverse
deb-src http://mirrors.aliyun.com/ubuntu/ bionic-backports main restricted universemultiverse
2)清华源:
deb https://mirrors.tuna.tsinghua.edu.cn/ubuntu/ bionic main restricted universe multiverse
deb-src https://mirrors.tuna.tsinghua.edu.cn/ubuntu/ bionic main restricted universe multiverse
deb https://mirrors.tuna.tsinghua.edu.cn/ubuntu/ bionic-updates main restricted universe multiverse
deb-src https://mirrors.tuna.tsinghua.edu.cn/ubuntu/ bionic-updates main restricted universe multiverse
deb https://mirrors.tuna.tsinghua.edu.cn/ubuntu/ bionic-backports main restricted universe multiverse
deb-src https://mirrors.tuna.tsinghua.edu.cn/ubuntu/ bionic-backports main restricted universe multiverse
deb https://mirrors.tuna.tsinghua.edu.cn/ubuntu/ bionic-security main restricted universe multiverse
deb-src https://mirrors.tuna.tsinghua.edu.cn/ubuntu/ bionic-security main restricted universe multiverse
deb https://mirrors.tuna.tsinghua.edu.cn/ubuntu/ bionic-proposed main restricted universe multiverse
deb-src https://mirrors.tuna.tsinghua.edu.cn/ubuntu/ bionic-proposed main restricted universe multiverse
3)163网易源
deb http://mirrors.163.com/ubuntu/ bionic main restricted universe multiverse
deb http://mirrors.163.com/ubuntu/ bionic-security main restricted universe multiverse
deb http://mirrors.163.com/ubuntu/ bionic-updates main restricted universe multiverse
deb http://mirrors.163.com/ubuntu/ bionic-proposed main restricted universe multiverse
deb http://mirrors.163.com/ubuntu/ bionic-backports main restricted universe multiverse
deb-src http://mirrors.163.com/ubuntu/ bionic main restricted universe multiverse
deb-src http://mirrors.163.com/ubuntu/ bionic-security main restricted universe multiverse
deb-src http://mirrors.163.com/ubuntu/ bionic-updates main restricted universe multiverse
deb-src http://mirrors.163.com/ubuntu/ bionic-proposed main restricted universe multiverse
deb-src http://mirrors.163.com/ubuntu/ bionic-backports main restricted universe multiverse
4)中科大:
deb https://mirrors.ustc.edu.cn/ubuntu/ bionic main restricted universe multiverse
deb-src https://mirrors.ustc.edu.cn/ubuntu/ bionic main restricted universe multiverse
deb https://mirrors.ustc.edu.cn/ubuntu/ bionic-updates main restricted universe multiverse
deb-src https://mirrors.ustc.edu.cn/ubuntu/ bionic-updates main restricted universe multiverse
deb https://mirrors.ustc.edu.cn/ubuntu/ bionic-backports main restricted universe multiverse
deb-src https://mirrors.ustc.edu.cn/ubuntu/ bionic-backports main restricted universe multiverse
deb https://mirrors.ustc.edu.cn/ubuntu/ bionic-security main restricted universe multiverse
deb-src https://mirrors.ustc.edu.cn/ubuntu/ bionic-security main restricted universe multiverse
deb https://mirrors.ustc.edu.cn/ubuntu/ bionic-proposed main restricted universe multiverse
deb-src https://mirrors.ustc.edu.cn/ubuntu/ bionic-proposed main restricted universe multiverse
3.3、apt与apt-get对比
Ubuntu是基于Debian 作为母版发行的,Debian系的包管理工具APT( Advanced Packaging Tool)可方便用户安装、删除和管理的软件包。而apt-get 是其中一款广受欢迎的命令行工具,另外一款较为流行小工具的是 Aptitude 兼顾命令行与 GUI 。APT更广,它是所有包管理子命令的集合;可简单理解,pt = apt-get、apt-cache 和 apt-config 中最常用命令选项的集合。
apt 具有更精减但足够的命令选项,而且参数选项的组织方式更为有效。另外,pt 命令安装或删除程序时看到进度条;更新存储库数据库时提示用户可升级的软件包个数;


apt-get有t比 apt 更多、更细化的操作功能;apt-get具备出色的解决软件依赖关系的能力。 Ubuntu 16.04引入apt命令,并以某种方式取代了 apt-get ; 对于update操作,apt update 命令不仅更新存储库索引,还告知存储库中是否有可用软件以及有多少新版本可用。apt-get upgrade 命令会更新系统中当前存在的所有软件包,但不会在系统上安装或删除现有软件包。新的apt upgrade 命令将安装可升级软件包的依赖项添加的软件包,它也不会删除以前安装的软件包。
3.4、PAE内核
PAE即Physical Address Extension,最初是为了弥补32位地址在PC服务器应用上的不足而推出的。更新至支持PAE的Linux内核,可以让你的32位Linux支持最大64GB内存,它允许内核映射完整的4 GB内存,并解决许多计算机上存在的BIOS内存漏洞,并导致无PAE的纯32位内核“仅”看到3.1或3.2 GB的内存,尽管物理上为4 GB。但进程的地址空间保持在32位,这意味着它最多只能访问4GB的内存。但是,操作系统可以访问64GB的地址空间,为进程分配4GB的块。
#安装
apt-get install linux-generic-pae linux-headers-2.6.38-13-generic-pae
注:PAE需要硬件支持。如果将pae内核安装在不支持它的硬件上,则系统可能会崩溃。在这种情况下,请安装通用内核。
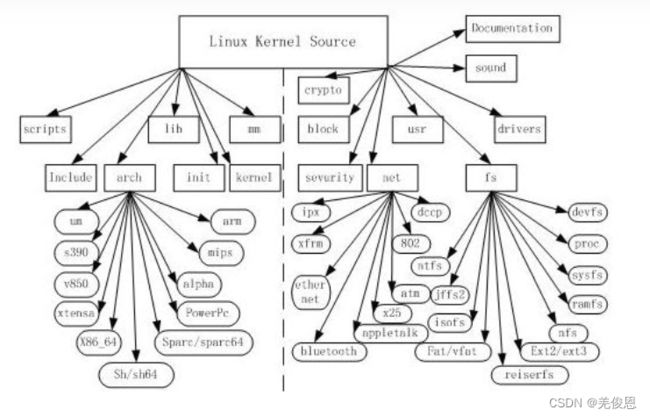
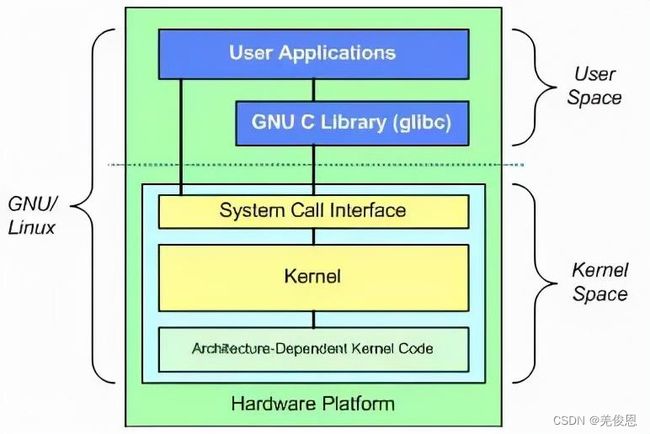
3.5、内核结构图
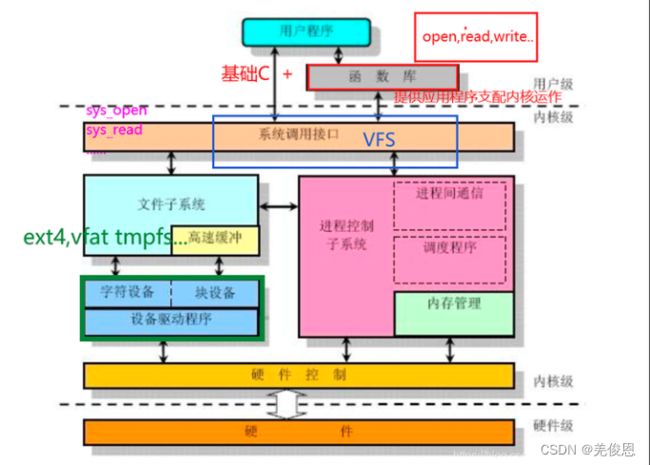
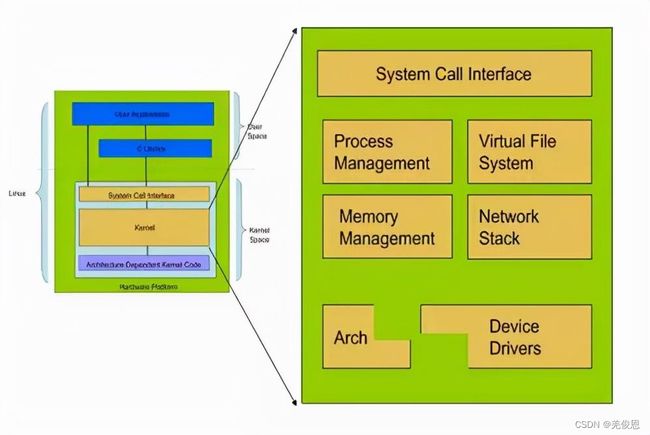
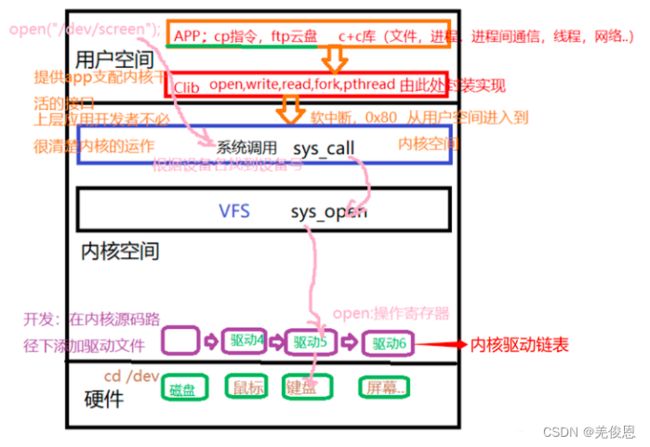
Linux系统层次结构: 又称为Linux体系结构,区分上面的Linux内核结构,前者可以分为两块:
(1)用户空间:用户空间中又包含了,用户的应用程序,C库
(2)内核空间:内核空间包括,系统调用,内核,以及与平台构架相关的代码
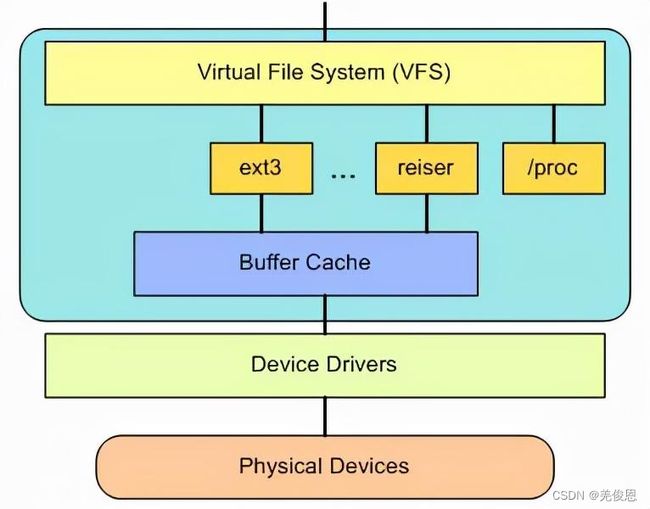
另外,虚拟文件系统(VFS)是Linux内核中十分有用的一个方面,由于它为文件系统提供了一个通用的插口具象。VFS在SCI和内核所支持的文件系统之间提供了一个交换层:
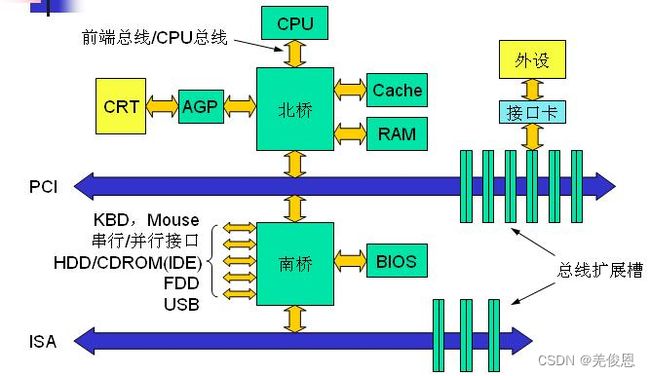
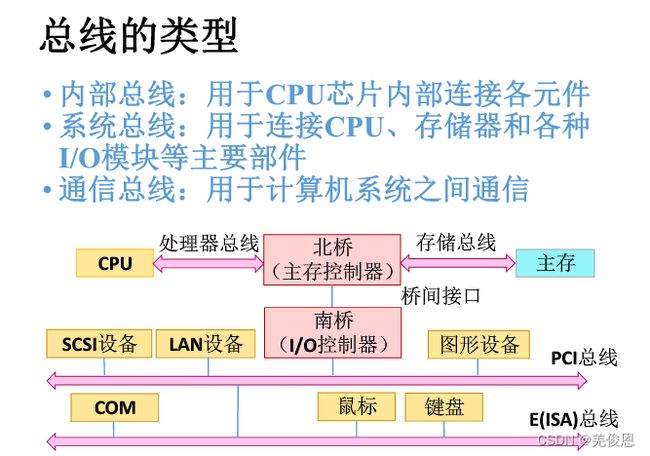
总线类型:
四、漏洞升级内核处理
4.1、Linux kernel 缓冲区错误漏洞
CNNVD编号:CNNVD-202203-2027
危害等级: 高危
CVE编号: CVE-2022-27666
漏洞类型: 缓冲区错误
**漏洞描述:**Linux kernel 5.16.15之前版本存在安全漏洞,该漏洞源于net/ipv4/esp4.c 和 net/ipv6/esp6.c 中IPsec ESP 代 码存在缓冲区溢出。本地攻击者可利用该漏洞通过覆盖内核堆对象获得特权。
处理: 内核升级到5.16.15及更新的版本
wget --no-check-certificate https://cdn.kernel.org/pub/linux/kernel/v5.x/linux-5.16.15.tar.gz
wget --no-check-certificate https://cdn.kernel.org/pub/linux/kernel/v5.x/linux-5.16.15.tar.sign
或者参考上文在线升级:

grub2-set-default "CentOS Linux (5.18.7-1.el7.elrepo.x86_64) 7 (Core)
#备份启动文件
ll /boot/grub2/grub.cfg
-rw-r--r-- 1 root root 7551 Jun 29 16:59 /boot/grub2/grub.cfg
mv /boot/grub2/grub.cfg ./os_bak/
#生产新的OS启动文件
grub2-mkconfig -o /boot/grub2/grub.cfg

ll /boot/grub2/grub.cfg

-rw-r----- 1 root root 7506 Jun 29 17:38 /boot/grub2/grub.cfg

grub2-editenv list  //新的启动如下

saved_entry=CentOS Linux (5.18.7-1.el7.elrepo.x86_64) 7 (Core)

shutdown -r "now"