十五.SpringCloud极简入门-Spring Cloud Stream消息驱动
老鸟飞过,只做学习使用,欢迎交流
1.Spring Cloud Stream介绍
1.1.为什么要用Spring Cloud Stream
在项目开发的过程中,由于需求的变更可能会导致MQ中间件的更换,比如我们最开始使用的RabbitMQ,后续需要更换为Kafka,RabbitMQ和Kafka架构上的不同会在消息中间件的变更过程中给我们带来很多困扰,甚至可能要推倒代码重做,Spring Cloud Stream使用解耦合的方式让消息中间件的变更变得简单。
1.2.什么是Spring Cloud Stream
官方将 Spring Cloud Stream 定义成一个构建消息驱动微服务的框架。应用程序通过 inputs 或者 outputs 来与 Spring Cloud Stream 中binder 交互而 Spring Cloud Stream 的 binder 负责与消息中间件交互,简而言之SpringCloud Stream可以用来整合各种MQ实现统一的操作方案,目前支持RabbitMQ,和Kafka。
1.3.理解Spring Cloud Stream
官方文档提供的架构图:

如上图所示 ,spring cloud stream 通过inputs来获取要消费的数据(消费者,从队列中获取消息),通过outputs来发布生产的数据(提供者,把消息输出到队列中)。应用程序通过通道和Binder链接,Binder和外界进行交流 , 应用程序只需要关注怎么和Binder交互即可。无需关注外界的MQ中间件。
简单理解:就好比是找了一个会多国语言的翻译(Binder),我们只需要用汉语和翻译交流,翻译负责和其他的国家的人做交流。
Binder
Binder位于应用程序和 MQ消息中间件之间 ,起到承上启下的作用,Binder向应用程序暴露统一的通道(Channel),使得应用测序不用去关注各式各样的消息中间件(MQ),而只需要关注怎么和Binder进行绑定,例如我们需要更换MQ就只需要更换Binder的类型即可,不用考虑修改逻辑代码。
1.4.Spring Cloud Stream 常用注解
我们先来了解几个注解,后面代码中会用到:
-
Middleware:这个指的是中间件,如 RabbitMQ和Kafka
-
@Input : 输入通道,接受到的消息进入程序 , 这个标签一般用在消费者身上
-
@Output:输出通道 ,消息离开程序 ,这个标签一般用在生产者身上
-
@StreamListener: 该标签用来指定监听队列 , 用于消费者接受消息
-
@EnableBinding : 开启绑定,将通道和交换机绑定在一起
2.Spring Cloud Stream编码实战
2.1.RabbitMQ安装
见消息总线一文中的RabbitMQ安装:https://blog.csdn.net/u014494148/article/details/105166372
2.2.消费者服务
搭建工程
springcloud-stream-consumer-server-1090 ,导入基础依赖 stream-rabbit是和rabbit整合的包
 <dependency>
     <groupId>org.springframework.cloudgroupId>
     <artifactId>spring-cloud-starter-netflix-eureka-clientartifactId>
 dependency>
<dependency>
    <groupId>org.springframework.bootgroupId>
    <artifactId>spring-boot-starter-webartifactId>
dependency>

<dependency>
    <groupId>org.springframework.cloudgroupId>
    <artifactId>spring-cloud-starter-stream-rabbitartifactId>
dependency>
主配置类
//服务注册与发现
@SpringBootApplication
@EnableDiscoveryClient
public class StreamConsumerServerApplication1090 {
    public static void main(String[] args) {
        SpringApplication.run(StreamConsumerServerApplication1090.class);
    }
}
yml配置文件
eureka:
  client:
    serviceUrl:
      defaultZone: http://peer1:1010/eureka/,http://peer2:1011/eureka/,http://peer3:1012/eureka/
  instance:
    prefer-ip-address: true  #使用ip注册到Eureka
    instance-id: stream-consumer-server:1090  #指定客户端实例的ID
spring:
  application:
    name: stream-consumer-server
  cloud:
    stream:
      bindings:
        input: #消息输入配置,我们这里是消费者,如果是生成者就用output
          content-type: application/json	#内容类型
          destination: myStream #消息目的地 , 会在RabbitMQ创建一个名字叫mySteram的交换机
  rabbitmq:	#RabbitMQ的链接配置
    host: localhost
    port: 5672
    username: guest
    password: guest

server:
  port: 1090
这里除了要注册到Eureak Server之外,通过spring.cloud.stream.bindings.input 来定义了消息的输入配置。
- content-type :用来指定消息的类型
- destination :用来指定消息的目的地,其实就是指定MQ中的交换机
spring.rabbitmq是用来配置RabbitMQ的链接参数。
Stream的消息通道绑定接口
public interface StreamClient {

    //对应配置中的bindings
    String INPUT = "input";

    //用来输入消息
    @Input(StreamClient.INPUT)
    SubscribableChannel input();
}
创建 StreamClient 接口,通过 @Input注解定义输入通道,另外,@Input 还有一个 value 属性,该属性可以用来设置消息通道的名称,这里指定的消息通道名称是 input对应yml配置。如果直接使用两个注解而没有指定具体的 value 值,则会默认使用方法名作为消息通道的名称,定义输入通道时,需要返回 SubscribableChannel 接口对象,该接口集成自 MessageChannel 接口,它定义了维护消息通道订阅者的方法。简而言之,就是用来定义消息接收的。
消息接收
@Component
//绑定消息接口
@EnableBinding(value = {StreamClient.class})
public class StreamConsumer {

    private Logger logger = LoggerFactory.getLogger(StreamConsumer .class);

    @StreamListener(StreamClient.INPUT)
    public void receive(String message) {
        logger.info("收到消息: {}", message);
    }
}
@EnableBinding 注解用来指定一个或多个定义了 @Input 注解的接口,以此实现对消息通道(Channel)的绑定。上面我们通过 @EnableBinding(value = {StreamClient.class}) 绑定了 StreamClient 接口,该接口是我们自己实现的对输入输出消息通道绑定的定义
@StreamListener,主要定义在方法上,作用是将被修饰的方法注册为消息中间件上数据流的事件监听器,注解中的属性值对应了监听的消息通道名。上面我们将 receive 方法注册为StreamClient.INPUT 消息通道的监听处理器,当我们往这个消息通道发送信息的时候,receiver 方法会执行。
简单理解就是当我们往 StreamClient.INPUT 这个输入通道发消息的时候 ,应用程序通过@StreamListener 标签监听到消息,然后调用receive方法接收数据进行消费。
启动测试
启动消费者程序,打开RabbitMQ控制界面,可以看到这里创建了一个交换机 , 类型默认是Topic定向 ,routingkey是“#”

2.3.提供者服务
搭建工程
创建工程
springcloud-stream-provider-server-1100 ,导入依赖,和消费者服务一样。
 <dependency>
     <groupId>org.springframework.cloudgroupId>
     <artifactId>spring-cloud-starter-netflix-eureka-clientartifactId>
 dependency>
<dependency>
    <groupId>org.springframework.bootgroupId>
    <artifactId>spring-boot-starter-webartifactId>
dependency>

<dependency>
    <groupId>org.springframework.cloudgroupId>
    <artifactId>spring-cloud-starter-stream-rabbitartifactId>
dependency>
yml配置文件
eureka:
  client:
    serviceUrl:
      defaultZone: http://peer1:1010/eureka/,http://peer2:1011/eureka/,http://peer3:1012/eureka/
  instance:
    prefer-ip-address: true  #使用ip注册到Eureka
    instance-id: stream-consumer-server:1100  #指定客户端实例的ID

spring:
  application:
    name: stream-provider-server
  cloud:
    stream:
      bindings:
        output: #消息输出配置
          content-type: application/json
          destination: myStream #消息目的地
  rabbitmq:
    host: localhost
    port: 5672
    username: guest
    password: guest

server:
  port: 1100
主配置类
//服务注册与发现
@SpringBootApplication
@EnableDiscoveryClient
@EnableBinding(StreamClient.class)	//绑定stream的API接口
public class StreamProviderServerApplication1100 {
    public static void main(String[] args) {
        SpringApplication.run(StreamProviderServerApplication1100.class);
    }
}
这里的主配置通过 @EnableBinding(StreamClient.class) 绑定stream的接口实现对消息通道的绑定。下面是Stream消息通道绑定接口:
Stream的消息通道绑定接口
public interface StreamClient {

    //对应配置中的bindings
    String OUTPUT = "output";

    //用来输出消息
    @Output(StreamClient.OUTPUT)
    MessageChannel output();
}
这里和消费者的绑定输入通道差不多,这里在提供者方绑定的是输出通道,“output”对应了yml配置中的“bindings.output”配置。应用程序通过 MessageChannel 来发送消息,通过 @Output(StreamClient.OUTPUT)绑定的通道把消息发送到RabbitMQ中。
编写消息发送测试controller
@RestController
public class StreamProvider {

    @Autowired
    StreamClient streamClient ;

    @RequestMapping("/send")
    public void send(){
        streamClient.output().send(MessageBuilder.withPayload("我是消息我是消息").build());
    }
}
注入 streamClient,通过output()得到消息输出通道(MessageChannel ),通过send方法去发送消息到MQ
访问测试
启动消费者,再启动提供者,访问提供者:http://localhost:1100/send ,观察消费者的控制台应该收到了消息,并且RabbitMQ产生了一个的队列

修改消费者 的端口为 1091 ,再启动一个消费者,然后访问 http://localhost:1100/send 观察两个消费者应该都受到消息了
2.4.消息分组
上面的案例Stream是通过topic方式进行消息广播 ,有的时候我们希望一个消息只是被一个消费者收到,因为有些消息不能被重复消费,我们可以使用消组。通过配置消息分组的方式来达到如上效果,下面修改下配置文件,修改如下:注意,我这里修改的是消费者
eureka:
  client:
    serviceUrl:
      defaultZone: http://peer1:1010/eureka/,http://peer2:1011/eureka/,http://peer3:1012/eureka/
  instance:
    prefer-ip-address: true  #使用ip注册到Eureka
    instance-id: stream-consumer-server:1090  #指定客户端实例的ID
spring:
  application:
    name: stream-consumer-server
  cloud:
    stream:
      bindings:
        input: #消息输入配置,我们这里是消费者,如果是生成者就用output
          content-type: application/json	#内容类型
          destination: myStream #消息目的地 , 会在RabbitMQ创建一个名字叫mySteram的交换机
          group: stream #指定组,多个消费者在同一个组,那么一个消息就只会给到一个消费者
  rabbitmq:	#RabbitMQ的链接配置
    host: localhost
    port: 5672
    username: guest
    password: guest

server:
  port: 1090
group: stream #指定组,多个消费者在同一个组,那么一个消息就只会给到一个消费者 , 重启多个消费者,查看MQ,这里多个一个:myStream.stream的队列,这个stream的后缀就是组名。

我们启动测试,多次发送消息,同一个消息只会被一个消息者获取。
2.5.消息分区
有的时候我们可能不满足于一个消息被一个消费者消费,对于特殊业务情况,除了要保证单个消费者消费之外,还希望有相同特点的消费都可以同一个消费者消费,这里就可以使用 Spring Cloud Stream 提供的消息分区功能。
消费者
Spring Cloud Stream 实现消息分区只需要在配置文件里进行相应的配置即可,消费者修改配置文件如下:
eureka:
  client:
    serviceUrl:
      defaultZone: http://peer1:1010/eureka/,http://peer2:1011/eureka/,http://peer3:1012/eureka/
  instance:
    prefer-ip-address: true  #使用ip注册到Eureka
    instance-id: stream-consumer-server:1090  #指定客户端实例的ID
spring:
  application:
    name: stream-consumer-server
  cloud:
    stream:
      bindings:
        input: #消息输入配置,我们这里是消费者,如果是生成者就用output
          content-type: application/json	#内容类型
          destination: myStream #消息目的地 , 会在RabbitMQ创建一个名字叫mySteram的交换机
          group: stream #指定组,多个消费者在同一个组,那么一个消息就只会给到一个消费者
          #通过该参数开启消费者分区功能
          partitioned: true
      #配置总共有多少个消费者
      instance-count: 2
      #当前消费者是第几个,从 0 开始,最大值为instance-count 减 1 。
      instance-index: 0
  rabbitmq:	#RabbitMQ的链接配置
    host: localhost
    port: 5672
    username: guest
    password: guest

server:
  port: 1090
启动两个消费者 ,注意修改端口,第二个消费者需要将 instance-index: 0 改为1 , 观察MQ

提供者
修改提供者springcloud-stream-provider-1100工程,修改配置文件,指定分区个数
eureka:
  client:
    serviceUrl:
      defaultZone: http://peer1:1010/eureka/,http://peer2:1011/eureka/,http://peer3:1012/eureka/
  instance:
    prefer-ip-address: true  #使用ip注册到Eureka
    instance-id: stream-consumer-server:1100  #指定客户端实例的ID

spring:
  application:
    name: stream-provider-server
  cloud:
    stream:
      bindings:
        output: #消息输出配置
          content-type: application/json
          destination: myStream #消息目的地
          partitionCount: 2  #分区个数
          #分区规则表达式配置,从header中获取分区索引
          partitionKeyExpression: headers['partitionKey']
  rabbitmq:
    host: localhost
    port: 5672
    username: guest
    password: guest

server:
  port: 1100
提示: partitionCount 用来配置消费者分区熟练,我们上面启动了2个消费者 , partitionKeyExpression是分区的key的表达式,即:把消息要发给哪个分区就是通过这个配置来决定的,我们配置headers[‘partitionKey’] 的目的是待会儿需要在发送消息的时候把设置header的partitionKey属性来传递分区的索引。
修改提供者发送消息的Controller
@RestController
public class StreamProvider {

    @Autowired
    StreamClient streamClient ;

    @RequestMapping("/send")
    public void send(){
        streamClient.output().send(
                MessageBuilder.withPayload("我是消息我是消息")
                        //设置键值,往第0个消费者发消息,对应配置文件
                        .setHeader("partitionKey",0).build());
    }
}
这里的setHeader(“partitionKey”,0)对应了yml配置中的headers[‘partitionKey’],将索引 0 传递给partitionKeyExpression,那么消息只会发给分区索引为 0 的消费者。
启动测试,根据 setHeader(“partitionKey”,0).值的不同,消息会发送到不同的消费者。我们只需要控制partitionKey就可以控制相同类型的消息只给到一个消费者。
2.6.消息消费重试
当消息消费失败,可以通过 max-attempts来修改消息重试次数,默认3次,如果修改成 0 就不进行从重试,如果是业务逻辑出错及时多次重试可能也是继续失败,所以可以将重试修改成 0 ,避免不必要的性能消耗。
spring:
  cloud:
    stream:
      bindings:
        input: #消息输入配置
          consumer:
            max-attempts: 1 #重试次数,默认3次
2.7.消息处理失败降级
消息消费失败,可以使用降级手段返回预先准备好的兜底方案,修改消费者:
@Component
//绑定消息接口
@EnableBinding(value = {StreamClient.class})
public class StreamConsumer {

    private Logger logger = LoggerFactory.getLogger(StreamConsumer .class);

    @StreamListener(StreamClient.INPUT)
    public void receive(String message) {
        logger.info("收到消息: {}", message);
        throw new RuntimeException("异常了");
    }
    /**
     * 消息消费失败的降级处理逻辑
     *
     * @param message
     */
    @ServiceActivator(inputChannel  = "myStream.stream-0.errors")
    public void error(Message<?> message) {
        System.out.println("消息消费失败");
    }
}
提示:这里的消费方法抛出了异常,查询会自动触发降级,执行error方法的兜底业务逻辑。
inputChannel的值是 destination = myStream , group = stream , instance-index = 0的组合 , 当“myStream.stream-0”队列中的消息消费失败,会自动调用error方法执行托底逻辑。可以通过日志把错误消息保存下来然后分析、修复Bug再重新处理。
2.8.死信队列存储消费失败消息
上面我们通过降级方案 , 可以让消费失败的消息采用另一种兜里的方案去处理,但是消息终归是失败了,消息也丢失了,其实我们可以把处理失败的消息加入DLQ死信队列,然后让失败的消息重新被消费。
spring:
    stream:
      rabbit:
        bindings:
          input:
            consumer:
              auto-bind-dlq: true  #开启死信队列
              dlq-ttl: 50000 #死信队列消息存活时间 ,有些数据过时了就没意义了
              republish-to-dlq: true #把失败原因也推送到死信队列
              deadLetterQueueName: myStream.stream-0.dlq #指定队列名称
              requeue-rejected: true #重新排队拒绝消息的简称失败的消息将重新提交给同一处理程序并连续循环,
              #直到处理程序抛出AmqpRejectAndDontRequeueException 本质上使您可以在处理程序本身内构建自己的
auto-bind-dlq: true 开启死信队列 , 当MQ消费失败达到最大重试次数就会把消息加入 死信队列 , 我们可以通过把死信队列中的消息再移动到 正常队列重复消费。
- auto-bind-dlq: true 开启死信队列
- dlq-ttl: 50000 死信队列消息存活时间 ,有些数据过时了就没意义了
- republish-to-dlq: true 把失败原因也推送到死信队列
- deadLetterQueueName: myStream.stream-0.dlq 指定队列名称
- requeue-rejected: true 重新排队拒绝消息的将失败的消息将重新提交给同一处理程序并连续循环,直到处理程序抛出AmqpRejectAndDontRequeueException ,我们可以在代码中控制该异常的抛出来结束消息的连续循环处理。
观察MQ,自动传了死信队列

查看消息内容如下:
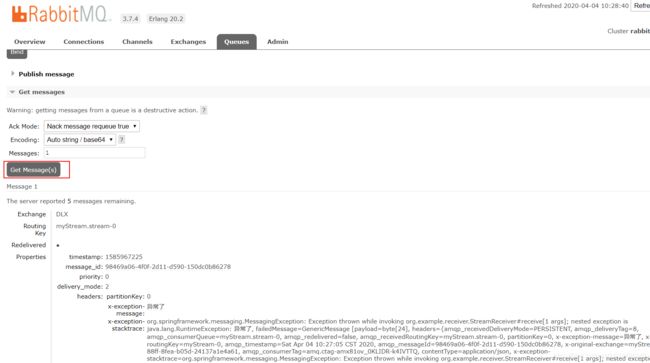
这里可以通过move message把消息移动到正常队列,重复消费

2.9.消息给指定的消费者消费
我们可以在消息提供者方通过headers设置一个属性标记,在消费方使用@StreamListener(condition=)来根据该属性进行指定消息的消费。
消息提供者
@RestController
public class StreamProvider {

    @Autowired
    StreamClient streamClient ;

    @RequestMapping("/send")
    public void send(){
        streamClient.output().send(
                MessageBuilder.withPayload("我是消息我是消息版本1.0")
                        //设置键值,往第0个消费者发消息,对应配置文件
                        .setHeader("partitionKey",0)
                        .setHeader("version","1.0") //版本
                        .build());

        streamClient.output().send(
                MessageBuilder.withPayload("我是消息我是消息版本2.0")
                        //设置键值,往第0个消费者发消息,对应配置文件
                        .setHeader("partitionKey",0)
                        .setHeader("version","2.0") //版本
                        .build());
    }
}
提示:这里通过 .setHeader(“version”,“2.0”) //版本 设置了一个版本号
消费者
@Component
//绑定消息接口
@EnableBinding(value = {StreamClient.class})
public class StreamConsumer{

    private Logger logger = LoggerFactory.getLogger(StreamConsumer.class);

    @StreamListener(value = StreamClient.INPUT,condition = "headers['version']=='1.0'")
    public void receive1(String message) {
        logger.info("receive1收到消息: {}", message);
    }
    @StreamListener(value = StreamClient.INPUT,condition = "headers['version']=='2.0'")
    public void receive2(String message) {
        logger.info("receive2收到消息: {}", message);
    }

}
提示:这里在 @StreamListener监听注解中加入一个条件属性condition ,在不同的消费方法上指定了不同的条件,即不同的消息version,这样一来,receive1方法就只消费version为1.0的消息,receive2就只消费version为2.0的消息
2.10.消息手动确认
消息手动确认机制可以有效的防止消息的丢失,当消费者消息消费失败,我们可以触发消息的确认,这样一来消息任然还在队列中,那么我们可以通过技术日志的手段方便程序员来排除错误,修改业务逻辑之后再进行消费。
修改确认模式为手动
spring:
    stream:
      rabbit:
        bindings:
          input:
            consumer:
              acknowledge-mode: manual  #手动签收
消费者确认消息
 @StreamListener(value = StreamClient.INPUT,condition = "headers['version']=='1.0'")
    public void receive1(String message,
                         @Header(AmqpHeaders.CHANNEL) Channel channel,
                         @Header(AmqpHeaders.DELIVERY_TAG) Long deliveryTag
    ) {
        logger.info("receive1收到消息: {}", message);
        //throw new RuntimeException("异常了");
        try {
            channel.basicAck(deliveryTag,false);    //手动确认
        } catch (IOException e) {
            e.printStackTrace();
        }
    }
提示:
- @Header(AmqpHeaders.CHANNEL) Channel channel:获取通道
- @Header(AmqpHeaders.DELIVERY_TAG) Long deliveryTag : 获取消息ID
- channel.basicAck(deliveryTag,false); //手动确认
总结
本片文件介绍了Spring Cloud Stream的一些常见用法