- Flink中的SQL Client和SQL Gateway
BigDataMLApplication
flinkflinksqlgateway
Flink中的SQLClient和SQLGateway对比目录定义基本原理适用场景主要区别常用运维命令示例官方链接正文1.定义SQLClient:FlinkSQLClient是一种用于提交和执行FlinkSQL语句的命令行界面或图形界面工具。SQLGateway:FlinkSQLGateway是一个独立的服务,它允许客户端通过RESTfulAPI将SQL查询提交到Flink集群。2.基本原理SQL
- llama.cpp 编译安装@Ubuntu
skywalk8163
项目实践人工智能llamaubuntulinux人工智能
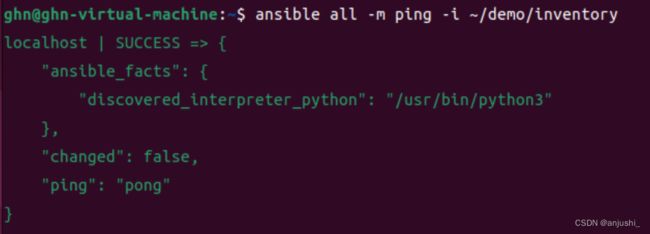
在Kylin和Ubuntu编译llama.cpp,具体参考:llama模型c语言推理@FreeBSD-CSDN博客现在代码并编译:gitclonehttps://github.com/ggerganov/llama.cppcdllama.cppmkdirbuildcdbuildcmake..cmake--build.--configRelease#可选安装makeinstall#或可选添加路径ex
- springboot集成logback-spring.xml文件
RT_0114
SpringBootspringbootspringlogback
彩色日志日志分debug和error文件输出,方便开发人员运维日志限制最大保管天数日志限制总量大小占用量GB日志限制单个文件大小MB日志显示最大保留天数屏蔽没用的日志${CONSOLE_LOG_PATTERN}${log.path}/debug.log${log.path}/%d{yyyy-MM-dd,aux}/debug.%d{yyyy-MM-dd}.%i.log.gz1024MB50GB365
- linux基础命令(一)
运维搬运工
linuxlinux服务器centos
Linux基础命令1、设置主机名1.1、hostname查看主机名[root@ansible~]#cat/etc/hostnameansible或[root@ansible~]#hostnameansible注意:主机名中不允许使用下划线“_”,可以用短横线“-”1.2、hostname临时修改主机名#临时修改直接修改的是内存中的,重启会失效[root@ansible~]#hostnameansi
- 网络安全(黑客)——自学2024
小言同学喜欢挖漏洞
web安全安全网络学习网络安全信息安全渗透测试
01什么是网络安全网络安全可以基于攻击和防御视角来分类,我们经常听到的“红队”、“渗透测试”等就是研究攻击技术,而“蓝队”、“安全运营”、“安全运维”则研究防御技术。无论网络、Web、移动、桌面、云等哪个领域,都有攻与防两面性,例如Web安全技术,既有Web渗透,也有Web防御技术(WAF)。作为一个合格的网络安全工程师,应该做到攻守兼备,毕竟知己知彼,才能百战百胜。02怎样规划网络安全如果你是一
- 黑客(网络安全)技术自学30天
一个迷人的黑客
web安全安全网络笔记网络安全信息安全渗透测试
01什么是网络安全网络安全可以基于攻击和防御视角来分类,我们经常听到的“红队”、“渗透测试”等就是研究攻击技术,而“蓝队”、“安全运营”、“安全运维”则研究防御技术。无论网络、Web、移动、桌面、云等哪个领域,都有攻与防两面性,例如Web安全技术,既有Web渗透,也有Web防御技术(WAF)。作为一个合格的网络安全工程师,应该做到攻守兼备,毕竟知己知彼,才能百战百胜。02怎样规划网络安全如果你是一
- linux安装docker及docker-compose 部署spring boot项目
时而有事儿
dockerlinuxdockerlinuxspringboot
linux系统环境:centos5.14本篇描述的是在centos系统版本下安装docker,如果是ubuntu版本,请看这篇文章:linuxubuntu20安装docker和docker-compose-CSDN博客正文:安装docker和docker-compose安装docker---------运行命名等待安装完成遇到选择直接输入yyuminstall-yyum-utilsdevice-m
- 自学黑客(网络安全)技术——2024最新
九九归二
web安全安全学习笔记网络网络安全信息安全
01什么是网络安全网络安全可以基于攻击和防御视角来分类,我们经常听到的“红队”、“渗透测试”等就是研究攻击技术,而“蓝队”、“安全运营”、“安全运维”则研究防御技术。无论网络、Web、移动、桌面、云等哪个领域,都有攻与防两面性,例如Web安全技术,既有Web渗透,也有Web防御技术(WAF)。作为一个合格的网络安全工程师,应该做到攻守兼备,毕竟知己知彼,才能百战百胜。02怎样规划网络安全如果你是一
- Ubuntu下安装Chrome浏览器(简单,使用)
Starry-sky(jing)
[linux操作系统笔记]chrome深度学习linux
下载安装GoogleChrome浏览器deb包极速下载:下载链接32位wgethttps://dl.google.com/linux/direct/google-chrome-stable_current_i386.deb64位wgethttps://dl.google.com/linux/direct/google-chrome-stable_current_amd64.deb安装sudodpk
- 【Linux】PyCharm无法启动报错及解决方法
不是AI
python软件操作Linuxlinuxpycharm运维
一、问题描述如图,笔者试图在Ubuntu18.04虚拟机上运行PyCharm开发工具(已安装,安装过程可以参考我的博客Ubuntu安装PyCharm),无法启动,报错:CannotconnecttoalreadyrunningIDEinstance.Exception:Process2574isstillrunning.报错截图如下:二、解决方法通过报错信息看出,出于某种原因,进程(PID为257
- 网络安全(黑客技术)—自学
德西德西
web安全安全网络安全学习python开发语言php
1.网络安全是什么网络安全可以基于攻击和防御视角来分类,我们经常听到的“红队”、“渗透测试”等就是研究攻击技术,而“蓝队”、“安全运营”、“安全运维”则研究防御技术。2.网络安全市场一、是市场需求量高;二、则是发展相对成熟入门比较容易。3.所需要的技术水平需要掌握的知识点偏多(举例):4.国家政策环境对于国家与企业的地位愈发重要,没有网络安全就没有国家安全更有为国效力的正义黑客—红客联盟可见其重视
- Ubuntu中安装VSCode的一个指令
Trigger_G
Ubuntu与ROSubuntuvscodelinux
问题描述本来想去VSCode官网上下载软件包,然后双击使用UbuntuSoftware安装的,但是安装老不成功。想用命令行指令dpkg进行安装,虽然能成功,但是后续使用code.命令打开VSCode又报错说找不到命令。解决方式在命令行中使用下述命令安装VSCode。sudosnapinstall--classiccode(建议安装的时候连上手机的热点,不然会报连接不上下载站点相关的错误)
- SQL运维_Unix下MySQL-8.0.18配置文件示例
Mostcow
SQLsql运维unix
SQL运维_Unix下MySQL-8.0.18配置文件示例MySQL是一个关系型数据库管理系统,由瑞典MySQLAB公司开发,属于Oracle旗下产品。MySQL是最流行的关系型数据库管理系统之一,在WEB应用方面,MySQL是最好的RDBMS(RelationalDatabaseManagementSystem,关系数据库管理系统)应用软件之一。MySQL是一种关系型数据库管理系统,关系数据库将
- 在 Linux/Ubuntu/Debian 上安装 SQL Server 2019
理工男老K
ubuntulinux运维debiansqlserver
Microsoft为Linux发行版(包括Ubuntu)提供SQLServer。以下是有关如何执行此操作的基本指南:注册MicrosoftUbuntu存储库并添加公共存储库GPG密钥:sudowget-qO-https://packages.microsoft.com/keys/microsoft.asc|sudoapt-keyadd-sudoadd-apt-repository"$(wget-q
- 关于HDP的20道高级运维面试题
编织幻境的妖
运维
1.描述HDP的主要组件及其作用。HDP(HortonworksDataPlatform)的主要组件包括Hadoop框架、HDFS、MapReduce、YARN以及Hadoop生态系统中的其他关键工具,如Spark、Flink、Hive、HBase等。以下是对这些组件及其作用的具体描述:Hadoop框架:Hadoop是一个开源的分布式计算框架,用Java语言编写,用于存储和处理大规模数据集。它广义
- ubuntu生成 设置 core文件
sun007700
ubuntulinux运维
ubuntu生成&设置core文件,调试段错误_ubuntu生成core文件-CSDN博客ubuntu设置core文件_ubuntucore文件默认位置-CSDN博客ulimit-asudovim/etc/profile#或者vi~/.bashrculimit-cunlimited#添加,退出source/etc/profilesudosystemctldisableapport.servicev
- 网络安全(黑客技术)—2024自学
德西德西
开发语言php安全web安全网络安全python网络
1.网络安全是什么网络安全可以基于攻击和防御视角来分类,我们经常听到的“红队”、“渗透测试”等就是研究攻击技术,而“蓝队”、“安全运营”、“安全运维”则研究防御技术。2.网络安全市场一、是市场需求量高;二、则是发展相对成熟入门比较容易。3.所需要的技术水平需要掌握的知识点偏多(举例):4.国家政策环境对于国家与企业的地位愈发重要,没有网络安全就没有国家安全更有为国效力的正义黑客—红客联盟可见其重视
- 网络安全(黑客)—2024自学笔记
羊村最强沸羊羊
web安全笔记安全网络安全网络python开发语言
前言一、什么是网络安全网络安全可以基于攻击和防御视角来分类,我们经常听到的“红队”、“渗透测试”等就是研究攻击技术,而“蓝队”、“安全运营”、“安全运维”则研究防御技术。无论网络、Web、移动、桌面、云等哪个领域,都有攻与防两面性,例如Web安全技术,既有Web渗透,也有Web防御技术(WAF)。作为一个合格的网络安全工程师,应该做到攻守兼备,毕竟知己知彼,才能百战百胜。二、怎样规划网络安全如果你
- 谈谈对前端性能监控的理解和实践
Layla_c
webjavepython前端
一、谈谈对前端性能监控的理解和实践前端性能监控是确保网页或应用高效、稳定运行的关键环节,它涉及对前端页面加载速度、资源消耗、错误率等指标的实时监控和预警。通过前端性能监控,开发者和运维团队能够及时发现并解决性能瓶颈,从而提升用户体验和系统稳定性。理解前端性能监控,首先要明确其重要性。在移动互联网时代,用户对网页和应用的响应速度有着极高的要求。如果页面加载缓慢或出现卡顿,用户可能会选择离开,这对企业
- Devops-02-Jpom 简而轻的低侵入式在线构建、自动部署、日常运维、项目监控软件
老马啸西风
java
拓展阅读Devops-01-devops是什么?Devops-02-Jpom简而轻的低侵入式在线构建、自动部署、日常运维、项目监控软件代码质量管理SonarQube-01-入门介绍项目管理平台-01-jira入门介绍缺陷跟踪管理系统,为针对缺陷管理、任务追踪和项目管理的商业性应用软件项目管理平台-01-Phabricator入门介绍一套集成的强大工具,帮助公司构建更高质量的软件持续集成平台01je
- Docker(一):Docker入门教程
蓝胖子的白日梦丶
如今Docker的使用已经非常普遍,特别在一线互联网公司。使用Docker技术可以帮助企业快速水平扩展服务,从而到达弹性部署业务的能力。在云服务概念兴起之后,Docker的使用场景和范围进一步发展,如今在微服务架构越来越流行的情况下,微服务+Docker的完美组合,更加方便微服务架构运维部署落地。本文详细解释介绍Docker入门相关内容,后期重点关注Docker在微服务体系中的使用。在了解Dock
- 渔夫码头密语: 记录使用 Docker 安装 Wordpress
shelby_loo
docker容器运维
最近在阿贝云的免费服务器上试水,配置虽小(1核CPU、1G内存、10G硬盘、5M带宽),但对此次任务正合适。作为国内首家提供这样不错的免费云服务器的阿贝云,给我们开源界添增不少乐子,在这里对Docker和Wordpress去搞一搞,总比呆在办公室曱甴better!今天与你分享一下如何在Ubuntu系统上使用Docker快速搭建Wordpress博客环境。Wordpress作为全球最大同类型开源内容
- 企业数字化转型必读:数据处理是“终极任务”
MongoDB 数据平台
mongodb人工智能
当前,可用的数据获取和分析技术的跃进,为产业创新创造了巨大的机遇,诸如线上音视频平台、游戏开发和运营商、新消费品牌、从传统行业中崛起的数字化工厂等等,迎来了前所未有的快节奏业务迭代,同时也面临着数据处理需求更加复杂多变的挑战。对于企业来说,在开发体验、开发效率、用户使用体验以及运维成本之间寻找平衡,可谓一项“终极任务”——以下是来自不同行业的4个客户案例,一起来看看他们是如何在MDB的帮忙下降本增
- Linux mkswap命令教程:如何设置Linux交换区(附实例详解和注意事项)
我要下东西噢
linuxlinux运维服务器
Linuxmkswap命令介绍mkswap命令用于在设备或文件上设置Linux交换区。设备参数通常是磁盘分区(例如/dev/sdb7),但也可以是文件。Linux内核不查看分区ID,但许多安装脚本假定十六进制类型82(LINUX_SWAP)的分区是交换分区。Linuxmkswap命令适用的Linux版本mkswap命令适用于所有主流的Linux发行版,包括Debian、Ubuntu、Alpine、
- Unix运维_Unix下配置PHP-7.x.x和Apache-2.x.x
Mostcow
Unixunix运维php
Unix运维_Unix下配置PHP-7.x.x和Apache-2.x.xApacheHTTPServer(简称Apache,音译为:阿帕奇)是Apache软件基金会的一个开放源码的网页服务器。Apache源于NCSAhttpd服务器,经过多次修改,成为世界上最流行的Web服务器软件之一。Apache可以运行在几乎所有广泛使用的计算机平台上,由于其跨平台和安全性被广泛使用。它快速,可靠并且可通过简单
- 网络安全(黑客)—2024自学
德西德西
web安全python网络安全网络安全开发语言php
1.网络安全是什么网络安全可以基于攻击和防御视角来分类,我们经常听到的“红队”、“渗透测试”等就是研究攻击技术,而“蓝队”、“安全运营”、“安全运维”则研究防御技术。2.网络安全市场一、是市场需求量高;二、则是发展相对成熟入门比较容易。3.所需要的技术水平需要掌握的知识点偏多(举例):4.国家政策环境对于国家与企业的地位愈发重要,没有网络安全就没有国家安全更有为国效力的正义黑客—红客联盟可见其重视
- 在Ubuntu-12.04环境下使用新的Rust开发工具
塵觴葉
ubunturustlinux
在老旧的系统环境下使用Rust开发工具笔者的一台硬件资源紧张的旧电脑安装了Ubuntu-12.04,希望在其上运行比较新的Rust开发工具,但却发现其因glibc较老,不能正常运行cargo工具,结果如下:yejq@UNIX:~$uname-aLinuxUNIX3.13.0-32-generic#57~precise1-UbuntuSMPTueJul1503:51:20UTC2014x86_64x
- 在Linux/Ubuntu/Debian中创建自己的命令快捷方式
理工男老K
linuxubuntudebian运维
虽然图标快捷方式使你移动鼠标双击就打开目标,但是你还是需要先定位到它。而在终端Terminal中你只需要输入一个自定义命令就能一步到位。要在Ubuntu中创建你自己的命令或别名,你可以使用主目录中的“.bashrc”文件。以下是创建通过Wine运行Photoshop的别名的方法:打开终端窗口。在文本编辑器中打开“.bashrc”文件。你可以使用你喜欢的任何文本编辑器,例如nano或vim。例如:n
- Ubuntu系统下C语言开发环境搭建与使用教程
洛可可白
后端专栏ubuntuc语言linux
前言欢迎来到我的技术小宇宙!这里不仅是我记录技术点滴的后花园,也是我分享学习心得和项目经验的乐园。无论你是技术小白还是资深大牛,这里总有一些内容能触动你的好奇心。洛可可白:个人主页个人专栏:✅前端技术✅后端技术个人博客:洛可可白博客代码获取:bestwishes0203封面壁纸:洛可可白wallpaper文章目录Ubuntu系统下C语言开发环境搭建与使用教程教程内容0.序言1.准备工作2.安装SS
- 网络安全(黑客)0基础到精通,看这一篇就够了!
羊村最强沸羊羊
web安全安全网络安全php网络python开发语言
前言一、什么是网络安全网络安全可以基于攻击和防御视角来分类,我们经常听到的“红队”、“渗透测试”等就是研究攻击技术,而“蓝队”、“安全运营”、“安全运维”则研究防御技术。无论网络、Web、移动、桌面、云等哪个领域,都有攻与防两面性,例如Web安全技术,既有Web渗透,也有Web防御技术(WAF)。作为一个合格的网络安全工程师,应该做到攻守兼备,毕竟知己知彼,才能百战百胜。二、怎样规划网络安全如果你
- 312个免费高速HTTP代理IP(能隐藏自己真实IP地址)
yangshangchuan
高速免费superwordHTTP代理
124.88.67.20:843
190.36.223.93:8080
117.147.221.38:8123
122.228.92.103:3128
183.247.211.159:8123
124.88.67.35:81
112.18.51.167:8123
218.28.96.39:3128
49.94.160.198:3128
183.20
- pull解析和json编码
百合不是茶
androidpull解析json
n.json文件:
[{name:java,lan:c++,age:17},{name:android,lan:java,age:8}]
pull.xml文件
<?xml version="1.0" encoding="utf-8"?>
<stu>
<name>java
- [能源与矿产]石油与地球生态系统
comsci
能源
按照苏联的科学界的说法,石油并非是远古的生物残骸的演变产物,而是一种可以由某些特殊地质结构和物理条件生产出来的东西,也就是说,石油是可以自增长的....
那么我们做一个猜想: 石油好像是地球的体液,我们地球具有自动产生石油的某种机制,只要我们不过量开采石油,并保护好
- 类与对象浅谈
沐刃青蛟
java基础
类,字面理解,便是同一种事物的总称,比如人类,是对世界上所有人的一个总称。而对象,便是类的具体化,实例化,是一个具体事物,比如张飞这个人,就是人类的一个对象。但要注意的是:张飞这个人是对象,而不是张飞,张飞只是他这个人的名字,是他的属性而已。而一个类中包含了属性和方法这两兄弟,他们分别用来描述对象的行为和性质(感觉应该是
- 新站开始被收录后,我们应该做什么?
IT独行者
PHPseo
新站开始被收录后,我们应该做什么?
百度终于开始收录自己的网站了,作为站长,你是不是觉得那一刻很有成就感呢,同时,你是不是又很茫然,不知道下一步该做什么了?至少我当初就是这样,在这里和大家一份分享一下新站收录后,我们要做哪些工作。
至于如何让百度快速收录自己的网站,可以参考我之前的帖子《新站让百
- oracle 连接碰到的问题
文强chu
oracle
Unable to find a java Virtual Machine--安装64位版Oracle11gR2后无法启动SQLDeveloper的解决方案
作者:草根IT网 来源:未知 人气:813标签:
导读:安装64位版Oracle11gR2后发现启动SQLDeveloper时弹出配置java.exe的路径,找到Oracle自带java.exe后产生的路径“C:\app\用户名\prod
- Swing中按ctrl键同时移动鼠标拖动组件(类中多借口共享同一数据)
小桔子
java继承swing接口监听
都知道java中类只能单继承,但可以实现多个接口,但我发现实现多个接口之后,多个接口却不能共享同一个数据,应用开发中想实现:当用户按着ctrl键时,可以用鼠标点击拖动组件,比如说文本框。
编写一个监听实现KeyListener,NouseListener,MouseMotionListener三个接口,重写方法。定义一个全局变量boolea
- linux常用的命令
aichenglong
linux常用命令
1 startx切换到图形化界面
2 man命令:查看帮助信息
man 需要查看的命令,man命令提供了大量的帮助信息,一般可以分成4个部分
name:对命令的简单说明
synopsis:命令的使用格式说明
description:命令的详细说明信息
options:命令的各项说明
3 date:显示时间
语法:date [OPTION]... [+FORMAT]
- eclipse内存优化
AILIKES
javaeclipsejvmjdk
一 基本说明 在JVM中,总体上分2块内存区,默认空余堆内存小于 40%时,JVM就会增大堆直到-Xmx的最大限制;空余堆内存大于70%时,JVM会减少堆直到-Xms的最小限制。 1)堆内存(Heap memory):堆是运行时数据区域,所有类实例和数组的内存均从此处分配,是Java代码可及的内存,是留给开发人
- 关键字的使用探讨
百合不是茶
关键字
//关键字的使用探讨/*访问关键词private 只能在本类中访问public 只能在本工程中访问protected 只能在包中和子类中访问默认的 只能在包中访问*//*final 类 方法 变量 final 类 不能被继承 final 方法 不能被子类覆盖,但可以继承 final 变量 只能有一次赋值,赋值后不能改变 final 不能用来修饰构造方法*///this()
- JS中定义对象的几种方式
bijian1013
js
1. 基于已有对象扩充其对象和方法(只适合于临时的生成一个对象):
<html>
<head>
<title>基于已有对象扩充其对象和方法(只适合于临时的生成一个对象)</title>
</head>
<script>
var obj = new Object();
- 表驱动法实例
bijian1013
java表驱动法TDD
获得月的天数是典型的直接访问驱动表方式的实例,下面我们来展示一下:
MonthDaysTest.java
package com.study.test;
import org.junit.Assert;
import org.junit.Test;
import com.study.MonthDays;
public class MonthDaysTest {
@T
- LInux启停重启常用服务器的脚本
bit1129
linux
启动,停止和重启常用服务器的Bash脚本,对于每个服务器,需要根据实际的安装路径做相应的修改
#! /bin/bash
Servers=(Apache2, Nginx, Resin, Tomcat, Couchbase, SVN, ActiveMQ, Mongo);
Ops=(Start, Stop, Restart);
currentDir=$(pwd);
echo
- 【HBase六】REST操作HBase
bit1129
hbase
HBase提供了REST风格的服务方便查看HBase集群的信息,以及执行增删改查操作
1. 启动和停止HBase REST 服务 1.1 启动REST服务
前台启动(默认端口号8080)
[hadoop@hadoop bin]$ ./hbase rest start
后台启动
hbase-daemon.sh start rest
启动时指定
- 大话zabbix 3.0设计假设
ronin47
What’s new in Zabbix 2.0?
去年开始使用Zabbix的时候,是1.8.X的版本,今年Zabbix已经跨入了2.0的时代。看了2.0的release notes,和performance相关的有下面几个:
:: Performance improvements::Trigger related da
- http错误码大全
byalias
http协议javaweb
响应码由三位十进制数字组成,它们出现在由HTTP服务器发送的响应的第一行。
响应码分五种类型,由它们的第一位数字表示:
1)1xx:信息,请求收到,继续处理
2)2xx:成功,行为被成功地接受、理解和采纳
3)3xx:重定向,为了完成请求,必须进一步执行的动作
4)4xx:客户端错误,请求包含语法错误或者请求无法实现
5)5xx:服务器错误,服务器不能实现一种明显无效的请求
- J2EE设计模式-Intercepting Filter
bylijinnan
java设计模式数据结构
Intercepting Filter类似于职责链模式
有两种实现
其中一种是Filter之间没有联系,全部Filter都存放在FilterChain中,由FilterChain来有序或无序地把把所有Filter调用一遍。没有用到链表这种数据结构。示例如下:
package com.ljn.filter.custom;
import java.util.ArrayList;
- 修改jboss端口
chicony
jboss
修改jboss端口
%JBOSS_HOME%\server\{服务实例名}\conf\bindingservice.beans\META-INF\bindings-jboss-beans.xml
中找到
<!-- The ports-default bindings are obtained by taking the base bindin
- c++ 用类模版实现数组类
CrazyMizzz
C++
最近c++学到数组类,写了代码将他实现,基本具有vector类的功能
#include<iostream>
#include<string>
#include<cassert>
using namespace std;
template<class T>
class Array
{
public:
//构造函数
- hadoop dfs.datanode.du.reserved 预留空间配置方法
daizj
hadoop预留空间
对于datanode配置预留空间的方法 为:在hdfs-site.xml添加如下配置
<property>
<name>dfs.datanode.du.reserved</name>
<value>10737418240</value>
- mysql远程访问的设置
dcj3sjt126com
mysql防火墙
第一步: 激活网络设置 你需要编辑mysql配置文件my.cnf. 通常状况,my.cnf放置于在以下目录: /etc/mysql/my.cnf (Debian linux) /etc/my.cnf (Red Hat Linux/Fedora Linux) /var/db/mysql/my.cnf (FreeBSD) 然后用vi编辑my.cnf,修改内容从以下行: [mysqld] 你所需要: 1
- ios 使用特定的popToViewController返回到相应的Controller
dcj3sjt126com
controller
1、取navigationCtroller中的Controllers
NSArray * ctrlArray = self.navigationController.viewControllers;
2、取出后,执行,
[self.navigationController popToViewController:[ctrlArray objectAtIndex:0] animated:YES
- Linux正则表达式和通配符的区别
eksliang
正则表达式通配符和正则表达式的区别通配符
转载请出自出处:http://eksliang.iteye.com/blog/1976579
首先得明白二者是截然不同的
通配符只能用在shell命令中,用来处理字符串的的匹配。
判断一个命令是否为bash shell(linux 默认的shell)的内置命令
type -t commad
返回结果含义
file 表示为外部命令
alias 表示该
- Ubuntu Mysql Install and CONF
gengzg
Install
http://www.navicat.com.cn/download/navicat-for-mysql
Step1: 下载Navicat ,网址:http://www.navicat.com/en/download/download.html
Step2:进入下载目录,解压压缩包:tar -zxvf navicat11_mysql_en.tar.gz
- 批处理,删除文件bat
huqiji
windowsdos
@echo off
::演示:删除指定路径下指定天数之前(以文件名中包含的日期字符串为准)的文件。
::如果演示结果无误,把del前面的echo去掉,即可实现真正删除。
::本例假设文件名中包含的日期字符串(比如:bak-2009-12-25.log)
rem 指定待删除文件的存放路径
set SrcDir=C:/Test/BatHome
rem 指定天数
set DaysAgo=1
- 跨浏览器兼容的HTML5视频音频播放器
天梯梦
html5
HTML5的video和audio标签是用来在网页中加入视频和音频的标签,在支持html5的浏览器中不需要预先加载Adobe Flash浏览器插件就能轻松快速的播放视频和音频文件。而html5media.js可以在不支持html5的浏览器上使video和audio标签生效。 How to enable <video> and <audio> tags in
- Bundle自定义数据传递
hm4123660
androidSerializable自定义数据传递BundleParcelable
我们都知道Bundle可能过put****()方法添加各种基本类型的数据,Intent也可以通过putExtras(Bundle)将数据添加进去,然后通过startActivity()跳到下一下Activity的时候就把数据也传到下一个Activity了。如传递一个字符串到下一个Activity
把数据放到Intent
- C#:异步编程和线程的使用(.NET 4.5 )
powertoolsteam
.net线程C#异步编程
异步编程和线程处理是并发或并行编程非常重要的功能特征。为了实现异步编程,可使用线程也可以不用。将异步与线程同时讲,将有助于我们更好的理解它们的特征。
本文中涉及关键知识点
1. 异步编程
2. 线程的使用
3. 基于任务的异步模式
4. 并行编程
5. 总结
异步编程
什么是异步操作?异步操作是指某些操作能够独立运行,不依赖主流程或主其他处理流程。通常情况下,C#程序
- spark 查看 job history 日志
Stark_Summer
日志sparkhistoryjob
SPARK_HOME/conf 下:
spark-defaults.conf 增加如下内容
spark.eventLog.enabled true spark.eventLog.dir hdfs://master:8020/var/log/spark spark.eventLog.compress true
spark-env.sh 增加如下内容
export SP
- SSH框架搭建
wangxiukai2015eye
springHibernatestruts
MyEclipse搭建SSH框架 Struts Spring Hibernate
1、new一个web project。
2、右键项目,为项目添加Struts支持。
选择Struts2 Core Libraries -<MyEclipes-Library>
点击Finish。src目录下多了struts