ansible模块 (7-13)
模块
7、hostname模块:
远程主机名管理模块
ansible 192.168.10.202 -m hostname -a 'name=liu'
8、copy模块:
用于复制指定的主机文件到远程主机的模块
常用参数:
dest: 指出要复制的文件在哪,必须使用绝对路径。如果源目标是目录,指目标也得是目录。如果目标的文件存在,会覆盖原有内容
src: 复制文件的源,最好使用绝对路径,原目标是目录,指目标也是目录
owner:指出文件的所有者
group:指定文件的所在组
content:从主机复制指定内容到目标主机,使用content就不能使用src
mode:可以给予复制之后的文件的权限
复制文件夹(不能为空)
ansible 192.168.10.202 -m copy -a 'src=/opt/guoqi dest=/opt/guoqi1 mode=700'
复制文件
ansible 192.168.10.202 -m copy -a 'src=/opt/ky32.txt dest=/opt/ky32.txt owner=guoqi group=guoqi mode=600'
content
ansible 192.168.10.202 -m copy -a 'content="hello lyw" dest=/opt/hello.txt'

9、file模块
文件模块跟目录没有关系
管理文件属性
owner、group0、mode等
state=link:创建链接文件
state=touch:创建文件
state=absent:删除文件
file模块创建一个文件,ky32.txt 所有者和所在组guoqi 权限700
ansible 192.168.10.202 -m file -a 'owner=guoqi group=guoqi mode=700 path=/opt/ky32.txt'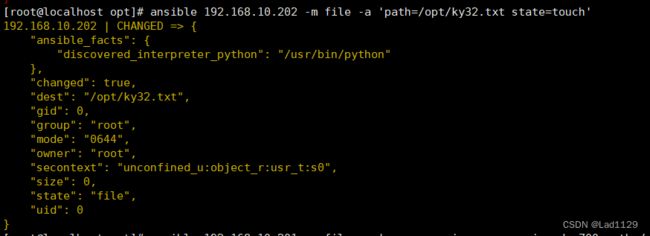

创建软连接
ansible 192.168.10.202 -m file -a 'path=/opt/fatab.link src=/opt/fstab.bak state=link'

删除软连接
ansible 192.168.10.202 -m file -a 'path=/opt/fatab.link state=absent'

10、yum模块
远程主机上安装与卸载软件包,在目标主机上的操作都是后台运行,不影响其他用户的使用。
安装
ansible 192.168.10.202 -m yum -a 'name=tree'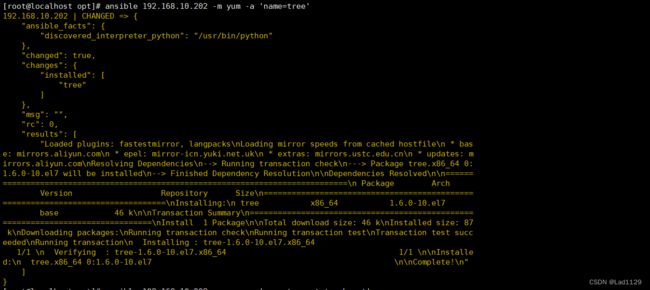
卸载
ansible 192.168.10.202 -m yum -a 'name=tree state=absent'
查询远程主机httpd的状态 2、开启 3、访问 (this is httpd)
ansible 192.168.10.202 -a 'systemctl restart httpd.service'
ansible 192.168.10.202 -a 'curl 192.168.10.202' ansible 192.168.10.202 -m shell -a 'echo "this is httpd" > /var/www/html/index.html'
11、systemd/service模块
name,设定管理服务的名称
state=started]stopped|restarted 管理动作
enabled=true 表示是否设置开机自启,若果不加,默认式开机不自启
runlevel:配合enabled,如果是开机自启可以设置运行级别。
对httpd开机自启设置
ansible 192.168.10.202 -m service -a 'enabled=true name=httpd state=restarted'
远程下载nginx,访问页面设置成:this is nginx,并设置开机自启
安装nginx
ansible 192.168.10.202 -m yum -a 'name=nginx'

启动nginx
ansible 192.168.10.202 -a 'systemctl restart nginx.service'

重定向输入this is nginx
ansible 192.168.10.202 -m shell -a 'echo "this is nginx" > /usr/share/nginx/html/index.html'

访问页面
ansible 192.168.10.202 -a 'curl 192.168.10.202'

设置开机自启
ansible 192.168.10.202 -m service -a 'enabled=true name=nginx state=restarted'

12、script模块
运行本地脚本,然后把结果输出到目标主机
写一个shell的脚本,内容: touch 123 echo"郭旗真帅”> 123
vim test.sh
-------------------
echo "郭旗真帅" > /opt/guoqi.txt
-------------------

ansible all -m script -a 'test.sh'

ansible all -a 'cat /opt/guoqi.txt'
13、setup模块
setup查看目标主机的环境系统(facts),目标节点的系统信息
获取环境信息
ansible 192.168.10.202 -m setup查看IP地址
ansible all -m setup -a 'filter=*ipv4'查看cpu信息
ansible all -m setup -a 'filter=ansible_facts'
ansible all -m setup -a 'filter=*processor'
查看内存
ansible all -m setup -a 'filter="ansible_memory_mb"'查看内核
ansible all -m setup -a 'filter="ansible_proc*"'查看系统os信息 用的是什么系统
ansible all -m setup -a 'filter="*os*"'查看系统信息 用的是什么系统版本
ansible all -m setup -a 'filter="*system*"'查看硬盘
ansible all -m setup -a 'filter="ansible_dev*"'主机清单:
ansible可以管理上千台主机。
192.168.10.6[1:3]
管理61 62 63
主机清单管理组当中的变量名:
ansible_host 连接时的ip地址
ansible_port 声明对方的连接端口,默认是ssh的22端口。
ansible_user 指定连接时使用对方主机的用户名,不指定主机ansible的用户即为使用目标主机的用户名
ansible_password 指定连接sshs时的密码(目标主机的用户密码)
ansible_become 提升用户的权限,改变用户身份
ansible_become root
ansible_become_password 切换用户的密码(免密钥的登录)
vim /etc/ansible/ansible.cfg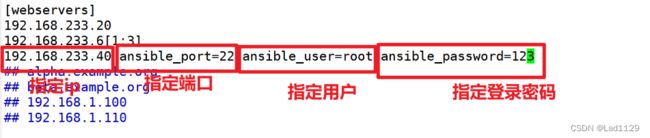
设置免密钥对
vim /etc/ansible/ansible.cfg71行

声明所有的用户、端口和密码

组嵌套
vim /etc/ansible/ansible.cfg