基于haproxy+keepalived+ceph实现高可用web Cluster
环境拓扑图

项目环境
ansible:192.168.2.2
wbe1:192.168.2.11
web2:192.168.2.12
database:192.168.2.21
haproxy1/DNS:192.168.2.5(eth0) 192.168.4.5(eth1)
haproxy2:192.168.2.6 192.168.4.6
VIP:192.168.4.80
ceph:node1:192.168.2.41
node2:192.168.2.42
node3:192.168.2.43
prometheus:192.168.2.9
client:192.168.4.10
目录
一、安装配置ansible
1、修改etc/hosts、配置SSH密钥
2、安装ansible
3、修改主配置文件
二、ansible一键安装nginx
1、在ansible拷贝nginx安装包给web集群
2、设置vim默认选项
3、编写安装nginx的脚本
4、编写playbook批量安装nginx、php
5、在各web结点配置nginx动静分离,开启php服务
三、部署数据库服务器
1、安装数据库软件包
2、创建账户并上传php动态网页代码
3、客户机登录网站并指定用户数据库服务器地址
四、部署HAProxy代理服务器
1、ansible一键下载haproxy,keepalived
2、配置haproxy
五、配置keepalived
1、proxy1
2、proxy2
六、部署DNS服务器
七、部署ceph分布式存储
1、所有主机挂载ceph光盘和系统光盘,配置yum源
2、在node1配置SSH密钥,让node1可用无密码连接node1,node2,node3
3、修改/etc/hosts域名解析记录
4、配置NTP服务器同步时间
5、部署ceph集群
6、部署ceph文件系统
7、迁移网站数据到ceph集群
八、客户端访问
九、部署Git版本控制系统
基于ssh协议的版本控制服务器
基于http协议的版本控制服务器
十、搭建Prometheus+grafana监控
部署prometheus和exports
配置监控端
配置被监控端
所有主机都和ceph集群ntp服务器同步时间
登录http://192.168.2.9:9090查看
部署grafana可视化工具
安装grafana
修改配置,添加数据源对接prometheus
导入模板文件去展示数据的不同风格
导入prometheus自带模板
导入下载的node-exporter的grafana模板
一、安装配置ansible
修改网卡为eth0
rm -rf /etc/sysconfig/network-scripts/ifcfg-ens*
vi /etc/default/grub //修改内核参数
grub2-mkconfig -o /boot/gru2/grub.cfg //刷新配置文件
reboot
nmtui设置网卡名和IP地址以及主机名
1、修改etc/hosts、配置SSH密钥
[root@ansible ~]# vim /etc/hosts
192.168.2.11 web1
192.168.2.12 web2
[root@ansible ~]# ssh-keygen -f /root/.ssh/id_rsa -N ''
[root@ansible ~]# for i in web1 web2
> do
> ssh-copy-id $i
> done
2、安装ansible
[root@ansible ~]# tar -xf ansible_centos7.tar.gz
[root@ansible ~]# cd ansible_centos7
[root@ansible ansible_centos7]# ls
ansible-2.8.5-1.el7.ans.noarch.rpm    python-paramiko-2.1.1-9.el7.noarch.rpm
python-jinja2-2.7.2-4.el7.noarch.rpm  sshpass-1.06-2.el7.x86_64.rpm
[root@ansible ansible_centos7]# yum -y install *
3、修改主配置文件
主配置文件ansible.cfg:参考/etc/ansible/ansible.cfg
配置文件查找顺序:
首先检测ANSIBLE_CONFIG变量定义的配置文件
其次检查当前目录下的./ansible.cfg文件
再次检查当前用户家目录下~/ansible.xfg文件
最后检查/etc/ansible/ansible.cfg文件
[root@ansible ~]# mkdir ~/ansible
[root@ansible ~]# vim ~/ansible/ansible.cfg
[defaults]
inventory = ~/ansible/inventory    //主机清单配置文件
#forks=5                            //ssh并发数量
#host_key_checking=False            //是否校验密钥

[root@ansible ~]# vim ~/ansible/inventory
[webserver]                        //定义主机组
web[1:2]                          //组中具体主句
二、ansible一键安装nginx
1、在ansible拷贝nginx安装包给web集群
[root@ansible ansible]# for i in web1 web2
> do
> scp ~/lnmp_soft.tar.gz $i:~/
> done
2、设置vim默认选项
[root@ansible ansible]# vim ~/.vimrc
set ai                //自动缩进
set ts=2            //tab建跳两个空格
set et                //tab转换为空格
3、编写安装nginx的脚本
[root@ansible ansible]# vim install_nginx.sh
#!/bin/bash
yum install -y openssl openssl-devel gcc pcre pcre-devel automake make net-tools vim
tar -xf lnmp_soft.tar.gz
tar -xf lnmp_soft/nginx-1.12.2.tar.gz
cd nginx-1.12.2
./configure   \
--with-http_ssl_module   \
--with-http_stub_status_module
make
make install
/usr/local/nginx/sbin/nginx
4、编写playbook批量安装nginx、php
[root@ansible ansible]# vim install_nginx.yml
---
- hosts: webserver
  tasks:
    - name: install nginx
      script: ~/ansible/install_nginx.sh
    - name: install php
      yum:
        name:
          - php
          - php-mysql
          - php-fpm
        state: present


[root@ansible ansible]# ansible-playbook install_nginx.yml
5、在各web结点配置nginx动静分离,开启php服务
 [root@web1 ~]# vim /usr/local/nginx/conf/nginx.conf
location / {
            root   html;
            index  index.php index.html index.htm;
        }

        location ~ \.php$ {
            root           html;
            fastcgi_pass   127.0.0.1:9000;
            fastcgi_index  index.php;
            include        fastcgi.conf;
        }
[root@web1 ~]# /usr/local/nginx/sbin/nginx -s reload
[root@web1 ~]# systemctl enable php-fpm --now
三、部署数据库服务器
1、安装数据库软件包
[root@database ~]# yum -y install mariadb mariadb-server mariadb-devel
[root@database ~]# systemctl start mariadb
[root@database ~]# systemctl enable mariadb
[root@database ~]# firewall-cmd --set-default-zone=trusted
[root@database ~]# setenforce  0
[root@database ~]# sed -i  '/SELINUX/s/enforcing/permissive/'  /etc/selinux/config
2、创建账户并上传php动态网页代码
[root@database ~]# mysql
MariaDB [(none)]> create database wordpress character set utf8mb4;
MariaDB [(none)]> grant all on wordpress.* to wordpress@'%' identified by 'wordpress';
MariaDB [(none)]> flush privileges;
MariaDB [(none)]> exit
[root@web1 ~]# yum -y install unzip
[root@web1 ~]# unzip wordpress.zip
[root@web1 ~]# cd wordpress
[root@web1 wordpress]# tar -xf wordpress-5.0.3-zh_CN.tar.gz
[root@web1 wordpress]# cp -r wordpress/* /usr/local/nginx/html/
[root@web1 wordpress]# chown -R apache.apache /usr/local/nginx/html/3、客户机登录网站并指定用户数据库服务器地址

创建账号再登录

四、部署HAProxy代理服务器
1、ansible一键下载haproxy,keepalived
[root@ansible ansible]# vim /etc/hosts
192.168.2.5 proxy1
192.168.2.6 proxy2

[root@ansible ansible]# for i in proxy1 proxy2; do ssh-copy-id $i; done
[root@ansible ansible]# vim inventory
[haproxy]
proxy[1:2]

[root@ansible ansible]# ansible haproxy -m yum -a "name=haproxy,keepalived  state=present"
2、配置haproxy
[root@proxy1 ~]# vim /etc/haproxy/haproxy.cfg
listen wordpress *:80        //监听80端口
  balance roundrobin         //轮询算法
  server web1 192.168.2.11:80 check inter 2000 rise 2 fall 3
  server web2 192.168.2.12:80 check inter 2000 rise 2 fall 3
[root@proxy1 ~]# systemctl enable haproxy --now
五、配置keepalived
1、proxy1
[root@proxy1 ~]# vim /etc/keepalived/keepalived.conf

[root@proxy1 ~]# systemctl enable keepalived --now
global_defs {
  router_id  proxy1                //设置路由ID号
  vrrp_iptables                    //设置防火墙规则
}
vrrp_instance VI_1 {
  state MASTER                         //主服务器为MASTER(备服务器为BACKUP)
  interface eth1                    //网卡名称
  virtual_router_id 51
  priority 100                     //服务器优先级,优先级高优先获取VIP
  advert_int 1
  authentication {
    auth_type pass
    auth_pass 1111                //主备服务器密码
  }
  virtual_ipaddress {                //谁是主服务器谁获得该VIP
192.168.4.80
}
}
2、proxy2
[root@proxy2 ~]# vim /etc/keepalived/keepalived.conf
global_defs {
  router_id  proxy2
vrrp_iptables
}
vrrp_instance VI_1 {
  state BACKUP
  interface eth1
  virtual_router_id 51
  priority 50
  advert_int 1
  authentication {
    auth_type pass
    auth_pass 1111
  }
  virtual_ipaddress {
192.168.4.80
}
}
[root@proxy2 ~]# systemctl enable keepalived --now
六、部署DNS服务器
[root@proxy1 ~]# yum -y  install bind bind-chroot
[root@proxy1 ~]# vim /etc/named.conf
options {
        listen-on port 53 { any; };           //服务监听的地址与端口
        directory       "/var/named";         //数据文件路径
        allow-query     { any; };             //允许任何主机访问DNS服务
... ...
};
zone "zy.com" IN {                        //定义正向区域
        type master;
        file "zy.com.zone";
};
#include "/etc/named.rfc1912.zones";
#include "/etc/named.root.key";
[root@proxy1 ~]# named-checkconf /etc/named.conf
[root@proxy1 ~]# cp -p /var/named/named.localhost /var/named/zy.com.zone
[root@proxy1 ~]# vim /var/named/zy.com.zone
@       NS      dns.zy.com.
dns     A       192.168.4.5
www     A       192.168.4.80

[root@proxy1 ~]# systemctl enable named --now
七、部署ceph分布式存储
1、所有主机挂载ceph光盘和系统光盘,配置yum源
[root@node1 ~]# mkdir /ceph
[root@node1 ~]# vim /etc/fstab
    /dev/sr0    /ceph     iso9660   defaults   0  0
    /dev/sr1    /media    iso9660   defaults   0  0
[root@node1 ~]# mount -a
[root@node1 ~]# cat /etc/yum.repos.d/ceph.repo
[mon]
name=mon
baseurl=file:///ceph/MON
gpgcheck=0
[osd]
name=osd
baseurl=file:///ceph/OSD
gpgcheck=0
[tools]
name=tools
baseurl=file:///ceph/Tools
gpgcheck=0
2、在node1配置SSH密钥,让node1可用无密码连接node1,node2,node3
[root@node1 ~]# ssh-keygen  -f /root/.ssh/id_rsa  -N  ''
[root@node1 ~]# for i in   41  42  43
do
ssh-copy-id  192.168.2.$i
done
3、修改/etc/hosts域名解析记录
[root@node1 ~]# vim /etc/hosts
192.168.2.41    node1
192.168.2.42     node2
192.168.2.43    node3
[root@node1 ~]# for i in 41 42 43
do
     scp /etc/hosts 192.168.2.$i:/etc
done
4、配置NTP服务器同步时间
[root@node1 ~]# vim /etc/chrony.conf
allow 192.168.2.0/24
local stratum 10
[root@node1 ~]# systemctl restart chronyd
[root@node2 ~]# vim /etc/chrony.conf
server 192.168.2.41 iburst
[root@node2 ~]# systemctl restart chronyd
[root@node2 ~]# chronyc sources -v
[root@node3 ~]# vim /etc/chrony.conf
server 192.168.2.41 iburst
[root@node3 ~]# systemctl restart chronyd
[root@node3 ~]# chronyc sources -v5、部署ceph集群
[root@node1 ~]# yum -y install ceph-deploy
[root@node1 ~]# mkdir ceph-cluster
[root@node1 ~]# cd ceph-cluster
[root@node1 ceph-cluster]# for i in node1 node2 node3
do
     ssh $i "yum -y install ceph-mon ceph-osd ceph-mds"
done
初始化mon服务
[root@node1 ceph-cluster]# ceph-deploy new node1 node2 node3
[root@node1 ceph-cluster]# ceph-deploy mon create-initial
[root@node1 ceph-cluster]# ceph -s
使用ceph-deploy工具初始化数据磁盘
[root@node1 ceph-cluster]# ceph-deploy disk  zap  node1:sdb  node1:sdc
[root@node1 ceph-cluster]# ceph-deploy disk  zap  node2:sdb  node2:sdc
[root@node1 ceph-cluster]# ceph-deploy disk  zap  node3:sdb  node3:sdc
初始化OSD集群
[root@node1 ceph-cluster]# ceph-deploy osd create  node1:sdb  node1:sdc
[root@node1 ceph-cluster]# ceph-deploy osd create  node2:sdb  node2:sdc
[root@node1 ceph-cluster]# ceph-deploy osd create  node3:sdb  node3:sdc
[root@node1 ceph-cluster]# ceph -s
6、部署ceph文件系统
//启动mds服务
[root@node1 ceph-cluster]# ceph-deploy mds create node3
//创建存储池
[root@node1 ceph-cluster]# ceph osd pool create cephfs_data 64
[root@node1 ceph-cluster]# ceph osd pool create cephfs_metadata 64
[root@node1 ceph-cluster]# ceph osd lspools
//创建文件系统
[root@node1 ceph-cluster]# ceph fs new myfs1 cephfs_metadata cephfs_data
[root@node1 ceph-cluster]# ceph fs ls
7、迁移网站数据到ceph集群
[root@web1 ~]# cd /usr/local/nginx/html/
[root@web1 html]# tar -czpf /root/html.tar.gz ./*
[root@web1 ~]# /usr/local/nginx/sbin/nginx -s stop
[root@web1 ~]# yum -y install ceph-common
//实现永久挂载
[root@node1 ceph-cluster]# cat ceph.client.admin.keyring
[client.admin]
        key = AQC3zwJlwQxiDxAA56KU/XdUJt6/Ij4it3v+3g==
[root@web1 ~]#  mount -t ceph 192.168.2.41:6789:/ /usr/local/nginx/html/ -o name=admin,secret=AQC3zwJlwQxiDxAA56KU/XdUJt6/Ij4it3v+3g==
[root@web1 ~]# echo " mount -t ceph 192.168.2.41:6789:/ /usr/local/nginx/html/ -o name=admin,secret=AQC3zwJlwQxiDxAA56KU/XdUJt6/Ij4it3v+3g==" >> /etc/rc.local
[root@web1 ~]# chmod +x /etc/rc.local
[root@node1 ~]#cp /root/html.tar.gz /usr/local/nginx/html/
[root@web1 html]# tar -xf html.tar.gz
[root@web1 html]# rm -rf html.tar.gz
[root@web1 ~]# /usr/local/nginx/sbin/nginx
ceph核心组件:OSDs:存储设备
Monitors:集群监控组件
MDSs:存放文件系统的元数据(对象存储和块存储不需要该组件)
RadosGW:对象存储网关
客户端访问ceph块存储设备命令:rbd map 镜像名称
八、客户端访问
修改dns映射文件
[root@client ~]# vim /etc/resolv.conf
nameserver 192.168.4.5


九、部署Git版本控制系统
为了节省资源,将git部署到database服务器上
[root@database ~]# yum -y install git
[root@database ~]# mkdir /var/lib/git/
[root@database ~]# git init --bare /var/lib/git/wordpress.git    初始化空仓库
在这里我分别部署ssh协议和http协议的版本控制服务器
基于ssh协议的版本控制服务器
[root@web1 ~]# yum -y install git       //下载git
//修改git配置,用户标记自己的信息
[root@web1 ~]# git config --global push.default simple
[root@web1 ~]# git config --global user.email [email protected]
[root@web1 ~]# git config --global user.name"name"

[root@web1 ~]# cd /var/
//将远程git仓库的数据克隆到本地git仓库
[root@web1 var]# git clone [email protected]:/var/lib/git/wordpress.git
//必须进入工作目录操作
[root@web1 var]# cd /var/wordpress
[root@web1 wordpress]# cp -a /usr/local/nginx/html/* ./
//add将数据提交到本地仓库的暂存区
[root@web1 wordpress]# git add .
//commit提交到本地git仓库
[root@web1 wordpress]# git commit -m "wordpress code"
//push提交到远程服务器
[root@web1 wordpress]# git push
基于http协议的版本控制服务器
//下载gitweb服务
[root@database ~]# yum -y install httpd gitweb
//修改配置
[root@database ~]# vim /etc/gitweb.conf
//指定git仓库地址
$projectroot = "/var/lib/git";
[root@database ~]# systemctl start httpd
web2通过网站http://192.168.2.21/git访问并在上面下载上传数据

十、搭建Prometheus+grafana监控
部署prometheus和exports
prometheus客户端分为pull和push两种提交数据方式
pull:服务端主动向客户端拉取数据,需要在客户端安装exports作为守护进程
push:客户端需安装pushgateway,运维人员再用脚本把监控数据组织成键值形式提交给pushgateway再有它提交给服务端
配置监控端
安装软件
[root@prometheus ~]# tar -xf prometheus_soft.tar.gz
[root@prometheus prometheus_soft]# tar -xf prometheus-2.17.2.linux-386.tar.gz
[root@prometheus prometheus_soft]# mv prometheus-2.17.2.linux-386 /usr/local/prometheus
安装导出器
[root@prometheus prometheus_soft]# tar -xf node_exporter-1.0.0-rc.0.linux-amd64.tar.gz
[root@prometheus prometheus_soft]# mv node_exporter-1.0.0-rc.0.linux-amd64 /usr/local/node_exporter
配置用systemctl启动服务
[root@prometheus prometheus_soft]# vim /usr/lib/systemd/system/prometheus.service
[Unit]
Description=Prometheus Monitoring System
After=network.target
[Service]
ExecStart=/usr/local/prometheus/prometheus \
  --config.file=/usr/local/prometheus/prometheus.yml \
  --storage.tsdb.path=/usr/local/prometheus/data/
[Install]
WantedBy=multi-user.target
[root@prometheus prometheus_soft]# systemctl  enable prometheus.service --now

[root@prometheus prometheus_soft]# vim /usr/lib/systemd/system/node_exporter.service
[Unit]
Description=node_exporter
After=network.target
[Service]
Type=simple
ExecStart=/usr/local/node_exporter/node_exporter
[Install]
WantedBy=multi-user.target
[root@prometheus prometheus_soft]# systemctl enable node_exporter --now

[root@prometheus prometheus_soft]# vim /usr/local/prometheus/prometheus.yml
scrape_configs:
  # The job name is added as a label `job=` to any timeseries scraped from this config.
  - job_name: 'prometheus'

    # metrics_path defaults to '/metrics'
    # scheme defaults to 'http'.

    static_configs:
    - targets: ['192.168.2.9:9090']
  - job_name: 'web1'
    static_configs:
    - targets: ['192.168.2.11:9100']
  - job_name: 'web2'
    static_configs:
    - targets: ['192.168.2.12:9100']

[root@prometheus prometheus_soft]# systemctl restart prometheus.service
配置被监控端
部署通用的node-exporter:监控硬件和操作系统信息
[root@web2 ~]# tar -xf node_exporter-1.0.0-rc.0.linux-amd64.tar.gz
[root@web2 ~]# mv node_exporter-1.0.0-rc.0.linux-amd64 /usr/local/node_exporter
[root@web2 ~]# vim /usr/lib/systemd/system/node_exporter.service
[root@web2 ~]#  systemctl  enable node_exporter --now
所有主机都和ceph集群ntp服务器同步时间
[root@web1 ~]# vim /etc/chrony.conf
[root@web1 ~]# systemctl restart chronyd
[root@web1 ~]# chronyc sources -v
登录http://192.168.2.9:9090查看


部署grafana可视化工具
安装grafana
//安装
[root@prometheus prometheus_soft]# yum install grafana-6.7.3-1.x86_64.rpm
//启动服务
[root@prometheus prometheus_soft]# systemctl enable grafana-server.service --now
//查看看端口号
[root@prometheus prometheus_soft]# ss -ntulp | grep grafana
tcp    LISTEN     0      128      :::3000                 :::*                   users:(("grafana-server",pid=11589,fd=6))
使用浏览器输入http://192.168.2.9:3000访问,初始用户名密码都为admin,登录后需修改密码

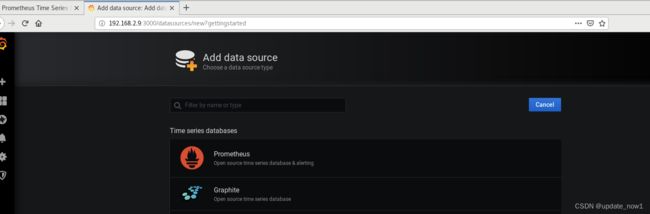
修改配置,添加数据源对接prometheus

导入模板文件去展示数据的不同风格
导入prometheus自带模板

展示监控主机的状态

导入下载的node-exporter的grafana模板
下载模板导入虚拟机:1-node-exporter-for-prometheus-dashboard-update-1102_rev11.json mysql_rev1.json
导入模板

查看