某项目网络实施中的几个关键点解析
项目背景:某网络项目牵涉到旧网升级新网的改造,新增设备比较多的是JUNIPER EX系列交换机(涉及高中低端),与原有CISCO 系列交换机融合。
1、新核心EX8208(主)与旧核心CISCO 6506相连,网络架构如图:
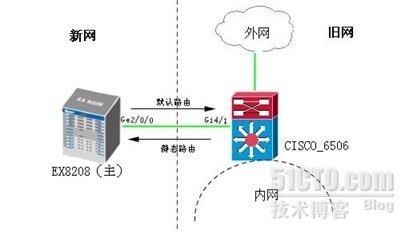
EX8208(主)Ge-2/0/0口通过光纤跳线与CISCO 6506 Gi4/1口互联;从EX8208(主)指一条默认路由到CISCO 6506,根据需要在CISCO 6506再指一条静态路由到EX8208(主)。
下面看两个设备上的关键配置:
EX8208(主)配置:
lab@ex8208-master# show interfaces ge-2/0/0
unit 0 {
descrIPtion "connect to cisco6506_Gi4/1";
family inet {
address 172.16.0.1/30;
}
}
lab@ex8208-master# show routing-options
static {
route 0.0.0.0/0 next-hop 172.16.0.2;
}
CISCO6506上配置:
cs_6506#interface GigabitEthernet4/1
IP address 172.16.0.2 255.255.255.252
cs_6506#ip route 172.16.0.0 255.255.0.0 172.16.0.1
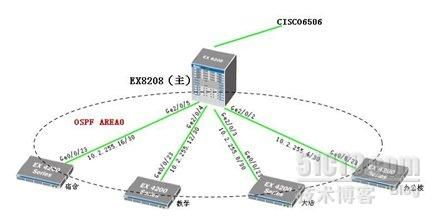
2、组建新网络的4个汇聚交换机EX4200连接到核心EX8208,使用OSPF协议,在核心EX8208(主)与4个汇聚交换机之间使用三层动态路由协议OSPF,网络架构如图:
核心EX8208(主)配置如下:
lab@ex8208-master# show interfaces
ge-2/0/2 {
unit 0 {
descrIPtion "connect to a1_EX4200-24F_GE-0/0/23";
family inet {
address 10.2.255.5/30;
}
}
}
ge-2/0/3 {
unit 0 {
descrIPtion "connect to a2_EX4200-24F_GE-0/0/23";
family inet {
address 10.2.255.9/30;
}
}
}
ge-2/0/4 {
unit 0 {
descrIPtion "connect to a3_EX4200-24F_GE-0/0/23";
family inet {
address 10.2.255.13/30;
}
}
}
ge-2/0/5 {
unit 0 {
descrIPtion "connect to a4_EX4200-24F_GE-0/0/23";
family inet {
address 10.2.255.17/30;
}
}
}
lab@ex8208-master# show protocols ospf
export RED-STATIC;
area 0.0.0.0 {
interface ge-2/0/3.0 {
interface-type p2p; //OSPF类型点对点
}
interface ge-2/0/4.0 {
interface-type p2p;
}
interface ge-2/0/5.0 {
interface-type p2p;
}
interface lo0.1 {
interface-type p2p; //管理IP
}
interface ge-2/0/2.0 {
interface-type p2p;
}
}
lab@ex8208-master# run show ospf neighbor
Address Interface State ID Pri Dead
10.2.255.6 ge-2/0/2.0 Full 10.2.255.6 128 34
10.2.255.10 ge-2/0/3.0 Full 10.2.255.10 128 36
10.2.255.14 ge-2/0/4.0 Full 10.2.255.14 128 37
10.2.255.18 ge-2/0/5.0 Full 10.2.255.18 128 38
其中一台EX4200上配置如下:
lab@a2_EX4200-24F# show interfaces ge-0/0/23
unit 0 {
family inet {
address 10.2.255.10/30;
}
}
lab@a2_EX4200-24F# show protocols ospf
area 0.0.0.0 {
interface ge-0/0/23.0 {
interface-type p2p;
}
interface vlan.2 {
interface-type p2p;
}
}
}
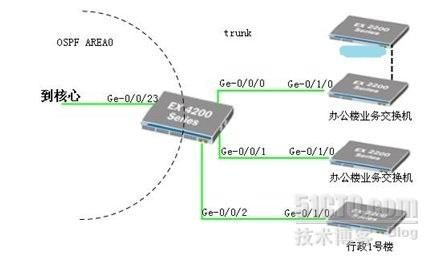
3、办公楼汇聚交换机EX4200通过LC-LC光纤跳线分别与两台业务交换机(EX2200-48T)相连,链路为trunk链路;
行政1号楼通过光纤(4芯光纤)与办公楼汇聚交换机相连,两根ST-LC的光纤跳线;链路为trunk链路。
其他楼交换机通过一条双绞线与办公楼业务交换机相连,链路为trunk链路。
EX2200交换机上的VLAN和VLAN互通以及TRUNK设置:
EX2200#set vlans sales vlan-id 100(设置VLAN ID)
EX2200#set vlans sales interface ge-0/0/0(把端口加入VLAN)
EX2200#set vlans sales interface ge-0/0/1
EX2200#set vlans sales interface ge-0/0/2
EX2200#set vlans sales interface ge-0/0/3
EX2200#set vlans sales interface ge-0/0/4
..........同理配置其他端口
EX2200#set vlans sales interface ge-0/0/23
EX2200#set interface vlan unit 100 family inet 192.168.192.97/27(配置管理地址)
EX2200#set vlans sales l3-interface vlan.100(VLAN三层互通)
注:如果需要将所有的端口都划分到同一个VLAN中,如果一条命令一条命令的操作会很麻烦。这个时候可以用到interface-range
EX2200#set interfaces interface-range RANGE member-range ge0/0/0 to ge0/0/23
定义一个interface-range 名为RANGE 并把接口ge0/0/0 到ge0/0/23划到这个组里。
然后把这个RANGE 当作接口来操作,把它划到VLAN100中。
EX2200#set interfaces interface-range ALL unit 0 family ethernet-switching vlan members VLAN100
OK,这样就把ge0/0/0 to ge0/0/23的所有接口加入到VLAN100中。
接下来看EX2200上的TRUNK口配置
EX2200#set interfaces ge-0/1/2 unit 0 family ethernet-switching port-mode trunk
EX2200#set interfaces ge-0/1/2 unit 0 family ethernet-switching port-mode trunk vlan member all
允许所有的VLAN通过ge0/1/2这个TRUNK口
好了,通过这个项目的几个关键点解析,相信大家对JUNIPER EX系列交换机(涉及高中低端)在实际网络中的配置和运用会有一定的了解,也希望能对你有所帮助。