Mybatis Plus 看这篇就够了,通俗易懂,一发入魂
文章目录
-
- 快速入门
- 核心功能
-
- 注解
- CRUD接口
-
- Mapper CRUD接口
-
-
- selectMaps
- selectObjs
- selectCount
-
- Service CRUD 接口
- 条件构造器
-
- 使用示例
- Condition
- 实体对象作为条件
- allEq方法
- lambda条件构造器
- 更新操作
- 删除操作
- 自定义SQL
-
- 原生mybatis
- mybatis-plus
- 分页查询
- AR模式
- 主键策略
- 配置
-
- 基本配置
- 进阶配置
- 代码生成器
- 高级功能
-
- 逻辑删除
- 自动填充
- 乐观锁插件
- 性能分析插件
- 多租户SQL解析器
- 动态表名SQL解析器
- 总结
mybatis-plus是一款Mybatis增强工具,用于简化开发,提高效率。下文使用缩写 mp来简化表示 mybatis-plus,本文主要介绍mp搭配SpringBoot的使用。
注:本文使用的mp版本是当前最新的3.4.2,早期版本的差异请自行查阅文档
官方网站:https://baomidou.com/
快速入门
-
创建一个SpringBoot项目
-
导入依赖
<project xmlns="http://maven.apache.org/POM/4.0.0" xmlns:xsi="http://www.w3.org/2001/XMLSchema-instance" xsi:schemaLocation="http://maven.apache.org/POM/4.0.0 https://maven.apache.org/xsd/maven-4.0.0.xsd"> <modelVersion>4.0.0modelVersion> <parent> <groupId>org.springframework.bootgroupId> <artifactId>spring-boot-starter-parentartifactId> <version>2.3.4.RELEASEversion> <relativePath/> parent> <groupId>com.examplegroupId> <artifactId>mybatis-plusartifactId> <version>0.0.1-SNAPSHOTversion> <name>mybatis-plusname> <properties> <java.version>1.8java.version> properties> <dependencies> <dependency> <groupId>org.springframework.bootgroupId> <artifactId>spring-boot-starterartifactId> dependency> <dependency> <groupId>org.springframework.bootgroupId> <artifactId>spring-boot-starter-testartifactId> <scope>testscope> dependency> <dependency> <groupId>org.springframework.bootgroupId> <artifactId>spring-boot-configuration-processorartifactId> dependency> <dependency> <groupId>com.baomidougroupId> <artifactId>mybatis-plus-boot-starterartifactId> <version>3.4.2version> dependency> <dependency> <groupId>mysqlgroupId> <artifactId>mysql-connector-javaartifactId> <scope>runtimescope> dependency> <dependency> <groupId>org.projectlombokgroupId> <artifactId>lombokartifactId> dependency> dependencies> <build> <plugins> <plugin> <groupId>org.springframework.bootgroupId> <artifactId>spring-boot-maven-pluginartifactId> plugin> plugins> build> project>- 1
- 2
- 3
- 4
- 5
- 6
- 7
- 8
- 9
- 10
- 11
- 12
- 13
- 14
- 15
- 16
- 17
- 18
- 19
- 20
- 21
- 22
- 23
- 24
- 25
- 26
- 27
- 28
- 29
- 30
- 31
- 32
- 33
- 34
- 35
- 36
- 37
- 38
- 39
- 40
- 41
- 42
- 43
- 44
- 45
- 46
- 47
- 48
- 49
- 50
- 51
- 52
- 53
- 54
- 55
- 56
-
配置数据库
# application.yml
spring:
  datasource:
    driver-class-name: com.mysql.cj.jdbc.Driver
    url: jdbc:mysql://localhost:3306/yogurt?serverTimezone=Asia/Shanghai
    username: root
    password: root
mybatis-plus:
configuration:
log-impl: org.apache.ibatis.logging.stdout.StdOutImpl #开启SQL语句打印
- 1
- 2
- 3
- 4
- 5
- 6
- 7
- 8
- 9
- 10
- 11
-
创建一个实体类
package com.example.mp.po; import lombok.Data; import java.time.LocalDateTime; @Data public class User { private Long id; private String name; private Integer age; private String email; private Long managerId; private LocalDateTime createTime; }- 1
- 2
- 3
- 4
- 5
- 6
- 7
- 8
- 9
- 10
- 11
- 12
-
创建一个mapper接口
package com.example.mp.mappers; import com.baomidou.mybatisplus.core.mapper.BaseMapper; import com.example.mp.po.User; public interface UserMapper extends BaseMapper<User> { }- 1
- 2
- 3
- 4
-
在SpringBoot启动类上配置mapper接口的扫描路径
package com.example.mp; import org.mybatis.spring.annotation.MapperScan; import org.springframework.boot.SpringApplication; import org.springframework.boot.autoconfigure.SpringBootApplication; @SpringBootApplication @MapperScan("com.example.mp.mappers") public class MybatisPlusApplication { public static void main(String[] args) { SpringApplication.run(MybatisPlusApplication.class, args); } }- 1
- 2
- 3
- 4
- 5
- 6
- 7
- 8
- 9
- 10
- 11
-
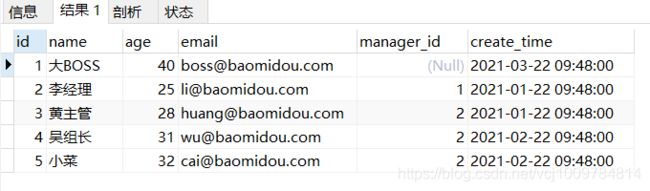
在数据库中创建表
DROP TABLE IF EXISTS user;
CREATE TABLE user (
id BIGINT(20) PRIMARY KEY NOT NULL COMMENT '主键',
name VARCHAR(30) DEFAULT NULL COMMENT '姓名',
age INT(11) DEFAULT NULL COMMENT '年龄',
email VARCHAR(50) DEFAULT NULL COMMENT '邮箱',
manager_id BIGINT(20) DEFAULT NULL COMMENT '直属上级id',
create_time DATETIME DEFAULT NULL COMMENT '创建时间',
CONSTRAINT manager_fk FOREIGN KEY(manager_id) REFERENCES user (id)
) ENGINE=INNODB CHARSET=UTF8;
INSERT INTO user (id, name, age ,email, manager_id, create_time) VALUES
(1, ‘大BOSS’, 40, ‘[email protected]’, NULL, ‘2021-03-22 09:48:00’),
(2, ‘李经理’, 40, ‘[email protected]’, 1, ‘2021-01-22 09:48:00’),
(3, ‘黄主管’, 40, ‘[email protected]’, 2, ‘2021-01-22 09:48:00’),
(4, ‘吴组长’, 40, ‘[email protected]’, 2, ‘2021-02-22 09:48:00’),
(5, ‘小菜’, 40, ‘[email protected]’, 2, ‘2021-02-22 09:48:00’)- 1
- 2
- 3
- 4
- 5
- 6
- 7
- 8
- 9
- 10
- 11
- 12
- 13
- 14
- 15
- 16
- 17
-
编写一个SpringBoot测试类
package com.example.mp; import com.example.mp.mappers.UserMapper; import com.example.mp.po.User; import org.junit.Test; import org.junit.runner.RunWith; import org.springframework.beans.factory.annotation.Autowired; import org.springframework.boot.test.context.SpringBootTest; import org.springframework.test.context.junit4.SpringRunner; import java.util.List; import static org.junit.Assert.*; @RunWith(SpringRunner.class) @SpringBootTest public class SampleTest { @Autowired private UserMapper mapper; @Test public void testSelect() { List<User> list = mapper.selectList(null); assertEquals(5, list.size()); list.forEach(System.out::println); } }- 1
- 2
- 3
- 4
- 5
- 6
- 7
- 8
- 9
- 10
- 11
- 12
- 13
- 14
- 15
- 16
- 17
- 18
- 19
- 20
- 21
- 22
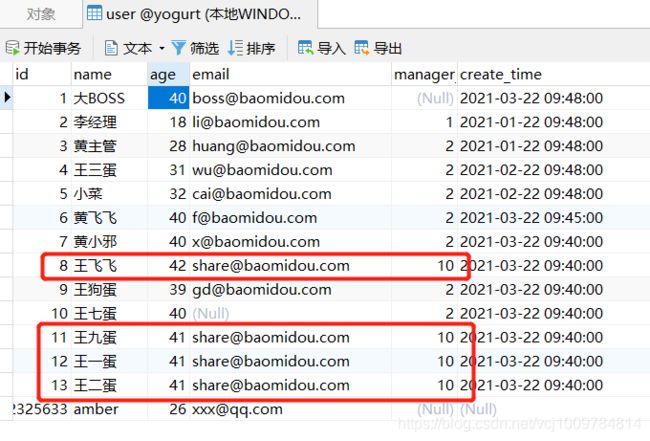
准备工作完成
数据库情况如下
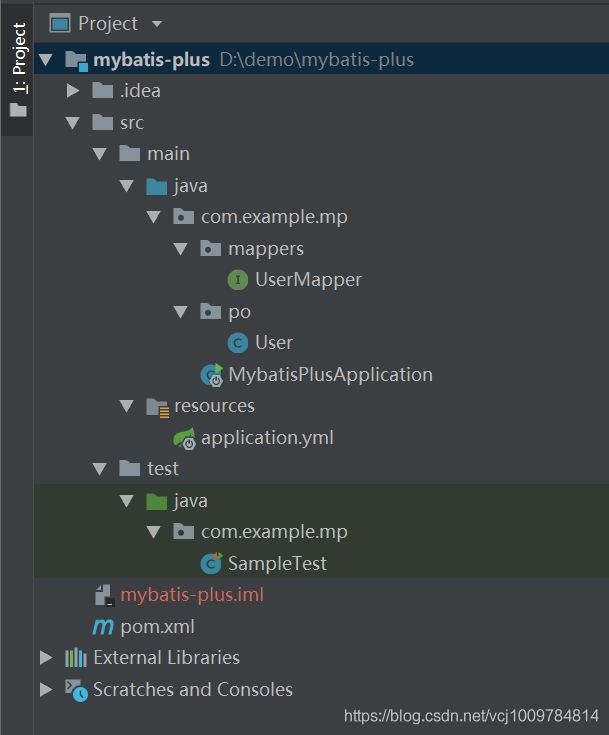
项目目录如下
运行测试类
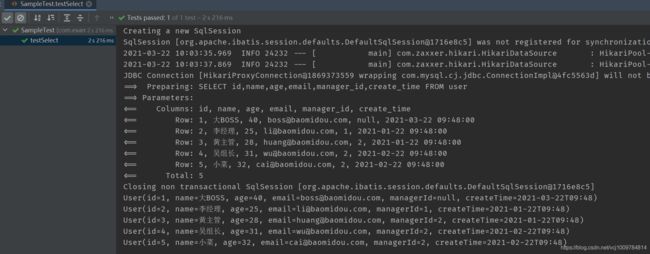
可以看到,针对单表的基本CRUD操作,只需要创建好实体类,并创建一个继承自
BaseMapper的接口即可,可谓非常简洁。并且,我们注意到,User类中的managerId,createTime属性,自动和数据库表中的manager_id,create_time对应了起来,这是因为mp自动做了数据库下划线命名,到Java类的驼峰命名之间的转化。核心功能
注解
mp一共提供了8个注解,这些注解是用在Java的实体类上面的。
-
@TableName注解在类上,指定类和数据库表的映射关系。实体类的类名(转成小写后)和数据库表名相同时,可以不指定该注解。
-
@TableId注解在实体类的某一字段上,表示这个字段对应数据库表的主键。当主键名为id时(表中列名为id,实体类中字段名为id),无需使用该注解显式指定主键,mp会自动关联。若类的字段名和表的列名不一致,可用
value属性指定表的列名。另,这个注解有个重要的属性type,用于指定主键策略,参见主键策略小节 -
@TableField注解在某一字段上,指定Java实体类的字段和数据库表的列的映射关系。这个注解有如下几个应用场景。
-
排除非表字段
若Java实体类中某个字段,不对应表中的任何列,它只是用于保存一些额外的,或组装后的数据,则可以设置
exist属性为false,这样在对实体对象进行插入时,会忽略这个字段。排除非表字段也可以通过其他方式完成,如使用static或transient关键字,但个人觉得不是很合理,不做赘述 -
字段验证策略
通过
insertStrategy,updateStrategy,whereStrategy属性进行配置,可以控制在实体对象进行插入,更新,或作为WHERE条件时,对象中的字段要如何组装到SQL语句中。参见配置小节 -
字段填充策略
通过
fill属性指定,字段为空时会进行自动填充
-
-
@Version乐观锁注解,参见乐观锁小节
-
@EnumValue注解在枚举字段上
-
@TableLogic逻辑删除,参见逻辑删除小节
-
KeySequence序列主键策略(
oracle) -
InterceptorIgnore插件过滤规则
CRUD接口
mp封装了一些最基础的CRUD方法,只需要直接继承mp提供的接口,无需编写任何SQL,即可食用。mp提供了两套接口,分别是Mapper CRUD接口和Service CRUD接口。并且mp还提供了条件构造器
Wrapper,可以方便地组装SQL语句中的WHERE条件,参见条件构造器小节Mapper CRUD接口
只需定义好实体类,然后创建一个接口,继承mp提供的
BaseMapper,即可食用。mp会在mybatis启动时,自动解析实体类和表的映射关系,并注入带有通用CRUD方法的mapper。BaseMapper里提供的方法,部分列举如下:insert(T entity)插入一条记录deleteById(Serializable id)根据主键id删除一条记录delete(Wrapper根据条件构造器wrapper进行删除wrapper) selectById(Serializable id)根据主键id进行查找selectBatchIds(Collection idList)根据主键id进行批量查找selectByMap(Map根据map中指定的列名和列值进行等值匹配查找selectMaps(Wrapper根据 wrapper 条件,查询记录,将查询结果封装为一个Map,Map的key为结果的列,value为值wrapper) selectList(Wrapper根据条件构造器wrapper) wrapper进行查询update(T entity, Wrapper根据条件构造器wrapper) wrapper进行更新updateById(T entity)- …
简单的食用示例如前文快速入门小节,下面讲解几个比较特别的方法
selectMaps
BaseMapper接口还提供了一个selectMaps方法,这个方法会将查询结果封装为一个Map,Map的key为结果的列,value为值该方法的使用场景如下:
-
只查部分列
当某个表的列特别多,而SELECT的时候只需要选取个别列,查询出的结果也没必要封装成Java实体类对象时(只查部分列时,封装成实体后,实体对象中的很多属性会是null),则可以用
selectMaps,获取到指定的列后,再自行进行处理即可比如
@Test public void test3() { QueryWrapper<User> wrapper = new QueryWrapper<>(); wrapper.select("id","name","email").likeRight("name","黄"); List<Map<String, Object>> maps = userMapper.selectMaps(wrapper); maps.forEach(System.out::println); }- 1
- 2
- 3
- 4
- 5
- 6
- 7

-
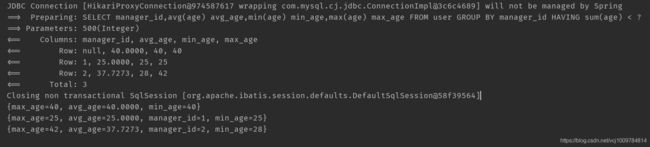
进行数据统计
比如
// 按照直属上级进行分组,查询每组的平均年龄,最大年龄,最小年龄
/**
select avg(age) avg_age ,min(age) min_age, max(age) max_age from user group by manager_id having sum(age) < 500;
**/
@Test
public void test3() {
QueryWrapper<User> wrapper = new QueryWrapper<>();
wrapper.select(“manager_id”, “avg(age) avg_age”, “min(age) min_age”, “max(age) max_age”)
.groupBy(“manager_id”).having(“sum(age) < {0}”, 500);
List<Map<String, Object>> maps = userMapper.selectMaps(wrapper);
maps.forEach(System.out::println);
}- 1
- 2
- 3
- 4
- 5
- 6
- 7
- 8
- 9
- 10
- 11
- 12
- 13
selectObjs
只会返回第一个字段(第一列)的值,其他字段会被舍弃
比如
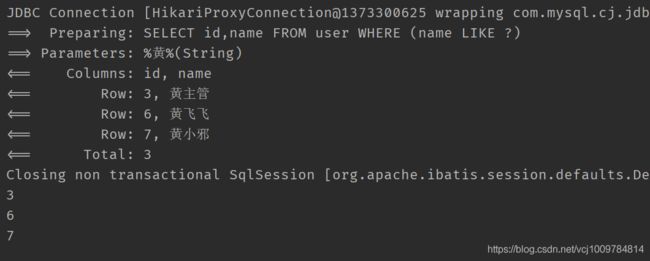
@Test public void test3() { QueryWrapper<User> wrapper = new QueryWrapper<>(); wrapper.select("id", "name").like("name", "黄"); List<Object> objects = userMapper.selectObjs(wrapper); objects.forEach(System.out::println); }- 1
- 2
- 3
- 4
- 5
- 6
- 7
得到的结果,只封装了第一列的id
selectCount
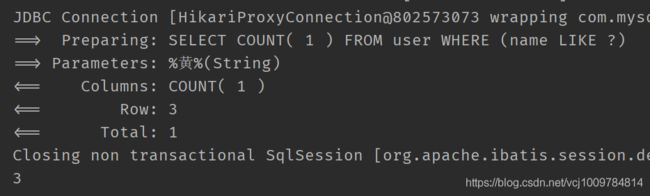
查询满足条件的总数,注意,使用这个方法,不能调用
QueryWrapper的select方法设置要查询的列了。这个方法会自动添加select count(1)比如
@Test public void test3() { QueryWrapper<User> wrapper = new QueryWrapper<>(); wrapper.like("name", "黄");Integer count = userMapper.selectCount(wrapper); System.out.println(count); }- 1
- 2
- 3
- 4
- 5
- 6
- 7
- 8
Service CRUD 接口
另外一套CRUD是Service层的,只需要编写一个接口,继承
IService,并创建一个接口实现类,即可食用。(这个接口提供的CRUD方法,和Mapper接口提供的功能大同小异,比较明显的区别在于IService支持了更多的批量化操作,如saveBatch,saveOrUpdateBatch等方法。食用示例如下
-
首先,新建一个接口,继承
IServicepackage com.example.mp.service;
import com.baomidou.mybatisplus.extension.service.IService;
import com.example.mp.po.User;public interface UserService extends IService<User> {
}- 1
- 2
- 3
- 4
- 5
- 6
- 7
-
-
创建这个接口的实现类,并继承
ServiceImpl,最后打上@Service注解,注册到Spring容器中,即可食用package com.example.mp.service.impl; import com.baomidou.mybatisplus.extension.service.impl.ServiceImpl;
import com.example.mp.mappers.UserMapper;
import com.example.mp.po.User;
import com.example.mp.service.UserService;
import org.springframework.stereotype.Service;@Service
public class UserServiceImpl extends ServiceImpl<UserMapper, User> implements UserService { }- 1
- 2
- 3
- 4
- 5
- 6
- 7
- 8
- 9
- 10
-
测试代码
package com.example.mp; import com.baomidou.mybatisplus.core.conditions.query.LambdaQueryWrapper;
import com.baomidou.mybatisplus.core.toolkit.Wrappers;
import com.example.mp.po.User;
import com.example.mp.service.UserService;
import org.junit.Test;
import org.junit.runner.RunWith;
import org.springframework.beans.factory.annotation.Autowired;
import org.springframework.boot.test.context.SpringBootTest;
import org.springframework.test.context.junit4.SpringRunner;
@RunWith(SpringRunner.class)
@SpringBootTest
public class ServiceTest {
@Autowired
private UserService userService;
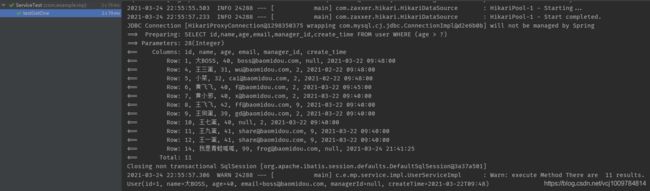
@Test
public void testGetOne() {
LambdaQueryWrapper<User> wrapper = Wrappers.<User>lambdaQuery();
wrapper.gt(User::getAge, 28);
User one = userService.getOne(wrapper, false); // 第二参数指定为false,使得在查到了多行记录时,不抛出异常,而返回第一条记录
System.out.println(one);
}
}- 1
- 2
- 3
- 4
- 5
- 6
- 7
- 8
- 9
- 10
- 11
- 12
- 13
- 14
- 15
- 16
- 17
- 18
- 19
- 20
- 21
- 22
- 23
- 24
-
结果
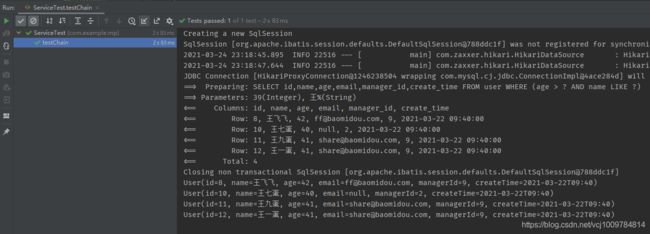
另,
IService也支持链式调用,代码写起来非常简洁,查询示例如下@Test public void testChain() { List<User> list = userService.lambdaQuery() .gt(User::getAge, 39) .likeRight(User::getName, "王") .list(); list.forEach(System.out::println); }- 1
- 2
- 3
- 4
- 5
- 6
- 7
- 8
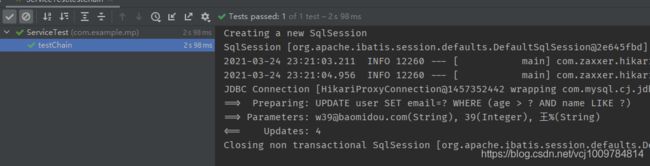
更新示例如下
@Test public void testChain() { userService.lambdaUpdate() .gt(User::getAge, 39) .likeRight(User::getName, "王") .set(User::getEmail, "[email protected]") .update(); }- 1
- 2
- 3
- 4
- 5
- 6
- 7
- 8
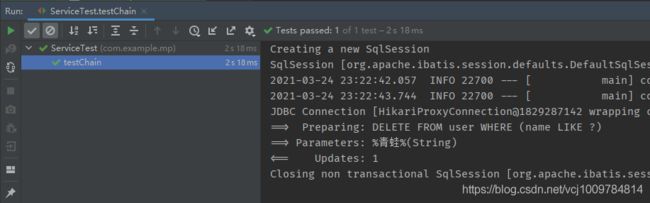
删除示例如下
@Test public void testChain() { userService.lambdaUpdate() .like(User::getName, "青蛙") .remove(); }- 1
- 2
- 3
- 4
- 5
- 6
条件构造器
mp让我觉得极其方便的一点在于其提供了强大的条件构造器
Wrapper,可以非常方便的构造WHERE条件。条件构造器主要涉及到3个类,AbstractWrapper。QueryWrapper,UpdateWrapper,它们的类关系如下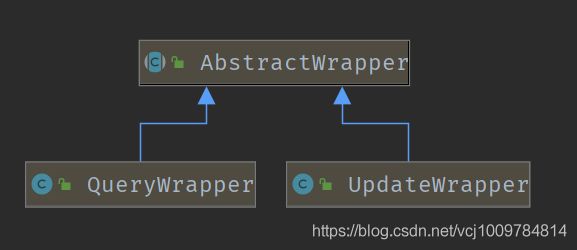
在
AbstractWrapper中提供了非常多的方法用于构建WHERE条件,而QueryWrapper针对SELECT语句,提供了select()方法,可自定义需要查询的列,而UpdateWrapper针对UPDATE语句,提供了set()方法,用于构造set语句。条件构造器也支持lambda表达式,写起来非常舒爽。下面对
AbstractWrapper中用于构建SQL语句中的WHERE条件的方法进行部分列举eq:equals,等于allEq:all equals,全等于ne:not equals,不等于gt:greater than ,大于>ge:greater than or equals,大于等于≥lt:less than,小于<le:less than or equals,小于等于≤between:相当于SQL中的BETWEENnotBetweenlike:模糊匹配。like("name","黄"),相当于SQL的name like '%黄%'likeRight:模糊匹配右半边。likeRight("name","黄"),相当于SQL的name like '黄%'likeLeft:模糊匹配左半边。likeLeft("name","黄"),相当于SQL的name like '%黄'notLike:notLike("name","黄"),相当于SQL的name not like '%黄%'isNullisNotNullinand:SQL连接符ANDor:SQL连接符ORapply:用于拼接SQL,该方法可用于数据库函数,并可以动态传参- …
使用示例
下面通过一些具体的案例来练习条件构造器的使用。(使用前文创建的
user表)// 案例先展示需要完成的SQL语句,后展示Wrapper的写法// 1. 名字中包含佳,且年龄小于25
// SELECT * FROM user WHERE name like ‘%佳%’ AND age < 25
QueryWrapper<User> wrapper = new QueryWrapper<>();
wrapper.like(“name”, “佳”).lt(“age”, 25);
List<User> users = userMapper.selectList(wrapper);
// 下面展示SQL时,仅展示WHERE条件;展示代码时, 仅展示Wrapper构建部分// 2. 姓名为黄姓,且年龄大于等于20,小于等于40,且email字段不为空
// name like ‘黄%’ AND age BETWEEN 20 AND 40 AND email is not null
wrapper.likeRight(“name”,“黄”).between(“age”, 20, 40).isNotNull(“email”);// 3. 姓名为黄姓,或者年龄大于等于40,按照年龄降序排列,年龄相同则按照id升序排列
// name like ‘黄%’ OR age >= 40 order by age desc, id asc
wrapper.likeRight(“name”,“黄”).or().ge(“age”,40).orderByDesc(“age”).orderByAsc(“id”);// 4.创建日期为2021年3月22日,并且直属上级的名字为李姓
// date_format(create_time,’%Y-%m-%d’) = ‘2021-03-22’ AND manager_id IN (SELECT id FROM user WHERE name like ‘李%’)
wrapper.apply(“date_format(create_time, ‘%Y-%m-%d’) = {0}”, “2021-03-22”) // 建议采用{index}这种方式动态传参, 可防止SQL注入
.inSql(“manager_id”, “SELECT id FROM user WHERE name like ‘李%’”);
// 上面的apply, 也可以直接使用下面这种方式做字符串拼接,但当这个日期是一个外部参数时,这种方式有SQL注入的风险
wrapper.apply(“date_format(create_time, ‘%Y-%m-%d’) = ‘2021-03-22’”);// 5. 名字为王姓,并且(年龄小于40,或者邮箱不为空)
// name like ‘王%’ AND (age < 40 OR email is not null)
wrapper.likeRight(“name”, “王”).and(q -> q.lt(“age”, 40).or().isNotNull(“email”));// 6. 名字为王姓,或者(年龄小于40并且年龄大于20并且邮箱不为空)
// name like ‘王%’ OR (age < 40 AND age > 20 AND email is not null)
wrapper.likeRight(“name”, “王”).or(
q -> q.lt(“age”,40)
.gt(“age”,20)
.isNotNull(“email”)
);// 7. (年龄小于40或者邮箱不为空) 并且名字为王姓
// (age < 40 OR email is not null) AND name like ‘王%’
wrapper.nested(q -> q.lt(“age”, 40).or().isNotNull(“email”))
.likeRight(“name”, “王”);// 8. 年龄为30,31,34,35
// age IN (30,31,34,35)
wrapper.in(“age”, Arrays.asList(30,31,34,35));
// 或
wrapper.inSql(“age”,“30,31,34,35”);// 9. 年龄为30,31,34,35, 返回满足条件的第一条记录
// age IN (30,31,34,35) LIMIT 1
wrapper.in(“age”, Arrays.asList(30,31,34,35)).last(“LIMIT 1”);// 10. 只选出id, name 列 (QueryWrapper 特有)
// SELECT id, name FROM user;
wrapper.select(“id”, “name”);// 11. 选出id, name, age, email, 等同于排除 manager_id 和 create_time
// 当列特别多, 而只需要排除个别列时, 采用上面的方式可能需要写很多个列, 可以采用重载的select方法,指定需要排除的列
wrapper.select(User.class, info -> {
String columnName = info.getColumn();
return !“create_time”.equals(columnName) && !“manager_id”.equals(columnName);
});- 1
- 2
- 3
- 4
- 5
- 6
- 7
- 8
- 9
- 10
- 11
- 12
- 13
- 14
- 15
- 16
- 17
- 18
- 19
- 20
- 21
- 22
- 23
- 24
- 25
- 26
- 27
- 28
- 29
- 30
- 31
- 32
- 33
- 34
- 35
- 36
- 37
- 38
- 39
- 40
- 41
- 42
- 43
- 44
- 45
- 46
- 47
- 48
- 49
- 50
- 51
- 52
- 53
- 54
- 55
- 56
- 57
- 58
- 59
- 60
- 61
Condition
条件构造器的诸多方法中,均可以指定一个
boolean类型的参数condition,用来决定该条件是否加入最后生成的WHERE语句中,比如String name = "黄"; // 假设name变量是一个外部传入的参数 QueryWrapper<User> wrapper = new QueryWrapper<>(); wrapper.like(StringUtils.hasText(name), "name", name); // 仅当 StringUtils.hasText(name) 为 true 时, 会拼接这个like语句到WHERE中 // 其实就是对下面代码的简化 if (StringUtils.hasText(name)) { wrapper.like("name", name); }- 1
- 2
- 3
- 4
- 5
- 6
- 7
- 8
实体对象作为条件
调用构造函数创建一个
Wrapper对象时,可以传入一个实体对象。后续使用这个Wrapper时,会以实体对象中的非空属性,构建WHERE条件(默认构建等值匹配的WHERE条件,这个行为可以通过实体类里各个字段上的@TableField注解中的condition属性进行改变)示例如下
@Test public void test3() { User user = new User(); user.setName("黄主管"); user.setAge(28); QueryWrapper<User> wrapper = new QueryWrapper<>(user); List<User> users = userMapper.selectList(wrapper); users.forEach(System.out::println); }- 1
- 2
- 3
- 4
- 5
- 6
- 7
- 8
- 9
执行结果如下。可以看到,是根据实体对象中的非空属性,进行了等值匹配查询。

若希望针对某些属性,改变等值匹配的行为,则可以在实体类中用
@TableField注解进行配置,示例如下package com.example.mp.po; import com.baomidou.mybatisplus.annotation.SqlCondition; import com.baomidou.mybatisplus.annotation.TableField; import lombok.Data; import java.time.LocalDateTime; @Data public class User { private Long id; @TableField(condition = SqlCondition.LIKE) // 配置该字段使用like进行拼接 private String name; private Integer age; private String email; private Long managerId; private LocalDateTime createTime; }- 1
- 2
- 3
- 4
- 5
- 6
- 7
- 8
- 9
- 10
- 11
- 12
- 13
- 14
- 15
运行下面的测试代码
@Test public void test3() { User user = new User(); user.setName("黄"); QueryWrapper<User> wrapper = new QueryWrapper<>(user); List<User> users = userMapper.selectList(wrapper); users.forEach(System.out::println); }- 1
- 2
- 3
- 4
- 5
- 6
- 7
- 8
从下图得到的结果来看,对于实体对象中的
name字段,采用了like进行拼接
@TableField中配置的condition属性实则是一个字符串,SqlCondition类中预定义了一些字符串以供选择package com.baomidou.mybatisplus.annotation;public class SqlCondition {
//下面的字符串中, %s 是占位符, 第一个 %s 是列名, 第二个 %s 是列的值
public static final String EQUAL = “%s=#{%s}”;
public static final String NOT_EQUAL = “%s<>#{%s}”;
public static final String LIKE = “%s LIKE CONCAT(’%%’,#{%s},’%%’)”;
public static final String LIKE_LEFT = “%s LIKE CONCAT(’%%’,#{%s})”;
public static final String LIKE_RIGHT = “%s LIKE CONCAT(#{%s},’%%’)”;
}- 1
- 2
- 3
- 4
- 5
- 6
- 7
- 8
- 9
- 10
SqlCondition中提供的配置比较有限,当我们需要<或>等拼接方式,则需要自己定义。比如package com.example.mp.po; import com.baomidou.mybatisplus.annotation.SqlCondition; import com.baomidou.mybatisplus.annotation.TableField; import lombok.Data; import java.time.LocalDateTime; @Data public class User { private Long id; @TableField(condition = SqlCondition.LIKE) private String name; @TableField(condition = "%s > #{%s}") // 这里相当于大于, 其中 > 是字符实体 private Integer age; private String email; private Long managerId; private LocalDateTime createTime; }- 1
- 2
- 3
- 4
- 5
- 6
- 7
- 8
- 9
- 10
- 11
- 12
- 13
- 14
- 15
- 16
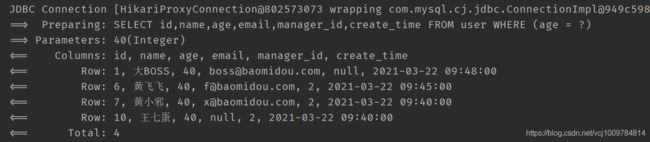
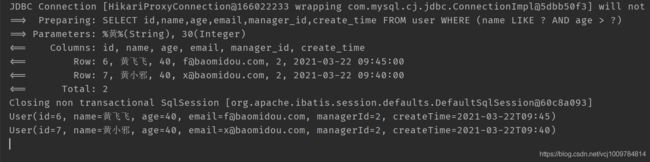
测试如下
@Test public void test3() { User user = new User(); user.setName("黄"); user.setAge(30); QueryWrapper<User> wrapper = new QueryWrapper<>(user); List<User> users = userMapper.selectList(wrapper); users.forEach(System.out::println); }- 1
- 2
- 3
- 4
- 5
- 6
- 7
- 8
- 9
从下图得到的结果,可以看出,
name属性是用like拼接的,而age属性是用>拼接的
allEq方法
allEq方法传入一个
map,用来做等值匹配@Test public void test3() { QueryWrapper<User> wrapper = new QueryWrapper<>(); Map<String, Object> param = new HashMap<>(); param.put("age", 40); param.put("name", "黄飞飞"); wrapper.allEq(param); List<User> users = userMapper.selectList(wrapper); users.forEach(System.out::println); }- 1
- 2
- 3
- 4
- 5
- 6
- 7
- 8
- 9
- 10

当allEq方法传入的Map中有value为
null的元素时,默认会设置为is null@Test public void test3() { QueryWrapper<User> wrapper = new QueryWrapper<>(); Map<String, Object> param = new HashMap<>(); param.put("age", 40); param.put("name", null); wrapper.allEq(param); List<User> users = userMapper.selectList(wrapper); users.forEach(System.out::println); }- 1
- 2
- 3
- 4
- 5
- 6
- 7
- 8
- 9
- 10

若想忽略map中value为
null的元素,可以在调用allEq时,设置参数boolean null2IsNull为false@Test public void test3() { QueryWrapper<User> wrapper = new QueryWrapper<>(); Map<String, Object> param = new HashMap<>(); param.put("age", 40); param.put("name", null); wrapper.allEq(param, false); List<User> users = userMapper.selectList(wrapper); users.forEach(System.out::println); }- 1
- 2
- 3
- 4
- 5
- 6
- 7
- 8
- 9
- 10

若想要在执行allEq时,过滤掉Map中的某些元素,可以调用allEq的重载方法
allEq(BiPredicate@Test public void test3() { QueryWrapper<User> wrapper = new QueryWrapper<>(); Map<String, Object> param = new HashMap<>(); param.put("age", 40); param.put("name", "黄飞飞"); wrapper.allEq((k,v) -> !"name".equals(k), param); // 过滤掉map中key为name的元素 List<User> users = userMapper.selectList(wrapper); users.forEach(System.out::println); }- 1
- 2
- 3
- 4
- 5
- 6
- 7
- 8
- 9
- 10
lambda条件构造器
lambda条件构造器,支持lambda表达式,可以不必像普通条件构造器一样,以字符串形式指定列名,它可以直接以实体类的方法引用来指定列。示例如下
@Test public void testLambda() { LambdaQueryWrapper<User> wrapper = new LambdaQueryWrapper<>(); wrapper.like(User::getName, "黄").lt(User::getAge, 30); List<User> users = userMapper.selectList(wrapper); users.forEach(System.out::println); }- 1
- 2
- 3
- 4
- 5
- 6
- 7

像普通的条件构造器,列名是用字符串的形式指定,无法在编译期进行列名合法性的检查,这就不如lambda条件构造器来的优雅。
另外,还有个链式lambda条件构造器,使用示例如下
@Test public void testLambda() { LambdaQueryChainWrapper<User> chainWrapper = new LambdaQueryChainWrapper<>(userMapper); List<User> users = chainWrapper.like(User::getName, "黄").gt(User::getAge, 30).list(); users.forEach(System.out::println); }- 1
- 2
- 3
- 4
- 5
- 6
更新操作
上面介绍的都是查询操作,现在来讲更新和删除操作。
BaseMapper中提供了2个更新方法-
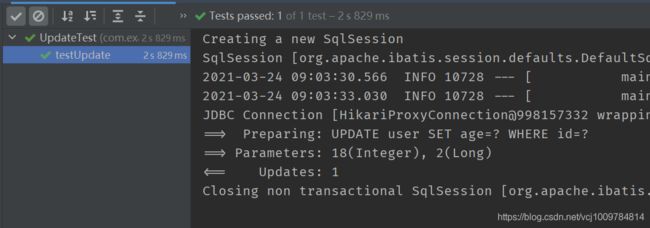
updateById(T entity)根据入参
entity的id(主键)进行更新,对于entity中非空的属性,会出现在UPDATE语句的SET后面,即entity中非空的属性,会被更新到数据库,示例如下@RunWith(SpringRunner.class) @SpringBootTest public class UpdateTest { @Autowired private UserMapper userMapper; @Test public void testUpdate() { User user = new User(); user.setId(2L); user.setAge(18); userMapper.updateById(user); } }- 1
- 2
- 3
- 4
- 5
- 6
- 7
- 8
- 9
- 10
- 11
- 12
- 13
-
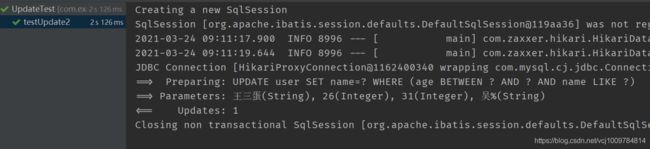
update(T entity, Wrapperwrapper) 根据实体
entity和条件构造器wrapper进行更新,示例如下@Test public void testUpdate2() { User user = new User(); user.setName("王三蛋"); LambdaUpdateWrapper<User> wrapper = new LambdaUpdateWrapper<>(); wrapper.between(User::getAge, 26,31).likeRight(User::getName,"吴"); userMapper.update(user, wrapper); }- 1
- 2
- 3
- 4
- 5
- 6
- 7
- 8
额外演示一下,把实体对象传入
Wrapper,即用实体对象构造WHERE条件的案例@Test public void testUpdate3() { User whereUser = new User(); whereUser.setAge(40); whereUser.setName("王");LambdaUpdateWrapper<User> wrapper = new LambdaUpdateWrapper<>(whereUser); User user = new User(); user.setEmail("[email protected]"); user.setManagerId(10L); userMapper.update(user, wrapper); }
- 1
- 2
- 3
- 4
- 5
- 6
- 7
- 8
- 9
- 10
- 11
- 12
- 13
注意到我们的User类中,对
name属性和age属性进行了如下的设置@Data public class User { private Long id; @TableField(condition = SqlCondition.LIKE) private String name; @TableField(condition = "%s > #{%s}") private Integer age; private String email; private Long managerId; private LocalDateTime createTime; }- 1
- 2
- 3
- 4
- 5
- 6
- 7
- 8
- 9
- 10
- 11
执行结果
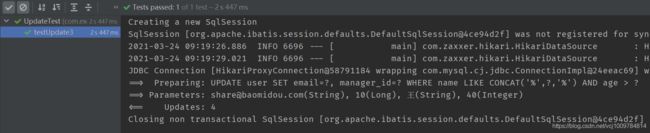
再额外演示一下,链式lambda条件构造器的使用
@Test public void testUpdate5() { LambdaUpdateChainWrapper<User> wrapper = new LambdaUpdateChainWrapper<>(userMapper); wrapper.likeRight(User::getEmail, "share") .like(User::getName, "飞飞") .set(User::getEmail, "[email protected]") .update(); }- 1
- 2
- 3
- 4
- 5
- 6
- 7
- 8

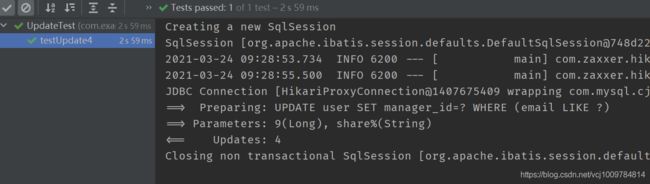
反思
由于
BaseMapper提供的2个更新方法都是传入一个实体对象去执行更新,这在需要更新的列比较多时还好,若想要更新的只有那么一列,或者两列,则创建一个实体对象就显得有点麻烦。针对这种情况,UpdateWrapper提供有set方法,可以手动拼接SQL中的SET语句,此时可以不必传入实体对象,示例如下@Test public void testUpdate4() { LambdaUpdateWrapper<User> wrapper = new LambdaUpdateWrapper<>(); wrapper.likeRight(User::getEmail, "share").set(User::getManagerId, 9L); userMapper.update(null, wrapper); }- 1
- 2
- 3
- 4
- 5
- 6
删除操作
BaseMapper一共提供了如下几个用于删除的方法deleteById根据主键id进行删除deleteBatchIds根据主键id进行批量删除deleteByMap根据Map进行删除(Map中的key为列名,value为值,根据列和值进行等值匹配)delete(Wrapper根据条件构造器wrapper) Wrapper进行删除
与前面查询和更新的操作大同小异,不做赘述
自定义SQL
当mp提供的方法还不能满足需求时,则可以自定义SQL。
原生mybatis
示例如下
- 注解方式
package com.example.mp.mappers;import com.baomidou.mybatisplus.core.mapper.BaseMapper;
import com.example.mp.po.User;
import org.apache.ibatis.annotations.Select;import java.util.List;
/**
-
@Author yogurtzzz
-
@Date 2021/3/18 11:21
**/
public interface UserMapper extends BaseMapper<User> {@Select(“select * from user”)
List<User> selectRaw();
}
- 1
- 2
- 3
- 4
- 5
- 6
- 7
- 8
- 9
- 10
- 11
- 12
- 13
- 14
- 15
- 16
- 17
- xml方式
DOCTYPE mapper PUBLIC "-//mybatis.org//DTD Mapper 3.0//EN" "http://mybatis.org/dtd/mybatis-3-mapper.dtd"> <mapper namespace="com.example.mp.mappers.UserMapper"> <select id="selectRaw" resultType="com.example.mp.po.User"> SELECT * FROM user select> mapper>- 1
- 2
- 3
- 4
- 5
- 6
- 7
package com.example.mp.mappers;import com.baomidou.mybatisplus.core.mapper.BaseMapper;
import com.example.mp.po.User;
import org.apache.ibatis.annotations.Select;
import java.util.List;public interface UserMapper extends BaseMapper<User> {
List<User> selectRaw();
}- 1
- 2
- 3
- 4
- 5
- 6
- 7
- 8
- 9
- 10
使用xml时,若xml文件与mapper接口文件不在同一目录下,则需要在
application.yml中配置mapper.xml的存放路径mybatis-plus: mapper-locations: /mappers/*- 1
- 2
若有多个地方存放mapper,则用数组形式进行配置
mybatis-plus: mapper-locations: - /mappers/* - /com/example/mp/*- 1
- 2
- 3
- 4
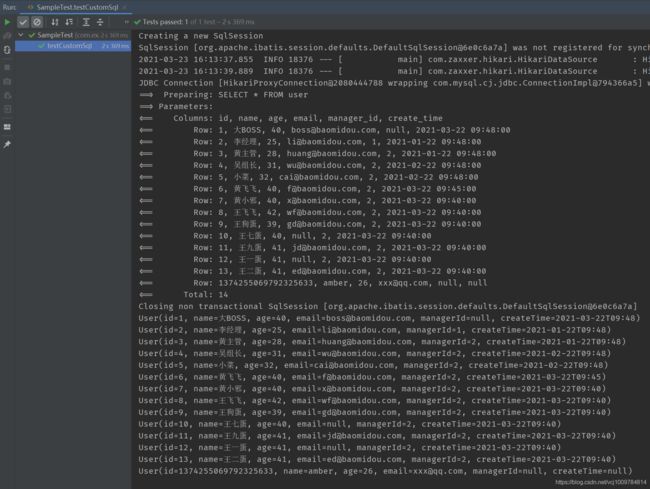
测试代码如下
@Test public void testCustomRawSql() { List<User> users = userMapper.selectRaw(); users.forEach(System.out::println); }- 1
- 2
- 3
- 4
- 5
结果
mybatis-plus
也可以使用mp提供的Wrapper条件构造器,来自定义SQL
示例如下
- 注解方式
package com.example.mp.mappers; import com.baomidou.mybatisplus.core.conditions.Wrapper; import com.baomidou.mybatisplus.core.mapper.BaseMapper; import com.baomidou.mybatisplus.core.toolkit.Constants; import com.example.mp.po.User; import org.apache.ibatis.annotations.Param; import org.apache.ibatis.annotations.Select; import java.util.List;public interface UserMapper extends BaseMapper<User> {
// SQL中不写WHERE关键字,且固定使用${ew.customSqlSegment} @Select("select * from user ${ew.customSqlSegment}") List<User> findAll(@Param(Constants.WRAPPER)Wrapper<User> wrapper);}
- 1
- 2
- 3
- 4
- 5
- 6
- 7
- 8
- 9
- 10
- 11
- 12
- 13
- 14
- 15
- xml方式
package com.example.mp.mappers; import com.baomidou.mybatisplus.core.conditions.Wrapper; import com.baomidou.mybatisplus.core.mapper.BaseMapper; import com.example.mp.po.User; import java.util.List;public interface UserMapper extends BaseMapper<User> {
List<User> findAll(Wrapper<User> wrapper);
}- 1
- 2
- 3
- 4
- 5
- 6
- 7
- 8
- 9
DOCTYPE mapper PUBLIC "-//mybatis.org//DTD Mapper 3.0//EN" "http://mybatis.org/dtd/mybatis-3-mapper.dtd"> <mapper namespace="com.example.mp.mappers.UserMapper"><select id="findAll" resultType="com.example.mp.po.User"> SELECT * FROM user ${ew.customSqlSegment} </select>mapper>
- 1
- 2
- 3
- 4
- 5
- 6
- 7
- 8
- 9
分页查询
BaseMapper中提供了2个方法进行分页查询,分别是selectPage和selectMapsPage,前者会将查询的结果封装成Java实体对象,后者会封装成Map。分页查询的食用示例如下-
创建mp的分页拦截器,注册到Spring容器中
package com.example.mp.config; import com.baomidou.mybatisplus.annotation.DbType; import com.baomidou.mybatisplus.extension.plugins.MybatisPlusInterceptor; import com.baomidou.mybatisplus.extension.plugins.inner.PaginationInnerInterceptor; import org.springframework.context.annotation.Bean; import org.springframework.context.annotation.Configuration;
@Configuration
public class MybatisPlusConfig {/** 新版mp **/ @Bean public MybatisPlusInterceptor mybatisPlusInterceptor() { MybatisPlusInterceptor interceptor = new MybatisPlusInterceptor(); interceptor.addInnerInterceptor(new PaginationInnerInterceptor(DbType.MYSQL)); return interceptor; } /** 旧版mp 用 PaginationInterceptor **/}
- 1
- 2
- 3
- 4
- 5
- 6
- 7
- 8
- 9
- 10
- 11
- 12
- 13
- 14
- 15
- 16
- 17
- 18
- 19
-
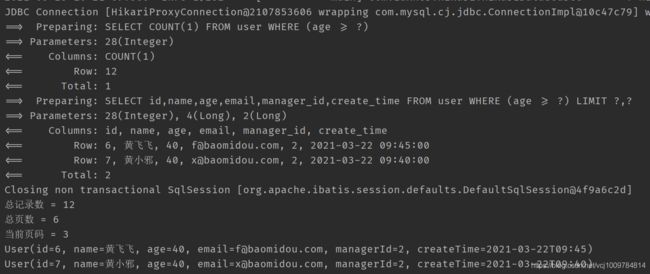
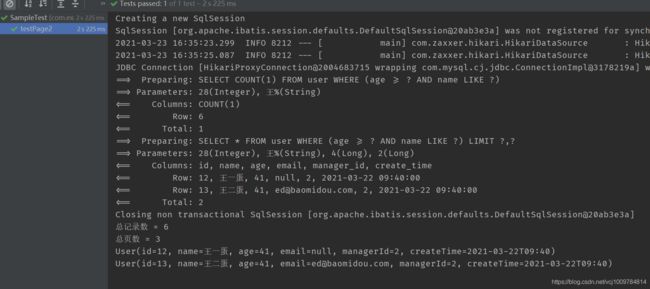
执行分页查询
@Test public void testPage() { LambdaQueryWrapper<User> wrapper = new LambdaQueryWrapper<>(); wrapper.ge(User::getAge, 28); // 设置分页信息, 查第3页, 每页2条数据 Page<User> page = new Page<>(3, 2); // 执行分页查询 Page<User> userPage = userMapper.selectPage(page, wrapper); System.out.println("总记录数 = " + userPage.getTotal()); System.out.println("总页数 = " + userPage.getPages()); System.out.println("当前页码 = " + userPage.getCurrent()); // 获取分页查询结果 List<User> records = userPage.getRecords(); records.forEach(System.out::println); }- 1
- 2
- 3
- 4
- 5
- 6
- 7
- 8
- 9
- 10
- 11
- 12
- 13
- 14
- 15
-
结果
-
其他
-
注意到,分页查询总共发出了2次SQL,一次查总记录数,一次查具体数据。若希望不查总记录数,仅查分页结果。可以通过
Page的重载构造函数,指定isSearchCount为false即可public Page(long current, long size, boolean isSearchCount)- 1
-
在实际开发中,可能遇到多表联查的场景,此时
BaseMapper中提供的单表分页查询的方法无法满足需求,需要自定义SQL,示例如下(使用单表查询的SQL进行演示,实际进行多表联查时,修改SQL语句即可)-
在mapper接口中定义一个函数,接收一个Page对象为参数,并编写自定义SQL
// 这里采用纯注解方式。当然,若SQL比较复杂,建议还是采用XML的方式 @Select("SELECT * FROM user ${ew.customSqlSegment}") Page<User> selectUserPage(Page<User> page, @Param(Constants.WRAPPER) Wrapper<User> wrapper);- 1
- 2
- 3
-
执行查询
@Test public void testPage2() { LambdaQueryWrapper<User> wrapper = new LambdaQueryWrapper<>(); wrapper.ge(User::getAge, 28).likeRight(User::getName, "王"); Page<User> page = new Page<>(3,2); Page<User> userPage = userMapper.selectUserPage(page, wrapper); System.out.println("总记录数 = " + userPage.getTotal()); System.out.println("总页数 = " + userPage.getPages()); userPage.getRecords().forEach(System.out::println); }- 1
- 2
- 3
- 4
- 5
- 6
- 7
- 8
- 9
- 10
-
结果
-
-
AR模式
ActiveRecord模式,通过操作实体对象,直接操作数据库表。与ORM有点类似。
示例如下
-
让实体类
User继承自Modelpackage com.example.mp.po;
import com.baomidou.mybatisplus.annotation.SqlCondition;
import com.baomidou.mybatisplus.annotation.TableField;
import com.baomidou.mybatisplus.extension.activerecord.Model;
import lombok.Data;
import lombok.EqualsAndHashCode;
import java.time.LocalDateTime;@EqualsAndHashCode(callSuper = false)
@Data
public class User extends Model<User> {
private Long id;
@TableField(condition = SqlCondition.LIKE)
private String name;
@TableField(condition = “%s > #{%s}”)
private Integer age;
private String email;
private Long managerId;
private LocalDateTime createTime;
}- 1
- 2
- 3
- 4
- 5
- 6
- 7
- 8
- 9
- 10
- 11
- 12
- 13
- 14
- 15
- 16
- 17
- 18
- 19
- 20
- 21
- 22
-
-
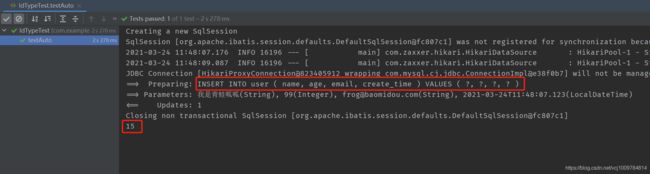
直接调用实体对象上的方法
@Test public void insertAr() { User user = new User(); user.setId(15L); user.setName("我是AR猪"); user.setAge(1); user.setEmail("[email protected]"); user.setManagerId(1L); boolean success = user.insert(); // 插入 System.out.println(success); }- 1
- 2
- 3
- 4
- 5
- 6
- 7
- 8
- 9
- 10
- 11
-
结果

其他示例
// 查询 @Test public void selectAr() { User user = new User(); user.setId(15L); User result = user.selectById(); System.out.println(result); } // 更新 @Test public void updateAr() { User user = new User(); user.setId(15L); user.setName("王全蛋"); user.updateById(); } //删除 @Test public void deleteAr() { User user = new User(); user.setId(15L); user.deleteById(); }- 1
- 2
- 3
- 4
- 5
- 6
- 7
- 8
- 9
- 10
- 11
- 12
- 13
- 14
- 15
- 16
- 17
- 18
- 19
- 20
- 21
- 22
- 23
主键策略
在定义实体类时,用
@TableId指定主键,而其type属性,可以指定主键策略。mp支持多种主键策略,默认的策略是基于雪花算法的自增id。全部主键策略定义在了枚举类
IdType中,IdType有如下的取值-
AUTO数据库ID自增,依赖于数据库。在插入操作生成SQL语句时,不会插入主键这一列
-
NONE未设置主键类型。若在代码中没有手动设置主键,则会根据主键的全局策略自动生成(默认的主键全局策略是基于雪花算法的自增ID)
-
INPUT需要手动设置主键,若不设置。插入操作生成SQL语句时,主键这一列的值会是
null。oracle的序列主键需要使用这种方式 -
ASSIGN_ID当没有手动设置主键,即实体类中的主键属性为空时,才会自动填充,使用雪花算法
-
ASSIGN_UUID当实体类的主键属性为空时,才会自动填充,使用UUID
-
…(还有几种是已过时的,就不再列举)
可以针对每个实体类,使用
@TableId注解指定该实体类的主键策略,这可以理解为局部策略。若希望对所有的实体类,都采用同一种主键策略,挨个在每个实体类上进行配置,则太麻烦了,此时可以用主键的全局策略。只需要在application.yml进行配置即可。比如,配置了全局采用自增主键策略# application.yml mybatis-plus: global-config: db-config: id-type: auto- 1
- 2
- 3
- 4
- 5
下面对不同主键策略的行为进行演示
-
AUTO在
User上对id属性加上注解,然后将MYSQL的user表修改其主键为自增。@EqualsAndHashCode(callSuper = false) @Data public class User extends Model<User> { @TableId(type = IdType.AUTO) private Long id; @TableField(condition = SqlCondition.LIKE) private String name; @TableField(condition = "%s > #{%s}") private Integer age; private String email; private Long managerId; private LocalDateTime createTime; }- 1
- 2
- 3
- 4
- 5
- 6
- 7
- 8
- 9
- 10
- 11
- 12
- 13
测试
@Test public void testAuto() { User user = new User(); user.setName("我是青蛙呱呱"); user.setAge(99); user.setEmail("[email protected]"); user.setCreateTime(LocalDateTime.now()); userMapper.insert(user); System.out.println(user.getId()); }- 1
- 2
- 3
- 4
- 5
- 6
- 7
- 8
- 9
- 10
结果
可以看到,代码中没有设置主键ID,发出的SQL语句中也没有设置主键ID,并且插入结束后,主键ID会被写回到实体对象。
-
NONE在MYSQL的
user表中,去掉主键自增。然后修改User类(若不配置@TableId注解,默认主键策略也是NONE)@TableId(type = IdType.NONE) private Long id;- 1
- 2
插入时,若实体类的主键ID有值,则使用之;若主键ID为空,则使用主键全局策略,来生成一个ID。
-
其余的策略类似,不赘述
小结
AUTO依赖于数据库的自增主键,插入时,实体对象无需设置主键,插入成功后,主键会被写回实体对象。INPUT完全依赖于用户输入。实体对象中主键ID是什么,插入到数据库时就设置什么。若有值便设置值,若为null则设置null其余的几个策略,都是在实体对象中主键ID为空时,才会自动生成。
NONE会跟随全局策略,ASSIGN_ID采用雪花算法,ASSIGN_UUID采用UUID全局配置,在
application.yml中进行即可;针对单个实体类的局部配置,使用@TableId即可。对于某个实体类,若它有局部主键策略,则采用之,否则,跟随全局策略。配置
mybatis plus有许多可配置项,可在
application.yml中进行配置,如上面的全局主键策略。下面列举部分配置项基本配置
configLocation:若有单独的mybatis配置,用这个注解指定mybatis的配置文件(mybatis的全局配置文件)mapperLocations:mybatis mapper所对应的xml文件的位置typeAliasesPackage:mybatis的别名包扫描路径- …
进阶配置
-
mapUnderscoreToCamelCase:是否开启自动驼峰命名规则映射。(默认开启) -
dbTpe:数据库类型。一般不用配,会根据数据库连接url自动识别 -
fieldStrategy:(已过时)字段验证策略。该配置项在最新版的mp文档中已经找不到了,被细分成了insertStrategy,updateStrategy,selectStrategy。默认值是NOT_NULL,即对于实体对象中非空的字段,才会组装到最终的SQL语句中。有如下几种可选配置
-
IGNORED:忽略校验。即,不做校验。实体对象中的全部字段,无论值是什么,都如实地被组装到SQL语句中(为NULL的字段在SQL语句中就组装为NULL)。 -
NOT_NULL:非NULL校验。只会将非NULL的字段组装到SQL语句中 -
NOT_EMPTY:非空校验。当有字段是字符串类型时,只组装非空字符串;对其他类型的字段,等同于NOT_NULL -
NEVER:不加入SQL。所有字段不加入到SQL语句
这个配置项,可在
application.yml中进行全局配置,也可以在某一实体类中,对某一字段用@TableField注解进行局部配置这个字段验证策略有什么用呢?在UPDATE操作中能够体现出来,若用一个
User对象执行UPDATE操作,我们希望只对User对象中非空的属性,更新到数据库中,其他属性不做更新,则NOT_NULL可以满足需求。而若updateStrategy配置为IGNORED,则不会进行非空判断,会将实体对象中的全部属性如实组装到SQL中,这样,执行UPDATE时,可能就将一些不想更新的字段,设置为了NULL。 -
-
tablePrefix:添加表名前缀比如
mybatis-plus: global-config: db-config: table-prefix: xx_- 1
- 2
- 3
- 4
然后将MYSQL中的表做一下修改。但Java实体类保持不变(仍然为
User)。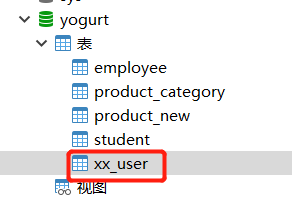
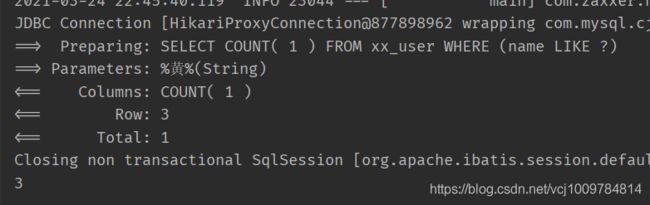
测试
@Test public void test3() { QueryWrapper<User> wrapper = new QueryWrapper<>(); wrapper.like("name", "黄"); Integer count = userMapper.selectCount(wrapper); System.out.println(count); }- 1
- 2
- 3
- 4
- 5
- 6
- 7
可以看到拼接出来的SQL,在表名前面添加了前缀
完整的配置可以参考mp的官网 ==> 传送门
代码生成器
mp提供一个生成器,可快速生成Entity实体类,Mapper接口,Service,Controller等全套代码。
示例如下
public class GeneratorTest { @Test public void generate() { AutoGenerator generator = new AutoGenerator();// 全局配置 GlobalConfig config = new GlobalConfig(); String projectPath = System.getProperty("user.dir"); // 设置输出到的目录 config.setOutputDir(projectPath + "/src/main/java"); config.setAuthor("yogurt"); // 生成结束后是否打开文件夹 config.setOpen(false); // 全局配置添加到 generator 上 generator.setGlobalConfig(config); // 数据源配置 DataSourceConfig dataSourceConfig = new DataSourceConfig(); dataSourceConfig.setUrl("jdbc:mysql://localhost:3306/yogurt?serverTimezone=Asia/Shanghai"); dataSourceConfig.setDriverName("com.mysql.cj.jdbc.Driver"); dataSourceConfig.setUsername("root"); dataSourceConfig.setPassword("root"); // 数据源配置添加到 generator generator.setDataSource(dataSourceConfig); // 包配置, 生成的代码放在哪个包下 PackageConfig packageConfig = new PackageConfig(); packageConfig.setParent("com.example.mp.generator"); // 包配置添加到 generator generator.setPackageInfo(packageConfig); // 策略配置 StrategyConfig strategyConfig = new StrategyConfig(); // 下划线驼峰命名转换 strategyConfig.setNaming(NamingStrategy.underline_to_camel); strategyConfig.setColumnNaming(NamingStrategy.underline_to_camel); // 开启lombok strategyConfig.setEntityLombokModel(true); // 开启RestController strategyConfig.setRestControllerStyle(true); generator.setStrategy(strategyConfig); generator.setTemplateEngine(new FreemarkerTemplateEngine()); // 开始生成 generator.execute(); }}
- 1
- 2
- 3
- 4
- 5
- 6
- 7
- 8
- 9
- 10
- 11
- 12
- 13
- 14
- 15
- 16
- 17
- 18
- 19
- 20
- 21
- 22
- 23
- 24
- 25
- 26
- 27
- 28
- 29
- 30
- 31
- 32
- 33
- 34
- 35
- 36
- 37
- 38
- 39
- 40
- 41
- 42
- 43
- 44
- 45
- 46
- 47
- 48
- 49
- 50
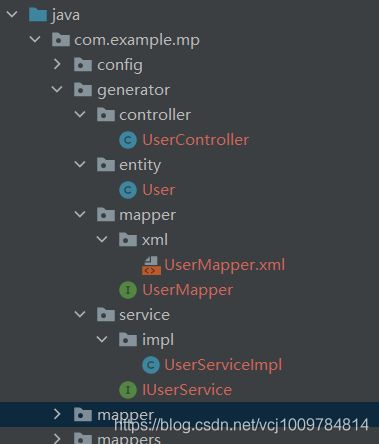
运行后,可以看到生成了如下图所示的全套代码
高级功能
高级功能的演示需要用到一张新的表
user2DROP TABLE IF EXISTS user2; CREATE TABLE user2 ( id BIGINT(20) PRIMARY KEY NOT NULL COMMENT '主键id', name VARCHAR(30) DEFAULT NULL COMMENT '姓名', age INT(11) DEFAULT NULL COMMENT '年龄', email VARCHAR(50) DEFAULT NULL COMMENT '邮箱', manager_id BIGINT(20) DEFAULT NULL COMMENT '直属上级id', create_time DATETIME DEFAULT NULL COMMENT '创建时间', update_time DATETIME DEFAULT NULL COMMENT '修改时间', version INT(11) DEFAULT '1' COMMENT '版本', deleted INT(1)