网络安装系统0x01
autoinstall-kickstart-01
- 安装DHCP服务
- 安装TFTP服务
- 安装HTTP服务
- 其它配置
-
- 创建HTTP站点发布的挂载点
- 配置支持PXE的启动程序
-
- PXE引导配置(bootstrap)
本次测试都是 vm 虚拟机上测试,需要用到vm
安装DHCP服务
先检查是否安装了dhcp服务,命令如下。
// An highlighted block
[root@localhost ~]# rpm -ql  dhcp
/etc/NetworkManager
/etc/NetworkManager/dispatcher.d
/etc/NetworkManager/dispatcher.d/12-dhcpd
/etc/dhcp/dhcpd.conf                #本次需要设置这里的配置文件
/etc/dhcp/dhcpd6.conf
/etc/dhcp/scripts
/etc/dhcp/scripts/README.scripts
/etc/openldap/schema/dhcp.schema
/etc/sysconfig/dhcpd
------------------------------------------
  **其中/etc/目录下面为:配置文件;启动脚本**
------------------------------------------
/usr/bin/omshell
/usr/lib/systemd/system/dhcpd.service
/usr/lib/systemd/system/dhcpd6.service
/usr/lib/systemd/system/dhcrelay.service
/usr/sbin/dhcpd
/usr/sbin/dhcrelay
--------------------------------------
      **其中/usr/目录下面为:命令**
--------------------------------------
/usr/share/doc/dhcp-4.2.5
/usr/share/doc/dhcp-4.2.5/dhcpd.conf.example
/usr/share/doc/dhcp-4.2.5/dhcpd6.conf.example
/usr/share/doc/dhcp-4.2.5/ldap
/usr/share/doc/dhcp-4.2.5/ldap/README.ldap
/usr/share/doc/dhcp-4.2.5/ldap/dhcp.schema
/usr/share/doc/dhcp-4.2.5/ldap/dhcpd-conf-to-ldap
/usr/share/man/man1/omshell.1.gz
/usr/share/man/man5/dhcpd.conf.5.gz
/usr/share/man/man5/dhcpd.leases.5.gz
/usr/share/man/man8/dhcpd.8.gz
/usr/share/man/man8/dhcrelay.8.gz
/usr/share/systemtap/tapset/dhcpd.stp
------------------------------------------------
  **其中/usr/share/目录下面为:参考文件;帮助文件**
------------------------------------------------
/var/lib/dhcpd
/var/lib/dhcpd/dhcpd.leases   #基线信息文件
/var/lib/dhcpd/dhcpd6.leases  #基线信息文件
-------------------------------------------
  **其中/var/目录下面为:库文件;**
-------------------------------------------
查看dhcpd.cfg配置文件
[root@localhost ~]# vi /etc/dhcp/dhcpd.conf

#
# DHCP Server Configuration file.
#   see /usr/share/doc/dhcp*/dhcpd.conf.example
#   see dhcpd.conf(5) man page
subnet 192.168.192.0 netmask 255.255.255.0 {
     range 192.168.192.100 192.168.192.200;   #可分配的起始结束IP
    option subnet-mask 255.255.255.0;	#设定netmask
    default-lease-time 21600;					#设置默认的IP租期
    max-lease-time 43200;						#设置最大的IP租期
    next-server 192.168.198.136;		#告知客户端TFTP服务器的IP
    filename "/pxelinux.0";	#告知客户端从TFTP根目录下载pxelinux.0文件
}
启动DHCP服务
[root@localhost ~]# systemctl start dhcpd.service
[root@localhost ~]# systemctl status dhcpd.service
● dhcpd.service - DHCPv4 Server Daemon
   Loaded: loaded (/usr/lib/systemd/system/dhcpd.service; disabled; vendor preset: disabled)
   Active: active (running) since Wed 2022-04-27 05:29:17 EDT; 12s ago
     Docs: man:dhcpd(8)
           man:dhcpd.conf(5)
 Main PID: 1688 (dhcpd)
   Status: "Dispatching packets..."
   CGroup: /system.slice/dhcpd.service
           └─1688 /usr/sbin/dhcpd -f -cf /etc/dhcp/dhcpd.conf -user dhcpd -group dhcpd --no-pid

Apr 27 05:29:17 localhost.localdomain dhcpd[1688]: Internet Systems Consortium DHCP Server 4.2.5
Apr 27 05:29:17 localhost.localdomain dhcpd[1688]: Copyright 2004-2013 Internet Systems Consortium.
Apr 27 05:29:17 localhost.localdomain dhcpd[1688]: All rights reserved.
Apr 27 05:29:17 localhost.localdomain dhcpd[1688]: For info, please visit https://www.isc.org/software/dhcp/
Apr 27 05:29:17 localhost.localdomain dhcpd[1688]: Not searching LDAP since ldap-server, ldap-port and ldap-base-dn were not specified in the config file
Apr 27 05:29:17 localhost.localdomain dhcpd[1688]: Wrote 0 leases to leases file.
Apr 27 05:29:17 localhost.localdomain dhcpd[1688]: Listening on LPF/ens33/00:0c:29:fe:b9:9f/192.168.192.0/24
Apr 27 05:29:17 localhost.localdomain dhcpd[1688]: Sending on   LPF/ens33/00:0c:29:fe:b9:9f/192.168.192.0/24
Apr 27 05:29:17 localhost.localdomain dhcpd[1688]: Sending on   Socket/fallback/fallback-net
Apr 27 05:29:17 localhost.localdomain systemd[1]: Started DHCPv4 Server Daemon.
[root@localhost ~]# cat /etc/dhcp/dhcpd
dhcpd6.conf  dhcpd.conf
[root@localhost ~]# cat /etc/dhcp/dhcpd.conf
#
# DHCP Server Configuration file.
#   see /usr/share/doc/dhcp*/dhcpd.conf.example
#   see dhcpd.conf(5) man page
subnet 192.168.192.0 netmask 255.255.255.0 {
	range 192.168.192.100 192.168.192.200;
	option subnet-mask 255.255.255.0;
	default-lease-time 21600;
	max-lease-time 43200;
	next-server 192.168.198.136;
	filename "/pxelinux.0";
}
查看DHCP网络监听的端口
[root@localhost ~]# netstat -tulpn | grep dhcpd
udp        0      0 0.0.0.0:67        0.0.0.0:*        1725/dhcpd
安装TFTP服务
先检查是否安装了tftp服务,命令如下。
[root@localhost ~]# rpm -ql tftp-server
/etc/xinetd.d/tftp
/usr/lib/systemd/system/tftp.service
/usr/lib/systemd/system/tftp.socket
/usr/sbin/in.tftpd
/usr/share/doc/tftp-server-5.2
/usr/share/doc/tftp-server-5.2/CHANGES
/usr/share/doc/tftp-server-5.2/README
/usr/share/doc/tftp-server-5.2/README.security
/usr/share/man/man8/in.tftpd.8.gz
/usr/share/man/man8/tftpd.8.gz
/var/lib/tftpboot
如果没有安装
yum -y install tftp-server
查看TFTP的配置文件
[root@localhost ~]# cat /etc/xinetd.d/tftp
# default: off
# description: The tftp server serves files using the trivial file transfer \
#	protocol.  The tftp protocol is often used to boot diskless \
#	workstations, download configuration files to network-aware printers, \
#	and to start the installation process for some operating systems.
service tftp
{
	socket_type		= dgram
	protocol		= udp
	wait			= yes
	user			= root
	server			= /usr/sbin/in.tftpd
	server_args		= -s /var/lib/tftpboot
	disable			= yes
	per_source		= 11
	cps			= 100 2
	flags			= IPv4
}
[root@localhost ~]#
这个配置文件中我们需要把 disable 这项改成no然后重新tftp服务,但重启后发现服务依旧启动不起来,没有对应服务的监听端口
systemctl restart tftp.service
[root@localhost ~]# netstat -tulpn
Active Internet connections (only servers)
Proto Recv-Q Send-Q Local Address           Foreign Address         State       PID/Program name
tcp        0      0 0.0.0.0:22              0.0.0.0:*               LISTEN      932/sshd
tcp        0      0 127.0.0.1:25            0.0.0.0:*               LISTEN      1140/master
tcp6       0      0 :::22                   :::*                    LISTEN      932/sshd
tcp6       0      0 ::1:25                  :::*                    LISTEN      1140/master
udp        0      0 0.0.0.0:67              0.0.0.0:*                           1725/dhcpd
udp        0      0 0.0.0.0:68              0.0.0.0:*                           720/dhclient
udp        0      0 127.0.0.1:323           0.0.0.0:*                           646/chronyd
udp6       0      0 :::69                   :::*                                1/systemd
udp6       0      0 ::1:323                 :::*                                646/chronyd
接着BAIDU查询得知centos 7 安装tftp-server服务还需要安装 xinetd服务
xinetd即extended internet daemon,xinetd是新一代的网络守护进程服务程序,又叫超级Internet服务器。经常用来管理多种轻量级Internet服务
yum -y install xinetd
[root@localhost ~]# rpm -ql xinetd
/etc/sysconfig/xinetd
/etc/xinetd.conf
/etc/xinetd.d/chargen-dgram
/etc/xinetd.d/chargen-stream
/etc/xinetd.d/daytime-dgram
/etc/xinetd.d/daytime-stream
/etc/xinetd.d/discard-dgram
/etc/xinetd.d/discard-stream
/etc/xinetd.d/echo-dgram
/etc/xinetd.d/echo-stream
/etc/xinetd.d/tcpmux-server
/etc/xinetd.d/time-dgram
/etc/xinetd.d/time-stream
/usr/lib/systemd/system/xinetd.service
/usr/sbin/xinetd
/usr/share/doc/xinetd-2.3.15
/usr/share/doc/xinetd-2.3.15/CHANGELOG
/usr/share/doc/xinetd-2.3.15/COPYRIGHT
/usr/share/doc/xinetd-2.3.15/README
/usr/share/doc/xinetd-2.3.15/empty.conf
/usr/share/doc/xinetd-2.3.15/sample.conf
/usr/share/man/man5/xinetd.conf.5.gz
/usr/share/man/man5/xinetd.log.5.gz
/usr/share/man/man8/xinetd.8.gz
[root@localhost ~]# systemctl start xinetd.service
[root@localhost ~]# netstat -tunlp | grep xinetd
udp        0      0 0.0.0.0:69              0.0.0.0:*                           4468/xinetd
[root@localhost ~]#
这时才算正常启动了,后百度知道
tftp服务必须依赖xinetd服务,xinetd服务是:网络守护进程服务程序
xinetd即extended internet daemon
安装HTTP服务
先查看http服务是否安装
[root@localhost ~]# rpm -ql httpd
/etc/httpd
/etc/httpd/conf
/etc/httpd/conf.d
/etc/httpd/conf.d/README
/etc/httpd/conf.d/autoindex.conf
/etc/httpd/conf.d/userdir.conf
/etc/httpd/conf.d/welcome.conf
/etc/httpd/conf.modules.d
/etc/httpd/conf.modules.d/00-base.conf
/etc/httpd/conf.modules.d/00-dav.conf
/etc/httpd/conf.modules.d/00-lua.conf
/etc/httpd/conf.modules.d/00-mpm.conf
/etc/httpd/conf.modules.d/00-proxy.conf
/etc/httpd/conf.modules.d/00-systemd.conf
/etc/httpd/conf.modules.d/01-cgi.conf
/etc/httpd/conf/httpd.conf
/etc/httpd/conf/magic
/etc/httpd/logs
/etc/httpd/modules
/etc/httpd/run
/etc/logrotate.d/httpd
/etc/sysconfig/htcacheclean
/etc/sysconfig/httpd
......
我们查看http服务配置文件,配置文件有几百行,我们主要要关心的设置是
ServerName 这里的配置
[root@localhost ~]# grep ServerName -n /etc/httpd/conf/httpd.conf
89:# ServerName gives the name and port that the server uses to identify itself.
95:#ServerName www.example.com:80
这里看到的是默认的配置我们需要改下,修改后查看
[root@localhost ~]# sed -i "95i ServerName 127.0.0.1:80" /etc/httpd/conf/httpd.conf
[root@localhost ~]# grep ServerName -n /etc/httpd/conf/httpd.conf
89:# ServerName gives the name and port that the server uses to identify itself.
95:ServerName 127.0.0.1:80
96:#ServerName www.example.com:80
[root@localhost ~]#
接着我们启动http服务,并查看服务是否有监听
[root@localhost ~]# systemctl start httpd.service
[root@localhost ~]# netstat -tulnp | grep httpd
tcp6       0      0 :::80       :::*     LISTEN      6761/httpd
然后网页打开测试

是可以打开的
以上三个服务安装完成,然后我再做其它配置
其它配置
创建HTTP站点发布的挂载点
在HTTP配置文件中有一项是Directory 设置参数
[root@localhost ~]# grep var  /etc/httpd/conf/httpd.conf
DocumentRoot "/var/www/html"
# Relax access to content within /var/www.

                     ==就这里==
    ScriptAlias /cgi-bin/ "/var/www/cgi-bin/"
# "/var/www/cgi-bin" should be changed to whatever your ScriptAliased

    #AddHandler type-map var
    # The mod_mime_magic module allows the server to use various hints from the
创建挂载发布centos镜像的目录先
[root@localhost ~]# mkdir -p /var/www/html/Centos-7x
[root@localhost ~]# ls -n /var/www/html/
total 0
drwxr-xr-x. 2 0 0 6 Apr 27 07:55 Centos-7x
[root@localhost ~]#
检查光驱是否有镜像–这里是虚拟机,是在设置里面查看的如下图

这时需要挂载我们的镜像挂载到我们的目录 ,并查看是否挂载成功
[root@localhost ~]# mount /dev/cdrom /var/www/html/Centos-7x/
mount: /dev/sr0 is write-protected, mounting read-only
[root@localhost ~]# df -hP
Filesystem               Size  Used Avail Use% Mounted on
devtmpfs                 898M     0  898M   0% /dev
tmpfs                    910M     0  910M   0% /dev/shm
tmpfs                    910M  9.6M  901M   2% /run
tmpfs                    910M     0  910M   0% /sys/fs/cgroup
/dev/mapper/centos-root   20G  1.5G   19G   8% /
/dev/sda1                253M  132M  122M  52% /boot
tmpfs                    182M     0  182M   0% /run/user/0
/dev/sr0                 4.4G  4.4G     0 100% /var/www/html/Centos-7x
[root@localhost ~]#
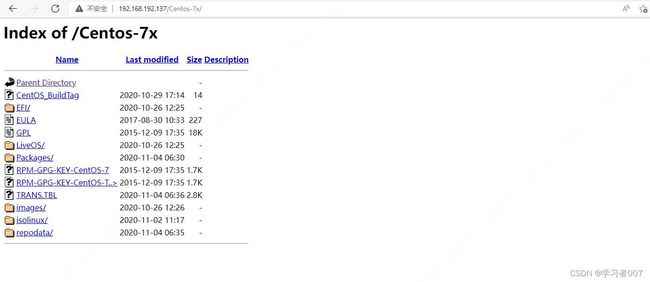
挂载完了后,我们可以看看HTTP能否正常发布我挂载的目录–镜像如下图
配置支持PXE的启动程序
PXE引导配置(bootstrap)
syslinux是一个功能强大的引导加载程序,而且兼容各种介质。syslinux是一个小型的linux操作系统,它的目的是简化首次安装linux的时间,并建立维护或其它特殊用途的启动盘。如果没有找到pxelinux.o这个文件,可以安装一下。
[root@localhost ~]# yum -y install syslinux
Loaded plugins: fastestmirror
Loading mirror speeds from cached hostfile
 * base: mirrors.aliyun.com
 * extras: mirrors.aliyun.com
 * updates: mirrors.cn99.com
Package syslinux-4.05-15.el7.x86_64 already installed and latest version
Nothing to do
接着复制启动菜单程序文件 pxelinux.0
但是我们要复制到哪里呢,首先网络安装系统时,服务器启动后就加载BIOS启动程序,然后选择的引导的是网络,这时我们创建的DHCP就会分配一个IP到服务器,DHCP的功能发挥完了就需要加载系统了,这时就需要 TFTP提供系统,所以我们就把最小系统放到TFTP的工作目录供服务器加载,所以我们这里是需要把这些启动程序都复制到TFTP的工作目录,那TFTP的工作目录是哪呢?我们可以通过TFTP的配置文件中可以看到,如下图
[root@localhost ~]# cat -n /etc/xinetd.d/tftp
     1	# default: off
     2	# description: The tftp server serves files using the trivial file transfer \
     3	#	protocol.  The tftp protocol is often used to boot diskless \
     4	#	workstations, download configuration files to network-aware printers, \
     5	#	and to start the installation process for some operating systems.
     6	service tftp
     7	{
     8		socket_type		= dgram
     9		protocol		= udp
    10		wait			= yes
    11		user			= root
    12		server			= /usr/sbin/in.tftpd
    13		server_args		= -s /var/lib/tftpboot      #这里就是TFTP的工作目录
    14		disable			= no
    15		per_source		= 11
    16		cps			= 100 2
    17		flags			= IPv4
    18	}
接着复制启动程序文件到TFTP工作目录,其中分两个地方来复制,一个是pxelinux.0文件,还有是isolinux文件下的所有内容,这个可以从我们刚才挂载的光驱中复制 目录是 /var/www/html/Centos-7x ;我们复制后查看下,这些是系统运行的必须文件.
[root@localhost ~]# cp /usr/share/syslinux/pxelinux.0 /var/lib/tftpboot/
[root@localhost ~]# cp -a /var/www/html/Centos-7x/isolinux//* /var/lib/tftpboot/
[root@localhost ~]# ls -al /var/lib/tftpboot/
total 60872
drwxr-xr-x.  2 root root      216 Apr 27 08:40 .
drwxr-xr-x. 28 root root     4096 Apr 27 05:50 ..
-r--r--r--.  1 root root     2048 Nov  4  2020 boot.cat
-rw-r--r--.  1 root root       84 Oct 26  2020 boot.msg
-rw-r--r--.  1 root root      281 Oct 26  2020 grub.conf
-rw-r--r--.  1 root root 55129656 Oct 26  2020 initrd.img
-rw-r--r--.  1 root root    24576 Nov  3  2020 isolinux.bin
-rw-r--r--.  1 root root     3032 Oct 26  2020 isolinux.cfg
-rw-r--r--.  1 root root   190896 Nov  5  2016 memtest
-rw-r--r--.  1 root root    26759 Apr 27 08:40 pxelinux.0
-rw-r--r--.  1 root root      186 Sep 30  2015 splash.png
-r--r--r--.  1 root root     2215 Nov  4  2020 TRANS.TBL
-rw-r--r--.  1 root root   153104 Oct 30  2018 vesamenu.c32
-rwxr-xr-x.  1 root root  6769256 Oct 19  2020 vmlinuz
做完上面工作后还需要
新建一个pxelinux.cfg目录,存放客户端(就是要安装系统的服务器)的配置文件
[root@localhost ~]# cp /usr/share/syslinux/pxelinux.0 /var/lib/tftpboot/
[root@localhost ~]# cp -a /var/www/html/Centos-7x/isolinux//* /var/lib/tftpboot/
[root@localhost ~]# ls -al /var/lib/tftpboot/
total 60872
drwxr-xr-x.  2 root root      216 Apr 27 08:40 .
drwxr-xr-x. 28 root root     4096 Apr 27 05:50 ..
-r--r--r--.  1 root root     2048 Nov  4  2020 boot.cat
-rw-r--r--.  1 root root       84 Oct 26  2020 boot.msg
-rw-r--r--.  1 root root      281 Oct 26  2020 grub.conf
-rw-r--r--.  1 root root 55129656 Oct 26  2020 initrd.img
-rw-r--r--.  1 root root    24576 Nov  3  2020 isolinux.bin
-rw-r--r--.  1 root root     3032 Oct 26  2020 isolinux.cfg
-rw-r--r--.  1 root root   190896 Nov  5  2016 memtest
-rw-r--r--.  1 root root    26759 Apr 27 08:40 pxelinux.0
-rw-r--r--.  1 root root      186 Sep 30  2015 splash.png
-r--r--r--.  1 root root     2215 Nov  4  2020 TRANS.TBL
-rw-r--r--.  1 root root   153104 Oct 30  2018 vesamenu.c32
-rwxr-xr-x.  1 root root  6769256 Oct 19  2020 vmlinuz
[root@localhost ~]# clear
[root@localhost ~]# mkdir -p /var/lib/tftpboot/pxelinux.cfg
[root@localhost ~]# cp /var/www/html/Centos-7x/isolinux/isolinux.cfg /var/lib/tftpboot/pxelinux.cfg/default
[root@localhost ~]# cat /var/lib/tftpboot/pxelinux.cfg/default
default vesamenu.c32
timeout 600

display boot.msg

# Clear the screen when exiting the menu, instead of leaving the menu displayed.
# For vesamenu, this means the graphical background is still displayed without
# the menu itself for as long as the screen remains in graphics mode.
menu clear
menu background splash.png
menu title CentOS 7
menu vshift 8
menu rows 18
menu margin 8
#menu hidden
menu helpmsgrow 15
menu tabmsgrow 13

# Border Area
menu color border * #00000000 #00000000 none

# Selected item
menu color sel 0 #ffffffff #00000000 none

# Title bar
menu color title 0 #ff7ba3d0 #00000000 none

# Press [Tab] message
menu color tabmsg 0 #ff3a6496 #00000000 none

# Unselected menu item
menu color unsel 0 #84b8ffff #00000000 none

# Selected hotkey
menu color hotsel 0 #84b8ffff #00000000 none

# Unselected hotkey
menu color hotkey 0 #ffffffff #00000000 none

# Help text
menu color help 0 #ffffffff #00000000 none

# A scrollbar of some type? Not sure.
menu color scrollbar 0 #ffffffff #ff355594 none

# Timeout msg
menu color timeout 0 #ffffffff #00000000 none
menu color timeout_msg 0 #ffffffff #00000000 none

# Command prompt text
menu color cmdmark 0 #84b8ffff #00000000 none
menu color cmdline 0 #ffffffff #00000000 none

# Do not display the actual menu unless the user presses a key. All that is displayed is a timeout message.

menu tabmsg Press Tab for full configuration options on menu items.

menu separator # insert an empty line
menu separator # insert an empty line

label linux
  menu label ^Install CentOS 7
  kernel vmlinuz
  append initrd=initrd.img inst.stage2=hd:LABEL=CentOS\x207\x20x86_64 quiet

label check
  menu label Test this ^media & install CentOS 7
  menu default
  kernel vmlinuz
  append initrd=initrd.img inst.stage2=hd:LABEL=CentOS\x207\x20x86_64 rd.live.check quiet

menu separator # insert an empty line

# utilities submenu
menu begin ^Troubleshooting
  menu title Troubleshooting

label vesa
  menu indent count 5
  menu label Install CentOS 7 in ^basic graphics mode
  text help
	Try this option out if you're having trouble installing
	CentOS 7.
  endtext
  kernel vmlinuz
  append initrd=initrd.img inst.stage2=hd:LABEL=CentOS\x207\x20x86_64 xdriver=vesa nomodeset quiet

label rescue
  menu indent count 5
  menu label ^Rescue a CentOS system
  text help
	If the system will not boot, this lets you access files
	and edit config files to try to get it booting again.
  endtext
  kernel vmlinuz
  append initrd=initrd.img inst.stage2=hd:LABEL=CentOS\x207\x20x86_64 rescue quiet

label memtest
  menu label Run a ^memory test
  text help
	If your system is having issues, a problem with your
	system's memory may be the cause. Use this utility to
	see if the memory is working correctly.
  endtext
  kernel memtest

menu separator # insert an empty line

label local
  menu label Boot from ^local drive
  localboot 0xffff

menu separator # insert an empty line
menu separator # insert an empty line

label returntomain
  menu label Return to ^main menu
  menu exit

menu end
到此为止,就可以网络安装系统了,下一篇更新相关配置文件解释
我们对Markdown编辑器进行了一些功能拓展与语法支持,除了标准的Markdown