将linux配置成网关
将linux配置成网关
- 问题描述
- 解决办法
-
- 0.安装iptables服务(必须)
- 1.开发ipv4转发
-
- 1.1启用TCP窗口缩放
- 1.2启用自动MTU
- 1.3禁用ipv6--可选
- 1.4使内核配置生效
- 2.开启SNAT
-
- 2.1设置VPC路由条目
- 3.自动调整mss值
- 4.持久化保存iptabels规则
- 5.禁止cloud-init修改网络配置
- 结果验证
问题描述
如何将Centos7配置成网关;
自建SNAT网关。
解决办法
0.安装iptables服务(必须)
iptabels默认不会以服务运行,iptables策略重启系统后会丢失,想让防火墙策略持久化,就必须要安装iptables服务
# 注销firewall
systemctl mask --now firewalld

# 注销ip6tables服务
systemctl mask --now ip6tables

# 注销ebtables服务
systemctl mask --now ebtables

# 安装iptables服务
yum install -y iptables-services

# 启动iptables服务
systemctl enable --now iptables.service
1.开发ipv4转发
https://blog.csdn.net/omaidb/article/details/122719243
vim /etc/sysctl.d/gateway.conf
# 开启内核开启数据包转发
## 1为开启;0为关闭
net.ipv4.ip_forward = 1
1.1启用TCP窗口缩放
# 启用TCP窗口缩放
## 用于提高 TCP 连接的性能和吞吐量。它允许发送方和接收方在传输数据时使用更大的窗口大小,以支持更高的数据传输速率。
net.ipv4.tcp_window_scaling = 1
1.2启用自动MTU
# 开启动态MTU
net.ipv4.tcp_mtu_probing = 1
1.3禁用ipv6–可选
# 关闭IPV6
## 1为开启;0为关闭
net.ipv6.conf.all.disable_ipv6 = 1
net.ipv6.conf.default.disable_ipv6 = 1
net.ipv6.conf.lo.disable_ipv6 = 1
1.4使内核配置生效
保存后使内核配置生效
# 加载所有的sysctl配置文件
sysctl --system
2.开启SNAT
- 当
网关服务器只有一张网卡的情况时,可以不需要执行这条iptables命令。
# 开启SNAT
## eth0换成实际的网卡
iptables -t nat -A POSTROUTING -o eth0 -j MASQUERADE
- 当
网关服务器有两张网卡时,一张连外网,一张连内网交换机,内网交换机再连接多个子PC,此时iptables就是必须的,且SNAT也必须为外网网卡IP
https://www.cnblogs.com/EasonJim/p/10206728.html
# 多网卡配置
# (不需要设置)可以指定哪个网卡
iptables -t nat -I POSTROUTING -j SNAT --to-source 192.168.104.12
2.1设置VPC路由条目
如果是阿里云的ECS实例,
在VPC的路由表中,添加如下一条路由条目。
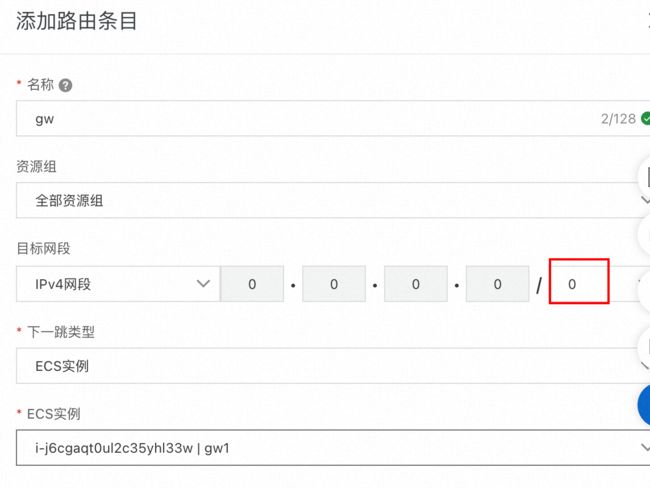
其中目标网段一定要填0.0.0.0/0;
ECS实例选择有公网IP的那个实例。
3.自动调整mss值
如果不执行这一条,会经常出现网站能ping通但打不开网页的问题。
# 自动调整mss值
iptables -A FORWARD -p tcp --tcp-flags SYN,RST SYN -j TCPMSS --clamp-mss-to-pmtu
4.持久化保存iptabels规则
iptabtles服务启动后会自动加载之前保存的iptables规则
# 保存iptables规则
service iptables save
5.禁止cloud-init修改网络配置
阿里云的ECS,默认是无法通过操作系统修改网络的,即使修改了也不会生效,cloud-init会改回阿里云的默认配置。
https://help.aliyun.com/zh/ecs/user-guide/install-cloud-init?spm=a2c4g.750001.0.i1#section-v23-ilz-0cn
# 打开/etc/cloud/cloud.cfg文件
vim /etc/cloud/cloud.cfg

# 在Example datasource config之前增加network的disabled配置
# 禁止cloud-init修改DNS
network:
  config: disabled

# 重启cloud-init服务
systemctl restart cloud-init

结果验证
在内网机器PC2中,
将/etc/sysconfig/network-script/ifcfg-eth0修改为:
BOOTPROTO=static
DEVICE=eth0
ONBOOT=yes
STARTMODE=auto
TYPE=Ethernet
USERCTL=no
# ip地址
IPADDR=172.20.235.120
# 子网掩码
NETMASK=255.255.255.0
GATEWAY=Linux网关IP地址
PEERDNS=no
然后使用这台内网PC2,ping下公网IP地址,如果通了就完成了。
# ping 114
ping 114.114.114.114
