在vue中使用CKEditor4富文本编辑器
本文的目的是为第一次使用CKEditor4的小伙伴能够快速上手,内容也是新手基本的API介绍。英文好的小伙伴也可以移步CKEditor4官网
介绍
用于 HTML 的智能可视文本编辑器
百万人认可。完全可定制。具有最多功能的排名第一的富文本编辑器。
安装
第一步:安装ckeditor4-vue到项目
npm install ckeditor4-vue
这里有必要说一下,发文时所用版本"ckeditor4-vue": “^2.1.1”,不同版本可能会有所差异。
第二步:去下载一个现成的 CKEditor 包
地址:https://ckeditor.com/ckeditor-4/download/

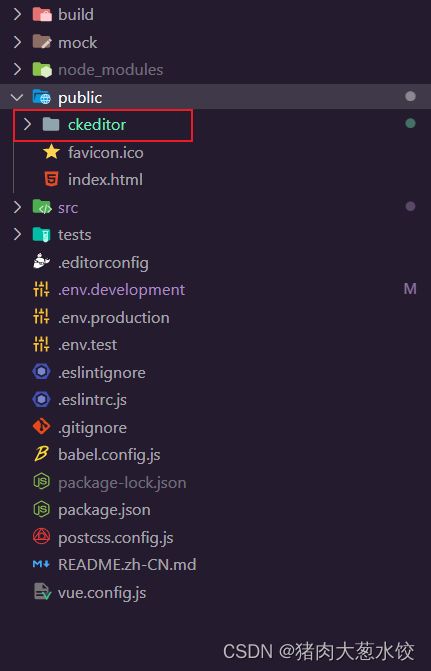
第三步:将压缩包中的ckeditor文件夹放到public中
使用
这里还是建议大家封装成单独组件使用,避免太多配置相关的冗余代码,这里我把我封装好的完整代码放在下面
<template>
  <div>
    <ckeditor
      :id="ckeditorId"
      ref="refCKEditor"
      v-model="editorData"
      :config="editorConfig"
      :read-only="readOnly"
      :throttle="120"
      :editor-url="editorUrl"
      @namespaceloaded="onNamespaceLoaded"
      @ready="onEditorReady"
      @input="onEditorInput"
    />
  </div>
</template>

<script>
import CKEditor from 'ckeditor4-vue'
import { ADDR_VISION_NO_PROJECT } from '@/api/index.js'
import { UPLOAD_DOWN_PATH } from '@/api/index.js'
import { getToken } from '@/utils/auth'
export default {
  name: 'CKEditor',
  components: {
    ckeditor: CKEditor.component // 引入
  },
  props: {
    reportIndex: {
      type: Number,
      default: null
    },
    // 用于区分单个tinymce
    ckeditorId: {
      type: String,
      default: 'ckeditor' + new Date().getTime() + parseInt(Math.random(20))
    },
    value: { // 内容
      type: String,
      default: ''
    },
    readOnly: { // 只读状态(这里说明一下,CKEditor4没有禁用只有只读)
      type: Boolean,
      default: false
    },
    height: { // 富文本高度
      type: Number,
      default: 400
    },
    toolbar: { // 富文本工具栏的相关配置,后续如果增加插件如果只是启用插件不配置工具栏也是不会出现该功能的
      type: Array,
      default: () => {
        return [
          { name: 'document', items: ['Source', '-', 'Save', 'NewPage', 'ExportPdf', 'Preview', 'Print', '-', 'Templates'] },
          { name: 'clipboard', items: ['Cut', 'Copy', 'Paste', 'PasteText', 'PasteFromWord', '-', 'Undo', 'Redo'] },
          { name: 'editing', items: ['Find', 'Replace', '-', 'SelectAll', '-', 'Scayt'] },
          { name: 'forms', items: ['Form', 'Checkbox', 'Radio', 'TextField', 'Textarea', 'Select', 'Button', 'ImageButton', 'HiddenField'] },
          '/',
          { name: 'basicstyles', items: ['Bold', 'Italic', 'Underline', 'Strike', 'Subscript', 'Superscript', '-', 'CopyFormatting', 'RemoveFormat'] },
          { name: 'paragraph', items: ['NumberedList', 'BulletedList', '-', 'Outdent', 'Indent', '-', 'Blockquote', 'CreateDiv', '-', 'JustifyLeft', 'JustifyCenter', 'JustifyRight', 'JustifyBlock', '-', 'BidiLtr', 'BidiRtl', 'Language'] },
          { name: 'links', items: ['Link', 'Unlink', 'Anchor'] },
          { name: 'insert', items: ['Image', 'Table', 'HorizontalRule', 'Smiley', 'SpecialChar', 'PageBreak', 'Iframe'] },
          '/',
          { name: 'styles', items: ['Styles', 'Format', 'Font', 'FontSize'] },
          { name: 'colors', items: ['TextColor', 'BGColor'] },
          { name: 'tools', items: ['Maximize', 'ShowBlocks'] }
        ]
      }
    },
    // 启动插件
    extraPlugins: { // 这里的插件主要是非自带的插件需要先在这里启用再添加到上边的工具里
      type: String,
      default: 'quicktable,notification,tableresizerowandcolumn,editorplaceholder,autogrow,image2,uploadimage,filebrowser'
    },
    // 删除工具栏的功能
    removeButtons: { // 一些不需要的功能可以在这里删除,主要是针对自带的功能,如果是非自带的直接不启动插件就好了
      type: String,
      default: ''
      // default: 'Source,Save,NewPage,ExportPdf,Preview,Print,Templates,Cut,Copy,Paste,PasteText,PasteFromWord,Undo,Redo,Replace,Find,SelectAll,Scayt,Form,Checkbox,Radio,TextField,Textarea,Select,Button,ImageButton,HiddenField,Subscript,Superscript,CopyFormatting,Outdent,Indent,CreateDiv,Blockquote,BidiLtr,BidiRtl,Language,Unlink,Link,Anchor,HorizontalRule,Smiley,SpecialChar,PageBreak,Iframe,Styles,ShowBlocks,About,Font'
    },
    autoGrowMinHeight: {
      type: Number,
      default: 200 // 自动增长最小高度,
    },
    autoGrowMaxHeight: {
      type: Number,
      default: 0 // 自动增长最大高度
    },
    editorplaceholder: { // 类似input的placeholder
      type: String,
      default: '请输入内容...'
    },
    // 上传图片地址
    imgUploadUrl: { // 这里是配置图片的上传地址,这里要写完整路径
      type: String,
      default: process.env.VUE_APP_BASE_API + ADDR_VISION_NO_PROJECT + '/stars/base/upload'
    },
    // 删除插件
    removePlugins: { // 主要是删除自带的付费插件,避免报错和警告
      type: String,
      default: 'exportpdf,easyimage,cloudservices'
    }
  },
  data() {
    return {
      editorData: '',
      ckeditor: null,
      editorUrl: '../ckeditor/ckeditor.js', // 将指令的值更改为指向所需的 CKEditor 4 脚本位置来更改
      editorConfig: {
        contentsCss: ['/ckeditor/css/ckeditor.css'], // 配置样式相关的文件,如果有精力完全可以自定义全部样式
        language: 'zh-cn',
        height: this.height,
        toolbar: this.toolbar,
        extraPlugins: this.extraPlugins,
        autoGrow_minHeight: this.autoGrowMinHeight,
        autoGrow_maxHeight: this.autoGrowMaxHeight,
        editorplaceholder: this.editorplaceholder,
        removeButtons: this.removeButtons,
        removePlugins: this.removePlugins,
        pasteFromWordRemoveFontStyles: true, // 保证word导入格式
        pasteFromWordRemoveStyles: false, // 粘贴从Word删除样式
        forcePasteAsPlainText: false, // 是否强制复制来的内容去除格式
        allowedContent: true, // 允许所有格式
        filebrowserImageUploadUrl: this.imgUploadUrl, // 上传地址
        on: {
          // 这里可以绑定一些方法获取到不同生命周期或不同时机触发的回调,具体根据自身需求查阅文档
          instanceReady: this.instanceReady // 创建 CKEDITOR 实例、完全初始化并准备好交互时触发的事件。
        }
      },
      notError: true,
      num: 0
    }
  },
  watch: {
    value: {
      handler: function(newV, oldV) {
        this.editorData = newV
      },
      deep: true,
      immediate: true
    }
  },
  methods: {
    // 当编辑器加载成功后调用
    onNamespaceLoaded(CKEDITOR) {
      // 这里算是我个人在实现功能的时候想到的一个比较鸡贼的小技巧吧,
      // 因为自定义的插件都放在public目录下所以没办法获取到vue的实例,请求数据也比较麻烦
      // 所以可以在编辑器加载成功后将数据或者方法添加到CKEDITOR实例中,通过CKEDITOR实例获取数据或者方法
      // 另外提醒大家一下,这里只有第一次初始化成功后才会触发
      // CKEDITOR.getDicData = this.dictFilter
    },
    instanceReady(evt) {
      // 这里和上面有些不同的是每次加载编辑器成功后都会触发回调
    },
    // 触发上传事件
    onEditorReady() {
      const _this = this
      const editor = _this.$refs.refCKEditor.instance
      const upload = editor.uploadRepository
      let fileInfo = {}
      upload.on('instanceCreated', evt => {
        this.num = 0
        this.notError = true
        const { file } = evt.data
        fileInfo = file
        const isLt1M = file.size / 1024 / 1024 < 1 // 小于1M
        const fileType = file.type.substring(
          file.type.lastIndexOf('/') + 1,
          file.type.length
        )
        const type =
          fileType == 'jpg' ||
          fileType == 'jpeg' ||
          fileType == 'png' ||
          fileType == 'JPG' ||
          fileType == 'JPEG'
        if (!type) {
          _this.$message.error(
            '上传图片只能是jpg 、 jpeg 、 png 、 JPG 、 JPEG格式!'
          )
        } else if (!isLt1M) {
          _this.$message.error('上传失败,图片不可超过1MB!')
        }
        if (type && isLt1M) {
          this.notError = true
        } else {
          this.notError = false
          throw new Error('上传内容不符合条件!') // 手动抛出异常可以解决手动多次上传按钮失效问题
        }
        this.num = 1
      })
      editor.on('fileUploadRequest', evt => {
        const fileLoader = evt.data.fileLoader
        const { xhr, file } = fileLoader
        // do {
        //   console.log("fileUploadRequest---do");
        // } while (this.num < 1);
        // 阻止混合复制时发送请求
        if (this.notError) {
          const formData = new FormData()
          xhr.open('post', this.imgUploadUrl)
          xhr.setRequestHeader(
            'Authorization',
            `Bearer${getToken()}`
          )
          formData.append('fileName', fileInfo)
          const nameCh = fileInfo.name.substring(0, fileInfo.name.lastIndexOf('.'))
          formData.append('nameCh', nameCh)
          // formData.append('file', file)
          xhr.send(formData)
          evt.stop()
        }
        evt.stop()
        evt.cancel()
      })
      editor.on('fileUploadResponse', evt => {
        evt.stop()
        const xhr = evt.data.fileLoader.xhr
        const res = JSON.parse(xhr.responseText)
        // 自己处理返回逻辑
        if (res.code == 100) {
          evt.data.url = UPLOAD_DOWN_PATH + res.content.filePath
          this.openSuccessTip('上传成功')
        } else {
          this.$message.error(res.msg)
          evt.cancel()
        }
      })
    },
    onEditorInput(e) { // 类似input的input事件
      this.$emit('input', e)
      this.$emit('eventHandle', {
        type: 'change',
        data: e,
        reportIndex: this.reportIndex
      })
    },
    // 提示
    openSuccessTip(text) {
      this.$message({
        message: text,
        type: 'success'
      })
    }
  }
}
</script>
<style lang="scss">
.el-message--error {
  z-index: 10011 !important;
}
</style>
这里特别提醒各位小伙伴,如果你是完全复制我上边的文件可能会报错,需要修改一下文件上传地址,以及引入一些插件,如果你不需要也可以删除这些插件,不过我个人觉得还是几个挺方便好用的插件,可以提升一些用户体验
    // 启动插件
    extraPlugins: {
      type: String,
      default: '', // 如果不需要可以不启用任何插件,这完全不会影响功能本身
      // default: 'quicktable,notification,tableresizerowandcolumn,editorplaceholder,autogrow,image2,uploadimage,filebrowser'
    },
如果想要安装这些插件可以去官方的组件库搜索这些插件,官方对这些也都有介绍我就不做过多的赘述了
- quicktable
- notification
- tableresizerowandcolumn
- editorplaceholder
- autogrow
- image2
- uploadimage
- filebrowser
下载的时候会提示文件要放到哪个路径下,已经启用的名称,如果无法启用,或者启用报错也要查看插件依赖的插件是否已安装
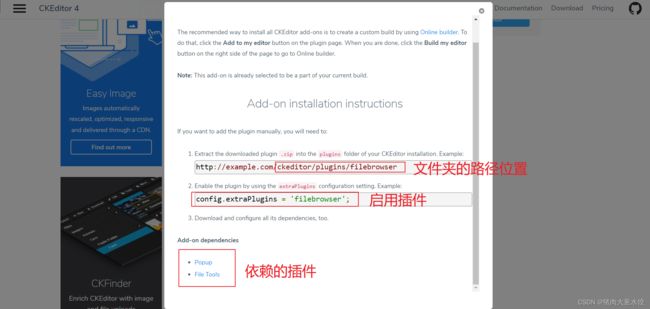
把下载好的文件放入指定的目录启用即可以,一般就是放在public\ckeditor\plugins文件夹中,这里面主要放的都是下载的插件以及自定义的插件,关于自定义插件我也会用另一篇文件去介绍,同样非常简单。
CKEditor4添加自定义按钮,创建自定义插件
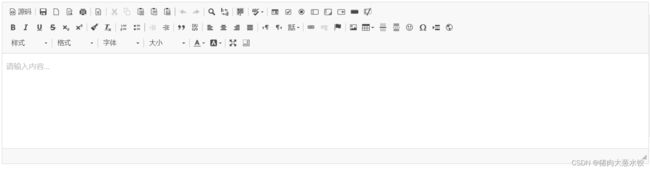
看到这里基本使用已经完成了,我们只需要在对应的地方引入组件就能在页面看到效果了。
<template>
  <!-- 使用v-model就可以获取到富文本的值 -->
  <CKEditor ref="ckeditor" v-model="ckeditorData" />
</template>
<script>
import CKEditor from '@/components/CKEditor/index.vue'
export default {
  components: {
    CKEditor
  },
  data() {
    return {
      ckeditorData: ''
    }
  }
}
</script>
以上只是基本的使用,更多的API及使用方法可以移步CKEditor4官网。
结尾
如果这篇文章对你有用欢迎点赞、收藏、评论,如果有任何问题、意见和建议可以在评论区互相交流学习