Xray 使用手册
目录
- 下载安装
- 参数详解
-
- 模式选择
- webscan 参数介绍
- 初级使用手册
-
- 简单的漏扫命令
- 使用HTTP代理的被动扫描
- 对指定单一URL进行扫描
- 指定本次扫描使用的插件
- burp联动
- AWVS 联动
下载安装
下载地址 https://github.com/chaitin/xray/releases
安装 没什么好说的,解压就行,解压之后把原本的 xray_windows_amd64.exe 改名为 xray.exe,方便之后调用
导入证书:命令行执行xray genca 之后导入生成的证书就行了,和导入burp证书一样
Google浏览器 设置 -> 搜索"证书" -> 管理证书 -> 受信任的根证书颁发机构 -> 导入 -> 选择证书之后一路下一步
FireFox settings -> Privacy & Security -> 一路往下找到 view Certificates -> Authorities -> import -> 选择证书之后一路下一步就行
xray 修改白名单
编辑 xray 目录下的 config.yaml 文件,在140行的位置添加 - '*' 允许扫描所有域和path
参数详解
模式选择
webscan, ws        Run a webscan task
					运行一个web扫描任务
servicescan, ss    Run a service scan task
					运行一个服务扫描任务
subdomain, sd      Run a subdomain task
					运行一个子域任务
poclint, pl, lint  lint yaml poc
					检查POC中的不规范的地方
burp-gamma, btg    Convert the export file of burp historical proxy records to POC format
					将burp历史代理记录的导出文件转换为POC格式
transform          transform other script to gamma
					将其他脚本转换为gamma,没太懂啥意思
reverse            Run a standalone reverse server
					运行一个单独的反连服务,应该是用来解决无回显的,没用过
convert            convert results from json to html or from html to json
					将结果在 json 或 html 之间转换
genca              GenerateToFile CA certificate and key
					生成一个CA证书及key,和bp的那个导出证书一样的效果
upgrade            check new version and upgrade self if any updates found
					检查并更新新版本
version            Show version info
					显示版本信息
x                  A command that enables all plugins
					一个命令使所有插件可用
webscan 参数介绍
--list, -l  list plugins
			列出插件
--plugins value, --plugin value, --plug value  specify the plugins to run, separated by ','
			指定运行的插件,用逗号分隔
--poc value, -p value   specify the poc to run, separated by ','
			指定运行的POC,用逗号分隔
--level value           specify the level of poc to run, separated by ','
			指定POC运行等级,用逗号分隔
--tags value            specify the level of poc to run, separated by ','
			同上
--listen value          use proxy resource collector, value is proxy addr, (example: 127.0.0.1:1111)
			监听指定地址(如本地1111端口,需要提前在浏览器或bp设置相应的代理)
--basic-crawler value, --basic value    use a basic spider to crawl the target and scan the requests
			使用基本的爬虫爬取目标并扫错请求
--browser-crawler value, --browser value    use a browser spider to crawl the target and scan the requests
			使用浏览器爬虫爬取目标并扫错请求
--url-file value, --uf value     read urls from a local file and scan these urls, one url per line
			从本地文件中获取要扫描的URL并扫描,每行一个URL
--burp-file value, --bf value    read requests from burpsuite exported file as targets
			从bp导出的文件里读取请求作为目标
--url value, -u value           scan a **single** url
			扫描一个单一的URL
--data value, -d value          data string to be sent through POST (e.g. 'username=admin')
			通过POST方法发送数据字符串
--raw-request FILE, --rr FILE    load http raw request from a FILE
			从文件中加载原始的http请求
--force-ssl, --fs                force usage of SSL/HTTPS for raw-request
			强制原始请求使用SSL/HTTPS
--json-output FILE, --jo FILE    output xray results to FILE in json format
			输出以json格式输出xray报告
--html-output FILE, --ho FILE    output xray result to FILE in HTML format
			输出以html格式输出xray报告
--webhook-output value, --wo value    post xray result to url in json format
			将json格式的报告发送到指定URL
初级使用手册
简单的漏扫命令
xray webscan --basic-crawler http://xxxx.com --html-output xxxx.html
使用HTTP代理的被动扫描
需要在浏览器设置代理为 127.0.0.1:7777 这一步骤和设置 burp 代理是一样的,之后使用浏览器访问网页,xray 就可以自动分析流量并扫描
xray webscan --listen 127.0.0.1:7777 --html-output xxx.html
对指定单一URL进行扫描
xray webscan --url http://xxxx.com/?a=b --html-output single-url.html
指定本次扫描使用的插件
xray 默认启用所有内置插件,可以使用以下命令指定本次扫描使用的插件
xray webscan --plugins cmd_injection,sqldet --url http://xxxx.com
burp联动
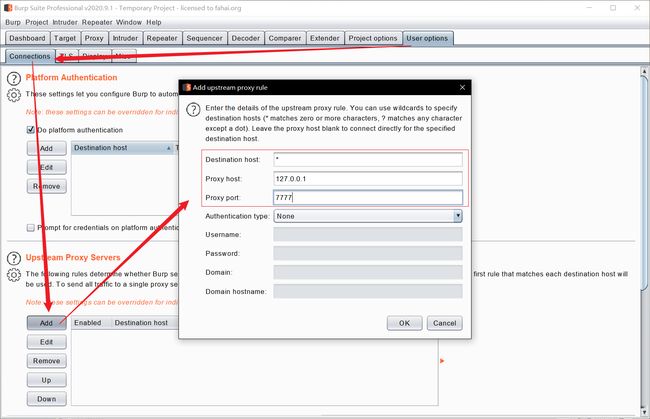
burp 添加上级代理
老版本 user options -> Connections -> Upstream proxy servers -> add -> Destination host = * ;Proxy host = 127.0.0.1 ;Proxy port = 7777
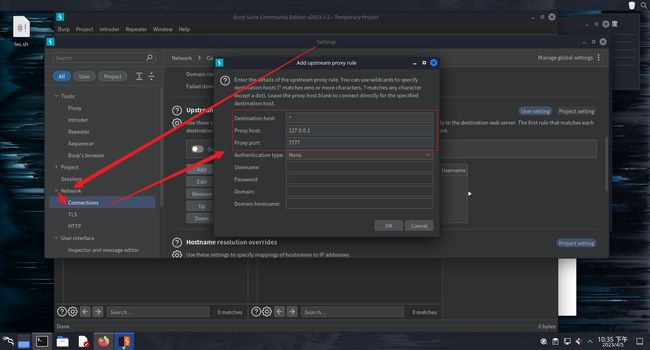
2023版 setting -> Network -> connections -> 后边的和老版本一样
AWVS 联动
awvs 的爬虫很好用,支持表单分析和单页应用的爬取,xray 的扫描能力比较强,速度也更快。awvs 和 xray 搭配使用岂不是更香
联动步骤:
-
xray开启被动代理
./xray webscan --listen 0.0.0.0:7777 --html-output xxx.html -
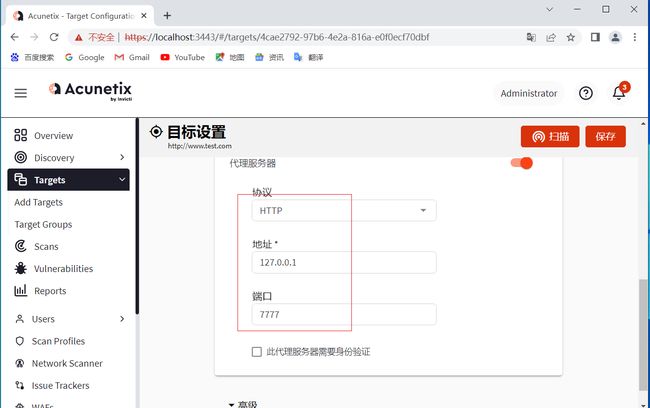
AWVS 添加目标
Add Target

-
设置代理到 Xray 7777,这里的IP根据自己实际情况填写,端口与之前设置的 Xray 监听端口保持一致
-
扫描时 配置文件选择仅爬取
Crawl Only扫描即可
