YOLOv7姿态估计pose estimation(姿态估计+目标检测+跟踪)
更多视觉项目请见:小白学视觉
概述
YOLOv7姿态估计:一种快速准确的人体姿态估计模型

人体姿态估计是计算机视觉中的一项重要任务,具有各种应用,例如动作识别、人机交互和监控。近年来,基于深度学习的方法在人体姿态估计方面取得了显著的性能。其中最流行的深度学习方法之一是YOLOv7姿态估计模型。
算法
YOLOv7姿态估计模型是YOLOv7目标检测模型的扩展,使用单个神经网络同时预测图像中多个物体的边界框和类别概率。在YOLOv7姿态估计模型中,网络预测每个人的关键点位置,从而可以用于估计人的姿态。

网络
YOLOv7姿态估计模型基于深度卷积神经网络架构,由多个卷积层、最大池化和全连接层组成。网络接受输入图像并产生特征图,然后用于预测每个人的关键点位置。

数据集
YOLOv7姿态估计模型使用大型数据集进行训练,例如COCO(通用对象上下文)和MPII(马克斯·普朗克计算机科学研究所),这些数据集包含成千上万的人在各种姿势和环境中的注释图像。该模型使用监督学习和数据增强技术进行训练,例如随机缩放、旋转和平移输入图像。

优势
YOLOv7姿态估计模型的一个关键优势是其速度和准确性。该模型能够实时估计多个人的姿态,使其适用于人机交互和监控等应用。此外,该模型在COCO和MPII等基准数据集上实现了最先进的性能,展示了其准确性和鲁棒性。
结论
总之,YOLOv7姿态估计模型是一种快速准确的基于深度学习的人体姿态估计模型。其能够实时估计多个人的姿态,使其适用于各种应用,而其在基准数据集上的最先进性能证明了其有效性。随着深度学习的不断发展,我们可以预期在人体姿态估计方面会有进一步的改进,而YOLOv7姿态估计模型很可能在这些发展中发挥重要作用。
代码
#全部代码可私信或者qq1309399183
def run(poseweights="yolov7-w6-pose.pt",source="football1.mp4",device='cpu',view_img=False,
        save_conf=False,line_thickness = 3,hide_labels=False, hide_conf=True):

    frame_count = 0  #count no of frames
    total_fps = 0  #count total fps
    time_list = []   #list to store time
    fps_list = []    #list to store fps

    device = select_device(opt.device) #select device
    half = device.type != 'cpu'

    model = attempt_load(poseweights, map_location=device)  #Load model
    _ = model.eval()
    names = model.module.names if hasattr(model, 'module') else model.names  # get class names

    if source.isnumeric() :
        cap = cv2.VideoCapture(int(source))    #pass video to videocapture object
    else :
        cap = cv2.VideoCapture(source)    #pass video to videocapture object

    if (cap.isOpened() == False):   #check if videocapture not opened
        print('Error while trying to read video. Please check path again')
        raise SystemExit()

    else:
        frame_width = int(cap.get(3))  #get video frame width
        frame_height = int(cap.get(4)) #get video frame height


        vid_write_image = letterbox(cap.read()[1], (frame_width), stride=64, auto=True)[0] #init videowriter
        resize_height, resize_width = vid_write_image.shape[:2]
        out_video_name = f"{source.split('/')[-1].split('.')[0]}"
        out = cv2.VideoWriter(f"{source}_keypoint.mp4",
                            cv2.VideoWriter_fourcc(*'mp4v'), 30,
                            (resize_width, resize_height))

        while(cap.isOpened): #loop until cap opened or video not complete

            print("Frame {} Processing".format(frame_count+1))

            ret, frame = cap.read()  #get frame and success from video capture

            if ret: #if success is true, means frame exist
                orig_image = frame #store frame
                image = cv2.cvtColor(orig_image, cv2.COLOR_BGR2RGB) #convert frame to RGB
                image = letterbox(image, (frame_width), stride=64, auto=True)[0]
                image_ = image.copy()
                image = transforms.ToTensor()(image)
                image = torch.tensor(np.array([image.numpy()]))

                image = image.to(device)  #convert image data to device
                image = image.float() #convert image to float precision (cpu)
                start_time = time.time() #start time for fps calculation

                with torch.no_grad():  #get predictions
                    output_data, _ = model(image)

                output_data = non_max_suppression_kpt(output_data,   #Apply non max suppression
                                            0.25,   # Conf. Threshold.
                                            0.65, # IoU Threshold.
                                            nc=model.yaml['nc'], # Number of classes.
                                            nkpt=model.yaml['nkpt'], # Number of keypoints.
                                            kpt_label=True)

                output = output_to_keypoint(output_data)

                im0 = image[0].permute(1, 2, 0) * 255 # Change format [b, c, h, w] to [h, w, c] for displaying the image.
                im0 = im0.cpu().numpy().astype(np.uint8)

                im0 = cv2.cvtColor(im0, cv2.COLOR_RGB2BGR) #reshape image format to (BGR)
                gn = torch.tensor(im0.shape)[[1, 0, 1, 0]]  # normalization gain whwh

                for i, pose in enumerate(output_data):  # detections per image

                    if len(output_data):  #check if no pose
                        for c in pose[:, 5].unique(): # Print results
                            n = (pose[:, 5] == c).sum()  # detections per class
                            print("No of Objects in Current Frame : {}".format(n))

                        for det_index, (*xyxy, conf, cls) in enumerate(reversed(pose[:,:6])): #loop over poses for drawing on frame
                            c = int(cls)  # integer class
                            kpts = pose[det_index, 6:]
                            label = None if opt.hide_labels else (names[c] if opt.hide_conf else f'{names[c]} {conf:.2f}')
                            plot_one_box_kpt(xyxy, im0, label=label, color=colors(c, True),
                                        line_thickness=opt.line_thickness,kpt_label=True, kpts=kpts, steps=3,
                                        orig_shape=im0.shape[:2])
环境安装教程
#1.克隆项目并进入
#联系我:然后git clone my_projcet
2.linux创建虚拟环境
python3 -m venv psestenv
source psestenv/bin/activate
3.如果windows用户请用这个:
python3 -m venv psestenv cd psestenv
cd Scripts activate
cd ..
cd ..
 pip install --upgrade pip
- pip install
pip install -r requirements.txt
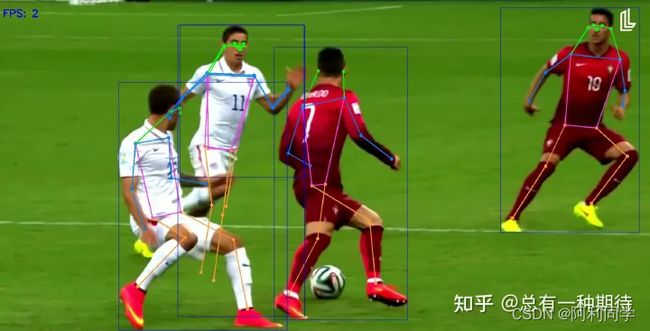
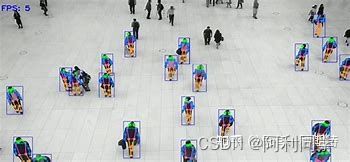
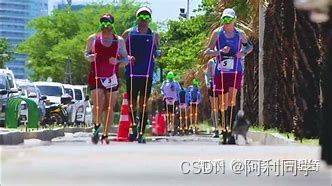
结果展示
更多视觉相关项目见专栏!。如果对你有用,欢迎私聊点赞交流