【2023最新版】PyCharm配置 Jupyter Notebook详解(启动、设置密码、测试等)
目录
一、准备工作
1. 安装Anaconda、pycharm
2. Jupyter官网
3. Jupyter常用命令
二、PyCharm配置 Jupyter Notebook
1. 启动Jupyter Notebook 服务器
2. 复制URL 地址
3. 配置Jupyter服务器
访问令牌 token注意事项
4. Jupyter服务器设置密码(避免每次输入token)
输入密码登录
三、测试 Jupyter Notebook
1. 新建Jupyter Notebook文件
2. 运行单元
未启动Jupyter
启动Jupyter
一、准备工作
1. 安装Anaconda、pycharm
win11 安装 Anaconda(2022.10)+pycharm(2022.3/2023.1.4)+配置虚拟环境_QomolangmaH的博客-CSDN博客 https://blog.csdn.net/m0_63834988/article/details/128693741?spm=1001.2014.3001.5501 Jupyter 是 Anaconda 发行版的一部分,并默认随 Anaconda 一起安装。
(也可以使用独立安装和使用,无需依赖 Anaconda)
pip install jupyter notebook2. Jupyter官网
Project Jupyter | Homehttps://jupyter.org/
3. Jupyter常用命令
Jupyterusage: jupyter [-h] [--version] [--config-dir] [--data-dir] [--runtime-dir] [--paths] [--json] [--debug] [subcommand] Jupyter: Interactive Computing positional arguments: subcommand the subcommand to launch optional arguments: -h, --help show this help message and exit --version show the versions of core jupyter packages and exit --config-dir show Jupyter config dir --data-dir show Jupyter data dir --runtime-dir show Jupyter runtime dir --paths show all Jupyter paths. Add --json for machine-readable format. --json output paths as machine-readable json --debug output debug information about paths Available subcommands: bundlerextension console dejavu events execute kernel kernelspec lab labextension labhub migrate nbclassic nbconvert nbextension notebook qtconsole run script server serverextension troubleshoot trust Please specify a subcommand or one of the optional arguments.
二、PyCharm配置 Jupyter Notebook
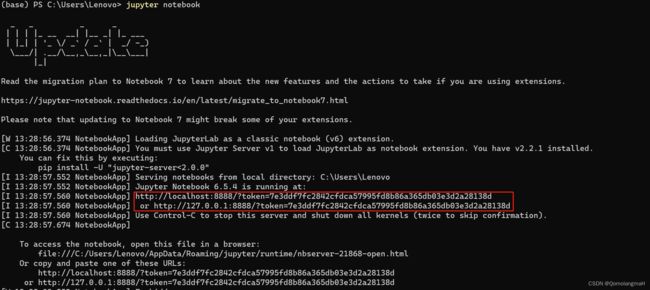
1. 启动Jupyter Notebook 服务器
终端输入:
jupyter notebook
2. 复制URL 地址
如图,终端中显示 Jupyter Notebook 服务器的 URL 地址(通常是 http://localhost:8888/),复制如下任一链接(包括token部分)
3. 配置Jupyter服务器
- 打开项目:


- 或直接找:
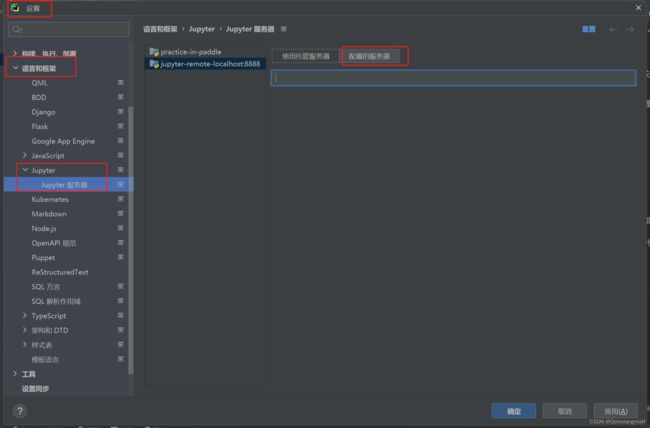
- 填入上述的链接(包括访问令牌 token)
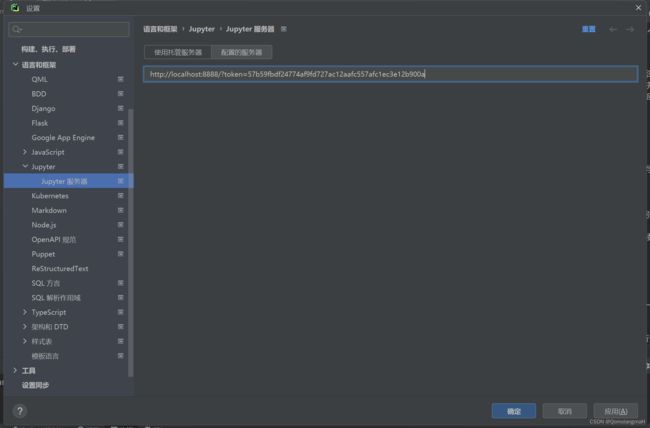
访问令牌 token注意事项
每次Jupyter提供的token不一样,若重新启动Jupyter需重新填充token

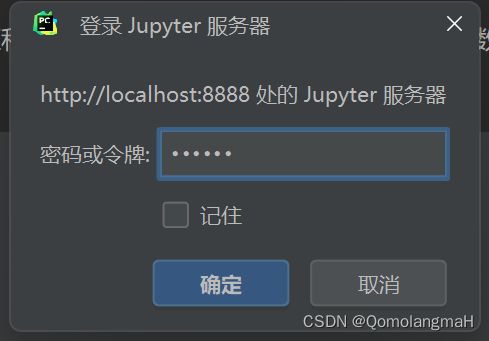
4. Jupyter服务器设置密码(避免每次输入token)
终端输入:
jupyter notebook password注意:输入密码不显示

建议设置简单密码(如123456)
输入密码登录
三、测试 Jupyter Notebook
1. 新建Jupyter Notebook文件

2. 运行单元
import pandas as pd

# 创建一个简单的数据集
data = {'Name': ['John', 'Emma', 'Sam', 'Lisa'],
        'Age': [28, 24, 32, 30],
        'City': ['New York', 'London', 'Sydney', 'Paris']}

# 将数据集转换成 DataFrame
df = pd.DataFrame(data)

# 查看 DataFrame 的前几行数据
print(df.head())
鼠标右键

未启动Jupyter

启动Jupyter
