微信小程序项目配置(原生)
微信小程序项目配置
-
- 1、父子组件通讯
-
- 1-1、父组件获取子组件实例
- 2、组件中的监听器 observers(vue中的watch)
- 3、组件生命周期
- 4、组件中的插槽
-
- 4-1、单个插槽的使用
- 4-2、多个插槽的使用
- 5、小程序中的混入 behaviors ,类似于vue中的 mixins
- 6、小程序嵌入 npm 包
-
- 6-1、小程序中嵌入 vant-weapp 组件库(https://youzan.github.io/vant-weapp/#/quickstart)
- 6-2、小程序 promise 化
- 7、微信网络请求二次封装 wx.request()
- 8、小程序中的状态管理(mobx-miniprogram、mobx-miniprogram-bindings)
- 9、分包
-
- 9-1、分包
- 9-2、独立分包
- 9-3、分包预下载
- 10、自定义 TabBar
- 11、微信小程序中使用sass(新版)
1、父子组件通讯
父组件


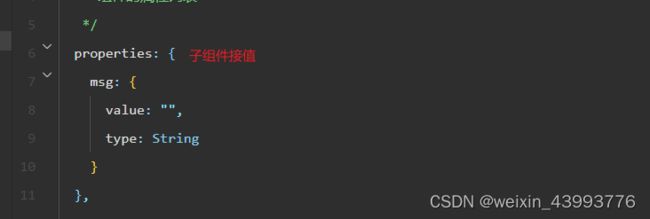
子组件

1-1、父组件获取子组件实例
父组件中
<my-test1 class="test1">my-test1>

js 部分
const child = this.selectComponent('.test1')  // child 就是子组件的实例
注意:小程序中的 data 和 properties 都是可读可写的,和vue不一样,不遵循单项数据流,
读 data 和 properties 中的值: this.data.xxx 和 this.properties.xxx
写 data 和 properties 中的值:this.setData({})
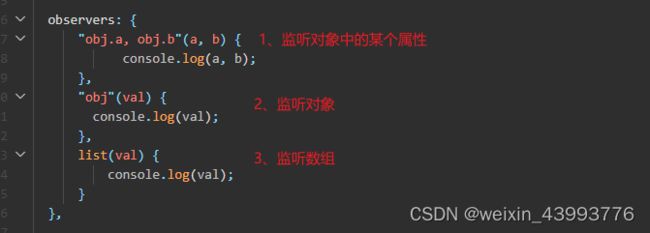
2、组件中的监听器 observers(vue中的watch)

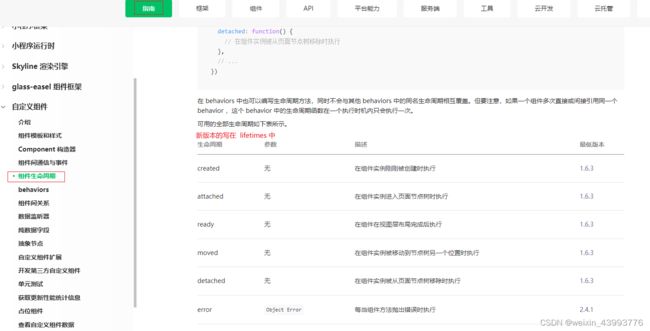
3、组件生命周期
4、组件中的插槽
4-1、单个插槽的使用
在组件中
<view>
	这是组件里面的内容
	<slot>slot>
view>
使用组件的页面或者组件
<my-test>
	<view>这里的内容就会填充在组件slot标签中view>
my-test>
4-2、多个插槽的使用
在微信小程序中多个插槽需要开启
在组件中:
Component({
	options: {
		multipleSlots: true  // 开启支持多个插槽
	}
})

<view>
	<slot name="top">slot>
	这是组件里面的内容
	<slot name="bottom">slot>
view>
页面中使用组件
<my-test3>
	<view slot="top">插槽名字为top的值view>
	<view slot="bottom">插槽名字为bottom的值view>
my-test3>
5、小程序中的混入 behaviors ,类似于vue中的 mixins
在项目根目录中创建 behaviors 目录,目录中创建 my-behaviors.js 文件
module.exports = Behavior({
	data: {
		userName: "張三"
	},
	properties: {

	},
	methods: {

	}
})
在组件中引用 behaviors
const myBehaviors = require("../../behaviors/my-behaviors.js")  // 只能使用相对路径
Component({
	behaviors: [myBehaviors]
})
到此,就可以正常使用 behaviors 中的成员和方法了
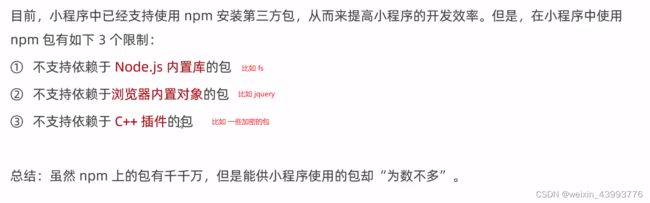
6、小程序嵌入 npm 包
6-1、小程序中嵌入 vant-weapp 组件库(https://youzan.github.io/vant-weapp/#/quickstart)
小程序根目录中初始化 package.json --> npm init -y
安装vant-weapp 包 --> yarn add @vant/weapp --production
修改app.json 去掉style: ‘v2’
手动更改 project.config.json
构架 npm 包
详细见官方文档
6-2、小程序 promise 化
yarn add miniprogram-api-promise
删除 miniprogram-npm 目录
重新构建npm包
在app.js中:
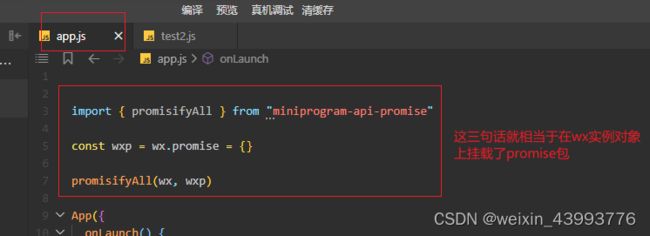
使用:
async initData() {
	const res = await wx.promise.request({  // wx.promise 就是对应上面自己定义的 wx.promise
		methds: 'POST',
		url: "http://www.bnaidu.com/api/test1/url",
		data: {
			pageL: 1,
			limit: 10,
			name: "zhansgan"
		}
	})
	console.log(res.data)
}
注意:也可以直接在小程序中使用 Promise 对象
7、微信网络请求二次封装 wx.request()
在utils工具包中创建 httpInstance 目录,里面创建 index.js 文件
const token = wx.getStorageSync('token')

// 1、后台管理系统(小程序版本)
// if(!token) {  // ,没有token就跳转到首页或者登录页面
// 	wx.reLaunch({
// 	  url: '/pages/index/index'
// 	})
// }

// 2、sass端推广的小程序(不一定需要登录才能进去的小程序)
// 在自己的业务组件中判断有没有token就好了

function httpInstance(url, data, method) {
	return new Promise((resolve, reject) => {
		// 请求
		wx.request({
			url: url,
			data: data,
			method: method || "GET",
			dataType: 'json',
			header: {
				//   'content-type': 'application/x-www-form-urlencoded',
				'content-type': 'application/json',
				'token': token
			},
			success: (res) => {
				resolve(res.data)
			},
			fail: (err) => {
				if (err.errMsg == "request:fail ") {
					wx.showToast({
						title: '请求出错',
						icon: 'none',
						duration: 2000,
						mask: false
					})
				} else if (err.errMsg == "request:fail timeout") {
					wx.showToast({
						title: '请求超时',
						icon: 'none',
						duration: 2000,
						mask: false
					})
				} else {
					reject(err)
				}
			}
		})
	})
}

module.exports = {
	httpInstance
}
在根目录中创建 eNum 目录,里面创建 index.js 文件
module.exports = {
	HOST: "http://192.168.1.73:8300"   // 自己的后端地址,上线需要改成备案之后的域名
}
在根目录创建 api 目录,里面创建 index.js 文件
const { httpInstance } = require("../utils/httpInstance/index.js")
const { HOST } = require("../eNum/index")

module.exports = {

	// 获取列表
	getModelList: (params) => httpInstance(HOST + "/major/v1/list", params, 'post')
}
到此 request 网络请求就封装完成
使用
// 在组件中正常使用就可以
async onLoad(options) {
	const params = {
		"page":1,
		"limit":10,
		"name":"",
		"orgName":"",
		"orgCode":"00002"
	}
	const res = await getModelList(params)
	console.log(res);
}
8、小程序中的状态管理(mobx-miniprogram、mobx-miniprogram-bindings)
yarn add mobx-miniprogram mobx-miniprogram-bindings
工具中重新构建npm
包安装完之后就可以创建store仓库了
在根目录下创建store目录,里面创建 index.js 文件
// store/index.js
const { observable, action } = require("mobx-miniprogram");

const store = observable({
	// 定义变量
	numA: 1,
	numB: 2,

	// 计算属性
	get sum() {
		return this.numA + this.numB
	},

	// action来修改mobx中的数据
	updateNumA: action(function(step) {
		this.numA += step
	}),
	updateNumB: action(function(step) {
		this.numB += step
	})
})

module.exports = {
	store
}
mobx 和页面绑定

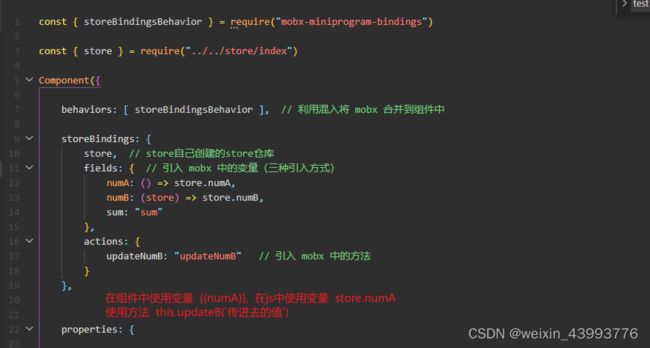
mobx 和组件绑定
9、分包
9-1、分包
主包:一般只包含项目的启动页面或者tabBar页面、以及所有分包都需要用到的一些公共资源
分包:只包含和当前分包有关的页面和私有资源
每个分包或者主包的大小不能超过2M
整个小程序不能超过16M
分包的加载规则:

    1、在小程序启动时, 默认会下载主包并启动主包页面, tabBar页面需要放在主包中
    2、当用户进入分包内的某个页面中,客户端会把对应的分包下载下来,下载完成后再进行展示,非 tabBar 的页面可以按照功能不同划分到不同的分包中
配置方法
// app.json 文件中, 和 pages 平级
"subPackages": [
	{
		"root": "package1",  // 分包根目录
		"name": "pack1",     // 分包别名
		"pages": [           // 分包里面的页面
			"pages/cat/cat",
			"pages/dog/dog"
		]
	},
	{
		"root": "package2",  // 分包根目录
		"name": "pack2",     // 分包别名
		"pages": [           // 分包里面的页面
			"pages/banana/banana",
			"pages/apple/apple"
		]
	}
],
查看分包的大小

9-2、独立分包
独立分包相对于普通的分包可以脱离主包,独立运行
"subPackages": [
	{
		"root": "package1",  // 分包根目录
		"name": "pack1",     // 分包别名
		"pages": [           // 分包里面的页面
			"pages/cat/cat",
			"pages/dog/dog"
		]
	},
	{
		"root": "package2",  // 分包根目录
		"name": "pack2",     // 分包别名
		"pages": [           // 分包里面的页面
			"pages/banana/banana",
			"pages/apple/apple"
		],
		"independent": true  // 将 package2 设置为独立分包
	}
],
注意:独立分包不能使用主包里面的资源
9-3、分包预下载
小程序进入某个页面时触发预下载功能,将其它页面的资源提前加载出来
// 在 package.json 中, 与 pages 平级
"preloadRule": {
	"pages/test3/test3": {  // 页面进入 test3页面时 预加载 分包 中的 root 为 package1 的 分包
		"packages": [
			"package1"  //  预加载的分包为 root: package1
		],
		"network": "all"  // 在 wifi 模块或者4G都进行预加载  值还可以填写 wifi,表示只能在 wifi 模块下加载
	}
}
10、自定义 TabBar
app.json 配置文件中开启自定义 tabbar 功能
"tabBar": {
	"custom": true,   // 开启自定义 tabbar 功能,tabbar其他的list里面数据保留
	"color": "8a8a8a",
	"selectedColor": "1afa29",
	"list": [
		{
			"pagePath": "pages/index/index",
			"text": "首页",
			"iconPath": "/images/home-active.png",
			"selectedIconPath": "/images/home.png"
		},
		{
			"pagePath": "pages/test/test",
			"text": "列表",
			"iconPath": "/images/list-active.png",
			"selectedIconPath": "/images/list.png"
		},
		{
			"pagePath": "pages/test3/test3",
			"text": "个人中心",
			"iconPath": "/images/my.png",
			"selectedIconPath": "/images/my-active.png"
		}
	]
}
项目根目录中创建 custom-tab-bar 目录, 里面创建 index.wxml index.js index.wxss 等
// wxml 中
<!-- 自定义 tabbar -->
<view class="tab-bar">
	<view class="tab-bar-border"></view>
	<view wx:for="{{list}}" wx:key="id" class="tab-bar-item" data-path="{{item.pagePath}}" data-index="{{index}}" bindtap="switchTab">
		<image src="{{selected === index ? item.selectedIconPath : item.iconPath}}" class="img"></image>
		<view class='{{ selected === index ? "text active" : "text" }}'>{{item.text}}</view>
	</view>
</view>

// wxss 中
.tab-bar-item {
	flex: 1;
	text-align: center;
	display: flex;
	justify-content: center;
	align-items: center;
	flex-direction: column;
}

.tab-bar-item .img {
	width: 50rpx;
	height: 50rpx;
}

.tab-bar-item .text {
	font-size: 26rpx;
	color: #999;
}.tab-bar-item .text.active {
	font-size: 26rpx;
	color:#62FC7B;
}

// js 中
const { storeBindingsBehavior } = require("mobx-miniprogram-bindings")
const { store } = require("../store/index")
Component({
	behaviors: [storeBindingsBehavior],
	storeBindings: {
		store,
		fields: {
			selected: "tabActive"
		},
		actions: {
			updateTabbarActive: "updateTabbarActive"
		}
	},
	data: {
		color: "#7A7E83",
		selectedColor: "red",
		list: [
			{
				id: 1,
				"pagePath": "/pages/index/index",
				"text": "首页",
				"iconPath": "/images/home-active.png",
				"selectedIconPath": "/images/home.png"
			},
			{
				id: 2,
				"pagePath": "/pages/test/test",
				"text": "列表",
				"iconPath": "/images/list-active.png",
				"selectedIconPath": "/images/list.png"
			},
			{
				id: 3,
				"pagePath": "/pages/test3/test3",
				"text": "个人中心",
				"iconPath": "/images/my.png",
				"selectedIconPath": "/images/my-active.png"
			}
		]
	},

	pageLifetimes: {
		// 小程序下次进来的时候页面和菜单高亮同步
		show() {
			if(typeof this.getTabBar === "function" && this.getTabBar()) {
				this.getTabBar().setData({
					currentIndex: 0
				})
			}
		}
	},

	methods: {
		// 点击高亮 tabbar
		switchTab(e) {
			const { path: url, index } = e.currentTarget.dataset
			wx.switchTab({
				url
			})
			this.updateTabbarActive(index)
		}
	}
})
注意:当前点击高亮的自定义 tabbar 的状态存在 store 中,进行全局状态管理,不然点击tabbar会出现菜单高亮对不上的问题
11、微信小程序中使用sass(新版)
在 project.config.json 配置文件中
"useCompilerPlugins": [
    "sass"   // 支持sass 语法,支持ts语法也是在这个地方做修改
 ]
将 index.wxss 改成 index.scss 即可