Android进阶宝典 --- UI的绘制流程
在众多互联网产品中,客户端是冲在最前面的,直接面向用户,我们在开发过程中,写的布局UI,用户是直接与其交互的,那么我们的布局是怎么渲染到手机上的,首先需要了解,从app启动到第一帧展现之前,做了什么事?
UI绘制流程
- 1 App的启动流程
-
- 1.1 ApplicationThread
- 1.2 Instrumentation
- 1.3 ActivityThread
- 2 Activity的创建流程
- 3 UI的绘制流程
-
- 3.1 setContentView
-
- 3.1.1 DecorView和PhoneWindow
- 3.2 UI绘制流程
-
- 3.2.1 requestLayout
1 App的启动流程
每个App都是一个独立的进程,当一个app启动的时候,当前进程也被启动,在Android中有一个类ActivityThread,就是进程的初始类,其中main方法就是整个app的入口。
public static void main(String[] args) {
Trace.traceBegin(Trace.TRACE_TAG_ACTIVITY_MANAGER, "ActivityThreadMain");
// Install selective syscall interception
AndroidOs.install();
// CloseGuard defaults to true and can be quite spammy. We
// disable it here, but selectively enable it later (via
// StrictMode) on debug builds, but using DropBox, not logs.
CloseGuard.setEnabled(false);
Environment.initForCurrentUser();
// Make sure TrustedCertificateStore looks in the right place for CA certificates
final File configDir = Environment.getUserConfigDirectory(UserHandle.myUserId());
TrustedCertificateStore.setDefaultUserDirectory(configDir);
// Call per-process mainline module initialization.
initializeMainlineModules();
Process.setArgV0("" );
Looper.prepareMainLooper();
// Find the value for {@link #PROC_START_SEQ_IDENT} if provided on the command line.
// It will be in the format "seq=114"
long startSeq = 0;
if (args != null) {
for (int i = args.length - 1; i >= 0; --i) {
if (args[i] != null && args[i].startsWith(PROC_START_SEQ_IDENT)) {
startSeq = Long.parseLong(
args[i].substring(PROC_START_SEQ_IDENT.length()));
}
}
}
ActivityThread thread = new ActivityThread();
thread.attach(false, startSeq);
if (sMainThreadHandler == null) {
sMainThreadHandler = thread.getHandler();
}
if (false) {
Looper.myLooper().setMessageLogging(new
LogPrinter(Log.DEBUG, "ActivityThread"));
}
// End of event ActivityThreadMain.
Trace.traceEnd(Trace.TRACE_TAG_ACTIVITY_MANAGER);
Looper.loop();
throw new RuntimeException("Main thread loop unexpectedly exited");
}
每个app进程都有一个主线程,main方法就是通过主线程调用然后执行其中的代码,我们看到main方法中其实内容并不多,大部分是一些初始化的操作,那么app的启动是怎么做到的呢?
其实像App的启动、Activity的启动等,都是依赖系统服务完成,也就是说,ActivityThead是要和系统服务打交道,然后做启动操作,那么ActivityThead是如何和系统服务通信的呢?
1.1 ApplicationThread
在ActivityThead中有一个成员变量ApplicationThread,ApplicationThread就是ActivityThread与ActivityManagerService通信的桥梁,ActivityThread接收ActivityManagerService的命令做对应的操作。

当ActivityThead想要启动MainActivity时,会先通过ApplicationThread向AMS请求,AMS中存在ApplicationThread的代理,通过ApplicationThread回调给到ActivityThread做响应的处理操作,熟悉aidl流程的话这个也不难理解。
1.2 Instrumentation
如果知道Activity启动流程的话,对于这个类也不会陌生,这个类就是用于追踪Application和Activity声明周期的类。
1.3 ActivityThread
当主线程执行main方法时,其实ActivityThread并没有创建,当执行到下面两行时,ActivityThread才真正创建完成。
ActivityThread thread = new ActivityThread();
thread.attach(false, startSeq);
我们可以看到,main方法执行完成之后,就退出了,但是并不代表这个应用退出了,在main方法中初始化了MainLooper,这个MainLooper会一直从主线程的MessageQueue中取出消息处理消息,保证程序的运行。
所以,当我们的app启动之后,第一步就是创建Application,当然这不是在ActivityThread中直接new Application这么简单,而是需要ActivityThread与AMS通信,获取Application的信息,从而创建Application
所以接下来,看下attach的源码:
private void attach(boolean system, long startSeq) {
    sCurrentActivityThread = this;
    mConfigurationController = new ConfigurationController(this);
    mSystemThread = system;
    if (!system) {
        RuntimeInit.setApplicationObject(mAppThread.asBinder());
        //关键点①
        final IActivityManager mgr = ActivityManager.getService();
        try {
            mgr.attachApplication(mAppThread, startSeq);
        } catch (RemoteException ex) {
            throw ex.rethrowFromSystemServer();
        }
        // Watch for getting close to heap limit.
        BinderInternal.addGcWatcher(new Runnable() {
            @Override public void run() {
                if (!mSomeActivitiesChanged) {
                    return;
                }
                Runtime runtime = Runtime.getRuntime();
                long dalvikMax = runtime.maxMemory();
                long dalvikUsed = runtime.totalMemory() - runtime.freeMemory();
                if (dalvikUsed > ((3*dalvikMax)/4)) {
                    if (DEBUG_MEMORY_TRIM) Slog.d(TAG, "Dalvik max=" + (dalvikMax/1024)
                            + " total=" + (runtime.totalMemory()/1024)
                            + " used=" + (dalvikUsed/1024));
                    mSomeActivitiesChanged = false;
                    try {
                        ActivityTaskManager.getService().releaseSomeActivities(mAppThread);
                    } catch (RemoteException e) {
                        throw e.rethrowFromSystemServer();
                    }
                }
            }
        });
    } else {
        // Don't set application object here -- if the system crashes,
        // we can't display an alert, we just want to die die die.
        android.ddm.DdmHandleAppName.setAppName("system_process",
                UserHandle.myUserId());
        try {
            mInstrumentation = new Instrumentation();
            mInstrumentation.basicInit(this);
            ContextImpl context = ContextImpl.createAppContext(
                    this, getSystemContext().mPackageInfo);
            mInitialApplication = context.mPackageInfo.makeApplication(true, null);
            mInitialApplication.onCreate();
        } catch (Exception e) {
            throw new RuntimeException(
                    "Unable to instantiate Application():" + e.toString(), e);
        }
    }

    ViewRootImpl.ConfigChangedCallback configChangedCallback = (Configuration globalConfig) -> {
        synchronized (mResourcesManager) {
            // TODO (b/135719017): Temporary log for debugging IME service.
            if (Build.IS_DEBUGGABLE && mHasImeComponent) {
                Log.d(TAG, "ViewRootImpl.ConfigChangedCallback for IME, "
                        + "config=" + globalConfig);
            }

            // We need to apply this change to the resources immediately, because upon returning
            // the view hierarchy will be informed about it.
            if (mResourcesManager.applyConfigurationToResources(globalConfig,
                    null /* compat */,
                    mInitialApplication.getResources().getDisplayAdjustments())) {
                mConfigurationController.updateLocaleListFromAppContext(
                        mInitialApplication.getApplicationContext());

                // This actually changed the resources! Tell everyone about it.
                final Configuration updatedConfig =
                        mConfigurationController.updatePendingConfiguration(globalConfig);
                if (updatedConfig != null) {
                    sendMessage(H.CONFIGURATION_CHANGED, globalConfig);
                    mPendingConfiguration = updatedConfig;
                }
            }
        }
    };
    ViewRootImpl.addConfigCallback(configChangedCallback);
}
关键点①:获取AMS的代理对象
public static IActivityManager getService() {
    return IActivityManagerSingleton.get();
}
@UnsupportedAppUsage
private static final Singleton<IActivityManager> IActivityManagerSingleton =
        new Singleton<IActivityManager>() {
            @Override
            protected IActivityManager create() {
                final IBinder b = ServiceManager.getService(Context.ACTIVITY_SERVICE);
                final IActivityManager am = IActivityManager.Stub.asInterface(b);
                return am;
            }
        };
我们可以看到,getService方法就是从ServiceManager中获取AMS,最终拿到的是AMS的代理对象(跨进程),调用attachApplication方法,传入了ApplicationThread对象,那么我们可以看一下AMS中的attachApplication方法
# ActivityManagerService # attachApplication

public final void attachApplication(IApplicationThread thread, long startSeq) {
    if (thread == null) {
        throw new SecurityException("Invalid application interface");
    }
    synchronized (this)
    //获取当前进程的一些信息
        int callingPid = Binder.getCallingPid();
        final int callingUid = Binder.getCallingUid();
        final long origId = Binder.clearCallingIdentity();
        attachApplicationLocked(thread, callingPid, callingUid, startSeq);
        Binder.restoreCallingIdentity(origId);
    }
}
在AMS的attachApplication当中,会调用attachApplicationLocked方法,首先会初始化当前 进程的信息,记录在ProcessRecord类中,然后调用ApplicationThread的bindApplication,将进程的信息回调到ActivityThread。
# ActivityManagerService # attachApplicationLocked

private boolean attachApplicationLocked(@NonNull IApplicationThread thread,
            int pid, int callingUid, long startSeq) {
    ProcessRecord app;
    ... //初始化进程信息
        final ProviderInfoList providerList = ProviderInfoList.fromList(providers);
        if (app.getIsolatedEntryPoint() != null) {
            // This is an isolated process which should just call an entry point instead of
            // being bound to an application.
            thread.runIsolatedEntryPoint(
                    app.getIsolatedEntryPoint(), app.getIsolatedEntryPointArgs());
        } else if (instr2 != null) {
            thread.bindApplication(processName, appInfo, providerList,
                    instr2.mClass,
                    profilerInfo, instr2.mArguments,
                    instr2.mWatcher,
                    instr2.mUiAutomationConnection, testMode,
                    mBinderTransactionTrackingEnabled, enableTrackAllocation,
                    isRestrictedBackupMode || !normalMode, app.isPersistent(),
                    new Configuration(app.getWindowProcessController().getConfiguration()),
                    app.getCompat(), getCommonServicesLocked(app.isolated),
                    mCoreSettingsObserver.getCoreSettingsLocked(),
                    buildSerial, autofillOptions, contentCaptureOptions,
                    app.getDisabledCompatChanges(), serializedSystemFontMap);
        } else {
            thread.bindApplication(processName, appInfo, providerList, null, profilerInfo,
                    null, null, null, testMode,
                    mBinderTransactionTrackingEnabled, enableTrackAllocation,
                    isRestrictedBackupMode || !normalMode, app.isPersistent(),
                    new Configuration(app.getWindowProcessController().getConfiguration()),
                    app.getCompat(), getCommonServicesLocked(app.isolated),
                    mCoreSettingsObserver.getCoreSettingsLocked(),
                    buildSerial, autofillOptions, contentCaptureOptions,
                    app.getDisabledCompatChanges(), serializedSystemFontMap);
        }
        if (profilerInfo != null) {
            profilerInfo.closeFd();
            profilerInfo = null;
        }

    return true;
}
bindApplication的关键就是最后一行,发送BIND_APPLICATION消息到MessageQueue
 public final void bindApplication(String processName, ApplicationInfo appInfo,
        ProviderInfoList providerList, ComponentName instrumentationName,
        ProfilerInfo profilerInfo, Bundle instrumentationArgs,
        IInstrumentationWatcher instrumentationWatcher,
        IUiAutomationConnection instrumentationUiConnection, int debugMode,
        boolean enableBinderTracking, boolean trackAllocation,
        boolean isRestrictedBackupMode, boolean persistent, Configuration config,
        CompatibilityInfo compatInfo, Map services, Bundle coreSettings,
        String buildSerial, AutofillOptions autofillOptions,
        ContentCaptureOptions contentCaptureOptions, long[] disabledCompatChanges,
        SharedMemory serializedSystemFontMap) {
        ...
    AppBindData data = new AppBindData();
    data.processName = processName;
    data.appInfo = appInfo;
    data.providers = providerList.getList();
    data.instrumentationName = instrumentationName;
    data.instrumentationArgs = instrumentationArgs;
    data.instrumentationWatcher = instrumentationWatcher;
    data.instrumentationUiAutomationConnection = instrumentationUiConnection;
    data.debugMode = debugMode;
    data.enableBinderTracking = enableBinderTracking;
    data.trackAllocation = trackAllocation;
    data.restrictedBackupMode = isRestrictedBackupMode;
    data.persistent = persistent;
    data.config = config;
    data.compatInfo = compatInfo;
    data.initProfilerInfo = profilerInfo;
    data.buildSerial = buildSerial;
    data.autofillOptions = autofillOptions;
    data.contentCaptureOptions = contentCaptureOptions;
    data.disabledCompatChanges = disabledCompatChanges;
    data.mSerializedSystemFontMap = serializedSystemFontMap;
    //代码关键
    sendMessage(H.BIND_APPLICATION, data);
}
case BIND_APPLICATION:
     Trace.traceBegin(Trace.TRACE_TAG_ACTIVITY_MANAGER, "bindApplication");
     AppBindData data = (AppBindData)msg.obj;
     handleBindApplication(data);
     Trace.traceEnd(Trace.TRACE_TAG_ACTIVITY_MANAGER);
     break;
对于handleBindApplication,我们只看核心代码,肯定就是怎么创建Application的,其实最终就是通过新建的Instrumentation的newApplication来创建了Application,然后调用Instrumentation的callApplicationOnCreate执行了Application的onCreate方法
# ActivityThread # handleBindApplication

Application app;
final StrictMode.ThreadPolicy savedPolicy = StrictMode.allowThreadDiskWrites();
final StrictMode.ThreadPolicy writesAllowedPolicy = StrictMode.getThreadPolicy();
try {
    // If the app is being launched for full backup or restore, bring it up in
    // a restricted environment with the base application class.
    app = data.info.makeApplication(data.restrictedBackupMode, null);

//代码太多了,可以自己跟进去,我这里只粘贴核心代码
app = mActivityThread.mInstrumentation.newApplication(
                    cl, appClass, appContext);

//执行了Application的onCreate方法
instrumentation.callApplicationOnCreate(app);
至此,Application已经启动,也就意味着当前app已经启动了。

2 Activity的创建流程
接着回到AMS的attachApplicationLocked方法中,在Application启动之后,调用了ActivityTaskManagerInternal的attachApplication方法
// See if the top visible activity is waiting to run in this process...
if (normalMode) {
    try {
        didSomething = mAtmInternal.attachApplication(app.getWindowProcessController());
    } catch (Exception e) {
        Slog.wtf(TAG, "Exception thrown launching activities in " + app, e);
        badApp = true;
    }
}
先看一下ActivityTaskManagerInternal这个类,看字面意思是Activity的任务管理类,这是一个抽象类,具体实现是LocalService
# LocalService # attachApplication

 public boolean attachApplication(WindowProcessController wpc) throws RemoteException {
    synchronized (mGlobalLockWithoutBoost) {
        if (Trace.isTagEnabled(TRACE_TAG_WINDOW_MANAGER)) {
            Trace.traceBegin(TRACE_TAG_WINDOW_MANAGER, "attachApplication:" + wpc.mName);
        }
        try {
            return mRootWindowContainer.attachApplication(wpc);
        } finally {
            Trace.traceEnd(TRACE_TAG_WINDOW_MANAGER);
        }
    }
}
其实Activity的创建和启动,跟Application的创建和启动基本一致;同样也是ActivityThead跟AMS通信,ActivityThread要创建哪个Activity,AMS就将哪个Activity的信息封装好通过ApplicationThread回调给ActivityThread
# ApplicationThread # scheduleTransaction

@Override
public void scheduleTransaction(ClientTransaction transaction) throws RemoteException {
    ActivityThread.this.scheduleTransaction(transaction);
}
最终同样是发送Handler消息的方式,发送EXECUTE_TRANSACTION指令
void scheduleTransaction(ClientTransaction transaction) {
    transaction.preExecute(this);
    sendMessage(ActivityThread.H.EXECUTE_TRANSACTION, transaction);
}
case EXECUTE_TRANSACTION:
	 final ClientTransaction transaction = (ClientTransaction) msg.obj;
	 mTransactionExecutor.execute(transaction);
	 if (isSystem()) {
	     // Client transactions inside system process are recycled on the client side
	     // instead of ClientLifecycleManager to avoid being cleared before this
	     // message is handled.
	     transaction.recycle();
	 }
	 // TODO(lifecycler): Recycle locally scheduled transactions.
	 break;
Handler处理EXECUTE_TRANSACTION消息,执行了TransactionExecutor的execute方法
# TransactionExecutor # execute

public void execute(ClientTransaction transaction) {
   ......
   executeCallbacks(transaction);

   executeLifecycleState(transaction);
   mPendingActions.clear();
   if (DEBUG_RESOLVER) Slog.d(TAG, tId(transaction) + "End resolving transaction");
}
@Override
public void execute(ClientTransactionHandler client, IBinder token,
        PendingTransactionActions pendingActions) {
    Trace.traceBegin(TRACE_TAG_ACTIVITY_MANAGER, "activityStart");
    ActivityClientRecord r = client.getLaunchingActivity(token);
    client.handleLaunchActivity(r, pendingActions, null /* customIntent */);
    Trace.traceEnd(TRACE_TAG_ACTIVITY_MANAGER);
}
最终还是回调到了ActivityThread的handleLaunchActivity方法,在这个方法中,调用了performLaunchActivity
 public Activity handleLaunchActivity(ActivityClientRecord r,
            PendingTransactionActions pendingActions, Intent customIntent) {
	.....

    final Activity a = performLaunchActivity(r, customIntent);

    if (a != null) {
        r.createdConfig = new Configuration(mConfigurationController.getConfiguration());
        reportSizeConfigurations(r);
        if (!r.activity.mFinished && pendingActions != null) {
            pendingActions.setOldState(r.state);
            pendingActions.setRestoreInstanceState(true);
            pendingActions.setCallOnPostCreate(true);
        }
    } else {
        // If there was an error, for any reason, tell the activity manager to stop us.
        ActivityClient.getInstance().finishActivity(r.token, Activity.RESULT_CANCELED,
                null /* resultData */, Activity.DONT_FINISH_TASK_WITH_ACTIVITY);
    }

    return a;
}
在performLaunchActivity中,是通过Instrumentation类的newActivity方法,创建了一个Activity实例,看到这里是不是跟Application的很类似
# ActivityThread # performLaunchActivity

Activity activity = null;
try {
    java.lang.ClassLoader cl = appContext.getClassLoader();
    activity = mInstrumentation.newActivity(
            cl, component.getClassName(), r.intent);
    StrictMode.incrementExpectedActivityCount(activity.getClass());
    r.intent.setExtrasClassLoader(cl);
    r.intent.prepareToEnterProcess(isProtectedComponent(r.activityInfo),
            appContext.getAttributionSource());
    if (r.state != null) {
        r.state.setClassLoader(cl);
    }
} catch (Exception e) {
    if (!mInstrumentation.onException(activity, e)) {
        throw new RuntimeException(
            "Unable to instantiate activity " + component
            + ": " + e.toString(), e);
    }
}
Activity创建完成之后,就需要启动Activity,启动Activity还是调用了Instrumentation的callActivityOnCreate方法
if (r.isPersistable()) {
    mInstrumentation.callActivityOnCreate(activity, r.state, r.persistentState);
} else {
    mInstrumentation.callActivityOnCreate(activity, r.state);
}
最终是调用了Activity的performCreate方法,执行了onCreate方法,Activity也启动完成
public void callActivityOnCreate(Activity activity, Bundle icicle,
        PersistableBundle persistentState) {
    prePerformCreate(activity);
    activity.performCreate(icicle, persistentState);
    postPerformCreate(activity);
}
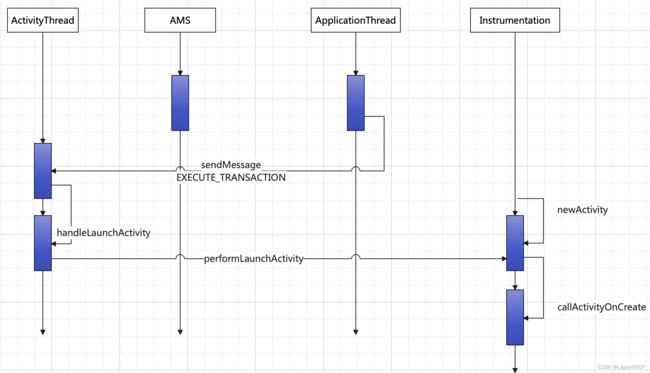
结合Application和Activity的创建启动流程:
AMS的主要职责就是初始化Application和Activity需要的数据,封装成对象,为他们的创建做准备,然后回调到ActivityThread;
ApplicationThread的主要职责就是作为ActivityThread和AMS通信桥梁;
ActivityThread的主要职责就是处理AMS发送来的请求;
Instrumentation的主要职责就是创建Application或者Activity,并启动他们。
3 UI的绘制流程
当Activity启动之后,会执行onCreate方法,在onCreate方法中,调用setContentView
3.1 setContentView
# Activity # setContentView
public void setContentView(@LayoutRes int layoutResID) {
   getWindow().setContentView(layoutResID);
   initWindowDecorActionBar();
}
首先是调用getWindow,获取Window对象,其中Window是一个抽象类,它有一个唯一的子类就是PhoneWindow,其实是调用了PhoneWindow的setContentView
# PhoneWindow # setContentView
public void setContentView(int layoutResID) {
    // Note: FEATURE_CONTENT_TRANSITIONS may be set in the process of installing the window
    // decor, when theme attributes and the like are crystalized. Do not check the feature
    // before this happens.
    if (mContentParent == null) {
        installDecor();
    } else if (!hasFeature(FEATURE_CONTENT_TRANSITIONS)) {
        mContentParent.removeAllViews();
    }

    if (hasFeature(FEATURE_CONTENT_TRANSITIONS)) {
        final Scene newScene = Scene.getSceneForLayout(mContentParent, layoutResID,
                getContext());
        transitionTo(newScene);
    } else {
        mLayoutInflater.inflate(layoutResID, mContentParent);
    }
    mContentParent.requestApplyInsets();
    final Callback cb = getCallback();
    if (cb != null && !isDestroyed()) {
        cb.onContentChanged();
    }
    mContentParentExplicitlySet = true;
}
3.1.1 DecorView和PhoneWindow
在看源码之前,首先了解PhoneWindow中的两个重要的成员变量:
DecorView:最顶层的View,在PhoneWindow中,可以看做整个Activity的装饰器;
mContentParent:布局容器,用于放置内容视图,要么是mDecor自身,或者mDecor的子集
// This is the top-level view of the window, containing the window decor.
private DecorView mDecor;
// This is the view in which the window contents are placed. It is either
// mDecor itself, or a child of mDecor where the contents go.
ViewGroup mContentParent;
接下来,看下setContentView这个方法,一开始mContentParent是空的,所以一开始先调用installDecor初始化mDecor和mContentParent;
 # PhoneWindow # installDecor

 private void installDecor() {
   mForceDecorInstall = false;
   //初始化DecorView
   if (mDecor == null) {
       mDecor = generateDecor(-1);
       mDecor.setDescendantFocusability(ViewGroup.FOCUS_AFTER_DESCENDANTS);
       mDecor.setIsRootNamespace(true);
       if (!mInvalidatePanelMenuPosted && mInvalidatePanelMenuFeatures != 0) {
           mDecor.postOnAnimation(mInvalidatePanelMenuRunnable);
       }
   } else {
       mDecor.setWindow(this);
   }


   if (mContentParent == null) {
   		// 初始化 mContentParent
       mContentParent = generateLayout(mDecor);
       ......
   }
}
初始化DecorView很简单,就是new DecorView然后返回,如果DecorView不为空,那么就将其放到PhoneWindow中。
接下来是对mContentParent的初始化,如果mContentParent是空的,那么就调用generateLayout方法(篇幅太长了,做了删减);
一开始就获取window窗体的属性,然后做一些配置,例如是不是悬浮、是否沉浸式布局、是否有ActionBar等,然后做完属性配置之后,开始装饰DecorView
# PhoneWindow # generateLayout
protected ViewGroup generateLayout(DecorView decor) {
    // Apply data from current theme.

    TypedArray a = getWindowStyle();
    mIsFloating = a.getBoolean(R.styleable.Window_windowIsFloating, false);
    int flagsToUpdate = (FLAG_LAYOUT_IN_SCREEN|FLAG_LAYOUT_INSET_DECOR)
            & (~getForcedWindowFlags());
    if (mIsFloating) {
        setLayout(WRAP_CONTENT, WRAP_CONTENT);
        setFlags(0, flagsToUpdate);
    } else {
        setFlags(FLAG_LAYOUT_IN_SCREEN|FLAG_LAYOUT_INSET_DECOR, flagsToUpdate);
        getAttributes().setFitInsetsSides(0);
        getAttributes().setFitInsetsTypes(0);
    }

    // Inflate the window decor.
    //装饰DecorView
    int layoutResource;
    int features = getLocalFeatures();
    // System.out.println("Features: 0x" + Integer.toHexString(features));
    if ((features & ((1 << FEATURE_LEFT_ICON) | (1 << FEATURE_RIGHT_ICON))) != 0) {
        if (mIsFloating) {
            TypedValue res = new TypedValue();
            getContext().getTheme().resolveAttribute(
                    R.attr.dialogTitleIconsDecorLayout, res, true);
            layoutResource = res.resourceId;
        } else {
            layoutResource = R.layout.screen_title_icons;
        }
        // XXX Remove this once action bar supports these features.
        removeFeature(FEATURE_ACTION_BAR);
        // System.out.println("Title Icons!");
    } else if ((features & ((1 << FEATURE_PROGRESS) | (1 << FEATURE_INDETERMINATE_PROGRESS))) != 0
            && (features & (1 << FEATURE_ACTION_BAR)) == 0) {
        // Special case for a window with only a progress bar (and title).
        // XXX Need to have a no-title version of embedded windows.
        layoutResource = R.layout.screen_progress;
        // System.out.println("Progress!");
    } else if ((features & (1 << FEATURE_CUSTOM_TITLE)) != 0) {
        // Special case for a window with a custom title.
        // If the window is floating, we need a dialog layout
        if (mIsFloating) {
            TypedValue res = new TypedValue();
            getContext().getTheme().resolveAttribute(
                    R.attr.dialogCustomTitleDecorLayout, res, true);
            layoutResource = res.resourceId;
        } else {
            layoutResource = R.layout.screen_custom_title;
        }
        // XXX Remove this once action bar supports these features.
        removeFeature(FEATURE_ACTION_BAR);
    } else if ((features & (1 << FEATURE_NO_TITLE)) == 0) {
        // If no other features and not embedded, only need a title.
        // If the window is floating, we need a dialog layout
        if (mIsFloating) {
            TypedValue res = new TypedValue();
            getContext().getTheme().resolveAttribute(
                    R.attr.dialogTitleDecorLayout, res, true);
            layoutResource = res.resourceId;
        } else if ((features & (1 << FEATURE_ACTION_BAR)) != 0) {
            layoutResource = a.getResourceId(
                    R.styleable.Window_windowActionBarFullscreenDecorLayout,
                    R.layout.screen_action_bar);
        } else {
            layoutResource = R.layout.screen_title;
        }
        // System.out.println("Title!");
    } else if ((features & (1 << FEATURE_ACTION_MODE_OVERLAY)) != 0) {
        layoutResource = R.layout.screen_simple_overlay_action_mode;
    } else {
        // Embedded, so no decoration is needed.
        layoutResource = R.layout.screen_simple;
        // System.out.println("Simple!");
    }

    mDecor.startChanging();
    mDecor.onResourcesLoaded(mLayoutInflater, layoutResource);
    //初始化mContentParent完成
    ViewGroup contentParent = (ViewGroup)findViewById(ID_ANDROID_CONTENT);
    if (contentParent == null) {
        throw new RuntimeException("Window couldn't find content container view");
    }
    ......
    return contentParent;
}
首先声明一个layoutResource变量,这里会做多级的判断,给layoutResource赋值,一般情况下都是R.layout.screen_simple这个布局,当我们新建一个工程,默认的界面就是一个状态栏ActionBar和空白容器,就是这个布局,调用DecorView的onResourcesLoaded方法
# DecorView # onResourcesLoaded
void onResourcesLoaded(LayoutInflater inflater, int layoutResource) {
    if (mBackdropFrameRenderer != null) {
        loadBackgroundDrawablesIfNeeded();
        mBackdropFrameRenderer.onResourcesLoaded(
                this, mResizingBackgroundDrawable, mCaptionBackgroundDrawable,
                mUserCaptionBackgroundDrawable, getCurrentColor(mStatusColorViewState),
                getCurrentColor(mNavigationColorViewState));
    }

    mDecorCaptionView = createDecorCaptionView(inflater);
    final View root = inflater.inflate(layoutResource, null);
    if (mDecorCaptionView != null) {
        if (mDecorCaptionView.getParent() == null) {
            addView(mDecorCaptionView,
                    new ViewGroup.LayoutParams(MATCH_PARENT, MATCH_PARENT));
        }
        mDecorCaptionView.addView(root,
                new ViewGroup.MarginLayoutParams(MATCH_PARENT, MATCH_PARENT));
    } else {

        // Put it below the color views.
        addView(root, 0, new ViewGroup.LayoutParams(MATCH_PARENT, MATCH_PARENT));
    }
    mContentRoot = (ViewGroup) root;
    initializeElevation();
}
在这个方法中,其实就是调用LayoutInflater的inflate方法,将这个布局加载到DecorView中;
<LinearLayout xmlns:android="http://schemas.android.com/apk/res/android"
android:layout_width="match_parent"
android:layout_height="match_parent"
android:fitsSystemWindows="true"
android:orientation="vertical">
<ViewStub android:id="@+id/action_mode_bar_stub"
          android:inflatedId="@+id/action_mode_bar"
          android:layout="@layout/action_mode_bar"
          android:layout_width="match_parent"
          android:layout_height="wrap_content"
          android:theme="?attr/actionBarTheme" />
<FrameLayout
     android:id="@android:id/content"
     android:layout_width="match_parent"
     android:layout_height="match_parent"
     android:foregroundInsidePadding="false"
     android:foregroundGravity="fill_horizontal|top"
     android:foreground="?android:attr/windowContentOverlay" />
</LinearLayout>
然后findViewById拿到一个ViewGroup,这个控件就是R.layout.screen_simple布局中的一个帧布局,id是content,也就是说,mContentParent就是这个帧布局
public static final int ID_ANDROID_CONTENT = com.android.internal.R.id.content;
当基础布局加载完成之后,开始加载我们自己的布局,调用LayoutInflater的inflate方法,将布局加载到mContentParent中
# PhoneWindow

mLayoutInflater.inflate(layoutResID, mContentParent);
总结一下,UI的加载流程:
当调用setContentView时(拿Activity为例),会调用PhoneWindow的setContentView方法,首先会进行初始化操作;
先初始化DecorView,然后初始化mContentParent;
在初始化mContentParent时,首先会窗体做一些基础配置(是否沉浸式、是否有ActionBar等),然后加载基础布局(R.layout.screen_simple)到DecorView中,通过findViewById拿到基础布局中id为content的帧布局,作为mContentParent的初始化结果;
最后,加载我们自己的布局,通过inflate方法,将自己的布局加载到mContentParent中。
3.2 UI绘制流程
在onCreate方法中,主要做的工作就是将我们自己的写的XML布局,加载到了DecorView当中,其实这只是一个开始,还需要对布局进行测试绘制,才能展示到手机上,这个过程,是在onResume生命周期中完成。
之前在创建Activity的时候,通过handleLaunchActivity方法,所以,如果调用Activity的onResume,那么就是调用handleResumeActivity方法,这个过程也是ActivityThread跟AMS通信完成,通过ApplicationThread回调
public void handleResumeActivity(ActivityClientRecord r, boolean finalStateRequest,
            boolean isForward, String reason) {
   ...
   final Activity a = r.activity;
   ...

   if (r.window == null && !a.mFinished && willBeVisible) {
   		//获取Activity的PhoneWindow
       r.window = r.activity.getWindow();
       View decor = r.window.getDecorView();
       decor.setVisibility(View.INVISIBLE);
       //获取WindowManager对象 WindowManagerImpl
       ViewManager wm = a.getWindowManager();
       WindowManager.LayoutParams l = r.window.getAttributes();
       a.mDecor = decor;
       ......
       if (a.mVisibleFromClient) {
           if (!a.mWindowAdded) {
               a.mWindowAdded = true;
               wm.addView(decor, l);
           } else {
               a.onWindowAttributesChanged(l);
           }
       }
   } else if (!willBeVisible) {
       if (localLOGV) Slog.v(TAG, "Launch " + r + " mStartedActivity set");
       r.hideForNow = true;
   }
   ......
   r.nextIdle = mNewActivities;
   mNewActivities = r;
   if (localLOGV) Slog.v(TAG, "Scheduling idle handler for " + r);
   Looper.myQueue().addIdleHandler(new Idler());
}
在handleResumeActivity中,会获取Activity的相关信息,例如拿到PhoneWindow对象、DecorView等,然后获取WindowManager对象,如果做过悬浮窗相关需求的伙伴,应该对这个很熟悉,当一个应用想要悬浮在其他应用之上时,就需要在WindowManager中添加view;
WindowManager是一个接口,他有一个具体实现类就是WindowManagerImpl,当获取当前Activity的基础布局,也就是DecorView之后,是将其添加到WindowManager中的;
在Android 10.0版本中,WindowManagerImpl的addView方法只有一个pass注释,不太清楚这是什么原因
 @Override
 public void addView(View arg0, android.view.ViewGroup.LayoutParams arg1) {
     // pass
 }
那我就拿ViewGroup的addView来看,其实是大概类似的,都是在一个容器里添加一个View,那么添加一个View之后,容器会干什么事呢?
# ViewGroup # addView
public void addView(View child, int index, LayoutParams params) {
    if (DBG) {
        System.out.println(this + " addView");
    }

    if (child == null) {
        throw new IllegalArgumentException("Cannot add a null child view to a ViewGroup");
    }

    // addViewInner() will call child.requestLayout() when setting the new LayoutParams
    // therefore, we call requestLayout() on ourselves before, so that the child's request
    // will be blocked at our level
    requestLayout();
    invalidate(true);
    addViewInner(child, index, params, false);
}
首先,调用requestLayout
3.2.1 requestLayout
requestLayout,从字面意思上来看,就是请求重新布局,也就是说每当有一个新的View添加到容器之后,都会重新测量布局。
# View # requestLayout

public void requestLayout() {
	//①
    if (mMeasureCache != null) mMeasureCache.clear();
    //②
    if (mAttachInfo != null && mAttachInfo.mViewRequestingLayout == null) {
        // Only trigger request-during-layout logic if this is the view requesting it,
        // not the views in its parent hierarchy
        ViewRootImpl viewRoot = getViewRootImpl();
        if (viewRoot != null && viewRoot.isInLayout()) {
            if (!viewRoot.requestLayoutDuringLayout(this)) {
                return;
            }
        }
        mAttachInfo.mViewRequestingLayout = this;
    }
    //③
    mPrivateFlags |= PFLAG_FORCE_LAYOUT;
    mPrivateFlags |= PFLAG_INVALIDATED;
    //④
    if (mParent != null && !mParent.isLayoutRequested()) {
        mParent.requestLayout();
    }
    if (mAttachInfo != null && mAttachInfo.mViewRequestingLayout == this) {
        mAttachInfo.mViewRequestingLayout = null;
    }
}
这个方法还是比较重要的,一行一行地分析
1:当某个View调用requestLayout的时候,如果还有测量的缓存,就清除;mMeasureCache是一个map,当view测量一次,就会加到map集合中,key如下
long key = (long) widthMeasureSpec << 32 | (long) heightMeasureSpec & 0xffffffffL;
2:mAttachInfo是View挂载到Window上时,Window给的一组View的信息,一般不为空;关键在于下个判断,View是否正在请求重新布局(mViewRequestingLayout),如果没有,那么就进入判断语句。
获取ViewRootImpl,ViewRootImpl可以把它看做是当前页面的View树形结构,熟悉自动化测试的应该明白,每个页面都有一棵View树,从根节点开始,直到叶子节点所有的子View都在这棵树形结构中;这里会判断如果View树正在布局,那么当前View这次的Layout就延时进行,直接return,不会走下面的流程。
如果没有进行布局,那么就设置mAttachInfo.mViewRequestingLayout为当前View
3:设置标志位,从PFLAG_FORCE_LAYOUT这个标志位可以看到,就是对这个View进行测量布局;
4:这里有个变量mParent,就是当前View的父容器,所以这里会调用父容器的requestLayout,就这样逐级上传,最终到达DecorView,DecorView的mParent就是ViewRootImpl,最终调用了ViewRootImpl的requestLayout。
# ViewRootImpl # requestLayout

public void requestLayout() {
    if (!mHandlingLayoutInLayoutRequest) {
        checkThread();
        mLayoutRequested = true;
        scheduleTraversals();
    }
}
这里有个标志位mHandlingLayoutInLayoutRequest,在performLayout时会被设置为true,也就说这里会判断当前是都正在绘制测量,如果没有,核心在于scheduleTraversals方法。
# ViewRootImpl # scheduleTraversals
void scheduleTraversals() {
    if (!mTraversalScheduled) {
        mTraversalScheduled = true;
        mTraversalBarrier = mHandler.getLooper().getQueue().postSyncBarrier();
        mChoreographer.postCallback(
                Choreographer.CALLBACK_TRAVERSAL, mTraversalRunnable, null);
        notifyRendererOfFramePending();
        pokeDrawLockIfNeeded();
    }
}
在scheduleTraversals方法中,通过Handler是启动了一个线程mTraversalRunnable,执行了doTraversal方法,然后在doTraversal方法中,执行了performTraversals方法
# ViewRootImpl # TraversalRunnable
final class TraversalRunnable implements Runnable {
    @Override
    public void run() {
        doTraversal();
    }
}
void doTraversal() {
    if (mTraversalScheduled) {
        mTraversalScheduled = false;
        mHandler.getLooper().getQueue().removeSyncBarrier(mTraversalBarrier);

        if (mProfile) {
            Debug.startMethodTracing("ViewAncestor");
        }

        performTraversals();

        if (mProfile) {
            Debug.stopMethodTracing();
            mProfile = false;
        }
    }
}
performTraversals方法中内容太多,就不再粘贴代码,只展示核心方法流程
 // Ask host how big it wants to be
performMeasure(childWidthMeasureSpec, childHeightMeasureSpec);

performLayout(lp, mWidth, mHeight);

performDraw();
其中performMeasure,最终调用了View的measure方法测量子View的大小;performLayout、performDraw同理
最后总结下流程图
