Nginx优化与防盗链
目录
引言
一、Nginx 服务优化
1. 隐藏版本号
1.1 查看 Nginx 版本
1.2 隐藏 Nginx 版本号
2. 修改用户与组
2.1 编译安装时指定用户和组
2.2 修改配置文件
3. 配置网页缓存时间
4.日志分割
5. 设置连接超时
二、Nginx 优化深入
1. 更改进程数
2. 配置网页压缩
① 压缩功能参数
② 上传图片到 /usr/local/nginx/html 目录下
③ 在网页中插入图片
④ 浏览器中访问网址
3. 盗链与防盗链
3.1 盗链
3.2 防盗链
4. FPM 参数优化
总结
引言
在企业信息化应用环境中,服务器的安全性和响应速度需要根据实际情况来进行相应的参数配置,来达到最优的用户体验。
但是默认的 Nginx 安装参数只能提供最基础的服务,还需调整页面缓存时间、连接超时、网页压缩等相应参数,才能让 Nginx 发挥最大的性能,接受更高的并发。
一、Nginx 服务优化
1. 隐藏版本号
在生产环境中,需要隐藏 Nginx 版本号,以避免泄露 Nginx 的版本,使攻击者不能针对特定版本进行攻击。
1.1 查看 Nginx 版本
(1)网页查看
(2)本地查看

1.2 隐藏 Nginx 版本号
隐藏 Nginx 版本号有两种方式:第一种是修改 Nginx 源码文件,指定不显示版本号;第二种是修改 Nginx 的主配置文件。
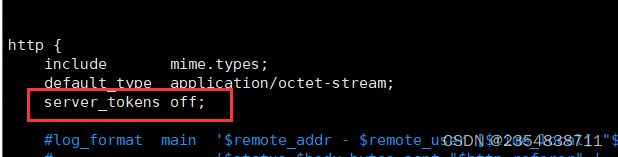
(1)修改配置文件
[root@localhost ~]#vim /usr/local/nginx/conf/nginx.conf
......
http {
include mime.types;
default_type application/octet-stream;
server_tokens off; #添加,关闭版本号
......[root@localhost ~]#nginx -t #测试配置文件语法
nginx: the configuration file /usr/local/nginx/conf/nginx.conf syntax is ok
nginx: configuration file /usr/local/nginx/conf/nginx.conf test is successful
[root@localhost ~]#systemctl restart nginx.service #重启服务

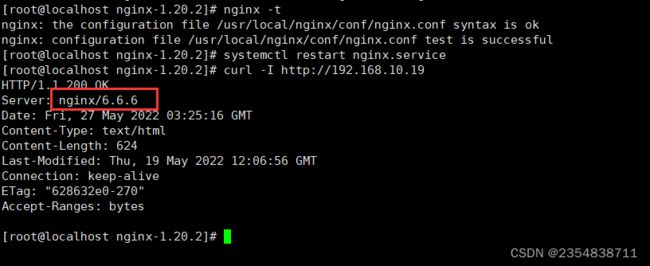
(2)修改源码文件
[root@localhost /opt/nginx-1.20.2/src/core]#vim /opt/nginx-1.12.2/src/core/nginx.h
......
#define nginx_version 1012002
#define NGINX_VERSION "6.6.6" #修改版本号
#define NGINX_VER "nginx/" NGINX_VERSION #修改服务器类型
......[root@localhost /]#cd /opt/nginx-1.20.2/
#重新编译安装
[root@localhost /opt/nginx-1.20.2]#./configure --prefix=/usr/local/nginx --user=nginx --group=nginx --with-http_stub_status_module
[root@localhost /opt/nginx-1.20.2]#make && make install[root@localhost /opt/nginx-1.20.2]#vim /usr/local/nginx/conf/nginx.conf
.......
http {
include mime.types;
default_type application/octet-stream;
# server_tokens off;
server_tokens on; #开启版本号
......[root@localhost /opt/nginx-1.20.2]#nginx -t
nginx: the configuration file /usr/local/nginx/conf/nginx.conf syntax is ok
nginx: configuration file /usr/local/nginx/conf/nginx.conf test is successful[root@localhost /opt/nginx-1.20.2]#systemctl restart nginx.service
[root@localhost /opt/nginx-1.20.2]#curl -I http://192.168.8.135
HTTP/1.1 200 OK
Server: mysql/8.8.8 #查看设置的版本信息
......

![]()


2. 修改用户与组
Nginx 运行时进程需要有用户与组的支持,用以实现对网站文件读取时进行访问控制。
主进程由 root 创建,子进程由指定的用户与组创建。
Nginx 默认使用 nobody 用户账号与组账号,一般需要进行修改。
修改 Nginx 用户和组有两种方法,一种是编译安装时指定用户和组,另一种是修改配置文件指定用户和组。
2.1 编译安装时指定用户和组
- 配置 Nginx 时,在 ./configure 后面指定用户和组的参数
[root@localhost /opt/nginx-1.20.2]#./configure \
--prefix=/usr/local/nginx \
--user=nginx \   									#指定用户名是 nginx
--group=nginx \										#指定组名是 nginx
--with-http_stub_status_module
![]()
2.2 修改配置文件
[root@localhost /opt/nginx-1.20.2]#vim /usr/local/nginx/conf/nginx.conf

user nginx nginx;									#修改用户为 nginx,组为 nginx
worker_processes  1;
......

[root@localhost /opt/nginx-1.20.2]#systemctl restart nginx.service
[root@localhost /opt/nginx-1.20.2]#ps aux |grep nginx
root       5451  0.0  0.0  20496   604 ?        Ss   20:04   0:00 nginx: master process /usr/local/nginx/sbin/nginx
nginx      5452  0.0  0.0  23024  1388 ?        S    20:04   0:00 nginx: worker process
root       5460  0.0  0.0 112676   980 pts/1    S+   20:04   0:00 grep --color=auto nginx
#主进程由 root 创建,子进程由 nginx 创建
3. 配置网页缓存时间
当 Nginx 将网页数据返回给客户端后,可设置缓存的时间,以便日后进行相同内容的请求时直接返回,避免重复请求,加快访问速度,一般只针对静态资源进行设置,对动态网页不用设置缓存时间。
(1)修改 Nginx 配置文件,在新的 location 段加入 expires 参数,指定缓存的时间,1d表示一天(若设置1.5天可指定为1d12h)
[root@localhost /data]#vim /usr/local/nginx/conf/nginx.conf
        location / {
            root   html;
            index  index.html index.htm;
        }
        location ~ \.(gif|jpg|jepg|png|bmp|ico)$ {           #加入新的location,以图片作为缓存对象
           root html;
           expires 1d;                             			 #指定缓存时间为1天
        }
......

[root@localhost /data]#nginx -t
nginx: the configuration file /usr/local/nginx/conf/nginx.conf syntax is ok
nginx: configuration file /usr/local/nginx/conf/nginx.conf test is successful
(2)上传图片到 html 目录中,并修改站点文件
[root@local /usr/local/nginx]#cd html/
[root@local /usr/local/nginx/html]#ls
50x.html  index.html
[root@local /usr/local/nginx/html]#rz -E                 #直接把图片拖进来,注意图片的格式!
rz waiting to receive.
[root@local /usr/local/nginx/html]#ls
50x.html  haimian.png  index.html

[root@local /usr/local/nginx/html]#vim index.html
......
Thank you for using nginx.
                           #23行位置插入识别图片
If you see this page, the nginx web server is successfully installed and
working. Further configuration is required.
......
(3)浏览器访问页面
4.日志分割
随着 Nginx 服务运行时间的增加,它的日志也会增加,为了能够方便知道 Nginx 的运行状态,需要时刻关注 Nginx 日志文件。过大的日志文件不利于日常监控和分析排查,因此需要定期的对日志文件进行切割。
Nginx 没有类似 Apache 的 cronlog 日志分割处理功能,但可以通过 Nginx 的信号控制功能脚本来实现日志的自动切割,并将脚本加入到 Linux 的计划任务中,让脚本在每天固定时间点执行,即可执行日志切割功能。
首先编写脚本 /opt/rzfg.sh ,把 Nginx 的日志文件 /usr/local/nginx/logs/access.log 移动到目录 /var/log/ngix 下面,以当前时间作为日志文件的名称
然后重载并创建新的日志文件
最后删除30天以前的日志文件
vim /opt/rzfg.sh

#!/bin/bash
#Filename:fenge.sh
d=$(date -d "-1 day" "+%Y%m%d")                     #-d表示设置,-1 day表示前一天
logs_path="/var/log/nginx"                            #日志存放的位置
pid_path=`cat /usr/local/nginx/logs/nginx.pid`
[ -d $logs_path ] || mkdir -p $logs_path             #判断是否有日志文件的目录,没有就创建

#移动访问日志到log_path,并命名text.com;脚本执行后创建日志进行命令,用时间戳的方式来标记唯一性
mv /usr/local/nginx/logs/access.log ${logs_path}/text.com-access.log-$d
kill -USR1 $pid_path                           #重载然后生成新的access日志
find $logs_path -mtime +30 -xargs rm -rf {} \;           #删除30天前的日志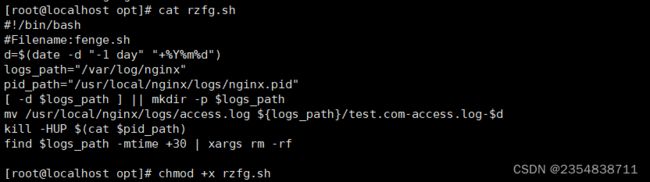
执行脚本,测试日志文件是否被切割
[root@localhost /opt]#chmod +x rzfg.sh
[root@localhost /opt]#sh -x rzfg.sh
++ date -d '-1 day' +%Y%m%d
+ d=20211006
+ logs_path=/var/log/nginx
+ pid_path=/usr/local/nginx/logs/nginx.pid
+ '[' -d /var/log/nginx ']'
+ mkdir -p /var/log/nginx
+ mv /usr/local/nginx/logs/access.log /var/log/nginx/test.com-access.log-20211006
++ cat /usr/local/nginx/logs/nginx.pid
+ kill -HUP 6109
+ find /var/log/nginx -mtime +30
+ xargs rm -rf

[root@localhost /opt]#cd /var/log/nginx/
[root@localhost /var/log/nginx]#ls
test.com-access.log-20220526                                     #按日期分割了日志文件
[root@localhost /var/log/nginx]#cd /usr/local/nginx/logs/
[root@localhost /usr/local/nginx/logs]#ls
access.log  error.log  nginx.pid

[root@localhost /var/log/nginx]#date -s 20220528                  #修改时间进行测试
2022年 05月 28日 星期五 00:00:00 CST
[root@localhost /var/log/nginx]#cd /opt/
[root@localhost /opt]#sh -x rzfg.sh
[root@localhost /opt]#cd /var/log/nginx/
[root@localhost /var/log/nginx]#ls
test.com-access.log-20220526  test.com-access.log-20220527
[root@localhost /usr/local/nginx/logs]#ntpdate ntp1.aliyun.com    #同步时间
28 May 14:10:54 ntpdate[92781]: step time server 120.25.115.20 offset -121861.620901 sec
[root@localhost /usr/local/nginx/logs]#date
2022年 05月 28日 星期二 14:11:12 CST
设置 crontab 任务,定期执行脚本自动进行日志分割
[root@localhost /usr/local/nginx/logs]#crontab -e

0 1 * * * /opt/rzfg.sh
#每天凌晨 1:30 分执行/opt/rzfg.sh 脚本,进行日志分割
5. 设置连接超时
-
在企业网站中,为了避免同一个客户长时间占用连接,造成资源的浪费,可以设置相应的连接超时参数,用来实现对连接访问时间的控制。
-
超时参数
[root@localhost /opt]#vim /usr/local/nginx/conf/nginx.conf

http {
......
    #keepalive_timeout  0;
    keepalive_timeout  65;
    Client_header_timeout 80;           #等待客户端发送请求头的超时时间,超时会发送408错误
    Client_body_timeout 80;				#等待客户端发送请求体的超时时间
......

[root@localhost /opt]#nginx -t
nginx: the configuration file /usr/local/nginx/conf/nginx.conf syntax is ok
nginx: configuration file /usr/local/nginx/conf/nginx.conf test is successful
Keepalive_timeout 					#设置连接保持超时时间
Client_header_timeout 				#指定等待客户端发送请求头的超时时间
Client_body_timeout  				#设置请求体读超时时间
二、Nginx 优化深入
1. 更改进程数
- 在高并发环境中,需要启动更多的 Nginx 进程以保证快速响应,用以处理用户的请求,避免造成阻塞
#ps aux 命令可以查看 Nginx 运行进程的个数
[root@localhost /opt]#ps aux |grep nginx
root       6555  0.0  0.0  20540  1452 ?        Ss   22:55   0:00 nginx: master process /usr/local/nginx/sbin/nginx
nginx      6790  0.0  0.0  23044  1420 ?        S    23:01   0:00 nginx: worker process
root       7329  0.0  0.0 112676   976 pts/1    S+   23:35   0:00 grep --color=auto nginx

#master process 是 Nginx 的主进程,开启了一个;worker process 是子进程,开启了一个
修改 Nginx 配置文件中的 work_processes 参数,一般设为 CPU 的个数或核数,在高并发的情况下可以设置为 CPU 个数或核数的2倍
#可以先查看 CPU 的核数来确定参数
[root@localhost /opt]#cat /proc/cpuinfo | grep -c "physical"
8
[root@localhost /usr/local/nginx/conf]#vim /usr/local/nginx/conf/nginx.conf
}
#user  nobody;
worker_processes  8;
worker_cpu_affinity 10000000 01000000 00100000 00010000 00001000 00000100 00000010 00000001;
......

#10000000表示启用第一个CPU内核,01000000表示启用第二个CPU内核,以此类推...
参数设置为8,和CPU的核数相同。
运行进程数设置多一些,响应客户端访问请求时,Nginx 就不会启动新的进程提供服务,从而减小了系统的开销,提升了服务的速度
修改完成后,重启服务,再使用 ps aux 命令查看运行进程数的变化情况
[root@localhost /usr/local/nginx/conf]#ps aux |grep nginx
root       7608  0.0  0.0  20496   664 ?        Ss   23:51   0:00 nginx: master process /usr/local/nginx/sbin/nginx
nginx      7609  0.0  0.0  23024  1392 ?        S    23:51   0:00 nginx: worker process
nginx      7610  0.0  0.0  23024  1392 ?        S    23:51   0:00 nginx: worker process
nginx      7611  0.0  0.0  23024  1392 ?        S    23:51   0:00 nginx: worker process
nginx      7612  0.0  0.0  23024  1392 ?        S    23:51   0:00 nginx: worker process
nginx      7613  0.0  0.0  23024  1392 ?        S    23:51   0:00 nginx: worker process
nginx      7614  0.0  0.0  23024  1392 ?        S    23:51   0:00 nginx: worker process
nginx      7615  0.0  0.0  23024  1392 ?        S    23:51   0:00 nginx: worker process
nginx      7616  0.0  0.0  23024  1392 ?        S    23:51   0:00 nginx: worker process
root       7628  0.0  0.0 112676   980 pts/1    S+   23:52   0:00 grep --color=auto nginx

#开启了一个主进程和八个子进程,设置的参数成功生效了
#默认情况下,Nginx 的多个进程可能更多地跑在一个 CPU 上,可以分配不同的进程给不同的 CPU 处理,
以充分利用硬件多核多 CPU 。
在一台 8 核的 CPU 服务器上,设置每个进程分别由不同的 CPU 核心处理,来达到 CPU 的性能最大化。
2. 配置网页压缩
Nginx 的 ngx_http_gzip_module 压缩模块提供了对文件内容压缩的功能,允许 Nginx 服务器将输出内容发送到客户端之前进行压缩,以节约网站的带宽,提升用户的访问体验。
默认 Nginx 已安装该模块,只需要在配置文件中加入相应的压缩功能参数对压缩性能进行优化即可。
① 压缩功能参数
[root@localhost /usr/local/nginx/conf]#vim /usr/local/nginx/conf/nginx.conf
http {
......
gzip on;
#开启gzip压缩功能
gzip_min_length 1k;
#用于设置允许压缩的页面最小字数
gzip_buffers 4 16k;
#表示申请4个单位为16KB的内存作为压缩结果流缓存,默认值是申请与原始数据大小相同的内存空间来存储gzip压缩结果
gzip_http_version 1.1;
#用于识别http协议版本,默认是1.1,目前大部分浏览器已支持gzip压缩,但处理很慢,也比较消耗CPU资源
gzip_comp_level 6;
#用来指定gzip压缩比,压缩比1最小,处理速度最快;压缩比为9最大,传输速度快,但处理速度最慢,使用默认即可
gzip_vary on;
#该选项可以让前端的缓存服务器缓存经过gzip压缩的页面
gzip_types text/plain application/x-javascript text/css image/jpg image/jpeg image/png image/gif application/xml text/javascript application/x-httpd-php application/javascript application/json;
#压缩类型,表示哪些网页文档启用压缩功能
......
}
gzip on;
gzip_min_length 1k;
gzip_buffers 4 16k;
gzip_http_version 1.1;
gzip_comp_level 6;
gzip_vary on;
gzip_types text/plain application/x-javascript text/css image/jpg image/jpeg image/png image/gif application/xml text/javascript application/x-httpd-php application/javascript application/json;
② 上传图片到 /usr/local/nginx/html 目录下
[root@localhost /usr/local/nginx/conf]#cd /usr/local/nginx/html/
[root@localhost /usr/local/nginx/html]#ls
50x.html  888.jpg  index.html
[root@localhost /usr/local/nginx/html]#rz -E
rz waiting to receive.
[root@localhost /usr/local/nginx/html]#ls
50x.html  888.jpg  haha.jpg  index.html
③ 在网页中插入图片
[root@localhost /usr/local/nginx/html]#vim index.html
......
hahahahahahahahaha!
                         #插入该图片内容
......
#插入该图片内容
......
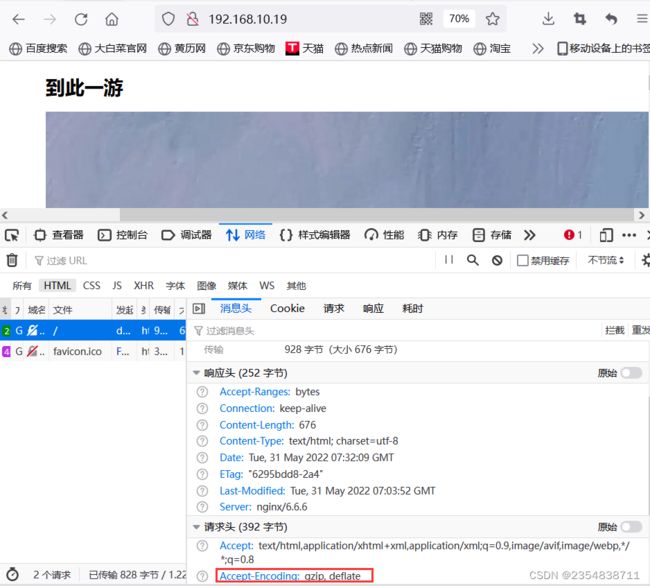
④ 浏览器中访问网址
3. 盗链与防盗链
盗链是一种恶意行为,在互联网上广泛存在,如果不了解什么是盗链,不采取一些方式防止盗链,网站经营者很有可能付惨重的代价,却得不到任何收益。那么什么是盗链?防止盗链又该如何操作呢?
3.1 盗链
盗链是指服务提供商自己不提供服务的内容,通过技术手段绕过其它有利益的最终用户界面(如广告),直接在自己的网站上向最终用户提供其它服务提供商的服务内容,骗取最终用户的浏览和点击率,受益者不提供资源或提供很少的资源,而真正的服务提供商却得不到任何的收益。
案例环境
盗链端: 192.168.10.16
服务端:192.168.10.19
windows: 192.168.10.20                #配置/hosts
盗链端配置
#设置域名和IP映射关系
[root@localhost ~]#vim /etc/hosts
192.168.10.19 www.zhangsan.com
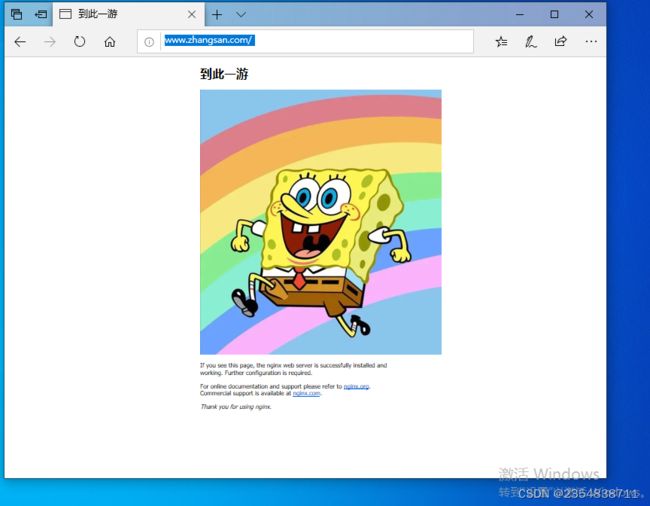
#在盗链端编写盗链页面index.html,盗取源主机的图片
[root@localhost ~]#vim /usr/local/nginx/html/index.html
到此一游!
 [root@daolian ~]#curl 192.168.10.13
到此一游!
服务端配置
#设置域名和IP映射关系
[root@localhost /usr/local/nginx/html]#vim /etc/hosts
192.168.10.13 www.zhangsan.com

[root@localhost ~]#cd /usr/local/nginx/html/               #把图片放入html目录下
[root@localhost /usr/local/nginx/html]#rz -E
rz waiting to receive.
[root@localhost /usr/local/nginx/html]#ls
50x.html  haimian.png  error.png  paidaxing.png  index.html
[root@localhost /usr/local/nginx/html]#vim index.html
到此一游!
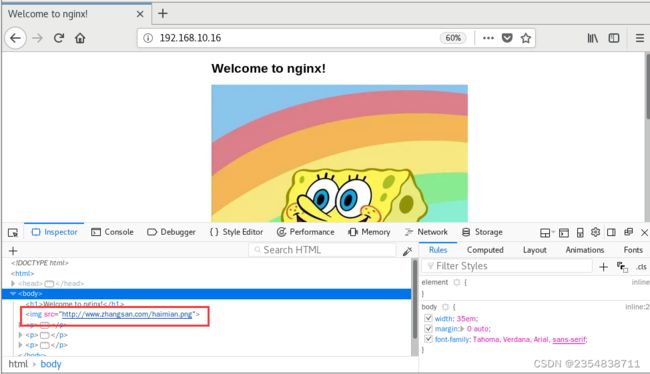
浏览器测试
最后在盗链端查看进行验证,右击查看图片,选择查看属性可以看到成功盗取
3.2 防盗链
在企业网站服务中,一般都要配置防盗链功能,以避免网站内容被非法盗用,造成经济损失,也避免不必要的贷款浪费。
server 端配置
[root@localhost /usr/local/nginx/html]#vim /usr/local/nginx/conf/nginx.conf
......
    server {
......
        location ~*\.(gif|jpg|png)$ {
        valid_referers *.zhangsan.com zhangsan.com;
        if ( $invalid_referer ) {
            rewrite ^/ http://www.zhangsan.com/error.png;
                }
        }
......
配置文件说明
location ~*\.(gif|jpg|png)$ {             #匹配不区分大小写,以.gif或.jpg或.png为结尾的文件
valid_referers *.zhangsan.com zhangsan.com;       #设置被信任的访问来源,www.haha.com可以正常使用图片

if ( $invalid_referer ) {
rewrite ^/ http://www.zhangsan.com/error.png;
#if语句来表示若链接的来源域名不是被信任的网址,$invalid_referer为1,则进行重写或返回403页面
上传 error.png 文件到 /usr/local/nginx/html 目录
[root@localhost ~]#cd /usr/local/nginx/html/
[root@localhost /usr/local/nginx/html]#ls
50x.html  haimian.png  error.png  paidaxing.png  index.html
检查配置文件语法,重启服务
[root@localhost ~]#nginx -t
nginx: the configuration file /usr/local/nginx/conf/nginx.conf syntax is ok
nginx: configuration file /usr/local/nginx/conf/nginx.conf test is successful
[root@localhost ~]#systemctl restart nginx.service
用浏览器进行验证
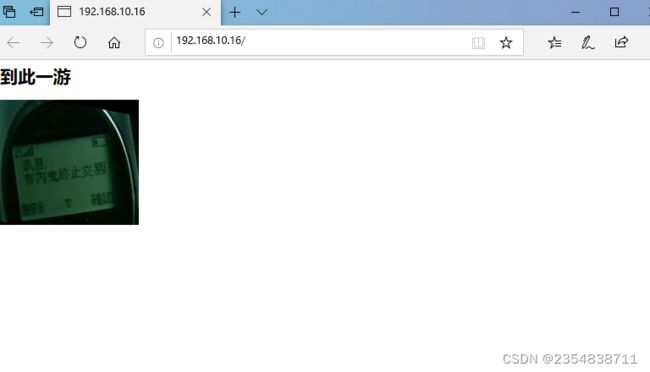
上面可以看到显示出来的是被重写的图片,说明防盗链配置成功!
4. FPM 参数优化
Nginx 的 PHP 解析功能实现如果是交由 FPM 处理的,为了提供 PHP 的处理速度,可对 FPM 模块进行参数的调整。
首先安装带 FPM 模块的 PHP 环境,保证 PHP 可以正常运行
FPM 进程有两种启动方式,由 pm 参数指定,分别是 static 和 dynamic,前者将产生固定数据的 fpm 进程,后者将以动态的方式产生 fpm 进程
static 方式可以使用 pm.max_children 指定启动的进程数量。dynamic 方式的参数则要根据服务器的内存与服务负载进行调整,参数下所示
| 选项 | 说明 |
| pm.max_children | 指定启动的进程的最大的数量 |
| pm.start_servers | 动态方式下初始的 ftpm 进程数量 |
| pm.min_spare_servers | 动态方式下最小的 fpm 空闲进程数 |
| pm.max_spare_servers | 动态方式下最大的 fpm 空闲进程数 |
假设云服务器上运行了个人论坛,内存为1.5 GB ,fpm 进程数为20,内存消耗将近 1GB ,处理速度较慢,需对参数进行优化处理
vim /usr/local/php/etc/php-fpm.conf
pid = run/php-fpm.pid

vim /usr/local/php/etc/php-fpm.d/www.conf
pm = dynamic										#将以动态的方式产生fpm进程
pm.max_children=20     								#static模式下空闲进程数上限,大于下面的值
pm.start_servers = 5   								#动态方式下默认开启的进程数,在最小和最大之间
pm.min_spare_servers = 2  							#动态方式下最少空闲进程数
pm.max_spare_servers = 8  							#动态方式下最大空闲进程数

#FPM 启动时有5个进程,最小空闲2个进程,最大空闲8个进程,最多可以有20个进程存在
#重启 php-fpm
[root@localhost ~]# kill -USR2 `cat /usr/local/php/var/run/php-fpm.pid`
[root@localhost ~]# netstat -anpt | grep 9000
总结
(1)Nginx 配置文件组成:global 全局模块配置;http { } 模块配置;server 模块;location 匹配 URL 和路径
(2)Nginx 擅长处理静态请求的服务,理论上能支持3~5万个并发请求,但受制于CPU个数和最大文件打开数
(3)Nginx 的优点是轻量级,功能比较丰富(开源&收费),缺陷是它默认情况下是不支持集群的
(4)Nginx 服务优化包括隐藏版本号、更改用户与组、配置网页缓存时间、日志切割、设置连接超时
(5)深入优化包括更改进程数、配置网页压缩、配置防盗链和FPM参数优化。