树莓派4b: 初级使用(Ubuntu21.10,Windows11写入SSD,远程连接,软路由搭建,webmin安装,自建Dockerhub,远程管理, 百度云盘,阿里云盘同步等)
虽然vps也便宜,但还是想买4b
树莓派4b显示器接线为 hdmini,买时没有附赠
所以以下均为mac系统下通过ssh操作
文章来自:http://blog.csdn.net/intbird 转载请说明出处
rasberrypi 4b
-
-
- 0. 服务面板
- 1. 安装windows11(arm64)
-
- 1. windows arm64镜像
- 2. 新方法: wor-flasher
- 3. Windows on Raspberry imager
- 2. 烧录linux(ubuntu,debian...)系统
-
- 1.官方工具
- 2. 从U盘或者SSD启动
-
- 1.帮助文档
- 2.U盘启动操作
- 3.SD Card Copier
- 4.将Ubuntu写入SSD
- 5.挂载苹果系统分区
- 3. Raspberry Pi OS的一些桌面设置
-
- 1. 设置为黑色主题
- 2. 打开cpu温度监控和使用率监控
- 3. 更多软件安装
-
- 1. 自带的app市场
- 2. 选择pi-apps第三方应用市场
- 4. Ubuntu Store 和 Snap store
-
- 1.Snap和Snap-store
- 2.Snap网络设置
- 3. snap-store安装软件
- 4.Ubuntu(树莓派armv7) 开启屏幕共享
- 5.Ubuntu(VPS amd64)打开屏幕共享
- 6.服务和桌面版切换
- 2.ssh启用
-
- 1. 没有hdmini线
- 2. 有线和无线网络
-
- 1.使用网线连接
- 3.命令行连接无线网
- 4.文本编辑管理无线网
- 5.DHCP和静态地址
- 3.ssh登录
-
- 默认user: pi
- 默认密码: raspberry
- 4.root用户
-
- 1. 修改root
- 2. 切换root
- 3. root登录
- 5.远程登录
-
- 1.远程登录(推荐zerotier)
-
- 1. 路由器支持配置 DDNS + DMZ
- 2.手动添加客户端软件支持
- 2.frp(需要公网ip)
-
- 1.frp查看
- 1.frp配置
- 3. zerotier
- 4.TeamViewer 和 VncView 等
- 5.ngrok
- 6.gost
- 7.wireguard 极其内核衍生软件
- 6.软路由和网络设置
-
- 1. SwitchOMG
- 2. GOST
- 3. 软路由
- 7. Docker
-
- 1. docker 安装
- 2. docker 管理工具:
-
- 1.portainer如图:
- 2.portainer安装
- 3.portainer密码: 123456
- 3. dockerHub registry2搭建:
-
- 1.registry2 添加
- 2.registry2 安装
- 3.registry2 解释
- 4.registry2 登录
- 4. docker迁移:
-
- 1.将运行中的容器打包并上传
- 2.或者使用potainer管理工具上传
- 3.另一台机器拉取运行镜像
- 4.Dockerfile
- 5.部分问题跟进
- 8. 远程管理
-
- 1. webmin安装系统监控
-
- 1.安装会自动提示依赖库
- 2.管理页面地址端口
- 3.配置一下https
- 4.mac远程管理树莓派
- 2. postfix邮件服务器
- 9.远程同步和备份
-
- 1. rsync
- 2. rclone
- 3.备份工具
-
- Amanda ,Rsync&Rclone, timeshift ,rsnapshot
- 4 云盘同步
-
- 4.1 百度盘同步
- 4.2 阿里盘同步
- 4.3 OneDrive盘
- 4.4 Mount WebDav
- 10.硬件
-
- camera
- temperature
- netstat
- temp cpu温度
- iftop 网络监控
-
0. 服务面板
https://pi.intbird.net/
搭建的部分服务可能会忘,html源码可以方便配置
公开的服务需要加个登录密码
没有密码权限的就不要放公网
map的key作为区分
- key包含https,value为空,则用key跳转
- value包含https,则使用value跳转
- key和value都不包含链接,则作为分割线
加个背景好看一点
https://pi.intbird.net/
https://pi.intbird.net/

1. 安装windows11(arm64)
1. windows arm64镜像
https://uupdump.net/
2. 新方法: wor-flasher
https://github.com/Botspot/wor-flasher
~/wor-flasher/install-wor-gui.sh

pi的bios里修改内存限制为 4G(我的是4G内存的pi)
重启到windows即可
3. Windows on Raspberry imager
https://www.worproject.ml/downloads

2. 烧录linux(ubuntu,debian…)系统
1.官方工具
https://www.raspberrypi.org/software/
可以在线选择要安装的系统和直接烧录sd卡
sd卡需要8g以上,否则失败

2. 从U盘或者SSD启动
1.帮助文档
https://www.raspberrypi.org/documentation/hardware/raspberrypi/bootmodes/msd.md
https://www.tomshardware.com/how-to/boot-raspberry-pi-4-usb
https://peyanski.com/official-raspberry-pi-4-usb-boot/
2.U盘启动操作
su root
apt update
apt-get upgrade -y
apt full-upgrade
rpi-update
reboot

su root
sudo rpi-eeprom-update -d -a
reboot

su root
raspi-config
Advanced Options > Boot Order > B1 USB Boot
进入高级设置

选择 boot order

选择boot-loader version

3.SD Card Copier
如果ssd不是sdcard等,无法用官方 pi-imager 写入
则可以通过sdcardcpier复制到ssd内
这个东西非常好
这个东西非常好
这个东西非常好
见: [ 4. 将Ubuntu写入SSD ]

4.将Ubuntu写入SSD
1.安装如图

树莓派从SSD启动Ubuntu的话
我还没看到直接烧录ubuntu系统的
所以:
简单和上手快的话就用 两个USB设备 + 一块SSD
大意说明:
准备
准备两个USB设备(读卡器,U盘等) + 一个SSD硬盘`烧录
一个USB烧录树莓派官方系统
一个USB烧录ubuntu官方系统启动
启动一个USB的ubuntu系统,完成ubuntu初始化设置
启动一个USB的树莓派系统,打开Copier SDCard工具复制
利用Copier SDCard工具
将刚才完成初始化的Ubuntu系统卡复制到SSD里重启
拔掉所有USB,从SSD启动Ubuntu即可
问题:
ubuntu系统设备发热明显
CPU负载较高
但是有很多桌面版交互较好
自由取舍吧
5.挂载苹果系统分区
挂载一个apfs硬盘到树莓派
- 自动挂载
	// 安装挂载工具
	apt-get install libfsapfs-utils
	> libfsapfs-utils 已经是最新版 (20190210-1)

   // 得到外设标示
 	fdisk -l
	> /dev/sda1    2048    616447    614400   300M EFI System
	> /dev/sda2  616448    878591    262144   128M Microsoft reserved
	> /dev/sda3  878592 234441607 233563016 111.4G unknown

	// 挂载硬盘
	mkdir -p /mnt/intbird-sandisk
    fsapfsmount -f 1 /dev/sda3 /mnt/intbird-sandisk
    > fsapfsmount 20190210
    > root@raspberrypi:/home/pi# ls /mnt/intbird-sandisk
    > Applications  cores  home  Library  mnt  opt  private  sw  System  Users  usr  Volumes
- 手动挂载
https://github.com/sgan81/apfs-fuse
看他的最新说明文档
3. Raspberry Pi OS的一些桌面设置
1. 设置为黑色主题

2. 打开cpu温度监控和使用率监控
应用程序快捷启动栏也是一样的设置


3. 更多软件安装
1. 自带的app市场

2. 选择pi-apps第三方应用市场

4. Ubuntu Store 和 Snap store
1.Snap和Snap-store
更新到最新版,Snap商店应用会越来越多的

2.Snap网络设置
- snap速度极其慢,所以设置一下网络
snap set system proxy.http="http://127.0.0.1:1083"
snap set system proxy.https="http://127.0.0.1:1083"
- 查看网络
snap get system proxy
root@respberrypi:~# snap get system proxy
Key Value
proxy.http http://127.0.0.1:1083
proxy.https http://127.0.0.1:1083
root@respberrypi:~#
- 删除网络
snap unset system proxy.http
snap unset system proxy.https
- 安装软件
snap install nextcloud
root@respberrypi:~# snap install nextcloud
nextcloud 20.0.4snap2 from Nextcloud✓ installed
3. snap-store安装软件
snap run snap-store

搜索要安装的软件安装即可


chrome

4.Ubuntu(树莓派armv7) 开启屏幕共享
ubuntu20.10 vnc 自带屏幕共享,官方文档
所以
- ubuntu在设置里允许屏幕共享
- mac打开屏幕共享app,连接到如图地址即可
ubuntu打开共享

mac: finder -> 连接服务器 -> vnc://respberrypi.local

5.Ubuntu(VPS amd64)打开屏幕共享
Ubuntu自带vino,因为没有图形界面
所以通过命令行打开它即可
效果如图

系统信息

切换用户

x86的snap商店比树莓派的arm snap商店东西多太多

//更新,桌面也有--no-recomends版的,自行查找
sudo apt update
sudo apt install tasksel
tasksel --list-tasks
tasksel install ubuntu-desktop
reboot

systemctl set-default graphical.target
reboot

//手动开启ubuntu桌面,待我研究他咋开机启动
//也可以开启其他桌面,当然其他桌面需要开启对应的VNC服务
startx &

//命令行配置vino,connections让本地和外网都能访问
gsettings set org.gnome.Vino require-encryption false
gsettings set org.gnome.settings-daemon.plugins.sharing active true
gsettings set org.gnome.Vino prompt-enabled false
gsettings set org.gnome.Vino authentication-methods "['vnc']"
gsettings set org.gnome.Vino vnc-password $(echo -n '$passwd'|base64)

dconf write /org/gnome/settings-daemon/plugins/sharing/vino-server/enabled-connections "['']"
export DISPLAY=:0 && /usr/lib/vino/vino-server &

6.服务和桌面版切换
开启桌面占用1G+内存,so…
// 服务模式
systemctl set-default multi-user.target

//桌面模式
systemctl set-default graphical.target
2.ssh启用
1. 没有hdmini线
1.无法远程连接:
拔掉sd卡, 直接在 sd卡的根目录下 添加一个名为 ssh 的空文件重启即可
2.可以远程连接:
修改pi密码通过远程连接在root下创建一个ssh文件
3.如果有显示器:
$sudo su
$raspi-config
$enable ssh

4.如果有远程桌面:

2. 有线和无线网络
1.使用网线连接
记录树莓派ip(如: 192.168.3.107)

3.命令行连接无线网
su root raspi-config
System Options > Wireless Lan > ssid & passwd


4.文本编辑管理无线网
https://www.raspberrypi.org/documentation/configuration/wireless/wireless-cli.md
nano /etc/wpa_supplicant/wpa_supplicant.conf

5.DHCP和静态地址
cat /etc/dhcpcd.conf
eth0: 有线网络
wlan0: 无线网络

3.ssh登录
默认user: pi
默认密码: raspberry
本地ip: 192.168.3.107
连接软件: termius , mac终端
ssh命令:
内网登录: ssh [email protected] -p 22
外网登录: ssh [email protected] -p 8002 (外网登录见下面)
工具登录: 如图 termius 的mac版

4.root用户
1. 修改root
使用pi登录后,修改root用户密码: sudo passwd root

2. 切换root
已添加root用户,切换root用户: su root or sudo su
3. root登录
root账户被禁用登陆(直接使用root用户远程登录会失败)
cat /etc/ssh/sshd_config
搜索 PermitRootLogin
修改: #PermitRootLogin prohibit-password
变为: PermitRootLogin yes
vi 后保存退出重启

5.远程登录
树莓派在家运行,不可能一直内网访问,可以开启远程登录
1.远程登录(推荐zerotier)
1. 路由器支持配置 DDNS + DMZ
已有公网ip (移动现在很少给家庭用户公网ip了, 基本上是废了)
通过ddns方式直接访问到树莓派的内网地址
- ddns: 使用 no-ip 或者 花生壳等( pi.ddns.net -> &public ip )
- 路由器静态地址分配 (固定树莓派ip)
- 在路由器端设置dmz主机ip( pi.ddns.net:8080 -> respi host)

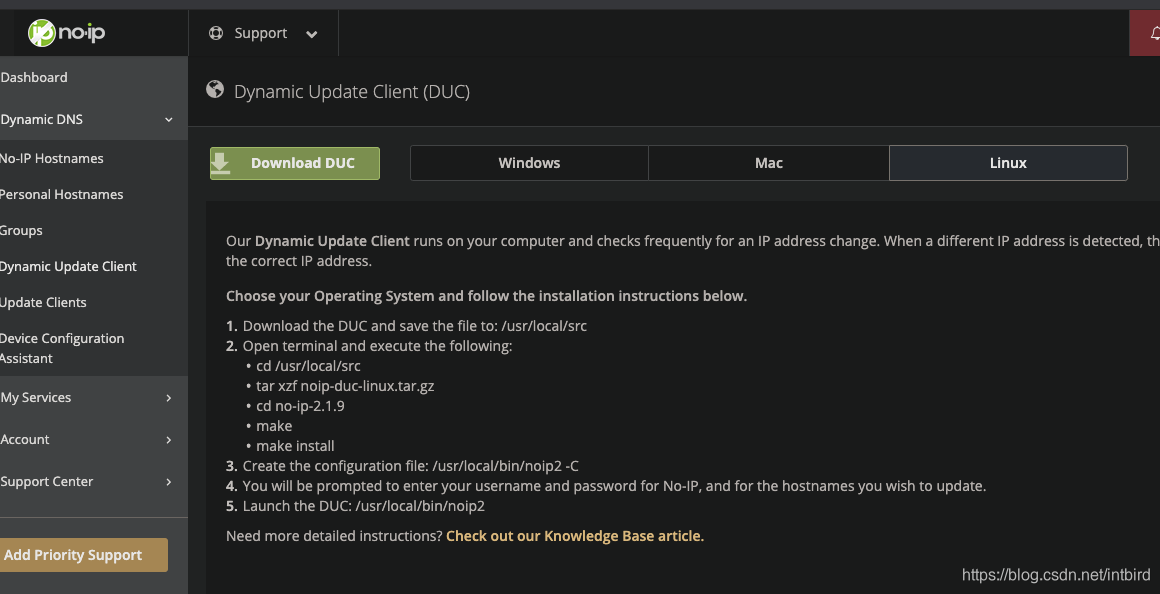
2.手动添加客户端软件支持
ddns的方式: (如: noip)
linux client: [https://my.noip.com/#!/dynamic-dns/duc](https://my.noip.com/#!/dynamic-dns/duc)
2.frp(需要公网ip)
1.frp查看
没有有公网ip: frp, ngrok等内网穿透
- 通过公网ip服务器转发树莓派 和 连接端的流量
- 通过xtcp 对点连接到树莓派
详细连接可以查看frp官网
frp多个客户端连接如图:

1.frp配置
- 树莓派端(armv7l):
./frpc -c ./frpc.ini - 公网ip服务端:
./frps -c ./frps.ini
公网ip远程连接如图: 可以在远程连接中 再次进行 远程连接

frpc.ini
[common]
authentication_method = token
section = xxx
server_addr = intbird.net
server_port = 8001

admin_addr = 127.0.0.1
admin_port = 7400
admin_user = intbird
admin_pwd = xxx

[web]
type = http
local_port = 80
custom_domains = intbird.net

[ssh]
type = tcp
local_ip = 127.0.0.1
local_port = 22
remote_port = 8002
use_encryption = true
frps.ini
[common]
authentication_method = token
section = xxx

dashboard_port = 8000
dashboard_user = intbird
dashboard_pwd = xxx

bind_port = 8001
bind_udp_port = 8002
vhost_http_port = 8003

subdomain_host = intbird.net
enable_prometheus = false
3. zerotier
过于强大和简单, 自行百度, 我最爱它

4.TeamViewer 和 VncView 等
TeamViewer

VNC

5.ngrok
没有付费,一次只能连接一个客户端且停止后地址会随机改变
https://dashboard.ngrok.com/get-started/setup
./ngork authtoken $youToken
./ngork tcp 22


6.gost
在公司访问家庭内网示例,在前面的步骤完成后即可
开启sks5或https( gost)
chomd u+x ./gost
./gost -L socks5+tls:/user:password@:1080

7.wireguard 极其内核衍生软件
linux + macos 多平台

6.软路由和网络设置
1. SwitchOMG
图标如图:

Chrome插件SwitchyOmega: https://github.com/FelisCatus/SwitchyOmega/releases

2. GOST
GOST转发本地指定端口,这样会灵活一点
1080端口 用于从家访问公司内网
1090端口 用于从公司访问家里内网
./gost-linux-armv7-2.11.1 -L=socks5://:1080 -F=socks5+tls://intbird:passwd@$HOST:1080
3. 软路由
树莓派的打开的端口 局域网电脑可以直接连接
所以再不使用fly-core进行tproxy的情况下:
将iphone的wifi服务连接到树莓派ip
iphone可以通过树莓派上网
1080端口 用于从家访问公司内网
1090端口 用于从公司访问家里内网
- oepnwrt或者fly-code说了就发不出去了…
7. Docker
Docker官网
1. docker 安装
- ubuntu
apt-get install -y docker.io
- centos
yum install -y docker
- macos

2. docker 管理工具:
docker有自己的管理工具和api,哪个工具都行:
docker本地api , tls远程api
kitematic , docker-app
k8s node 也算一个吧
我这里用portainer-ce
1.portainer如图:

2.portainer安装
ocker run -d -p 9000:9000 \
-v /var/run/docker.sock:/var/run/docker.sock \
-v /root/intbird/docker/portainer:/data \
--restart always \
portainer/portainer-ce \
--admin-password='$2a$10$752FJIPGCGYal52wccmoj.LY00lGmTnDxSmjeI48a.K6abTL.Zbj6'
3.portainer密码: 123456
进去以后改个密码

3. dockerHub registry2搭建:
1.registry2 添加

2.registry2 安装
 docker run -d \
  -p 5000:5000 \
  --restart=always \
  --name registry2 \
  -v /root/intbird/docker/registry2/auth:/auth \
  -v /root/intbird/docker/registry2/certs:/certs \
  -v /root/intbird/docker/registry2/data:/var/lib/registry \
  -e "REGISTRY_AUTH=htpasswd" \
  -e "REGISTRY_AUTH_HTPASSWD_REALM=intbird" \
  -e REGISTRY_AUTH_HTPASSWD_PATH=/auth/htpasswd.config \
  -e REGISTRY_HTTP_TLS_CERTIFICATE=/certs/registry.pem \
  -e REGISTRY_HTTP_TLS_KEY=/certs/registry.key \
  registry:2
3.registry2 解释
/auth: 授权文件所在目录
/certs: registry2 https的证书位置
/var/lib/registry : registry2仓库位置
注意: 1.REALM 为 intbird
即: 登录的用户名
注意: 2. htpasswd
htpasswd: 认证类型
可以使用docker工具(xmartlabs/htpasswd)生成
docker run --rm -ti xmartlabs/htpasswd intbird $passwd@ > htpasswd.config
4.registry2 登录
就用默认的5000端口, 443端口留作他用
docker login dockerhub.intbird.ml:5000

所需文件如图:

4. docker迁移:
两种push方法都是一样的,选一个用即可
1.将运行中的容器打包并上传
docker commit -p intbird-nodejs intbird-nodejs-snapshot
docker tag intbird-nodejs-snapshot dockerhub.intbird.ml:5000/intbird-nodejs-snapshot
docker push dockerhub.intbird.ml:5000/intbird-nodejs-snapshot
2.或者使用potainer管理工具上传
- 打包上传

- 密码正确则上传成功

- 检查仓库文件

3.另一台机器拉取运行镜像
docker login
intbird/$passwd
docker pull dockerhub.intbird.ml:5000/intbird-nodejs-snapshot:latest
4.Dockerfile
关于build产物优化体积 仁者见仁,智者见智
FROM node:14.15.0-alpine

WORKDIR /data/

COPY package*.json ./
COPY ./node .

RUN npm install

EXPOSE 8081
CMD [ "node", "node/node-dev.js" ]

# docker build -t intbird.net/nodejs .
# docker run -p 8081:8081 -d intbird.net/nodejs
docker build -t intbird/intbird-nodejs .
docker run -p 8081:8081 -d intbird/intbird-nodejs
5.部分问题跟进
-
两个常见的参数
--restart always: 相当于守护进程
--net-alias=intbird-nodejs: 允许别名访问同一网络 -
提示磁盘空间占满等
尝试了部分方法,效果我觉得不太理想
更多多待后续跟进尝试后继续…
8. 远程管理
1. webmin安装系统监控
1.安装会自动提示依赖库
https://www.webmin.com/deb.html
2.管理页面地址端口
https://raspberrypi:10000

3.配置一下https
1.自建的CA证书
2.用自建的CA证书生成raspberrypi证书
3.浏览器设置信任自建的CA证书即可


4.mac远程管理树莓派
配置一下 /etc/hosts 加入 $ip raspberry
证书信任一下后续远程连接有些安全保障


2. postfix邮件服务器
postfix + dovecot + spark等邮件客户端(待补充…)

9.远程同步和备份
树莓派组建或者挂载磁盘阵列后,
备份服务器或者远程文件到磁盘
或者将磁盘文件备份到远程服务器(百度云,阿里云,onedrive等)
1. rsync
https://wordpress.intbird.net/2021/02/08/syncthing/
# rsync -ahivzPL \
# --delete \
# --include-from="/root/intbird/intbird/rsync-include" \
# --exclude-from="/root/intbird/intbird/rsync-exclude" \
# --progress \
# -e "ssh -i /root/.ssh/id_rsa_c" \
# [email protected]:/root/ /root/clouds/server-c/
1.grsync
2. rclone
https://wordpress.intbird.net/2021/02/08/syncthing/
rclone 过于强大,示例为本人使用的
备份服务器指定文件夹 到 Onedrive云盘
以保证服务器可以随时恢复
当然也可以使用这两个sync工具,直接同步到树莓派
rclone sync \
--copy-links \
--delete-during \
--progress \
localhost:/ OneDrive:/OS-Backup/intbird.net/ \
--filter-from filter-list.txt \
-vv > /rclone/log.log  2>&1 &
3.备份工具
如何使用详见文章(https://wordpress.intbird.net):
https://wordpress.intbird.net/2021/08/06/debian-system-backup/
Amanda ,Rsync&Rclone, timeshift ,rsnapshot
4 云盘同步
!! 在上传之前可以使用 cryptmator,或者 veacrypt 对文件加密后上传
使用rclone工具或者webdav或者盘对应的linux版本
4.1 百度盘同步
bypy
bypy info // 获取授权码
	      << 填入web页面的授权码
bypy syncup // bypy -h  for more help
4.2 阿里盘同步
aliyundriver
java -jar webdav.jar --aliyundrive.refresh-token="Token"

4.3 OneDrive盘
rclone

rclone config
如果服务器没有浏览器不好授权
可以在本地授权后,将rclone.conf文件scp到服务器上去
服务直接使用授权过的配置可以直接登录
4.4 Mount WebDav
apt-get install davfs2
mount -t davfs http://127.0.0.1:8025 /media/pi/aliDrive/
10.硬件
!! 硬件什么的都需要单独购买,并不便宜,用python(大多数)去控制硬件api,主要看硬件接口和代码质量
camera
apt-get install cheese
点击摄像机图标切换相机源

temperature
DS18B20 + 4.7Ω上拉电阻(部分店家已集成电阻)
gpio readall //如果没有正确输出,请按下面代码重新安装
wget https://project-downloads.drogon.net/wiringpi-latest.deb
sudo dpkg -i wiringpi-latest.deb
4b是40pin针脚,bcm=4 物理针脚=7
!!如果启动时没有指定默认针脚,可以使用命令开启
dtoverlay w1-gpio gpiopin=17

接线(4.7K)

goio

netstat
netstat -tunlp

temp cpu温度
pi@raspberrypi:~ $ /opt/vc/bin/vcgencmd measure_temp
temp=28.0’C
使用kibana做一个温度监控
echo "'$(vcgencmd measure_temp)'"

curl --location --request PUT 'http://localhost:9200/rasberrypi/_temp/' -H 'Content-Type: application/json' -d '{
    "temp": 0,
    "temp_text": "'$(vcgencmd measure_temp)'"
}'
iftop 网络监控

刚使用两天, 后续继续补充
个人网站: https://intbird.net
文章来自: http://blog.csdn.net/intbird 转载请说明出处