go-zero入门
文章目录
- 简介
- 框架设计
- 环境准备
-
- go安装
- Go Module设置
- goctl安装
-
- 安装(mac\&linux)
- 安装(windows)
- protoc & protoc-gen-go安装
- goctl 各层代码生成一览
- goctl 生成REST和RPC微服务
-
- 生成数据模型层Model
- 生成API服务
-
- 目录结构
- 开发者需要做的
-
- 修改配置文件
- 修改上下文依赖
- 修改业务逻辑
- 生成swagger
- 生成rpc服务
-
- 方式一:快速生成greet服务
- 方式二:通过指定proto生成rpc服务
- 开发者需要做的
-
- 修改配置文件
- 修改上下文依赖
- 启动RPC服务
- 启动REST服务
- 集成Nacos注册中心
-
- 安装依赖
- 修改配置
- 集成服务监控Prometheus
-
- 在rest和rpc的yaml配置文件中添加Prometheus配置
- 修改 Prometheus 配置
- 集成链路追踪
-
- 在rest和rpc服务的yaml文件中添加Telemetry 配置
- 附录
-
- api配置
-
- 配置说明
-
- Config
- rest.RestConf
- service.ServiceConf
- logx.LogConf
- prometheus.Config
- SignatureConf
- PrivateKeyConf
- cache.CacheConf
- redis.RedisConf
- rpc配置
-
- 配置说明
-
- zrpc.RpcServerConf
- discov.EtcdConf
- redis.RedisKeyConf
简介
go-zero 是一个集成了各种工程实践的 web 和 rpc 框架。通过弹性设计保障了大并发服务端的稳定性,经受了充分的实战检验。
go-zero 包含极简的 API 定义和生成工具 goctl,可以根据定义的 api 文件一键生成 Go, iOS, Android, Kotlin, Dart, TypeScript, JavaScript 代码,并可直接运行。
主要特点:
- 强大的工具支持,尽可能少的代码编写
- 极简的接口
- 完全兼容 net/http
- 支持中间件,方便扩展
- 高性能
- 面向故障编程,弹性设计
- 内建服务发现、负载均衡
- 内建限流、熔断、降载,且自动触发,自动恢复
- API 参数自动校验
- 超时级联控制
- 自动缓存控制
- 链路跟踪、统计报警等
- 高并发支撑,稳定保障了疫情期间每天的流量洪峰
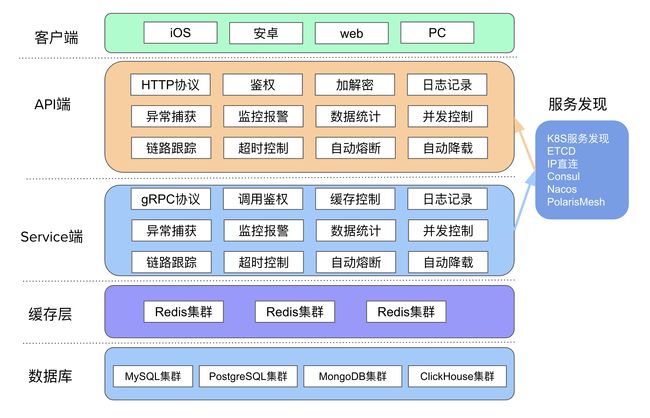
如下图,从多个层面保障了整体服务的高可用:

功能架构
框架设计
环境准备
go安装
下载go 安装包
安装完成,查看是否成功
go version
Go Module设置
Go Module是Golang管理依赖性的方式,像Java中的Maven,Android中的Gradle类似。
查看GO111MODULE开启情况
$ go env GO111MODULE
on
开启GO111MODULE,如果已开启(即执行go env GO111MODULE结果为on)请跳过。
$ go env -w GO111MODULE="on"
设置GOPROXY
$ go env -w GOPROXY=https://goproxy.cn
设置GOMODCACHE
查看GOMODCACHE
$ go env GOMODCACHE
如果目录不为空或者/dev/null,请跳过。
go env -w GOMODCACHE=$GOPATH/pkg/mod
goctl安装
安装(mac&linux)
# Go 1.15 及之前版本
GO111MODULE=on GOPROXY=https://goproxy.cn/,direct go get -u github.com/zeromicro/go-zero/tools/goctl@latest

# Go 1.16 及以后版本
GOPROXY=https://goproxy.cn/,direct go install github.com/zeromicro/go-zero/tools/goctl@latest
环境变量检测
go get 下载编译后的二进制文件位于 $GOPATH/bin 目录下,要确保$GOPATH/bin已经添加到环境变量。
执行vim /etc/paths,在最后一行添加如下内容
$GOPATH/bin
安装结果验证
goctl -v
安装(windows)
执行命令
go install github.com/zeromicro/go-zero/tools/goctl@latest
goctl使用详情参考goctl
protoc & protoc-gen-go安装
protoc是一款用C++编写的工具,其可以将proto文件翻译为指定语言的代码。在go-zero的微服务中,我们采用grpc进行服务间的通信,而grpc的编写就需要用到protoc和翻译成go语言rpc stub代码的插件protoc-gen-go。
goctl一键安装
$ goctl env check -i -f --verbose
[goctl-env]: preparing to check env

[goctl-env]: looking up "protoc"
[goctl-env]: "protoc" is not found in PATH
[goctl-env]: preparing to install "protoc"
"protoc" installed from cache
[goctl-env]: "protoc" is already installed in "/Users/keson/go/bin/protoc"

[goctl-env]: looking up "protoc-gen-go"
[goctl-env]: "protoc-gen-go" is not found in PATH
[goctl-env]: preparing to install "protoc-gen-go"
"protoc-gen-go" installed from cache
[goctl-env]: "protoc-gen-go" is already installed in "/Users/keson/go/bin/protoc-gen-go"

[goctl-env]: looking up "protoc-gen-go-grpc"
[goctl-env]: "protoc-gen-go-grpc" is not found in PATH
[goctl-env]: preparing to install "protoc-gen-go-grpc"
"protoc-gen-go-grpc" installed from cache
[goctl-env]: "protoc-gen-go-grpc" is already installed in "/Users/keson/go/bin/protoc-gen-go-grpc"

[goctl-env]: congratulations! your goctl environment is ready!
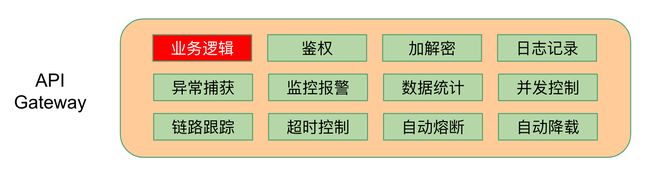
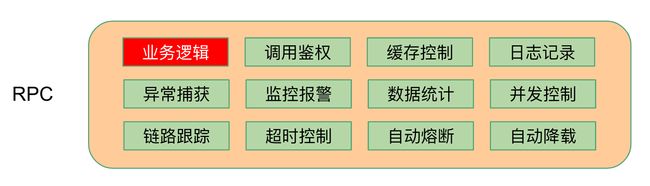
goctl 各层代码生成一览
所有绿色背景的功能模块是自动生成的,按需激活,红色模块是需要自己写的,也就是增加下依赖,编写业务特有逻辑,各层示意图分别如下:
API Gateway
RPC
model

goctl 生成REST和RPC微服务
生成数据模型层Model
编写enterprise.sql文件
CREATE TABLE `enterprise_baseinfo` (
   `id` varchar(255) COLLATE utf8_croatian_ci NOT NULL COMMENT 'id',
   `region_code` varchar(32) COLLATE utf8_croatian_ci DEFAULT NULL COMMENT '区域编码',
   `region_name` varchar(32) COLLATE utf8_croatian_ci DEFAULT NULL COMMENT '区域名称',
   `province_code` varchar(32) COLLATE utf8_croatian_ci DEFAULT NULL COMMENT '所属省份code',
   `province_name` varchar(255) COLLATE utf8_croatian_ci DEFAULT NULL COMMENT '所属省份名称',
   `city_code` varchar(32) COLLATE utf8_croatian_ci DEFAULT NULL COMMENT '所属城市code',
   `city_name` varchar(255) COLLATE utf8_croatian_ci DEFAULT NULL COMMENT '所属城市名称',
   `county_code` varchar(32) COLLATE utf8_croatian_ci DEFAULT NULL COMMENT '所属区县code',
   `county_name` varchar(255) COLLATE utf8_croatian_ci DEFAULT NULL COMMENT '所属区县名称',
   `town_name` varchar(255) COLLATE utf8_croatian_ci DEFAULT NULL COMMENT '所属乡镇名称',
   `street_name` varchar(255) COLLATE utf8_croatian_ci DEFAULT NULL COMMENT '街(村)、门牌号',
   PRIMARY KEY (`id`)
) ENGINE=InnoDB DEFAULT CHARSET=utf8mb4 COLLATE=utf8mb4_bin COMMENT=企业信息';
运行模板生成命令
goctl model mysql ddl -src ./model/enterprise.sql -dir ./model -c
生成API服务
首先创建 api 文件
$ vim api/enterprisesAPI.api
enterprisesAPI.api文件说明
syntax = "v1"
//swagger信息
info(
	title: "企业信息"
	desc: "企业信息"
	author: "xxx"
	email: "[email protected]"
	version: "v1.0"
)
//查询操作入参
type GetRequest {
	Id string `path:"id"`
}
//查询操作出参
type GetResponse {
	Message string `json:"message"`
}
//新增操作入参
type PostRequest {
	RegionCode   string `json:"region_code"`
	RegionName   string `json:"region_name"`
	ProvinceCode string `json:"province_code"`
	ProvinceName string `json:"province_name"`
	CityCode     string `json:"city_code"`
	CityName     string `json:"city_name"`
	CountyCode   string `json:"county_code"`
	CountyName   string `json:"county_name"`
	TownName     string `json:"town_name"`
	StreetName   string `json:"street_name"`
}
//新增操作出参
type PostResponse {
	Message string `json:"message"`
}
//更新操作入参
type PutRequest {
	Id           string `json:"id"`
	RegionCode   string `json:"region_code"`
	RegionName   string `json:"region_name"`
	ProvinceCode string `json:"province_code"`
	ProvinceName string `json:"province_name"`
	CityCode     string `json:"city_code"`
	CityName     string `json:"city_name"`
	CountyCode   string `json:"county_code"`
	CountyName   string `json:"county_name"`
	TownName     string `json:"town_name"`
	StreetName   string `json:"street_name"`
}
//更新操作出参
type PutResponse {
	Message string `json:"message"`
}
//删除操作入参
type DelRequest {
	Id string `path:"id"`
}
//删除操作出参
type DelResponse {
	Message string `json:"message"`
}
//配置enterprises接口
service enterprises-api {
	//swagger配置接口信息
	@doc(
		summary: "查询企业详情"
		description: "查询企业详情"
	)
	@handler GetHandler //接口绑定的handler
	get /enterprises/:id (GetRequest) returns (GetResponse)

	@doc(
		summary: "新增企业信息"
	)
	@handler PostHandler
	post /enterprises(PostRequest) returns (PostResponse)

	@doc(
		summary: "更新企业信息"
		description: "更新企业信息"
	)
	@handler PutHandler
	put /enterprises(PutRequest) returns (PutResponse)

	@doc(
		summary: "删除企业信息"
		description: "删除企业信息"
	)
	@handler DeleteHandler
	delete /enterprises/:id(DelRequest) returns (DelResponse)
}
运行模板生成命令
$ goctl api go -api enterprisesAPI.api -dir . -style gozero
目录结构
├── enterprisesAPI.api # api 文件
├── enterprises.go # 程序入口文件
├── etc
│   └── enterprises-api.yaml # api 网关层配置文件
├── go.mod
├── go.sum
└── internal
    ├── config
    │   └── config.go # 配置文件
    ├── handler # 视图函数层, handler 文件与下面的 logic 文件一一对应
    │   ├── xxxhandler.go
    │   ├── routes.go
    ├── logic # 需要手动填充代码的地方
    │   ├── xxxlogic.go
    ├── svc # 封装 rpc 对象的地方
    │   └── servicecontext.go
    └── types # 把 enterprisesAPI.api 中定义的结构体映射为真正的 golang 结构体
        └── types.go
开发者需要做的
- 服务中的配置文件编写(etc/xx.yaml、internal/config/config.go)
- 服务中业务逻辑编写(internal/logic/xxlogic.go)
- 服务中资源上下文的编写(internal/svc/servicecontext.go)
修改配置文件
vim api/etc/enterprises-api.yaml
Name: enterprises-api
Port: 8888

ListenOn: 172.16.15.118:8888

EnterprisesRpc:
  Etcd:
    Hosts:
    - etcd:2379
    Key: enterprises-api

CacheRedis:
  - Host: ip:6379
    Type: node # node可以不写,可以设为cluster
    Pass: xxxx # 如果有密码
vim api/internal/config/config.go
package config

import (
	"github.com/zeromicro/go-zero/rest"
	"github.com/zeromicro/go-zero/zrpc"
)

type Config struct {
	rest.RestConf
	zrpc.RpcServerConf
	EnterprisesRpc zrpc.RpcClientConf
}
修改上下文依赖
vim api/internal/svc/servicecontext.go
package svc

import (
	"enterprises/enterprises/enterprisesAPI/internal/config"
	"enterprises/enterprises/enterprisesRPC/enterprises"
	"github.com/zeromicro/go-zero/zrpc"
)

type ServiceContext struct {
	Config         config.Config
	EnterprisesRpc enterprises.Enterprises
}

func NewServiceContext(c config.Config) *ServiceContext {
	return &ServiceContext{
		Config:         c,
		EnterprisesRpc: enterprises.NewEnterprises(zrpc.MustNewClient(c.EnterprisesRpc)),
	}
}
修改业务逻辑
修改获取详情逻辑vim api/internal/logic/getlogic.go
package logic

import (
	"context"
	"enterprises/enterprises/enterprisesAPI/internal/svc"
	"enterprises/enterprises/enterprisesAPI/internal/types"
	"enterprises/enterprises/enterprisesRPC/enterprises"

	"github.com/zeromicro/go-zero/core/logx"
)

type GetLogic struct {
	logx.Logger
	ctx    context.Context
	svcCtx *svc.ServiceContext
}

func NewGetLogic(ctx context.Context, svcCtx *svc.ServiceContext) *GetLogic {
	return &GetLogic{
		Logger: logx.WithContext(ctx),
		ctx:    ctx,
		svcCtx: svcCtx,
	}
}

func (l *GetLogic) Get(req *types.GetRequest) (resp *types.GetResponse, err error) {
	// todo: add your logic here and delete this line
	enterprises, err := l.svcCtx.EnterprisesRpc.Detail(l.ctx, &enterprises.GetRequest{
		Id: 1,
	})
	if err != nil {
		return nil, err
	}
	return &types.GetResponse{
		Message: `"id":"` + enterprises.Id + `","EnterCode":"` + enterprises.EnterCode + `","EnterName":"` + enterprises.EnterName + `","Tyshxydm":"` + enterprises.Tyshxydm +
			`","EnterAddress":"` + enterprises.EnterAddress + `","RegionCode":"` + enterprises.RegionCode + `","RegionName":"` + enterprises.RegionName + `","ProvinceCode":"` + enterprises.ProvinceCode +
			`","ProvinceName":"` + enterprises.ProvinceName + `","CityCode":"` + enterprises.CityCode + `","CityName":"` + enterprises.CityName + `","CountyCode":"` + enterprises.CountyCode +
			`","CountyName":"` + enterprises.CountyName + `","TownName":"` + enterprises.TownName + `","StreetName":"` + enterprises.StreetName,
	}, nil
}
生成swagger
在.api文件中添加swagger注解,通过goctl swagger插件可以生成swagger接口文件
//swagger信息
info(
	title: "企业信息"
	desc: "企业信息"
	author: "xxx"
	email: "[email protected]"
	version: "v1.0"
)

...

//swagger配置接口信息
@doc(
	summary: "查询企业详情"
)
@handler GetHandler //接口绑定的handler
get /enterprises/:id (GetRequest) returns (GetResponse)
安装goctl-swagger插件
go install github.com/zeromicro/goctl-swagger@latest
执行swagger生成命令
goctl api plugin -plugin goctl-swagger="swagger -filename enterprisesAPI.json" -api enterprisesAPI.api -dir .
生成rpc服务
方式一:快速生成greet服务
$ goctl rpc new greet
方式二:通过指定proto生成rpc服务
$ goctl rpc template -o=enterprise.proto
生成rpc服务代码
$ goctl rpc protoc enterprise.proto --go_out=. --go-grpc_out=. --zrpc_out=.
开发者需要做的
- 服务中的配置文件编写(etc/xx.yaml、internal/config/config.go)
- 服务中资源上下文的编写(internal/svc/servicecontext.go)
- 服务中业务逻辑编写(internal/logic/xxlogic.go)
修改配置文件
vim rpc/etc/enterprise.yaml
修改服务监听地址,端口号为 0.0.0.0:8083,Etcd 服务配置,Mysql 服务配置,CacheRedis 服务配置
Name: enterprises-rpc
ListenOn: 0.0.0.0:8083

Etcd:
  Hosts:
  - 127.0.0.1:2379
  Key: enterprises-rpc


Mysql:
  DataSource: ads:xxx@tcp(172.16.17.2:3306)/ads_environment?charset=utf8mb4&parseTime=true

CacheRedis:
  - Host: ip:6379
    Type: node # node可以不写,可以设为cluster
    Pass: xxxx # 如果有密码
添加 Mysql 服务配置,CacheRedis 服务配置的实例化
vim rpc/internal/config/config.go
package config

import (
	"github.com/zeromicro/go-zero/core/stores/cache"
	"github.com/zeromicro/go-zero/zrpc"
)

type Config struct {
	zrpc.RpcServerConf

	//mysql配置
	Mysql struct {
		DataSource string
	}
	//redis配置
	CacheRedis cache.CacheConf
}
修改上下文依赖
注册服务上下文 model 的依赖vim rpc/internal/svc/servicecontext.go
package svc

import (
	"enterprises/enterprises/enterprisesRPC/internal/config"
	"enterprises/enterprises/model"
	"github.com/zeromicro/go-zero/core/stores/sqlx"
)

type ServiceContext struct {
	Config                     config.Config
	AdsEnterpriseBaseinfoModel model.AdsEnterpriseBaseinfoModel
}

func NewServiceContext(c config.Config) *ServiceContext {
	conn := sqlx.NewMysql(c.Mysql.DataSource)
	return &ServiceContext{
		Config:                     c,
		AdsEnterpriseBaseinfoModel: model.NewAdsEnterpriseBaseinfoModel(conn, c.CacheRedis),
	}
}
启动RPC服务
go run enterprise.go -f etc/enterprises.yaml
启动REST服务
go run enterprises.go -f etc/enterprisesAPI-api.yaml
集成Nacos注册中心
安装依赖
go get -u github.com/zeromicro/zero-contrib/zrpc/registry/nacos
修改配置
在etc/xx.yaml配置文件中添加服务IP及端口
ListenOn: 127.0.0.1:8081 //填写真实ip及端口
3.在xxx.go启动文件上添加nacos配置
package main

import (
	"flag"
	"github.com/nacos-group/nacos-sdk-go/common/constant"
	"github.com/zeromicro/go-zero/core/conf"
	"github.com/zeromicro/go-zero/zrpc"
	"github.com/zeromicro/zero-contrib/zrpc/registry/nacos"
	//-------------------------------------------------
	// 引入包
	_ "github.com/zeromicro/zero-contrib/zrpc/registry/nacos"
	//-------------------------------------------------
	"go-zero-demo/mall/user/rpc/internal/config"
	"go-zero-demo/mall/user/rpc/internal/server"
	"go-zero-demo/mall/user/rpc/internal/svc"
	"go-zero-demo/mall/user/rpc/types/user"
	"google.golang.org/grpc"
	"google.golang.org/grpc/reflection"
)

var configFile = flag.String("f", "etc/xxxx.yaml", "the config file")

func main() {
	flag.Parse()

	var c config.Config
	conf.MustLoad(*configFile, &c)
	ctx := svc.NewServiceContext(c)
	srv := server.NewUserServer(ctx)

	serverRpc := zrpc.MustNewServer(c.RpcServerConf, func(grpcServer *grpc.Server) {
		user.RegisterUserServer(grpcServer, srv)

		if c.Mode == service.DevMode || c.Mode == service.TestMode {
		reflection.Register(grpcServer)
		}
	})
	//------------------------------------------------------------------------
	// 注册服务到nacos
	sc := []constant.ServerConfig{
		*constant.NewServerConfig("127.0.0.1", 8848),
	}

	cc := &constant.ClientConfig{
		NamespaceId:         "",
		TimeoutMs:           50000,
		NotLoadCacheAtStart: true,
		LogDir:              "/tmp/nacos/log",
		CacheDir:            "/tmp/nacos/cache",
		LogLevel:            "debug",
	}

	opts := nacos.NewNacosConfig("enterprises-api", c.ListenOn, sc, cc)
	_ = nacos.RegisterService(opts)
	//----------------------------------------------------------------------
	serverRpc.Start()
}
集成服务监控Prometheus
在rest和rpc的yaml配置文件中添加Prometheus配置
api/etc/enterprise.yaml
Prometheus:
  Host: 0.0.0.0
  Port: 9080   # 指标采集端口
  Path: /metrics
rpc/etc/enterprise.yaml
Prometheus:
  Host: 0.0.0.0
  Port: 9081   # 指标采集端口
  Path: /metrics
修改 Prometheus 配置
# my global config
global:
  scrape_interval: 15s # Set the scrape interval to every 15 seconds. Default is every 1 minute.
  evaluation_interval: 15s # Evaluate rules every 15 seconds. The default is every 1 minute.
  # scrape_timeout is set to the global default (10s).

# Alertmanager configuration
alerting:
  alertmanagers:
    - static_configs:
        - targets:
          # - alertmanager:9093

# Load rules once and periodically evaluate them according to the global 'evaluation_interval'.
rule_files:
  # - "first_rules.yml"
  # - "second_rules.yml"

# A scrape configuration containing exactly one endpoint to scrape:
# Here it's Prometheus itself.
scrape_configs:
  # The job name is added as a label `job=` to any timeseries scraped from this config.
  - job_name: "prometheus"

    # metrics_path defaults to '/metrics'
    # scheme defaults to 'http'.

    static_configs:
      - targets: ["localhost:9090"]

  # 自己的项目配置
  - job_name: 'enterprise'
    static_configs:
      # 目标的采集地址
      - targets: ['golang:9080']
        labels:
          # 自定义标签
          app: 'enterprise-api'
          env: 'test'

      - targets: ['golang:9081']
        labels:
          app: 'enterprise-rpc'
          env: 'test'
集成链路追踪
Jaeger 是 Uber 开发并开源的一款分布式追踪系统,兼容 OpenTracing API,适用于以下场景:
- 分布式跟踪信息传递
- 分布式事务监控
- 问题分析
- 服务依赖性分析
- 性能优化
Jaeger 的全链路追踪功能主要由三个角色完成:
- client:负责全链路上各个调用点的计时、采样,并将 tracing 数据发往本地 agent。
- agent:负责收集 client 发来的 tracing 数据,并以 thrift 协议转发给 collector。
- collector:负责搜集所有 agent 上报的 tracing 数据,统一存储。
在rest和rpc服务的yaml文件中添加Telemetry 配置
rest
Telemetry:
  Name: enterprise-api
  Endpoint: http://jaeger:14268/api/traces
  Sampler: 1.0
  Batcher: jaeger
rpc
Telemetry:
  Name: enterprise-rpc
  Endpoint: http://jaeger:14268/api/traces
  Sampler: 1.0
  Batcher: jaeger
附录
api配置
api配置控制着api服务中的各种功能,包含但不限于服务监听地址,端口,环境配置,日志配置等,下面我们从一个简单的配置来看一下api中常用配置分别有什么作用。
配置说明
通过yaml配置我们会发现,有很多参数我们并没有与config对齐,这是因为config定义中,有很多都是带optional或者default 标签的,对于optional可选项,你可以根据自己需求判断是否需要设置,对于default标签,如果你觉得默认值就已经够了,可以不用设置, 一般default中的值基本不用修改,可以认为是最佳实践值。
Config
type Config struct{
    rest.RestConf // rest api配置
    Auth struct { // jwt鉴权配置
        AccessSecret string // jwt密钥
        AccessExpire int64 // 有效期,单位:秒
    }
    Mysql struct { // 数据库配置,除mysql外,可能还有mongo等其他数据库
        DataSource string // mysql链接地址,满足 $user:$password@tcp($ip:$port)/$db?$queries 格式即可
    }
    CacheRedis cache.CacheConf // redis缓存
    UserRpc    zrpc.RpcClientConf // rpc client配置
}
rest.RestConf
api服务基础配置,包含监听地址,监听端口,证书配置,限流,熔断参数,超时参数等控制,对其展开我们可以看到:
type RestConf struct{
    service.ServiceConf // service配置
    Host         string `json:",default=0.0.0.0"` // http监听ip,默认0.0.0.0
    Port         int // http监听端口,必填
    CertFile     string `json:",optional"` // https证书文件,可选
    KeyFile      string `json:",optional"` // https私钥文件,可选
    Verbose      bool   `json:",optional"` // 是否打印详细http请求日志
    MaxConns     int    `json:",default=10000"` // http同时可接受最大请求数(限流数),默认10000
    MaxBytes     int64  `json:",default=1048576,range=[0:8388608]"` // http可接受请求的最大ContentLength,默认1048576,被设置值不能必须在0到8388608之间
    // milliseconds
    Timeout      int64         `json:",default=3000"` // 超时时长控制,单位:毫秒,默认3000
    CpuThreshold int64         `json:",default=900,range=[0:1000]"` // cpu降载阈值,默认900,可允许设置范围0到1000
    Signature    SignatureConf `json:",optional"` // 签名配置
}
service.ServiceConf
type ServiceConf struct {
    Name       string // 服务名称
    Log        logx.LogConf // 日志配置
    Mode       string            `json:",default=pro,options=dev|test|pre|pro"` // 服务环境,dev-开发环境,test-测试环境,pre-预发环境,pro-正式环境
    MetricsUrl string            `json:",optional"` // 指标上报接口地址,该地址需要支持post json即可
    Prometheus prometheus.Config `json:",optional"` // prometheus配置
}
logx.LogConf
type LogConf struct {
    ServiceName         string `json:",optional"` // 服务名称
    Mode                string `json:",default=console,options=console|file|volume"` // 日志模式,console-输出到console,file-输出到当前服务器(容器)文件,,volume-输出docker挂在文件内
    Path                string `json:",default=logs"` // 日志存储路径
    Level               string `json:",default=info,options=info|error|severe"` // 日志级别
    Compress            bool   `json:",optional"` // 是否开启gzip压缩
    KeepDays            int    `json:",optional"` // 日志保留天数
    StackCooldownMillis int    `json:",default=100"` // 日志write间隔
}
prometheus.Config
type Config struct {
    Host string `json:",optional"` // prometheus 监听host
    Port int    `json:",default=9101"` // prometheus 监听端口
    Path string `json:",default=/metrics"` // 上报地址
}
SignatureConf
type SignatureConf struct {
    Strict      bool          `json:",default=false"` // 是否Strict模式,如果是则PrivateKeys必填
    Expiry      time.Duration `json:",default=1h"` // 有效期,默认1小时
    PrivateKeys []PrivateKeyConf // 签名密钥相关配置
}
PrivateKeyConf
type PrivateKeyConf struct {
    Fingerprint string // 指纹配置
    KeyFile     string // 密钥配置
}
cache.CacheConf
type CacheConf struct{
    ClusterConf []NodeConf

    NodeConf struct {
        redis.RedisConf
        Weight int `json:",default=100"` // 权重
    }
}
redis.RedisConf
type RedisConf struct {
    Host string // redis地址
    Type string `json:",default=node,options=node|cluster"` // redis类型
    Pass string `json:",optional"` // redis密码
}
rpc配置
rpc配置控制着一个rpc服务的各种功能,包含但不限于监听地址,etcd配置,超时,熔断配置等,下面我们以一个常见的rpc服务配置来进行说明。
配置说明
type Config struct {
    zrpc.RpcServerConf
    CacheRedis         cache.CacheConf // redis缓存配置,详情见api配置说明,这里不赘述
    Mysql struct { // mysql数据库访问配置,详情见api配置说明,这里不赘述
        DataSource string
    }
}
zrpc.RpcServerConf
type RpcServerConf struct {
    service.ServiceConf // 服务配置,详情见api配置说明,这里不赘述
    ListenOn      string // rpc监听地址和端口,如:127.0.0.1:8888
    Etcd          discov.EtcdConf    `json:",optional"` // etcd相关配置
    Auth          bool               `json:",optional"` // 是否开启Auth,如果是则Redis为必填
    Redis         redis.RedisKeyConf `json:",optional"` // Auth验证
    StrictControl bool               `json:",optional"` // 是否Strict模式,如果是则遇到错误是Auth失败,否则可以认为成功
    // pending forever is not allowed
    // never set it to 0, if zero, the underlying will set to 2s automatically
    Timeout      int64 `json:",default=2000"` // 超时控制,单位:毫秒
    CpuThreshold int64 `json:",default=900,range=[0:1000]"` cpu降载阈值,默认900,可允许设置范围0到1000
}
discov.EtcdConf
type EtcdConf struct {
    Hosts []string // etcd host数组
    Key   string // rpc注册key
}
redis.RedisKeyConf
type RedisConf struct {
    Host string // redis 主机
    Type string `json:",default=node,options=node|cluster"` // redis类型
    Pass string `json:",optional"` // redis密码
}

type RedisKeyConf struct {
    RedisConf
    Key string `json:",optional"` // 验证key
}