博流RISC-V芯片JTAG debug配置与运行
文章目录
-
- 1、Windows下安装与配置
- 2、Linux下安装与配置
- 3、芯片默认 JTAG PIN 列表
- 4、命令行运行JTAG
- 5、Eclipse下使用JTAG
1、Windows下安装与配置
- CKLink 驱动安装
Windows版驱动下载地址: https://occ-oss-prod.oss-cn-hangzhou.aliyuncs.com/resource//1666331581133/T-Head-DebugServer-windows-V5.16.5-20221021-1018.zip
解压后按照默认配置安装,安装成功后插上 cklink-lite 后,可以在设备管理器中找到 cklink-lite 已经找到

- 运行
双击桌面上的 T-HeadDebugServer 即可运行

正确连接 cklink-lite 与目标芯片,然后点击 T-HeadDebugServer 上的 Run debug server,如硬件连接正确,图标会由三角形编程圆形,并在软件窗口上显示芯片内核信息
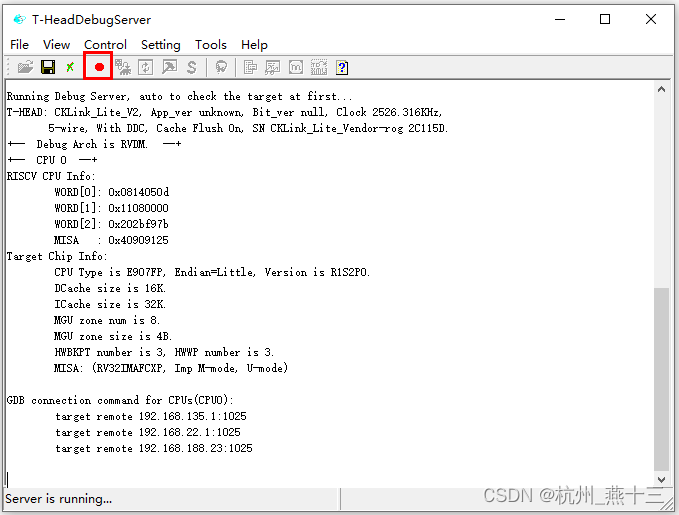
Running Debug Server, auto to check the target at first...
T-HEAD: CKLink_Lite_V2, App_ver unknown, Bit_ver null, Clock 2526.316KHz,
       5-wire, With DDC, Cache Flush On, SN CKLink_Lite_Vendor-rog 2C115D.
+--  Debug Arch is RVDM.  --+
+--  CPU 0  --+
RISCV CPU Info:
	WORD[0]: 0x0814050d
	WORD[1]: 0x11080000
	WORD[2]: 0x202bf97b
	MISA   : 0x40909125
Target Chip Info:
	CPU Type is E907FP, Endian=Little, Version is R1S2P0.
	DCache size is 16K.
	ICache size is 32K.
	MGU zone num is 8.
	MGU zone size is 4B.
	HWBKPT number is 3, HWWP number is 3.
	MISA: (RV32IMAFCXP, Imp M-mode, U-mode)

GDB connection command for CPUs(CPU0):
	target remote 192.168.135.1:1025
	target remote 192.168.22.1:1025
	target remote 192.168.188.23:1025
默认端口:1025
2、Linux下安装与配置
-
CKLink 驱动安装
Linux x86_64版驱动下载地址:https://occ-oss-prod.oss-cn-hangzhou.aliyuncs.com/resource//1666331533949/T-Head-DebugServer-linux-x86_64-V5.16.5-20221021.sh.tar.gz -
在 linux 命令行下执行
$ tar zxvf T-Head-DebugServer-linux-x86_64-V5.16.5-20221021.sh.tar.gz
$ sudo ./T-Head-DebugServer-linux-x86_64-V5.16.5-20221021.sh -i
其中参数含义为:
-i:安装
-u:卸载
然后按照提示输入 yes 就可以。
注意:必须要 ubuntu 22 以上才可以,ubuntu 20.04 不行。。
- 完成安装后,插上 CKlink-Lite,通过 lsusb 可以看到已经检测到了CKlink-Lite
$ lsusb
Bus 002 Device 004: ID 42bf:b210 Bouffalo C-Sky CKLink-Lite
Bus 002 Device 003: ID 0e0f:0002 VMware, Inc. Virtual USB Hub
Bus 001 Device 001: ID 1d6b:0002 Linux Foundation 2.0 root hub
Bus 002 Device 002: ID 0e0f:0003 VMware, Inc. Virtual Mouse
Bus 002 Device 001: ID 1d6b:0001 Linux Foundation 1.1 root hub
- 运行
- 确认安装完成,查看参数
$ DebugServerConsole -h
- server 端口号,默认 1025,可以通过
-p修改
$ DebugServerConsole -p 3333
注意:在运行 jtag 功能器件,T-HeadDebugServer 要一直运行。
3、芯片默认 JTAG PIN 列表
| CHIP/Pin | BL602/BL604 | BL702/BL704/BL706 | BL616/BL618 | BL808 |
|---|---|---|---|---|
| TMS | GPIO12 | GPIO0 | GPIO0 | GPIO6 |
| TCK | GPIO14 | GPIO2 | GPIO1 | GPIO12 |
| TDO | GPIO11 | GPIO9 | GPIO2 | GPIO7 |
| TDI | GPIO17 | GPIO1 | GPIO3 | GPIO13 |
4、命令行运行JTAG
- 运行 gdb
$ riscv64-unknown-elf-gdb helloworld_bl616.elf
GNU gdb (Xuantie-900 elf newlib gcc Toolchain V2.6.1 B-20220906) 10.0.50.20200724-git
Copyright (C) 2020 Free Software Foundation, Inc.
License GPLv3+: GNU GPL version 3 or later <http://gnu.org/licenses/gpl.html>
This is free software: you are free to change and redistribute it.
There is NO WARRANTY, to the extent permitted by law.
Type "show copying" and "show warranty" for details.
This GDB was configured as "--host=i686-w64-mingw32 --target=riscv64-unknown-elf".
Type "show configuration" for configuration details.
For bug reporting instructions, please see:
<https://www.gnu.org/software/gdb/bugs/>.
Find the GDB manual and other documentation resources online at:
    <http://www.gnu.org/software/gdb/documentation/>.

For help, type "help".
Type "apropos word" to search for commands related to "word"...
Reading symbols from .\helloworld_bl616.elf...
(gdb)
也可以先只运行 riscv64-unknown-elf-gdb 命令,然后在连接 gdb server 完成后,使用 file helloworld_bl616.elf 命令加载 elf 文件。
- 设置等待远程目标响应240秒的超时限制,默认为2秒。
(gdb) set remotetimeout 240
- 连接 gdb server
(gdb) target remote :1025
- 加载
(gdb) load
- 运行
(gdb) c
更多指令可查询 gdb 手册
5、Eclipse下使用JTAG
- 选择 Debug Configurations …

- 选择当前需要调试的目标项目的 elf 文件

注:使用 JTAG 调试前,需先下载完成对应目标项目的 bin 文件。