SpringBoot
Spring 缺点
1) 配置繁琐
虽然Spring的组件代码是轻量级的,但它的配置却是重量级的。一开始,Spring用XML配置,而且是很多
XML配置。Spring 2.5引入了基于注解的组件扫描,这消除了大量针对应用程序自身组件的显式XML配置。
Spring 3.0引入了基于Java的配置,这是一种类型安全的可重构配置方式,可以代替XML。
所有这些配置都代表了开发时的损耗。因为在思考Spring特性配置和解决业务问题之间需要进行思维切换,所
以编写配置挤占了编写应用程序逻辑的时间。和所有框架一样,Spring实用,但它要求的回报也不少。
2)依赖繁琐
项目的依赖管理也是一件耗时耗力的事情。在环境搭建时,需要分析要导入哪些库的坐标,而且还需要分析导
入与之有依赖关系的其他库的坐标,一旦选错了依赖的版本,随之而来的不兼容问题就会严重阻碍项目的开发
进度。
SpringBoot 功能
Spring Boot 并不是对 Spring 功能上的增强,而是提供了一种快速使用 Spring 的方式。
1) 自动配置
Spring Boot的自动配置是一个运行时(更准确地说,是应用程序启动时)的过程,考虑了众多因素,才决定
Spring配置应该用哪个,不该用哪个。该过程是SpringBoot自动完成的。
2) 起步依赖
起步依赖本质上是一个Maven项目对象模型(Project Object Model,POM),定义了对其他库的传递依赖
,这些东西加在一起即支持某项功能。
简单的说,起步依赖就是将具备某种功能的坐标打包到一起,并提供一些默认的功能。
3) 辅助功能
提供了一些大型项目中常见的非功能性特性,如嵌入式服务器、安全、指标,健康检测、外部配置等。
SpringBoot 快速入门
1,创建Maven项目
2,导入SpringBoot起步依赖
    org.springframework.boot
    spring-boot-starter-parent
    2.1.8.RELEASE


        org.springframework.boot
        spring-boot-starter-web
3,定义Controller
import org.springframework.web.bind.annotation.RequestMapping;
import org.springframework.web.bind.annotation.RestController;

@RestController
public class HelloController {

    @RequestMapping("/hello")
    public String hello(){
        return "spring boot!";
    }
}
4,编写引导类
import org.springframework.boot.SpringApplication;
import org.springframework.boot.autoconfigure.SpringBootApplication;

/**
 * 引导类 springboot项目的入口
 */
@SpringBootApplication
public class HelloApplication {
    public static void main(String[] args) {
        SpringApplication.run(HelloApplication.class,args);
    }
}
5,启动测试,直接启动main方法
IDEA快速构建springboot工程
File-->New-->Module-->Spring Initializr-->Next-->修改group id, artifact id,package-->Next-->依赖选Web,复选框选Spring Web-->Next-->Finish
起步依赖原理分析
1) spring-boot-starter-parent
在spring-boot-starter-parent中定义了各种技术的版本信息,组合了一套最优搭配的技术版本。

2) spring-boot-starter-web
在各种starter中,定义了完成该功能需要的坐标合集,其中大部分版本信息来自于父工程。
我们的工程继承parent,引入starter后,通过依赖传递,就可以简单方便获得需要的jar包,并且不会存在版本冲突等问题。
配置文件分类
SpringBoot是基于约定的,所以很多配置都有默认值,但如果想使用自己的配置替换默认配置的话,就可以使用
application.properties或者application.yml(application.yaml)进行配置。
默认配置文件名称:application
在同一级目录下优先级为:properties > yml > yaml
properties:
server.port=8080
yml:
server:
port: 8080
YAML
YAML全称是 YAML Ain't Markup Language 。YAML是一种直观的能够被电脑识别的的数据数据序列化格式,并且容易被人类阅
读,容易和脚本语言交互的,可以被支持YAML库的不同的编程语言程序导入,比如: C/C++, Ruby, Python, Java, Perl, C#, PHP
等。YML文件是以数据为核心的,比传统的xml方式更加简洁。
YAML文件的扩展名可以使用.yml或者.yaml。

properties:
server.port=8080
server.address=127.0.0.1

xml:

	8080
	127.0.0.1


yml:简洁,以数据为核心
server:
	port: 8080
	address: 127.0.0.1
YAML:基本语法
大小写敏感
数据值前边必须有空格,作为分隔符
使用空格缩进表示层级关系,相同缩进表示同一级
缩进时不允许使用Tab键,只允许使用空格(各个系统 Tab对应的 空格数目可能不同,导致层次混乱)。
缩进的空格数目不重要,只要相同层级的元素左侧对齐即可
# 表示注释,从这个字符一直到行尾,都会被解析器忽略。

name: anle

# 对象(map):键值对的集合。
person:
 name: zjc
 age: 18

#对象行内写法
person2: {name: zs,age: 20}

# 数组:一组按次序排列的值
address:
 - beijing
 - shanghai

# 数组行内写法
address2: [beijing,shanghai]

# 数组:一组按次序排列的值
msg1: 'hello \n world' # 不会识别转义字符,会原样输出
msg2: "hello \n world" # 会识别转义字符


# 参数引用
name2: lisi

person3:
 name2: ${name2}
读取配置内容
1) @Value
@Value("${name}")//取的name: anle
private String name;

@Value("${person.name}")//取的是对象(map):键值对的集合中的属性
private String namea;

@Value("${address[0]}")//取的数组中的某一项,一组按次序排列的值
private String address1;
2) Environment
import org.springframework.core.env.Environment;
@Autowired
private Environment env;
env.getProperty("name2")//方法中可以使用Environment直接获取配置文件中属性值
3) @ConfigurationProperties
自定义实体类
@Component
@ConfigurationProperties(prefix = "person")//需要指定前缀
public class Person {
    private String name;
    private int age;
    private String[] address;
}

application.yml
# 对象(map):键值对的集合。
person:
  address:
    -beijing
  name: zs
  age: 18

Controller类中可以使用注解注入yml文件中注入的自定义实体类
@Autowired
private Person person;
pom.xml中加上以下依赖,可以使自定义实体类的属性在yml文件中提示
    org.springframework.boot
    spring-boot-configuration-processor
    true
profile
1) profile是用来完成不同环境下,配置动态切换功能的。
2) profile配置方式
配置方式1,多profile文件方式
多profile文件方式:提供多个配置文件,每个代表一种环境。
application-dev.properties/yml 开发环境
server.port=8081
application-test.properties/yml 测试环境
server.port=8082
application-pro.properties/yml 生产环境
server.port=8083
配置方式2,yml多文档方式:
在yml中使用 — 分隔不同配置,直接重启springboot就会生效
---
server:
  port: 8081
spring:
  profiles: dev
---
server:
  port: 8082
spring:
  profiles: test
---
server:
  port: 8083
spring:
  profiles: pro
---
spring:
  profiles:
    active: test
3) profile激活方式
激活方式1 配置文件
配置文件: 再配置文件中配置:spring.profiles.active=dev
application.properties中配置
spring.profiles.active=dev
然后重启springboot
2022-10-17 16:58:37.545  INFO 16268 --- [           main] c.b.s.SpringbootInitApplication          : The following 1 profile is active: "dev"
2022-10-17 16:58:38.546  INFO 16268 --- [           main] o.s.b.w.embedded.tomcat.TomcatWebServer  : Tomcat initialized with port(s): 8081 (http)
激活方式2 虚拟机参数
虚拟机参数:在VM options 指定:-Dspring.profiles.active=dev,然后重启springboot
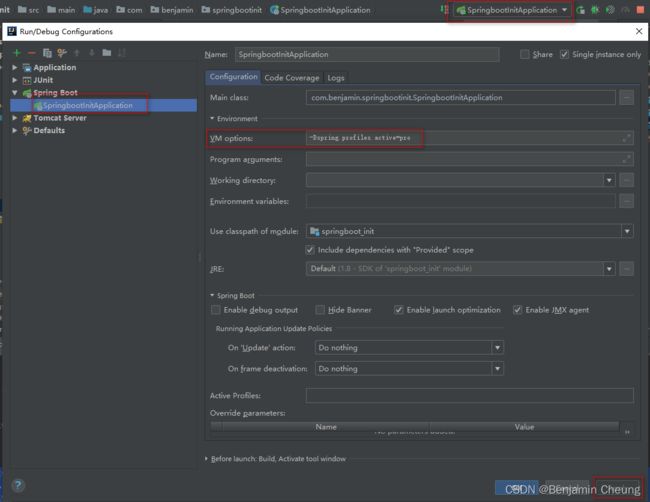
重启之后pro配置覆盖了配置文件中的配置
2022-10-17 17:12:01.413  INFO 696 --- [           main] c.b.s.SpringbootInitApplication          : The following 1 profile is active: "pro"
2022-10-17 17:12:01.561  WARN 696 --- [           main] o.s.b.c.config.ConfigDataEnvironment     : Property 'spring.profiles' imported from location 'class path resource [application.yml]' is invalid and should be replaced with 'spring.config.activate.on-profile' [origin: class path resource [application.yml] - 20:13]
2022-10-17 17:12:01.561  WARN 696 --- [           main] o.s.b.c.config.ConfigDataEnvironment     : Property 'spring.profiles' imported from location 'class path resource [application.yml]' is invalid and should be replaced with 'spring.config.activate.on-profile' [origin: class path resource [application.yml] - 14:13]
2022-10-17 17:12:01.562  WARN 696 --- [           main] o.s.b.c.config.ConfigDataEnvironment     : Property 'spring.profiles' imported from location 'class path resource [application.yml]' is invalid and should be replaced with 'spring.config.activate.on-profile' [origin: class path resource [application.yml] - 7:13]
2022-10-17 17:12:02.679  INFO 696 --- [           main] o.s.b.w.embedded.tomcat.TomcatWebServer  : Tomcat initialized with port(s): 8083 (http)
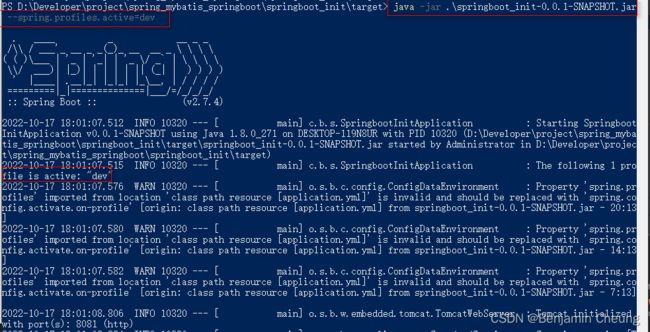
激活方式3 命令行
命令行参数:java –jar xxx.jar --spring.profiles.active=dev
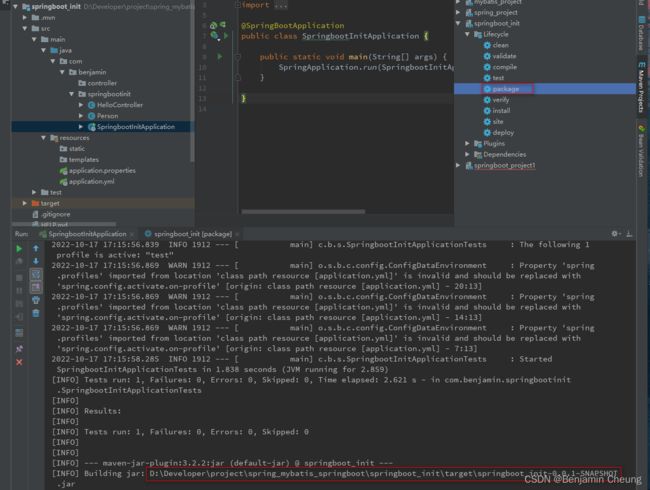
1,maven打包
 2,打开jar包所在位置,shift+右击,点击“在此处打开powershell窗口”
3,输入命令行 java –jar xxx.jar --spring.profiles.active=dev
内部配置加载顺序
Springboot程序启动时,会从以下位置加载配置文件:
1. file:./config/:当前项目下的/config目录下
2. file:./ :当前项目的根目录
	当前项目的根目录指project根目录,而非module根目录
3. classpath:/config/:classpath的/config目录
	resources/config目录
4. classpath:/ :classpath的根目录
	resources目录打包后,会被放在classes目录下,所以这块的classpath的根目录就是resources目录

加载顺序为上文的排列顺序,高优先级配置的属性会生效
外部配置加载顺序
通过官网查看外部属性加载顺序:
https://docs.spring.io/spring-boot/docs/current/reference/html/boot-features-external-config.html
外部配置文件加载顺序优先于内部配置文件,外部,内部形成补充。
SpringBoot整合Junit
1,搭建SpringBoot工程
2,引入starter-test起步依赖
    org.springframework.boot
    spring-boot-starter-test
    test
3,编写service类用于测试
import org.springframework.stereotype.Service;

@Service
public class UserService {
    public void add(){
        System.out.println("add..");
    }
}
3,编写测试类,
4,添加测试相关注解
• @RunWith(SpringRunner.class)
• @SpringBootTest(classes = 启动类.class)
5,编写测试方法
import com.benjamin.HelloApplication;
import org.junit.Before;
import org.junit.Test;
import org.junit.runner.RunWith;
import org.springframework.beans.factory.annotation.Autowired;
import org.springframework.boot.test.context.SpringBootTest;
import org.springframework.test.context.junit4.SpringRunner;

//UserService的测试类
@RunWith(SpringRunner.class)
//如果springboot的引导类和测试类路径相同可以不指定springboot的引导类
@SpringBootTest(classes = HelloApplication.class)//springboot的引导类
public class UserServiceTest {

    @Autowired //注入UserService
    private UserService service;

    @Before
    public void init(){
        System.out.println("init ...");
    }

    @Test
    public void testAdd(){
        service.add();
    }
}
SpringBoot整合Redis
1,搭建SpringBoot工程
2, 引入redis起步依赖
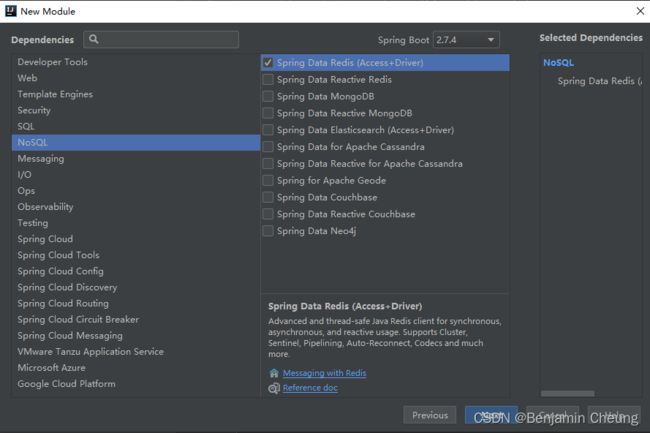
快速创建SpringBoot整合Redis的项目
File-->New-->Module-->Spring Initializr-->Next-->修改group id, artifact id,package-->Next-->依赖选NoSQL,复选框选Spring Date Redis-->Next-->Finish

倒数第二步需要注意Content root和Module file location是否和Module name相同。

正常创建SpringBoot整合Redis的项目
    org.springframework.boot
    spring-boot-starter-parent
    2.7.4


com.benjamin
spring_redis
0.0.1-SNAPSHOT
spring_redis
Demo project for Spring Boot

    1.8


        org.springframework.boot
        spring-boot-starter-data-redis


        org.springframework.boot
        spring-boot-starter-test
        test
3,配置redis相关属性
application.yml,可以配置远程访问地址,或本地地址
spring:
  redis:
    host: 127.0.0.1 #redis主机ip
    port: 6379
4,注入RedisTemplate模板
5,启动本地redis
如果遇到启动闪退问题,可以查看收藏文档
5,编写测试方法,测试
import org.junit.Test;
import org.junit.runner.RunWith;
import org.springframework.beans.factory.annotation.Autowired;
import org.springframework.boot.test.context.SpringBootTest;
import org.springframework.data.redis.core.RedisTemplate;
import org.springframework.test.context.junit4.SpringRunner;

@RunWith(SpringRunner.class)
@SpringBootTest
public class SpringRedisApplicationTests {

    @Autowired
    private RedisTemplate redisTemplate; //注入RedisTemplate模板

    @Test
    public void testSet() {
        //存入数据
        redisTemplate.boundValueOps("name").set("zhangsan");
    }
    @Test
    public void testGet() {
        //获取数据
        Object name = redisTemplate.boundValueOps("name").get();
        System.out.println(name);
    }
}
SpringBoot整合MyBatis
1,搭建SpringBoot工程
2,引入mybatis起步依赖,添加mysql驱动
"1.0" encoding="UTF-8"?>
"http://maven.apache.org/POM/4.0.0"
         xmlns:xsi="http://www.w3.org/2001/XMLSchema-instance"
         xsi:schemaLocation="http://maven.apache.org/POM/4.0.0 http://maven.apache.org/xsd/maven-4.0.0.xsd">
    4.0.0

    springboot_project1
    springboot_project1
    1.0-SNAPSHOT


        org.springframework.boot
        spring-boot-starter-parent
        2.1.8.RELEASE


            org.springframework.boot
            spring-boot-starter-web


            org.springframework.boot
            spring-boot-starter-test
            test


            org.springframework.boot
            spring-boot-configuration-processor
            true


            org.mybatis.spring.boot
            mybatis-spring-boot-starter
            2.1.0


            mysql
            mysql-connector-java
3,编写DataSource和MyBatis相关配置,
application.yml
注意设置时区和驱动最新url
# datasource
spring:
datasource:
# 需要指定时区?serverTimezone=UTC,要不然会报以下错误
# The server time zone value '�й���ʱ��' is unrecognized
url: jdbc:mysql://localhost:3306/test?serverTimezone=UTC
username: root
password: root
# 可以正常运行,但是驱动较老,可以配置最新的
# Loading class `com.mysql.jdbc.Driver'. This is deprecated. The new driver class is `com.mysql.cj.jdbc.Driver'
driver-class-name: com.mysql.jdbc.Driver
# mybatis xml实现方式的配置,注解方式不需要配置
mybatis:
mapper-locations: classpath:mapper/*Mapper.xml # mapper映射文件路径
type-aliases-package: com.benjamin.domain # 别名
# config-location: # 指定mybatis的核心配置文件,这里暂时不用
UserMapper.xml,只有xml实现方式需要配置
"1.0" encoding="UTF-8" ?>
"-//mybatis.org//DTD Mapper 3.0//EN" "http://mybatis.org/dtd/mybatis-3-mapper.dtd">
"com.benjamin.mapper.UserXmlMapper">
4,定义表和实体类
public class User {
    private int id;
    private String username;
    private String password;
}
5,编写dao和mapper文件/纯注解开发,
注解形式的mapper接口
import com.benjamin.domain.User;
import org.apache.ibatis.annotations.Mapper;
import org.apache.ibatis.annotations.Select;
import org.springframework.stereotype.Repository;
import java.util.List;
@Mapper
@Repository
public interface UserMapper {
    @Select("select * from user")
    public List findall();
}
xml形式的mapper接口
import com.benjamin.domain.User;
import org.apache.ibatis.annotations.Mapper;
import org.springframework.stereotype.Repository;
import java.util.List;
@Mapper
@Repository
public interface UserXmlMapper {
    public List findAll();
}
6,测试
@RunWith(SpringRunner.class)
//如果springboot的引导类和测试类路径相同可以不指定springboot的引导类
@SpringBootTest(classes = HelloApplication.class)//springboot的引导类
public class UserMapperTest {

    @Autowired //注入UserService
    private UserMapper mapper;
    @Test
    public void testFindall(){ //注解测试方法
        List userList = mapper.findall();
        //[User{id=1, username='zhangsan', password='123'}, User{id=2, username='lisi', password='123'}, User{id=3, username='wangwu', password='123'}, User{id=4, username='tom', password='123456'}]
        System.out.println(userList);
    }

    @Autowired //注入UserService
    private UserXmlMapper userXmlMapper;
    @Test
    public void testFindallXML(){ //xml测试方法
        List userList = userXmlMapper.findAll();
        //[User{id=1, username='zhangsan', password='123'}, User{id=2, username='lisi', password='123'}, User{id=3, username='wangwu', password='123'}, User{id=4, username='tom', password='123456'}]
        System.out.println(userList);
    }

}
SpringBoot 自动配置
Condition
Condition 是在Spring 4.0 增加的条件判断功能,通过这个可以功能可以实现选择性的创建 Bean 操作。
1,自定义条件:
定义条件类:自定义类实现Condition接口,重写 matches 方法,在 matches 方法中进行逻辑判断,返回
boolean值 。 matches 方法两个参数:
• context:上下文对象,可以获取属性值,获取类加载器,获取BeanFactory等。
• metadata:元数据对象,用于获取注解属性。
判断条件: 在初始化Bean时,使用 @Conditional(条件类.class)注解
2,SpringBoot 提供的常用条件注解:
• ConditionalOnProperty:判断配置文件中是否有对应属性和值才初始化Bean
• ConditionalOnClass:判断环境中是否有对应字节码文件才初始化Bean
• ConditionalOnMissingBean:判断环境中没有对应Bean才初始化Bean
例子:
1,自定义类实现Condition接口,重写 matches 方法,在 matches 方法中进行逻辑判断,返回
boolean值
public class ClassCondition implements Condition {
    /**
     *
     * @param context 上下文对象,用于获取环境,IOC容器,ClassLoader对象
     *                用于获取环境:Environment environment = context.getEnvironment();可以用来获取配置文件中属性值
     * @param metadata 注解元对象,可以用于获取注解定义的属性值
     * @return
     */
    @Override
    public boolean matches(ConditionContext context, AnnotatedTypeMetadata metadata) {

        //需求1:导入jedis坐标后创建bean
        //思路:判断redis.clients.jedis.Jedis文件是否存在
        /*boolean flag = true;
        try {
            Class aClass = Class.forName("redis.clients.jedis.Jedis");
        } catch (ClassNotFoundException e) {
            flag = false;
        }
        //return false;//NoSuchBeanDefinitionException: No bean named 'user2' available
        return flag; //User2{id=0, username='null', password='null'}*/


        //需求2:导入通过注解属性值value指定坐标后创建bean
        //思路:判断redis.clients.jedis.Jedis文件是否存在

        //获取注解属性值 value
        Map, Object> map = metadata.getAnnotationAttributes(ConditionOnClass.class.getName());
        //System.out.println(map);

        String[] value = (String[])map.get("value");

        boolean flag = true;
        try {
            for (String className : value) {
                Class aClass = Class.forName(className);
            }
        } catch (ClassNotFoundException e) {
            flag = false;
        }
        //return false;//NoSuchBeanDefinitionException: No bean named 'user2' available
        return flag; //User2{id=0, username='null', password='null'}
    }
}
2,判断条件: 在初始化Bean时,使用 @Conditional(条件类.class)注解
UserConfig类用于初始化user bean,使用条件注解,设置初始化前的先决条件
import com.alibaba.fastjson.JSON;
import com.benjamin.condition.ClassCondition;
import com.benjamin.condition.ConditionOnClass;
import com.benjamin.domain.User2;
import org.springframework.boot.autoconfigure.condition.ConditionalOnProperty;
import org.springframework.context.annotation.Bean;
import org.springframework.context.annotation.Conditional;
import org.springframework.context.annotation.Configuration;

@Configuration
//用于条件判断是否需要初始化bean
//@Conditional(ClassCondition.class)
//@ConditionOnClass("redis.clients.jedis.Jedis")
//比如需要初始化user2的先决条件是必须先导入JSON坐标
//@ConditionOnClass("com.alibaba.fastjson.JSON")
public class UserConfig {

    @Bean
    public User2 user2(){
        return new User2();
    }

    @Bean
    //ConditionalOnProperty获取bean的先决条件是配置文件必须配置相应的值
    @ConditionalOnProperty(name = "ben", havingValue = "good")
    public User2 user3(){
        return new User2();
    }
}
自定义条件注解
import org.springframework.context.annotation.Conditional;

import java.lang.annotation.*;
//将Conditional的注解搬过来
@Target({ElementType.TYPE, ElementType.METHOD})//定义此注解可以用在哪里
@Retention(RetentionPolicy.RUNTIME)//注解在运行时使用
@Documented//文档

@Conditional(ClassCondition.class)//用于条件判断是否需要初始化bean
public @interface ConditionOnClass {
    String[] value();
}
3,测试类,使用ApplicationContext初始化bean对象
/**
 * 引导类 springboot项目的入口
 */
@SpringBootApplication
public class HelloApplication {
    public static void main(String[] args) {
        //返回值是ApplicationContext,也就是spring的Ioc容器
        ConfigurableApplicationContext applicationContext = SpringApplication.run(HelloApplication.class, args);
        //获取bean,redisTemplate
        Object redisTemplate = applicationContext.getBean("redisTemplate");
        //org.springframework.data.redis.core.RedisTemplate@e11ecfa
        System.out.println(redisTemplate);

        Object user2 = applicationContext.getBean("user2");
        //User2{id=0, username='null', password='null'}
        System.out.println(user2);

        Object user3 = applicationContext.getBean("user3");
        //user3= User2{id=0, username='null', password='null'}
        System.out.println("user3= "+user3);//User2{id=0, username='null', password='null'}
    }
}
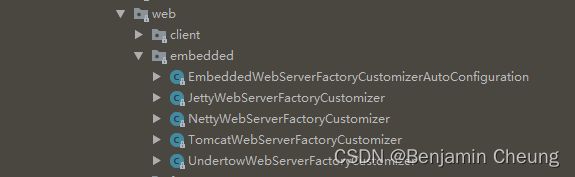
切换内置web服务器
SpringBoot的web环境中默认使用tomcat作为内置服务器,其实SpringBoot提供了4中内置服务器供我们选择,我们可
以很方便的进行切换
spring-boot-autoconfigure-2.1.8.RELEASE.jar中EmbeddedWebServerFactoryCustomizerAutoConfiguration类中的@ConditionalOnWebApplication条件判断,用于选择哪个服务器被加载
比如pom文件这样配置,就是排除了tomcat依赖,使用jetty服务器
    org.springframework.boot
    spring-boot-starter-web


            spring-boot-starter-tomcat
            org.springframework.boot


    spring-boot-starter-jetty
    org.springframework.boot
@Enable*注解
SpringBoot中提供了很多Enable开头的注解,这些注解都是用于动态启用某些功能的。而其底层原理是使用@Import注
解导入一些配置类,实现Bean的动态加载。
比如:SpringBoot 工程是否可以直接获取第三方jar包中定义的Bean?不行

1,@ComponentScan 扫描范围:当前引导类所在包及其子包
使用@ComponentScan扫描第三方包
         @ComponentScan("com.benjamin.springbootinit")
2,使用@Import注解,加载类。这些类都会被spring创建,并放入IOC容器
         @Import(ConfigPerson.class)
3,可以将import注解进行封装@EnablePerson
     1,第三方提供EnablePerson注解,导入import
          //导入元注解
          @Target({ElementType.TYPE})
          @Retention(RetentionPolicy.RUNTIME)
          @Documented
          //导入import注解
          @Import(ConfigPerson.class)
          public @interface EnablePerson {
          }
	 2,在需要获取第三方bean时,加上@EnablePerson注解,就可以实现Person实体类的初始化操作
@Import注解
@Enable*底层依赖于@Import注解导入一些类,使用@Import导入的类会被Spring加载到IOC容器中。而@Import提供4中用
法:
1,导入Bean
//第三方jar中定义了bean
public class Pig {
}
@Import(Pig.class) //导入实体类
@SpringBootApplication
public class ImportApplication {
    public static void main(String[] args) {
        //返回值是ApplicationContext,也就是spring的Ioc容器
        ConfigurableApplicationContext applicationContext = SpringApplication.run(ImportApplication.class, args);

        //Pig pig = applicationContext.getBean(Pig.class);
        Object pig = applicationContext.getBean("pig");
        //com.third.Pig@57545c3f
        System.out.println(pig);

        Map, Pig> pigMap = applicationContext.getBeansOfType(Pig.class);
        //{com.third.Pig=com.third.Pig@5d1e0fbb}
        System.out.println(pigMap);
2,导入配置类
//第三方jar中定义了Config类
import org.springframework.beans.factory.annotation.Configurable;
import org.springframework.context.annotation.Bean;
@Configurable
public class ConfigAnimal {
    @Bean
    public Pig pig(){
        return new Pig();
    }
    @Bean
    public Cat cat(){
        return new Cat();
    }
}
@Import(ConfigAnimal.class) //导入配置类
@SpringBootApplication
public class ImportApplication {
    public static void main(String[] args) {
        //返回值是ApplicationContext,也就是spring的Ioc容器
        ConfigurableApplicationContext applicationContext = SpringApplication.run(ImportApplication.class, args);

        //Pig pig = applicationContext.getBean(Pig.class);
        Object pig = applicationContext.getBean("pig");
        //com.third.Pig@57545c3f
        System.out.println(pig);

        Map, Pig> pigMap = applicationContext.getBeansOfType(Pig.class);
        //{com.third.Pig=com.third.Pig@5d1e0fbb}
        System.out.println(pigMap);

        Cat cat = applicationContext.getBean(Cat.class);
        //com.third.Cat@76a805b7
        System.out.println(cat);
    }
}
3,导入 ImportSelector 实现类。一般用于加载配置文件中的类
//第三方jar中定义了ImportSelector 实现类
import org.springframework.context.annotation.ImportSelector;
import org.springframework.core.type.AnnotationMetadata;
public class MyImportSelector implements ImportSelector {
    @Override
    public String[] selectImports(AnnotationMetadata importingClassMetadata) {
        return new String[]{"com.third.Cat","com.third.Pig"};
    }
}
@Import(MyImportSelector.class) //导入ImportSelector的实现类
@SpringBootApplication
public class ImportApplication {
    public static void main(String[] args) {
        //返回值是ApplicationContext,也就是spring的Ioc容器
        ConfigurableApplicationContext applicationContext = SpringApplication.run(ImportApplication.class, args);

        //Pig pig = applicationContext.getBean(Pig.class);
        Object pig = applicationContext.getBean("pig");
        //com.third.Pig@57545c3f
        System.out.println(pig);

        Map, Pig> pigMap = applicationContext.getBeansOfType(Pig.class);
        //{com.third.Pig=com.third.Pig@5d1e0fbb}
        System.out.println(pigMap);

        Cat cat = applicationContext.getBean(Cat.class);
        //com.third.Cat@76a805b7
        System.out.println(cat);
    }
}
4,导入 ImportBeanDefinitionRegistrar 实现类
//第三方jar中定义了 ImportBeanDefinitionRegistrar 实现类
import org.springframework.beans.factory.support.AbstractBeanDefinition;
import org.springframework.beans.factory.support.BeanDefinitionBuilder;
import org.springframework.beans.factory.support.BeanDefinitionRegistry;
import org.springframework.context.annotation.ImportBeanDefinitionRegistrar;
import org.springframework.core.type.AnnotationMetadata;

public class MyImportBeanDefinitionRegistrar implements ImportBeanDefinitionRegistrar {
    @Override
    public void registerBeanDefinitions(AnnotationMetadata importingClassMetadata, BeanDefinitionRegistry registry) {
        AbstractBeanDefinition beanDefinition = BeanDefinitionBuilder.rootBeanDefinition(Pig.class).getBeanDefinition();
        registry.registerBeanDefinition("pig", beanDefinition);
    }
}
@Import(MyImportBeanDefinitionRegistrar.class)  //导入ImportBeanDefinitionRegistrar的实现类
@SpringBootApplication
public class ImportApplication {
    public static void main(String[] args) {
        //返回值是ApplicationContext,也就是spring的Ioc容器
        ConfigurableApplicationContext applicationContext = SpringApplication.run(ImportApplication.class, args);

        //Pig pig = applicationContext.getBean(Pig.class);
        Object pig = applicationContext.getBean("pig");
        //com.third.Pig@57545c3f
        System.out.println(pig);

        Map, Pig> pigMap = applicationContext.getBeansOfType(Pig.class);
        //{com.third.Pig=com.third.Pig@5d1e0fbb}
        System.out.println(pigMap);

        Cat cat = applicationContext.getBean(Cat.class);
        //因为ImportBeanDefinitionRegistrar实现类中只注入了Pig所以这块Cat获取不到
        System.out.println(cat);
    }
}
@EnableAutoConfiguration 注解
@EnableAutoConfiguration 注解内部使用 @Import(AutoConfigurationImportSelector.class)来加载配置类。
配置文件位置:META-INF/spring.factories,该配置文件中定义了大量的配置类,当 SpringBoot 应用启动时,会自动加载
这些配置类,初始化Bean
并不是所有的Bean都会被初始化,在配置类中使用Condition来加载满足条件的Bean
自定义redis-starter
要求当导入redis坐标时,SpringBoot自动创建Jedis的Bean
启动redis-server.exe,如果启动闪退。解决方法
1,通过cmd进入redis安装路径
2,redis-server.exe redis.windows.conf
1,创建 redis-spring-boot-autoconfigure 模块
RedisAutoConfiguration.class
import org.springframework.boot.context.properties.EnableConfigurationProperties;
import org.springframework.context.annotation.Bean;
import org.springframework.context.annotation.Configuration;
import redis.clients.jedis.Jedis;
@Configuration
@EnableConfigurationProperties(RedisProperties.class)
//也可以设置前置条件,当有Jedis依赖时,才初始化bean对象
@ConditionalOnClass(Jedis.class)
public class RedisAutoConfiguration {
    /**
     提供jedis的bean
     */
    @Bean
    //当springboot没有加载jedis时,再加载bean
    @ConditionalOnMissingBean(name = "jedis")
    public Jedis jedis(RedisProperties redisProperties){
    	//当不从这里加载时,不会打印这句话
    	System.out.println("load jedis by RedisAutoConfiguration");
        return new Jedis(redisProperties.getHost(),redisProperties.getPort());
    }
}
RedisProperties.class
import org.springframework.boot.context.properties.ConfigurationProperties;
@ConfigurationProperties(prefix = "redis")
public class RedisProperties {
    private String host ="localhost";
    private int port = 6379;
    public String getHost() {return host;}
    public void setHost(String host) {this.host = host;}
    public int getPort() {return port;}
    public void setPort(int port) {this.port = port;}
}
redis-spring-boot-autoconfigure模块的pom
        org.springframework.boot
        spring-boot-starter


        redis.clients
        jedis
2,在 redis-spring-boot-autoconfigure 模块中初始化 Jedis 的Bean。并定义META-INF/spring.factories 文件
\resources\META-INF\spring.factories
org.springframework.boot.autoconfigure.EnableAutoConfiguration=\
  com.ben.RedisAutoConfiguration
3,创建 redis-spring-boot-starter 模块,依赖 redis-spring-boot-autoconfigure的模块
pom.xml
"1.0" encoding="UTF-8"?>
"http://maven.apache.org/POM/4.0.0"
         xmlns:xsi="http://www.w3.org/2001/XMLSchema-instance"
         xsi:schemaLocation="http://maven.apache.org/POM/4.0.0 http://maven.apache.org/xsd/maven-4.0.0.xsd">
    4.0.0


        org.springframework.boot
        spring-boot-starter-parent
        2.1.8.RELEASE


    com.ben
    redis-spring-boot-starter
    1.0-SNAPSHOT


        1.8


            org.springframework.boot
            spring-boot-starter


            com.ben
            redis-spring-boot-autoconfigure
            1.0-SNAPSHOT
4,在测试模块中引入自定义的 redis-starter 依赖,测试获取Jedis 的Bean,操作redis
在module3中引入starter依赖
    com.ben
    redis-spring-boot-starter
    1.0-SNAPSHOT
@SpringBootApplication
public class ImportApplication {
    public static void main(String[] args) {
        //返回值是ApplicationContext,也就是spring的Ioc容器
        ConfigurableApplicationContext applicationContext = SpringApplication.run(ImportApplication.class, args);

        Jedis jedis = applicationContext.getBean(Jedis.class);
        jedis.set("kname","kv");
        String kname = jedis.get("kname");
        System.out.println(kname);
        System.out.println(jedis);
    }

	//当存在以下jedis初始化方法时,不会从RedisAutoConfiguration加载bean对象
	@Bean
    public Jedis jedis(){
        return new Jedis("localhost",6379);
    }
}
SpringBoot 监听机制
Java 监听机制
SpringBoot 的监听机制,其实是对Java提供的事件监听机制的封装。
Java中的事件监听机制定义了以下几个角色:
① 事件:Event,继承 java.util.EventObject 类的对象
② 事件源:Source ,任意对象Object
③ 监听器:Listener,实现 java.util.EventListener 接口 的对象
SpringBoot 监听机制
SpringBoot 在项目启动时,会对几个监听器进行回调,我们可以实现这些监听器接口,在项目启动时完成一些操作。
ApplicationContextInitializer、SpringApplicationRunListener、CommandLineRunner、ApplicationRunner
ApplicationRunner,CommandLineRunner都是项目启动后执行run方法,不需要配置
import org.springframework.boot.ApplicationArguments;
import org.springframework.boot.ApplicationRunner;
import org.springframework.stereotype.Component;
import java.util.Arrays;
//当项目启动后执行run方法。
@Component
public class MyApplicationRunner implements ApplicationRunner {
    @Override
    public void run(ApplicationArguments args) throws Exception {
        System.out.println("ApplicationRunner...run");
        System.out.println(Arrays.asList(args.getSourceArgs()));
    }
}
import org.springframework.boot.CommandLineRunner;
import org.springframework.stereotype.Component;
import java.util.Arrays;
//当项目启动后执行run方法。
@Component
public class MyCommandLineRunner implements CommandLineRunner {
    @Override
    public void run(String... args) throws Exception {
        System.out.println("CommandLineRunner...run");
        System.out.println(Arrays.asList(args));
    }
}
ApplicationContextInitializer SpringApplicationRunListener执行的话,需要在META-INF/spring.factories配置,才会被加载
import org.springframework.context.ApplicationContextInitializer;
import org.springframework.context.ConfigurableApplicationContext;
import org.springframework.stereotype.Component;

@Component
public class MyApplicationContextInitializer implements ApplicationContextInitializer {
    @Override
    public void initialize(ConfigurableApplicationContext applicationContext) {
        System.out.println("ApplicationContextInitializer....initialize");
    }
}
import org.springframework.boot.SpringApplication;
import org.springframework.boot.SpringApplicationRunListener;
import org.springframework.context.ConfigurableApplicationContext;
import org.springframework.core.env.ConfigurableEnvironment;

public class MySpringApplicationRunListener implements SpringApplicationRunListener {

    public MySpringApplicationRunListener(SpringApplication application, String[] args) {
    }
    @Override
    public void starting() {
        System.out.println("starting...项目启动中");
    }

    @Override
    public void environmentPrepared(ConfigurableEnvironment environment) {
        System.out.println("environmentPrepared...环境对象开始准备");
    }
    @Override
    public void contextPrepared(ConfigurableApplicationContext context) {
        System.out.println("contextPrepared...上下文对象开始准备");
    }
    @Override
    public void contextLoaded(ConfigurableApplicationContext context) {
        System.out.println("contextLoaded...上下文对象开始加载");
    }
    @Override
    public void started(ConfigurableApplicationContext context) {
        System.out.println("started...上下文对象加载完成");
    }
    @Override
    public void running(ConfigurableApplicationContext context) {
        System.out.println("running...项目启动完成,开始运行");
    }
    @Override
    public void failed(ConfigurableApplicationContext context, Throwable exception) {
        System.out.println("failed...项目启动失败");
    }
}
resources/META-INF/spring.factories
org.springframework.context.ApplicationContextInitializer=com.listener.MyApplicationContextInitializer

org.springframework.boot.SpringApplicationRunListener=com.listener.MySpringApplicationRunListener
SpringBoot 启动流程
SpringBoot 启动流程
SpringBoot 监控
SpringBoot自带监控功能Actuator,可以帮助实现对程序内部运行情况监控,比如监控状况、Bean加载情况、配置属性、日志信息等。
1,导入依赖坐标
	org.springframework.boot
	spring-boot-starter-actuator
2,访问http://localhost:8080/acruator
application.properties
info.name=zs
info.age=23

# 开启健康检查的完整信息
management.endpoint.health.show-details=always
http://localhost:8080/actuator/info
{"name":"zs","age":"23"}

http://localhost:8080/actuator/health
{"status":"DOWN","details":{"diskSpace":{"status":"UP","details":{"total":132232318976,"free":101545701376,"threshold":10485760}},"redis":{"status":"DOWN","details":{"error":"org.springframework.data.redis.RedisConnectionFailureException: Unable to connect to Redis; nested exception is io.lettuce.core.RedisConnectionException: Unable to connect to localhost:6379"}}}}

{"status":"UP","details":{"diskSpace":{"status":"UP","details":{"total":132232318976,"free":101126270976,"threshold":10485760}},"redis":{"status":"UP","details":{"version":"2.8.9"}}}}
所有的监控endpoint暴露出来
info.name=zs
info.age=23

# 开启健康检查的完整信息
management.endpoint.health.show-details=always

# 将所有的监控endpoint暴露出来
management.endpoints.web.exposure.include=*
SpringBoot 监控使用
路径 				描述
/beans 				描述应用程序上下文里全部的Bean,以及它们的关系
/env 				获取全部环境属性
/env/{name} 		根据名称获取特定的环境属性值
/health 			报告应用程序的健康指标,这些值由HealthIndicator的实现类提供
/info 				获取应用程序的定制信息,这些信息由info打头的属性提供
/mappings 			描述全部的URI路径,以及它们和控制器(包含Actuator端点)的映射关系
/metrics 			报告各种应用程序度量信息,比如内存用量和HTTP请求计数
/metrics/{name} 	报告指定名称的应用程序度量值
/trace 				提供基本的HTTP请求跟踪信息(时间戳、HTTP头等)
SpringBoot 监控 - Spring Boot Admin
Spring Boot Admin是一个开源社区项目,用于管理和监控SpringBoot应用程序。
Spring Boot Admin 有两个角色,客户端(Client)和服务端(Server)。
应用程序作为Spring Boot Admin Client向为Spring Boot Admin Server注册
Spring Boot Admin Server 的UI界面将Spring Boot Admin Client的Actuator Endpoint上的一些监控信息。
admin-server:
1,创建 admin-server 模块
2,导入依赖坐标 admin-starter-server
pom.xml
4.0.0
org.springframework.boot
spring-boot-starter-parent
2.1.8.RELEASE
com.ben
springboot-admin-server
0.0.1-SNAPSHOT
springboot-admin-server
Demo project for Spring Boot
1.8
2.1.5
org.springframework.boot
spring-boot-starter-web
de.codecentric
spring-boot-admin-starter-server
org.springframework.boot
spring-boot-starter-test
test
de.codecentric
spring-boot-admin-dependencies
$ {spring-boot-admin.version}
pom
import
org.springframework.boot
spring-boot-maven-plugin
3,在引导类上启用监控功能@EnableAdminServer
import de.codecentric.boot.admin.server.config.EnableAdminServer;
import org.springframework.boot.SpringApplication;
import org.springframework.boot.autoconfigure.SpringBootApplication;

@EnableAdminServer
@SpringBootApplication
public class SpringbootAdminServerApplication {
    public static void main(String[] args) {
        SpringApplication.run(SpringbootAdminServerApplication.class, args);
    }
}
4,application.properties中修改server端口
server.port=9000
admin-client:
1,创建 admin-client 模块
2,导入依赖坐标 admin-starter-client
4.0.0
org.springframework.boot
spring-boot-starter-parent
2.1.8.RELEASE
com.ben
springboot-admin-client
0.0.1-SNAPSHOT
springboot-admin-client
Demo project for Spring Boot
1.8
2.1.5
org.springframework.boot
spring-boot-starter-web
de.codecentric
spring-boot-admin-starter-client
org.springframework.boot
spring-boot-starter-test
test
de.codecentric
spring-boot-admin-dependencies
$ {spring-boot-admin.version}
pom
import
org.springframework.boot
spring-boot-maven-plugin
3,配置相关信息:server地址等
application.properties
# 执行admin.server地址
spring.boot.admin.client.url=http://localhost:9000

# 开启所有的检查
management.endpoint.health.show-details=always
management.endpoints.web.exposure.include=*
4,编写一个controller用于测试
import org.springframework.web.bind.annotation.RequestMapping;
import org.springframework.web.bind.annotation.RestController;

@RestController
@RequestMapping("/user")
public class UserController {
    @RequestMapping("/findAll")
    public String findAll(){
        return "success";
    }
}
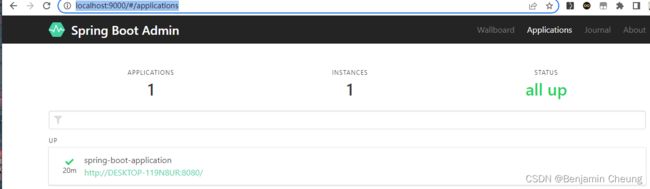
5,先后启动server和client服务,访问server
http://localhost:9000/#/applications
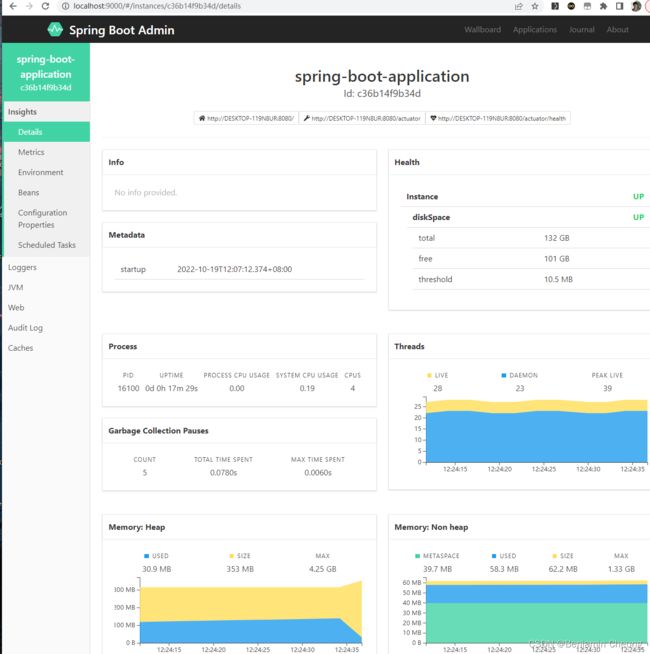
点击"Wallboard",点击需要检查的instance
Metrics查看访问的client端比如controller访问过的url
environment查看application.properties配置的参数
beans查看初始化的bean对象
JVM-->Threads查看线程情况
Web-->Mappings查看client端比如controller访问过的url
SpringBoot 项目部署
SpringBoot 项目开发完毕后,支持两种方式部署到服务器:
1,jar包(官方推荐) 这种方式使用的springboot内置的tomcat服务器
1,先使用idea maven projects,点击"lifecycle"中"package"

2,打开jar包所在目录,按住shift,右击,打开"windows power shell"运行
java -jar .\springboot-deploy-0.0.1-SNAPSHOT.jar命令启动项目。
2,war包
1,在pom文件中指定packaging为war
com.ben
springboot-deploy
0.0.1-SNAPSHOT
springboot-deploy
Demo project for Spring Boot
war
2,修改springboot的引导类,继承SpringBootServletInitializer重写configure方法
@SpringBootApplication
public class SpringbootDeployApplication extends SpringBootServletInitializer {
    public static void main(String[] args) {
        SpringApplication.run(SpringbootDeployApplication.class, args);
    }
    @Override
    protected SpringApplicationBuilder configure(SpringApplicationBuilder builder) {
        return builder.sources(SpringbootDeployApplication.class);
    }
}
3,将war包放在本地tomcat的webapps目录下,启动startup.bat
注意:这种方式springboot项目配置的server port等信息不生效,以本地tomcat信息为主。访问时需要加"/webapps"目录。
Spring Boot starter
Spring Boot之所以能够帮我们简化项目的搭建和开发过程,主要是基于它提供的起步依赖和自动配置。
起步依赖
起步依赖,其实就是将具备某种功能的坐标打包到一起,可以简化依赖导入的过程。例如,我们导入spring-boot-starter-web这个starter,则和web开发相关的jar包都一起导入到项目中了。
自动配置
自动配置,就是无须手动配置xml,自动配置并管理bean,可以简化开发过程。
1 基于Java代码的Bean配置
@Configuration和**@Bean**这两个注解一起使用就可以创建一个基于java代码的配置类,可以用来替代传统的xml配置文件。
@Configuration 注解的类可以看作是能生产让Spring IoC容器管理的Bean实例的工厂。
@Bean 注解的方法返回的对象可以被注册到spring容器中。

2 自动配置条件依赖
从MybatisAutoConfiguration这个类中使用的注解可以看出,要完成自动配置是有依赖条件的。

所以要完成Mybatis的自动配置,需要在类路径中存在SqlSessionFactory.class、SqlSessionFactoryBean.class这两个类,同时需要存在DataSource这个bean且这个bean完成自动注册。
这些注解是spring boot特有的,常见的条件依赖注解有:
| 注解 | 功能说明 |
|---|---|
| @ConditionalOnBean | 仅在当前上下文中存在某个bean时,才会实例化这个Bean |
| @ConditionalOnClass | 某个class位于类路径上,才会实例化这个Bean |
| @ConditionalOnExpression | 当表达式为true的时候,才会实例化这个Bean |
| @ConditionalOnMissingBean | 仅在当前上下文中不存在某个bean时,才会实例化这个Bean |
| @ConditionalOnMissingClass | 某个class在类路径上不存在的时候,才会实例化这个Bean |
| @ConditionalOnNotWebApplication | 不是web应用时才会实例化这个Bean |
| @AutoConfigureAfter | 在某个bean完成自动配置后实例化这个bean |
| @AutoConfigureBefore | 在某个bean完成自动配置前实例化这个bean |
3 Bean参数获取
要完成mybatis的自动配置,需要我们在配置文件中提供数据源相关的配置参数,例如数据库驱动、连接url、数据库用户名、密码等。
导入mybatis-spring-boot-starter这个jar包后会传递过来一个spring-boot-autoconfigure包,在这个包中有一个自动配置类DataSourceAutoConfiguration,如下所示:

我们可以看到这个类上加入了EnableConfigurationProperties这个注解,继续跟踪源码到DataSourceProperties这个类,如下:
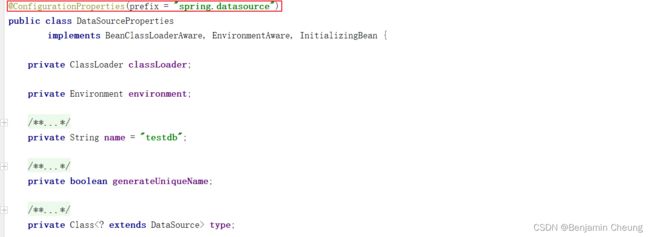
可以看到这个类上加入了ConfigurationProperties注解,这个注解的作用就是把yml或者properties配置文件中的配置参数信息封装到ConfigurationProperties注解标注的bean(即DataSourceProperties)的相应属性上。
@EnableConfigurationProperties注解的作用是使@ConfigurationProperties注解生效。
4 Bean的发现
spring boot默认扫描启动类所在的包下的主类与子类的所有组件,但并没有包括依赖包中的类。那么依赖包中的bean是如何被发现和加载的?
从Spring Boot项目的启动类开始跟踪,在启动类上我们一般会加入SpringBootApplication注解,此注解的源码如下:

重点介绍如下三个注解:
SpringBootConfiguration:作用就相当于Configuration注解,被注解的类将成为一个bean配置类
ComponentScan:作用就是自动扫描并加载符合条件的组件,最终将这些bean加载到spring容器中
EnableAutoConfiguration :这个注解很重要,借助@Import的支持,收集和注册依赖包中相关的bean定义
继续跟踪EnableAutoConfiguration注解源码:
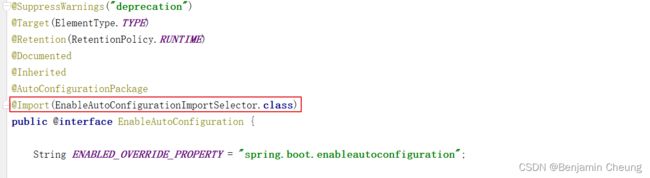
@EnableAutoConfiguration注解引入了@Import这个注解。
Import:导入需要自动配置的组件,此处为EnableAutoConfigurationImportSelector这个类
EnableAutoConfigurationImportSelector类源码如下:
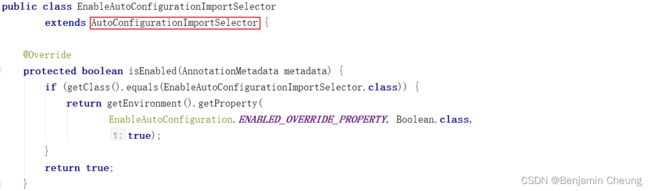
EnableAutoConfigurationImportSelector继承了AutoConfigurationImportSelector类,继续跟踪AutoConfigurationImportSelector类源码:
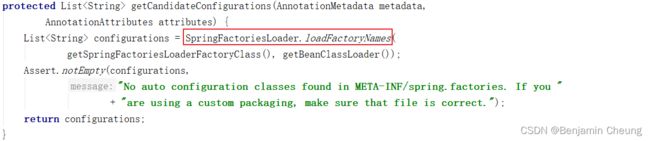
AutoConfigurationImportSelector类的getCandidateConfigurations方法中的调用了SpringFactoriesLoader类的loadFactoryNames方法,继续跟踪源码:
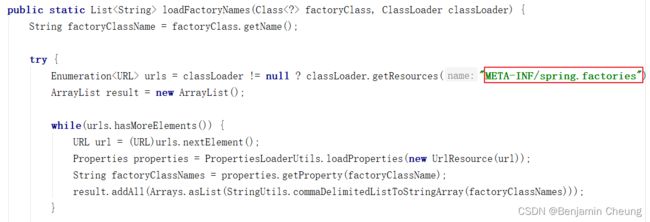
SpringFactoriesLoader的loadFactoryNames静态方法可以从所有的jar包中读取META-INF/spring.factories文件,而自动配置的类就在这个文件中进行配置:

spring.factories文件内容如下:

这样Spring Boot就可以加载到MybatisAutoConfiguration这个配置类了。
5 Bean的加载
在Spring Boot应用中要让一个普通类交给Spring容器管理,通常有以下方法:
1、使用 @Configuration与@Bean 注解
2、使用@Controller @Service @Repository @Component 注解标注该类并且启用@ComponentScan自动扫描
3、使用@Import 方法
其中Spring Boot实现自动配置使用的是@Import注解这种方式,AutoConfigurationImportSelector类的selectImports方法返回一组从META-INF/spring.factories文件中读取的bean的全类名,这样Spring Boot就可以加载到这些Bean并完成实例的创建工作。
6 自动配置总结
自动配置的关键几步以及相应的注解总结如下:
1、@Configuration与@Bean:基于Java代码的bean配置
2、@Conditional:设置自动配置条件依赖(自动配合的提前条件)
3、@EnableConfigurationProperties与@ConfigurationProperties:读取配置文件转换为bean(读取yml文件)
4、@EnableAutoConfiguration与@Import:实现bean发现与加载(Spring Boot实现自动配置)
案例一
开发starter
1,创建starter工程hello-spring-boot-starter并配置pom.xml文件
"1.0" encoding="UTF-8"?>
"http://maven.apache.org/POM/4.0.0"
         xmlns:xsi="http://www.w3.org/2001/XMLSchema-instance"
         xsi:schemaLocation="http://maven.apache.org/POM/4.0.0
                             http://maven.apache.org/xsd/maven-4.0.0.xsd">
    4.0.0

        org.springframework.boot
        spring-boot-starter-parent
        2.2.2.RELEASE


    com.ben
    hello-spring-boot-starter
    1.0-SNAPSHOT


            org.springframework.boot
            spring-boot-starter


            org.springframework.boot
            spring-boot-autoconfigure
2,创建配置属性类HelloProperties
package com.ben.config;

import org.springframework.boot.context.properties.ConfigurationProperties;

/*
 *读取配置文件转换为bean
 * */
@ConfigurationProperties(prefix = "hello")
public class HelloProperties {
    private String name;
    private String address;

    //get,set,toString
}
3,创建服务类HelloService
package com.ben.service;

public class HelloService {
    private String name;
    private String address;

    public HelloService(String name, String address) {
        this.name = name;
        this.address = address;
    }

    public String sayHello(){
        return "你好!我的名字叫 " + name + ",我来自 " + address;
    }
}
4,创建自动配置类HelloServiceAutoConfiguration
package com.ben.config;

import cn.itcast.service.HelloService;
import org.springframework.boot.autoconfigure.condition.ConditionalOnMissingBean;
import org.springframework.boot.context.properties.EnableConfigurationProperties;
import org.springframework.context.annotation.Bean;
import org.springframework.context.annotation.Configuration;

/*
* 配置类,基于Java代码的bean配置
* */

@Configuration
@EnableConfigurationProperties(HelloProperties.class)
public class HelloServiceAutoConfiguration {
    private HelloProperties helloProperties;

    //通过构造方法注入配置属性对象HelloProperties
    public HelloServiceAutoConfiguration(HelloProperties helloProperties) {
        this.helloProperties = helloProperties;
    }

    //实例化HelloService并载入Spring IoC容器
    @Bean
    @ConditionalOnMissingBean
    public HelloService helloService(){
        return new HelloService(helloProperties.getName(),helloProperties.getAddress());
    }
}
5,在resources目录下创建META-INF/spring.factories
org.springframework.boot.autoconfigure.EnableAutoConfiguration=\
com.ben.config.HelloServiceAutoConfiguration
6,maven install将当前starter安装到本地maven仓库供其他应用来使用
使用starter
1,创建maven工程myapp并配置pom.xml文件
"1.0" encoding="UTF-8"?>
"http://maven.apache.org/POM/4.0.0"
         xmlns:xsi="http://www.w3.org/2001/XMLSchema-instance"
         xsi:schemaLocation="http://maven.apache.org/POM/4.0.0 http://maven.apache.org/xsd/maven-4.0.0.xsd">
    4.0.0

        org.springframework.boot
        spring-boot-starter-parent
        2.2.2.RELEASE


    cn.itcast
    myapp
    1.0-SNAPSHOT


            org.springframework.boot
            spring-boot-starter-web


            cn.itcast
            hello-spring-boot-starter
            1.0-SNAPSHOT
2,创建application.yml文件
server:
  port: 8080
hello:
  name: xiaoming
  address: xian
3,创建HelloController
package com.ben.controller;

import cn.itcast.service.HelloService;
import org.springframework.beans.factory.annotation.Autowired;
import org.springframework.web.bind.annotation.GetMapping;
import org.springframework.web.bind.annotation.RequestMapping;
import org.springframework.web.bind.annotation.RestController;

@RestController
@RequestMapping("/hello")
public class HelloController {
    //HelloService在我们自定义的starter中已经完成了自动配置,所以此处可以直接注入
    @Autowired
    private HelloService helloService;

    @GetMapping("/say")
    public String sayHello(){
        return helloService.sayHello();
    }
}
4,创建启动类HelloApplication
package com.ben;

import org.springframework.boot.SpringApplication;
import org.springframework.boot.autoconfigure.SpringBootApplication;

@SpringBootApplication
public class HelloApplication {
    public static void main(String[] args) {
        SpringApplication.run(HelloApplication.class,args);
    }
}
5,执行启动类main方法,访问地址http://localhost:8080/hello/say
你好!我的名字叫 xiaoming,我来自 xian
案例二
通过自动配置来创建一个拦截器对象,通过此拦截器对象来实现记录日志功能。
开发starter
1,在hello-spring-boot-starter的pom.xml文件中追加如下maven坐标
    org.springframework.boot
    spring-boot-starter-web
    true


    org.springframework.boot
    spring-boot-configuration-processor
2,自定义MyLog注解
package com.ben.log;
import java.lang.annotation.ElementType;
import java.lang.annotation.Retention;
import java.lang.annotation.RetentionPolicy;
import java.lang.annotation.Target;

@Target(ElementType.METHOD)
@Retention(RetentionPolicy.RUNTIME)
public @interface MyLog {
    /**
     * 方法描述
     */
    String desc() default "";
}
3,自定义日志拦截器MyLogInterceptor
package com.ben.log;

import org.springframework.web.method.HandlerMethod;
import org.springframework.web.servlet.ModelAndView;
import org.springframework.web.servlet.handler.HandlerInterceptorAdapter;
import javax.servlet.http.HttpServletRequest;
import javax.servlet.http.HttpServletResponse;
import java.lang.reflect.Method;

public class MyLogInterceptor extends HandlerInterceptorAdapter {
    private static final ThreadLocal startTimeThreadLocal = new ThreadLocal<>();

    public boolean preHandle(HttpServletRequest request, HttpServletResponse response,
                             Object handler) throws Exception {
        HandlerMethod handlerMethod = (HandlerMethod)handler;
        Method method = handlerMethod.getMethod();//获得被拦截的方法对象
        MyLog myLog = method.getAnnotation(MyLog.class);//获得方法上的注解
        if(myLog != null){
            //方法上加了MyLog注解,需要进行日志记录
            long startTime = System.currentTimeMillis();
            startTimeThreadLocal.set(startTime);
        }
        return true;
    }

    public void postHandle(HttpServletRequest request, HttpServletResponse response,
                           Object handler, ModelAndView modelAndView) throws Exception {
        HandlerMethod handlerMethod = (HandlerMethod)handler;
        Method method = handlerMethod.getMethod();//获得被拦截的方法对象
        MyLog myLog = method.getAnnotation(MyLog.class);//获得方法上的注解
        if(myLog != null){
            //方法上加了MyLog注解,需要进行日志记录
            long endTime = System.currentTimeMillis();
            Long startTime = startTimeThreadLocal.get();
            long optTime = endTime - startTime;

            String requestUri = request.getRequestURI();
            String methodName = method.getDeclaringClass().getName() + "." +
                    method.getName();
            String methodDesc = myLog.desc();

            System.out.println("请求uri:" + requestUri);
            System.out.println("请求方法名:" + methodName);
            System.out.println("方法描述:" + methodDesc);
            System.out.println("方法执行时间:" + optTime + "ms");
        }
    }
}
4,创建自动配置类MyLogAutoConfiguration,用于自动配置拦截器、参数解析器等web组件
package com.ben.config;

import com.ben.log.MyLogInterceptor;
import org.springframework.context.annotation.Configuration;
import org.springframework.web.servlet.config.annotation.InterceptorRegistry;
import org.springframework.web.servlet.config.annotation.WebMvcConfigurer;

/**
 * 配置类,用于自动配置拦截器、参数解析器等web组件
 */

@Configuration
public class MyLogAutoConfiguration implements WebMvcConfigurer{
    //注册自定义日志拦截器
    public void addInterceptors(InterceptorRegistry registry) {
        registry.addInterceptor(new MyLogInterceptor());
    }
}
5,在spring.factories中追加MyLogAutoConfiguration配置
org.springframework.boot.autoconfigure.EnableAutoConfiguration=\
com.ben.config.HelloServiceAutoConfiguration,\
com.ben.config.MyLogAutoConfiguration
注意:在hello-spring-boot-starter中追加了新的内容,需要重新打包安装到maven仓库。
使用starter
1,在myapp工程的Controller方法上加入@MyLog注解
import com.ben.log.MyLog;
import com.ben.service.HelloService;
import org.springframework.beans.factory.annotation.Autowired;
import org.springframework.web.bind.annotation.GetMapping;
import org.springframework.web.bind.annotation.RequestMapping;
import org.springframework.web.bind.annotation.RestController;

@RestController
@RequestMapping("/hello")
public class HelloController {
    //HelloService在我们自定义的starter中已经完成了自动配置,所以此处可以直接注入
    @Autowired
    private HelloService helloService;

    @MyLog(desc = "sayHello方法")
    @GetMapping("/say")
    public String sayHello(){
        return helloService.sayHello();
    }
}
2,访问地址:http://localhost:8080/hello/say,查看控制台输出:
请求uri:/hello/say
请求方法名:cn.ben.controller.HelloController.sayHello
方法描述:sayHello方法
方法执行时间:27ms
springboot项目打开右上角没有run按钮
IDEA创建springboot项目后启动类不显示启动按钮
也可以直接右击SpringbootApplication启动类,“Run SpringbootApplication”