设计模式学习笔记

设计模式学习笔记

    • 1.写在前面
    • 2.UML类图
    • 3.模式的概念
    • 4.模式分类
    • 5.简化习语
      • 5.1 信使
      • 5.2 收集参数
    • 6.单件
    • 7.命令:选择操作
    • 8.消除对象耦合
      • 8.1代理模式:作为其他对象的前端
      • 8.2状态模式:改变对象的行为
    • 9.适配器模式
    • 10.模板方法模式
    • 11.策略模式:运行时选择算法
    • 12.职责链模式:尝试采用一系列策略模式
    • 13.工厂模式:封装对象的创建
      • 13.1 多态工厂
      • 13.2 抽象工厂
    • 14.构建器模式:创建复杂对象
    • 15.观察者模式
    • 16.小结

1.写在前面

  • 小编所在公司部门,积极倡导大家写好代码,并且会把好代码在组内分享与曝光,小编看过几次好代码案例后发现一个规律:优秀的代码少不了成熟的设计模式支撑。

  • 基于该原因,小编在下班之余开始阅读《大话设计模式》该电子书,里面以对话形式+简单例子讲解了各种设计模式,笔者看了将近1/3后,在一个悠闲的周六下午,冥想了一段时间,发现自己看的并不能支撑在工作中实战,其中最大的原因可能是对该设计模式还不够了解(除了单例模式,应为笔者在项目中经常用到)

  • 后来笔者开始放弃阅读《大话设计模式》该电子书,从公司借了本《C++编程思想》纸质书籍,准备补充下C++基础知识,在看的过程中(笔者是跳跃这看的),发现该书第10章讲解的是设计模式。

  • 于是笔者又开始阅读起来设计模式相关内容,怎么看都理解不够深(可能没有真正静下心来),于是想到边看边做笔记的方式:一来可以加深理解,二来可以进行知识管理与分享,遂成此文。

  • 笔者很少写博客,写的不好请大家批评指正!(对了,最近羊了个羊真上头)

2.UML类图

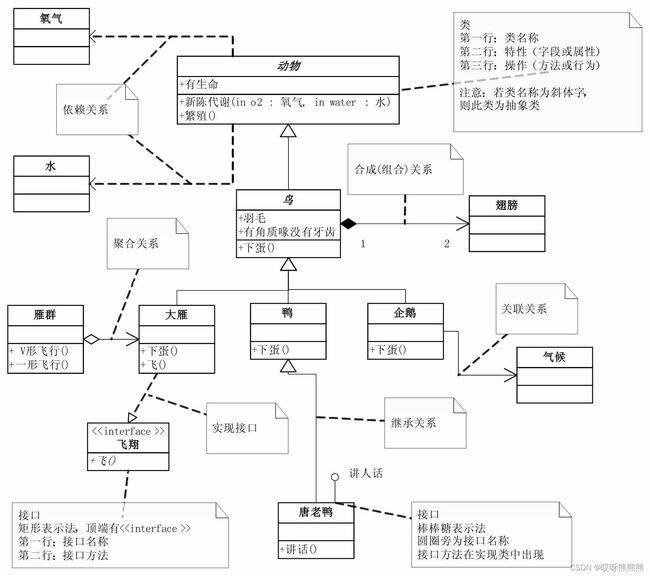
  • 废话不多说,上一个《大话设计模式》中的UML类图,对着这个图可以比较清楚理解一些箭头的意思了。
  • 补充一下:学习设计模式,但是不会UML类图(不会看/画)会影响学习的进度和质量,UML类图是设计模式思想理念的外在最好表现形式。

设计模式学习笔记_第1张图片

3.模式的概念

  • 最初,可以将模式看作解决某一类特定问题的特别技巧和具有洞察力的方法。

  • 虽然称为“设计模式”,他们实际上与设计领域并无联系。

  • 可以把模式的基本概念看做一般情节下程序设计的基本理念:增加一些抽象层。当人们对某事物进行抽象的时候,隔离特定的细节,最直接的动机之一是为了使变化的事物与不变的事物分离开

  • 因此,设计模式的目标是封装变化

4.模式分类

常见的23个设计模式,可以按照下面3中类目分类:

  1. 创建型:用于怎样创建一个对象。通常包括隔离对象创建的细节,这样代码不依赖于对象是什么类型,因此再增加一种新的对象时不需要改变代码。本文将介绍单件(Singleton)模式,工厂(Factory)模式和构建器(Builder)模式。

  2. 结构型:影响对象之间的连接方式,确保系统的变化不需要改变对象间的连接。结构型模式常常由工程项目限制条件来支配。本文将看到代理(Proxy)模式和适配器(Adapter)模式。

  3. 行为型:在程序中处理具有特定操作类型的对象。这些对象封装要执行的操作过程,比如解释一种语言,实践一个请求,遍历一个序列(如像在一个迭代器内)或者实现一个算法。本文包含命令(Command)模式,模板方法(Template Method)模式,状态(State)模式,策略(Strategy)模式,职责链(Chain of Responsiblity)模式和访问者(Visitor)模式。

5.简化习语

在讨论更复杂的技术之前,看一些能够保持代码简明的基本方法是有帮助的。

5.1 信使

信使(messager)是这些方法中最微不足道的一个,它将消息封装到一个对象中到处传递,而不是将消息的所有片段分开进行传递。

5.2 收集参数

信使的大兄弟是收集参数(Collecting Parameter),他的工作就是从传递给他的函数中获取信息。通常,当收集参数被传递给多个函数的时候使用它,就像蜜蜂在采花粉一样。

容器对于收集参数特别有用,因为他已经设置为动态增加对象。

6.单件

单件也许是最简单的设计模式,他是允许一个类有且仅有一个实例的方法。下面的程序显示如何在C++中实现一个单件模式:

#include 
using namespace std;

class Singleton {
	static Singleton s;
	int i;
	Singleton(int x) : i(x) { }
	Singleton& operator=(Singleton&);  // Disallowed
	Singleton(const Singleton&);  // Disallowed
public:
	static Singleton& instance() { return s; }
	int getValue() { return i; }
	void setValue(int x) { i = x; }
};

Singleton Singleton::s(47);

int main() {
	Singleton& s = Singleton::instance();
	cout << s.getValue() << endl; // 47
	Singleton& s2 = Singleton::instance();
	s2.setValue(9);
	cout << s.getValue() << endl; // 9
}

创建一个单件模式的关键是防止客户程序员获得任何控制其对象生存期的权利。为了做到这一点,声明所有的构造函数为私有,并且防止编译器隐式生成任何构造函数。

7.命令:选择操作

  • 命令(command)模式的结构很简单,但是对于消除代码间的耦合———清理代码———却有着重要的影响。

  • 从最直观的角度来看,命令模式就是一个函数对象:一个作为对象的函数。通过将函数封装为对象,就能够以参数的形式将其传递给其他函数或者对象,告诉他们在履行请求的过程中执行特定的操作。可以说,命令模式是携带行为信息的新使。

#include 
#include 
using namespace std;

class Command {
public:
	virtual void execute() = 0;
};

class Hello : public Command {
public:
	void execute() { cout << "Hello "; }
};

class World : public Command {
public:
	void execute() { cout << "World! "; }
};

class IAm : public Command {
public:
	void execute() { cout << "I'm the command pattern!"; }
};

// An object that holds commands
class Macro {
	vector<Command*> commands;
public:
	void add(Command* c) { commands.push_back(c); }
	void run() {
		vector<Command*>::iterator it = commands.begin();
		while (it != commands.end())
			(*it++)->execute();
	}
};

int main() {
	Macro macro;
	macro.add(new Hello);
	macro.add(new World);
	macro.add(new IAm);
	macro.run(); // Hello World! I'm the command pattern!
}

命令模式的一个常见的例子就是在应用程序中“撤销(undo)操作”功能的实现。每次在用户进行某项操作的时候,相应的“撤销操作”命令对象就被置入一个队列中。而每个命令对象执行后,程序的状态就倒退一步。

利用命令模式消除与事件处理的耦合

#include 
#include 
#include 
#include 
#include 
using namespace std;

// Framework for running tasks;
class Task {
public:
	virtual void operation() = 0;
};

class TaskRunner {
	static vector<Task*> tasks;
	TaskRunner() {} // Make it a Singleton
	TaskRunner& operator=(TaskRunner&); // Disallowed
	TaskRunner(const TaskRunner&); // Disallowed
	static TaskRunner tr;
public:
	static void add(Task& t) { tasks.push_back(&t); }
	static void run() {
		vector<Task*>::iterator it = tasks.begin();
		while (it != tasks.end())
			(*it++)->operation();
	}
};

TaskRunner TaskRunner::tr;
vector<Task*> TaskRunner::tasks;

class EventSimulator {
	clock_t creation;
	clock_t delay;
public:
	EventSimulator() : creation(clock()) {
		delay = CLOCKS_PER_SEC / 4 * (rand() % 20 + 1);
		cout << "delay = " << delay << endl;
	}
	bool fired() {
		return clock() > creation + delay;
	}
};

// Something that can produce asynchronous events;
class Button {
	bool pressed;
	string id;
	EventSimulator e; // For demonstration
public:
	Button(string name) : pressed(false), id(name) {}
	void press() { pressed = true; }
	bool isPressed() {
		if (e.fired()) press(); // Simulate the event
		return pressed;
	}
	friend ostream& operator<<(ostream& os, const Button& b) {
		return os << b.id;
	}
};

// The Command object
class CheckButton : public Task {
	Button& button;
	bool handled;
public:
	CheckButton(Button& b) : button(b), handled(false) {}
	void operation() {
		if (button.isPressed() && !handled) {
			cout << button << " pressed " << endl;
			handled = true;
		}
	}
};

// The procedures that perform the main processing.
// These need to be occaionally "interrupted" in order to
// check the state of the buttons or other events:
void procedure1() {
	// Preform procedure1 operation here.
	// ...
	TaskRunner::run();  // check all events
}

void procedure2() {
	// Preform procedure2 operation here.
	// ...
	TaskRunner::run();  // check all events
}

void procedure3() {
	// Preform procedure3 operation here.
	// ...
	TaskRunner::run();  // check all events
}

int main() {
	srand(time(0)); // Randomize
	Button b1("Button 1"), b2("Button 2"), b3("Button 3");
	CheckButton cb1(b1), cb2(b2), cb3(b3);
	TaskRunner::add(cb1);
	TaskRunner::add(cb2);
	TaskRunner::add(cb3);
	cout << "Control-C to exit" << endl;
	while (true) {
		procedure1();
		procedure2();
		procedure3();
	}
	// 输出:
	//delay = 3250
	//delay = 5000
	//delay = 1250
	//Control - C to exit
	//Button 3 pressed
	//Button 1 pressed
	//Button 2 pressed
}

在这里,命令对象由被单件TaskRunner执行的task表示。EventSimulator创建一个随机延迟时间,所以当周期性调用函数fired()时,在某个随即时段,其返回结果从true到false变化。EventSimulator对象在类Button中使用,模拟在某个不可预知的时间段用户事件发生的动作。CheckButton是Task的实现,在程序中通过所有“正常”代码对其进行周期性的检查——可以看到这些检查发生在函数Procedure1(),Procedure2()和Procedure3()的末尾。

8.消除对象耦合

  • 代理(Proxy)模式和状态(State)模式都是提供一个代理(Surrogate)类。代码与代理类打交道,而做实际工作的类隐藏在代理类背后。当调用代理类中的一个函数时,代理类仅转而去调用实现类中相应的函数。这两种模式是如此相似,从结构上看,可以认为代理模式只是状态模式的一个特例

  • 基本思想很简单:代理(Surrogate)类派生自一个基类,由平行地派生自同一个基类的一个或多个类提供实际的实现:
    设计模式学习笔记_第2张图片

  • 当一个代理对象被创建的时候,一个实现对象就分配给了它,代理对象就将函数调用发给实现对象。

  • 从结构上看来,代理模式和状态模式的区别很简单:代理模式只有一个实现类,而状态模式有多个(一个以上)实现。

8.1代理模式:作为其他对象的前端

如果按照上面的图结构实现代理模式,其实现代码如下:

#include 
using namespace std;
class ProxyBase {
public:
	virtual void f() = 0;
	virtual void g() = 0;
	virtual void h() = 0;
	virtual ~ProxyBase() {}
};

class Implementation : public ProxyBase {
public:
	void f() { cout << "Implementation.f()" << endl; }
	void g() { cout << "Implementation.g()" << endl; }
	void h() { cout << "Implementation.h()" << endl; }
};

class Proxy : public ProxyBase {
	ProxyBase* implementation;
public:
	Proxy() { implementation = new Implementation(); }
	~Proxy() { delete implementation; }
	// Forward calls to the implementation:
	void f() { implementation->f(); }
	void g() { implementation->g(); }
	void h() { implementation->h(); }
};

int main() {
	Proxy p;
	p.f(); // Implementation.f()
	p.g(); // Implementation.g()
	p.h(); // Implementation.h()
}

8.2状态模式:改变对象的行为

  • 状态模式产生一个可以改变其类的对象,当发现大多数或者所有函数都存在有条件的代码时,这种模式很有作用。
  • 在前端对象生存期期间,状态模式从一个实现对象到另一个实现对象进行切换,以实现对于相同的函数调用产生不同的行为。
  • 如果在决定函数该做什么之前在每个函数内部做很多测试,那么这种方法是对实现代码的一种很好的改进。
  • 举个例子,在青蛙王子童话中,青蛙王子依照其所处的状态有不同的行为。现在可以通过测试一个bool变量来实现:
#include 
using namespace std;

class Creature {
	bool isForg;
public:
	Creature() : isForg(true) {}
	void greet() {
		if (isForg) {
			cout << "Ribbet!" << endl;
		} else {
			cout << "Darling!" << endl;
		}
	}
	void kiss() { isForg = false; }
};

int main() {
	Creature creature;
	creature.greet(); // Ribbet!
	creature.kiss();
	creature.greet(); // Darling!
}

然而,greet()等任何其他所有函数在执行操作前都必须测试变量isFrog,这样就使代码变得笨拙至极,特别是在系统中加入了额外的状态时情况会更加严重。通过将操作委派给状态对象,这种情况就可以改变,代码从而得到简化。

#include 
#include 
using namespace std;

class Creature { // 在这里,将实现类设计为嵌套或者私有并不是必需的
	class State {
	public:
		virtual string response() = 0;
	};
	class Frog : public State {
	public:
		string response() { return "Ribbet!"; }
	};
	class Prince : public State {
	public:
		string response() { return "Darling!"; }
	};
	State* state;
public:
	Creature() : state(new Frog()) {}
	void greet() {
		cout << state->response() << endl;
	}
	void kiss() {
		delete state;
		state = new Prince();
	}
};

int main() {
	Creature creature;
	creature.greet(); // Ribbet!
	creature.kiss();
	creature.greet(); // Darling!
}

9.适配器模式

适配器(Adapter)模式接受一种类型并提供一个对其他类型的接口。假设有个产生斐波那契数列的发生器,如下所示:

#ifndef FIBONACCIGENERATOR_H
#define FIBONACCIGENERATOR_H

class FibonacciGenerator {
  int n;
  int val[2];
public:
  FibonacciGenerator() : n(0) { val[0] = val[1] = 0; }
  int operator()() {
    int result = n > 2 ? val[0] + val[1] : n > 0 ? 1 : 0;
    ++n;
    val[0] = val[1];
    val[1] = result;
    return result;
  }
  int count() { return n; }
};
#endif // FIBONACCIGENERATOR_H 

由于他是一个发生器,可以调用operator()来使用它,如下所示:

#include 
#include "FibonacciGenerator.h"
using namespace std;

int main() {
  FibonacciGenerator f;
  for(int i =0; i < 20; i++)
    cout << f.count() << ": " << f() << endl;
} ///:~

也许读者希望利用这个发生器来执行STL数值算法操作。遗憾的是,STL算法只能使用迭代器才能工作,这就存在接口不匹配的问题。解决方法就是创建一个适配器,它将接受FibonacciGenerator并产生一个供STL算法使用的迭代器。

#include 
#include 
#include "FibonacciGenerator.h"
#include "../C06/PrintSequence.h"
using namespace std;
 
class FibonacciAdapter { // Produce an iterator
  FibonacciGenerator f;
  int length;
public:
  FibonacciAdapter(int size) : length(size) {}
  class iterator;
  friend class iterator;
  class iterator : public std::iterator<
    std::input_iterator_tag, FibonacciAdapter, ptrdiff_t> {
    FibonacciAdapter& ap;
  public:
    typedef int value_type;
    iterator(FibonacciAdapter& a) : ap(a) {}
    bool operator==(const iterator&) const {
      return ap.f.count() == ap.length;
    }
    bool operator!=(const iterator& x) const {
      return !(*this == x);
    }
    int operator*() const { return ap.f(); }
    iterator& operator++() { return *this; }
    iterator operator++(int) { return *this; }
  };
  iterator begin() { return iterator(*this); }
  iterator end() { return iterator(*this); }
};
 
int main() {
  const int SZ = 20;
  FibonacciAdapter a1(SZ);
  cout << "accumulate: "
    << accumulate(a1.begin(), a1.end(), 0) << endl;
  FibonacciAdapter a2(SZ), a3(SZ);
  cout << "inner product: "
    << inner_product(a2.begin(), a2.end(), a3.begin(), 0)
    << endl;
  FibonacciAdapter a4(SZ);
  int r1[SZ] = {0};
  int* end = partial_sum(a4.begin(), a4.end(), r1);
  print(r1, end, "partial_sum", " ");
  FibonacciAdapter a5(SZ);
  int r2[SZ] = {0};
  end = adjacent_difference(a5.begin(), a5.end(), r2);
  print(r2, end, "adjacent_difference", " ");
  getchar();
} ///:~

10.模板方法模式

模板方法模式的一个重要特征使它的定义在基类中(有时作为一个私有成员函数)并且不能被改动——模板方法就是“坚持相同的代码”。它调用其他基类函数(就是那些被覆盖的函数)以便完成其工作,但是客户程序员不必直接调用这些函数,如下所示:

#include 
using namespace std;

class ApplicationFramework {
protected:
  virtual void customize1() = 0;
  virtual void customize2() = 0;
public:
  void templateMethod() {
    for(int i = 0; i < 5; i++) {
      customize1();
      customize2();
    }
  }
};

// Create a new "application":
class MyApp : public ApplicationFramework {
protected:
  void customize1() { cout << "Hello "; }
  void customize2() { cout << "World!" << endl; }
};

int main() {
  MyApp app;
  app.templateMethod();
} ///:~

驱动应用程序的“引擎”是模板方法模式。在GUI(图形用户界面)应用程序中,这个“引擎”就是主要的事件环。客户程序员只需提供customize1()和customize2()的定义,便可以令“应用程序”运行。

11.策略模式:运行时选择算法

  • 注意,模板方法模式是“坚持相同的代码”,而被覆盖的函数是“变化的代码”。然而,这种变化在编译时通过继承被固定下来。按照“组合优于继承”的格言,可以利用组合来解决将变化的代码从“坚持相同的代码”中分开的问题,从而产生了策略(Strategy)模式。
  • 这种方法有一个明显的好处:在程序运行时,可以插入变化的代码。策略模式也加入了“语境”,它可以是一个代理类,这个类控制着对特定策略对象的选择和使用——就像状态模式一样。
  • “策略”的意思就是:可以使用多种方法来解决某个问题——即“条条大路通罗马”。现在考虑一下忘记了某个人姓名时的情境。这里的程序可以用不同方法解决这个问题:
#include 
using namespace std;

class NameStrategy {
public:
  virtual void greet() = 0;
};

class SayHi : public NameStrategy {
public:
  void greet() {
    cout << "Hi! How's it going?" << endl;
  }
};

class Ignore : public NameStrategy {
public:
  void greet() {
    cout << "(Pretend I don't see you)" << endl;
  }
};

class Admission : public NameStrategy {
public:
  void greet() {
    cout << "I'm sorry. I forgot your name." << endl;
  }
};

// The "Context" controls the strategy:
class Context {
  NameStrategy& strategy;
public:
  Context(NameStrategy& strat) : strategy(strat) {}
  void greet() { strategy.greet(); }
};

int main() {
  SayHi sayhi;
  Ignore ignore;
  Admission admission;
  Context c1(sayhi), c2(ignore), c3(admission);
  c1.greet();
  c2.greet();
  c3.greet();
} ///:~

12.职责链模式:尝试采用一系列策略模式

  • 职责链(Chain of Responsibility)模式也许被看作一个使用策略对象的“递归的动态一般化”。此时提出一个调用,在一个链序列中的每个策略都试图满足这个调用。这个过程直到有一个策略成功满足该调用或者达到链序列的末尾才结束。
  • 在这里可以看到,使用一种自动递归搜索链中每个策略的机制,职责链模式自动找到一个解决方法:
#include 
#include 
#include "../purge.h"
using namespace std;

enum Answer { NO, YES };

class GimmeStrategy {
public:
  virtual Answer canIHave() = 0;
  virtual ~GimmeStrategy() {}
};

class AskMom : public GimmeStrategy {
public:
  Answer canIHave() {
    cout << "Mooom? Can I have this?" << endl;
    return NO;
  }
};

class AskDad : public GimmeStrategy {
public:
  Answer canIHave() {
    cout << "Dad, I really need this!" << endl;
    return NO;
  }
};

class AskGrandpa : public GimmeStrategy {
public:
  Answer canIHave() {
    cout << "Grandpa, is it my birthday yet?" << endl;
    return NO;
  }
};

class AskGrandma : public GimmeStrategy {
public:
  Answer canIHave() {
    cout << "Grandma, I really love you!" << endl;
    return YES;
  }
};

class Gimme : public GimmeStrategy {
  vector<GimmeStrategy*> chain;
public:
  Gimme() {
    chain.push_back(new AskMom());
    chain.push_back(new AskDad());
    chain.push_back(new AskGrandpa());
    chain.push_back(new AskGrandma());
  }
  Answer canIHave() {
    vector<GimmeStrategy*>::iterator it = chain.begin();
    while(it != chain.end())
      if((*it++)->canIHave() == YES)
        return YES;
    // Reached end without success...
    cout << "Whiiiiinnne!" << endl;
    return NO;
  }
  ~Gimme() { purge(chain); }
};

int main() {
  Gimme chain;
  chain.canIHave();
} ///:~

  • 注意,“语境”类Gimme和所有策略类都派生自同一个基类GimmeStrategy。

13.工厂模式:封装对象的创建

  • 如果程序中所有创建对象的代码都转到工厂执行,那么在增加新对象时所要做的全部工作就是只需修改工厂。这种设计是众所周知的工厂方法模式的一种变体。由于每个面向对象应用程序都需要创建对象,并且由于人们可能通过添加新类型来扩展应用程序,工厂模式可能是所有设计模式中最有用的模式之一。

  • 举一个例子,考虑通常使用的Shape例子。实现工厂模式的一种方法就是在基类中定义一个静态成员函数:

#include 
#include 
#include 
#include 
#include 
#include "../purge.h"
using namespace std;

class Shape {
public:
  virtual void draw() = 0;
  virtual void erase() = 0;
  virtual ~Shape() {}
  class BadShapeCreation : public logic_error {
  public:
    BadShapeCreation(string type)
    : logic_error("Cannot create type " + type) {}
  };
  static Shape* factory(const string& type)
    throw(BadShapeCreation);
};

class Circle : public Shape {
  Circle() {} // Private constructor
  friend class Shape;
public:
  void draw() { cout << "Circle::draw" << endl; }
  void erase() { cout << "Circle::erase" << endl; }
  ~Circle() { cout << "Circle::~Circle" << endl; }
};

class Square : public Shape {
  Square() {}
  friend class Shape;
public:
  void draw() { cout << "Square::draw" << endl; }
  void erase() { cout << "Square::erase" << endl; }
  ~Square() { cout << "Square::~Square" << endl; }
};

Shape* Shape::factory(const string& type)
  throw(Shape::BadShapeCreation) {
  if(type == "Circle") return new Circle;
  if(type == "Square") return new Square;
  throw BadShapeCreation(type);
}

char* sl[] = { "Circle", "Square", "Square",
  "Circle", "Circle", "Circle", "Square" };

int main() {
  vector<Shape*> shapes;
  try {
    for(size_t i = 0; i < sizeof sl / sizeof sl[0]; i++)
      shapes.push_back(Shape::factory(sl[i]));
  } catch(Shape::BadShapeCreation e) {
    cout << e.what() << endl;
    purge(shapes);
    return EXIT_FAILURE;
  }
  for(size_t i = 0; i < shapes.size(); i++) {
    shapes[i]->draw();
    shapes[i]->erase();
  }
  purge(shapes);
} ///:~

13.1 多态工厂

  • 在前面的例子中,静态成员函数static factory()迫使所有创建对象的操作都集中在一个地方,因此这个地方就是唯一需要修改代码的地方。这确实是一个合理的解决方法,因为她完美地封装了对象的创建过程。然而,“四人帮”强调工厂方法模式的理由是,可以使不同类型的工厂派生自基本类型的工厂。工厂方法模式事实上是多态工厂模式的一个特例。
#include 
#include 
#include 
#include 
#include 
#include 
#include "../purge.h"
using namespace std;

class Shape {
public:
  virtual void draw() = 0;
  virtual void erase() = 0;
  virtual ~Shape() {}
};

class ShapeFactory {
  virtual Shape* create() = 0;
  static map<string, ShapeFactory*> factories;
public:
  virtual ~ShapeFactory() {}
  friend class ShapeFactoryInitializer;
  class BadShapeCreation : public logic_error {
  public:
    BadShapeCreation(string type)
    : logic_error("Cannot create type " + type) {}
  };
  static Shape*
  createShape(const string& id) throw(BadShapeCreation) {
    if(factories.find(id) != factories.end())
      return factories[id]->create();
    else
      throw BadShapeCreation(id);
  }
};

// Define the static object:
map<string, ShapeFactory*> ShapeFactory::factories;

class Circle : public Shape {
  Circle() {} // Private constructor
  friend class ShapeFactoryInitializer;
  class Factory;
  friend class Factory;
  class Factory : public ShapeFactory {
  public:
    Shape* create() { return new Circle; }
    friend class ShapeFactoryInitializer;
  };
public:
  void draw() { cout << "Circle::draw" << endl; }
  void erase() { cout << "Circle::erase" << endl; }
  ~Circle() { cout << "Circle::~Circle" << endl; }
};

class Square : public Shape {
  Square() {}
  friend class ShapeFactoryInitializer;
  class Factory;
  friend class Factory;
  class Factory : public ShapeFactory {
  public:
    Shape* create() { return new Square; }
    friend class ShapeFactoryInitializer;
  };
public:
  void draw() { cout << "Square::draw" << endl; }
  void erase() { cout << "Square::erase" << endl; }
  ~Square() { cout << "Square::~Square" << endl; }
};

// Singleton to initialize the ShapeFactory:
class ShapeFactoryInitializer {
  static ShapeFactoryInitializer si;
  ShapeFactoryInitializer() {
    ShapeFactory::factories["Circle"]= new Circle::Factory;
    ShapeFactory::factories["Square"]= new Square::Factory;
  }
  ~ShapeFactoryInitializer() {
    map<string, ShapeFactory*>::iterator it =
      ShapeFactory::factories.begin();
    while(it != ShapeFactory::factories.end())
      delete it++->second;
  }
};

// Static member definition:
ShapeFactoryInitializer ShapeFactoryInitializer::si;

char* sl[] = { "Circle", "Square", "Square",
  "Circle", "Circle", "Circle", "Square" };

int main() {
  vector<Shape*> shapes;
  try {
    for(size_t i = 0; i < sizeof sl / sizeof sl[0]; i++)
      shapes.push_back(ShapeFactory::createShape(sl[i]));
  } catch(ShapeFactory::BadShapeCreation e) {
    cout << e.what() << endl;
    return EXIT_FAILURE;
  }
  for(size_t i = 0; i < shapes.size(); i++) {
    shapes[i]->draw();
    shapes[i]->erase();
  }
  purge(shapes);
} ///:~
  • 注意,ShapeFactory必须通过装载它的map与工厂对象进行初始化,这是操作发生在单件ShapeFactoryInitializer中。当增加一个新类型到这个设计时,必须定义该类型,创建一个工厂并修改ShapeFactoryInitializer,以便将工厂的一个实例插入map中。这些额外的操作再次暗示,如果不需要创建独立的工厂对象,尽可能使用静态(static)工厂方法模式。

13.2 抽象工厂

再举一个例子,假设要创建一个通用的游戏环境,并且希望它能支持不同类型的游戏。请看以下程序是如何使用抽象工厂模式的:

#include 
using namespace std;

class Obstacle {
public:
  virtual void action() = 0;
};

class Player {
public:
  virtual void interactWith(Obstacle*) = 0;
};

class Kitty: public Player {
  virtual void interactWith(Obstacle* ob) {
    cout << "Kitty has encountered a ";
    ob->action();
  }
};

class KungFuGuy: public Player {
  virtual void interactWith(Obstacle* ob) {
    cout << "KungFuGuy now battles against a ";
    ob->action();
  }
};

class Puzzle: public Obstacle {
public:
  void action() { cout << "Puzzle" << endl; }
};

class NastyWeapon: public Obstacle {
public:
  void action() { cout << "NastyWeapon" << endl; }
};

// The abstract factory:
class GameElementFactory {
public:
  virtual Player* makePlayer() = 0;
  virtual Obstacle* makeObstacle() = 0;
};

// Concrete factories:
class KittiesAndPuzzles : public GameElementFactory {
public:
  virtual Player* makePlayer() { return new Kitty; }
  virtual Obstacle* makeObstacle() { return new Puzzle; }
};

class KillAndDismember : public GameElementFactory {
public:
  virtual Player* makePlayer() { return new KungFuGuy; }
  virtual Obstacle* makeObstacle() {
    return new NastyWeapon;
  }
};

class GameEnvironment {
  GameElementFactory* gef;
  Player* p;
  Obstacle* ob;
public:
  GameEnvironment(GameElementFactory* factory)
  : gef(factory), p(factory->makePlayer()),
    ob(factory->makeObstacle()) {}
  void play() { p->interactWith(ob); }
  ~GameEnvironment() {
    delete p;
    delete ob;
    delete gef;
  }
};

int main() {
  GameEnvironment
    g1(new KittiesAndPuzzles),
    g2(new KillAndDismember);
  g1.play();
  g2.play();
}
/* Output:
Kitty has encountered a Puzzle
KungFuGuy now battles against a NastyWeapon */ ///:~

  • 在此环境中,Player对象与Obstacle对象交互,但是Player和Obstacle类型依赖于具体的游戏。可以选择特定的GameElementFactory来决定游戏的类型,然后GameEnvironment控制游戏的设置和进行。在本例中,游戏的设置和进行很简单,但是那些动作(初始条件和状态变化)在很大程度上决定了游戏的结果。在这里,GameEnvironment不是设计成继承的,即使这样做可能是有意义的。
  • 这个例子也说明将在稍后讨论双重派遣。

14.构建器模式:创建复杂对象

  • 构建器(Builder)模式的目标是将对象的创建与“表示法”分开。这就意味着,创建过程保持原状,但是产生对象的表示法可能不同。
  • 下面有个例子。作为模型的一辆自行车按照其类型(山地车/旅行车或赛车)来选择零部件组装一辆自行车。一个构建器与每个自行车类都关联,每个构建器实现的接口由抽象类BicycleBuilder中指定。单独的类BicycleTechnician表示“四人帮”中描述的“向导器”对象。
#ifndef BICYCLE_H
#define BICYCLE_H
#include 
#include 
#include 
#include 
#include "../purge.h"
using std::size_t;

class BicyclePart {
public:
  enum BPart { FRAME, WHEEL, SEAT, DERAILLEUR,
    HANDLEBAR, SPROCKET, RACK, SHOCK, NPARTS };
private:
  BPart id;
  static std::string names[NPARTS];
public:
  BicyclePart(BPart bp) { id = bp; }
  friend std::ostream&
  operator<<(std::ostream& os, const BicyclePart& bp) {
    return os << bp.names[bp.id];
  }
};

class Bicycle {
  std::vector<BicyclePart*> parts;
public:
  ~Bicycle() { purge(parts); }
  void addPart(BicyclePart* bp) { parts.push_back(bp); }
  friend std::ostream&
  operator<<(std::ostream& os, const Bicycle& b) {
    os << "{ ";
    for(size_t i = 0; i < b.parts.size(); ++i)
      os << *b.parts[i] << ' ';
    return os << '}';
  }
};

class BicycleBuilder {
protected:
  Bicycle* product;
public:
  BicycleBuilder() { product = 0; }
  void createProduct() { product = new Bicycle; }
  virtual void buildFrame() = 0;
  virtual void buildWheel() = 0;
  virtual void buildSeat() = 0;
  virtual void buildDerailleur() = 0;
  virtual void buildHandlebar() = 0;
  virtual void buildSprocket() = 0;
  virtual void buildRack() = 0;
  virtual void buildShock() = 0;
  virtual std::string getBikeName() const = 0;
  Bicycle* getProduct() {
    Bicycle* temp = product;
    product = 0;  // Relinquish product
    return temp;
  }
};

class MountainBikeBuilder : public BicycleBuilder {
public:
  void buildFrame();
  void buildWheel();
  void buildSeat();
  void buildDerailleur();
  void buildHandlebar();
  void buildSprocket();
  void buildRack();
  void buildShock();
  std::string getBikeName() const { return "MountainBike";}
};

class TouringBikeBuilder : public BicycleBuilder {
public:
  void buildFrame();
  void buildWheel();
  void buildSeat();
  void buildDerailleur();
  void buildHandlebar();
  void buildSprocket();
  void buildRack();
  void buildShock();
  std::string getBikeName() const { return "TouringBike"; }
};

class RacingBikeBuilder : public BicycleBuilder {
public:
  void buildFrame();
  void buildWheel();
  void buildSeat();
  void buildDerailleur();
  void buildHandlebar();
  void buildSprocket();
  void buildRack();
  void buildShock();
  std::string getBikeName() const { return "RacingBike"; }
};

class BicycleTechnician {
  BicycleBuilder* builder;
public:
  BicycleTechnician() { builder = 0; }
  void setBuilder(BicycleBuilder* b) { builder = b; }
  void construct();
};
#endif // BICYCLE_H ///:~
  • Bicycle持有一个vector,用于保存指向BicyclePart对象的指针,这些对象用于构造自行车的部件。由一个BicycleTechnician(本例中的“主管”)调用派生的BicycleBuilder对象的函数BicycleBuilder::createproduct()来初始化一辆自行车的创建。BicycleTechnician::construct()函数调用BicycleBuilder接口中的所有函数(因为他不知道有什么具体的构建器类型)。具体的构建器类省略了(通过空函数体)那些与他们所构建的自行车的类型无关的动作,如下面的实现文件所示:
#include "Bicycle.h"
#include 
#include 
using namespace std;

std::string BicyclePart::names[NPARTS] = {
  "Frame", "Wheel", "Seat", "Derailleur",
  "Handlebar", "Sprocket", "Rack", "Shock" };

// MountainBikeBuilder implementation
void MountainBikeBuilder::buildFrame() {
  product->addPart(new BicyclePart(BicyclePart::FRAME));
}
void MountainBikeBuilder::buildWheel() {
  product->addPart(new BicyclePart(BicyclePart::WHEEL));
}
void MountainBikeBuilder::buildSeat() {
  product->addPart(new BicyclePart(BicyclePart::SEAT));
}
void MountainBikeBuilder::buildDerailleur() {
  product->addPart(
    new BicyclePart(BicyclePart::DERAILLEUR));
}
void MountainBikeBuilder::buildHandlebar() {
  product->addPart(
    new BicyclePart(BicyclePart::HANDLEBAR));
}
void MountainBikeBuilder::buildSprocket() {
  product->addPart(new BicyclePart(BicyclePart::SPROCKET));
}
void MountainBikeBuilder::buildRack() {}
void MountainBikeBuilder::buildShock() {
  product->addPart(new BicyclePart(BicyclePart::SHOCK));
}

// TouringBikeBuilder implementation
void TouringBikeBuilder::buildFrame() {
  product->addPart(new BicyclePart(BicyclePart::FRAME));
}
void TouringBikeBuilder::buildWheel() {
  product->addPart(new BicyclePart(BicyclePart::WHEEL));
}
void TouringBikeBuilder::buildSeat() {
  product->addPart(new BicyclePart(BicyclePart::SEAT));
}
void TouringBikeBuilder::buildDerailleur() {
  product->addPart(
    new BicyclePart(BicyclePart::DERAILLEUR));
}
void TouringBikeBuilder::buildHandlebar() {
  product->addPart(
    new BicyclePart(BicyclePart::HANDLEBAR));
}
void TouringBikeBuilder::buildSprocket() {
  product->addPart(new BicyclePart(BicyclePart::SPROCKET));
}
void TouringBikeBuilder::buildRack() {
  product->addPart(new BicyclePart(BicyclePart::RACK));
}
void TouringBikeBuilder::buildShock() {}

// RacingBikeBuilder implementation
void RacingBikeBuilder::buildFrame() {
  product->addPart(new BicyclePart(BicyclePart::FRAME));
}
void RacingBikeBuilder::buildWheel() {
  product->addPart(new BicyclePart(BicyclePart::WHEEL));
}
void RacingBikeBuilder::buildSeat() {
  product->addPart(new BicyclePart(BicyclePart::SEAT));
}
void RacingBikeBuilder::buildDerailleur() {}
void RacingBikeBuilder::buildHandlebar() {
  product->addPart(
    new BicyclePart(BicyclePart::HANDLEBAR));
}
void RacingBikeBuilder::buildSprocket() {
  product->addPart(new BicyclePart(BicyclePart::SPROCKET));
}
void RacingBikeBuilder::buildRack() {}
void RacingBikeBuilder::buildShock() {}

// BicycleTechnician implementation
void BicycleTechnician::construct() {
  assert(builder);
  builder->createProduct();
  builder->buildFrame();
  builder->buildWheel();
  builder->buildSeat();
  builder->buildDerailleur();
  builder->buildHandlebar();
  builder->buildSprocket();
  builder->buildRack();
  builder->buildShock();
} ///:~
  • Bicycle流插入符为各个BicyclePart调用相应的插入符,并且打印其类型名称以便知道Bicycle对象包含的内容。程序举例如下:
#include 
#include 
#include 
#include 
#include "Bicycle.h"
#include "../purge.h"
using namespace std;

// Constructs a bike via a concrete builder
Bicycle* buildMeABike(
  BicycleTechnician& t, BicycleBuilder* builder) {
  t.setBuilder(builder);
  t.construct();
  Bicycle* b = builder->getProduct();
  cout << "Built a " << builder->getBikeName() << endl;
  return b;
}

int main() {
  // Create an order for some bicycles
  map <string, size_t> order;
  order["mountain"] = 2;
  order["touring"] = 1;
  order["racing"] = 3;

  // Build bikes
  vector<Bicycle*> bikes;
  BicycleBuilder* m = new MountainBikeBuilder;
  BicycleBuilder* t = new TouringBikeBuilder;
  BicycleBuilder* r = new RacingBikeBuilder;
  BicycleTechnician tech;
  map<string, size_t>::iterator it = order.begin();
  while(it != order.end()) {
    BicycleBuilder* builder;
    if(it->first == "mountain")
      builder = m;
    else if(it->first == "touring")
      builder = t;
    else if(it->first == "racing")
      builder = r;
    for(size_t i = 0; i < it->second; ++i)
      bikes.push_back(buildMeABike(tech, builder));
    ++it;
  }
  delete m;
  delete t;
  delete r;

  // Display inventory
  for(size_t i = 0; i < bikes.size(); ++i)
    cout << "Bicycle: " << *bikes[i] << endl;
  purge(bikes);
}

/* Output:
Built a MountainBike
Built a RacingBike
Built a RacingBike
Built a RacingBike
Built a TouringBike
Bicycle: {
  Frame Wheel Seat Derailleur Handlebar Sprocket Shock }
Bicycle: {
  Frame Wheel Seat Derailleur Handlebar Sprocket Shock }
Bicycle: { Frame Wheel Seat Handlebar Sprocket }
Bicycle: {
  Frame Wheel Seat Derailleur Handlebar Sprocket Rack }
*/ ///:~
  • 这种模式的功能就是它将部件组合成为一个完整产品的算法与部件本身分开,这样就允许通过一个共同接口的不同实现来为不同的产品提供不同的算法。

15.观察者模式

  • 观察者(Observer)模式用于一个相当常见的问题:当某些对象改变状态时,如果一组对象需要进行相应的更新,那么应改如何处理呢?
  • 在观察者模式中有两个“变化的事件”:正在进行观察的对象的数量和更新发生的方式。这就是说,观察者模式允许修改这二者而不影响周围的其他代码。
  • 可以用很多方法来实现观察者模式,下面的代码将创建一个程序框架,读者可根据这个框架自己的观察者模式代码。首先,这个接口描述了什么是观察者模式,如下所示:
#ifndef OBSERVER_H
#define OBSERVER_H

class Observable;
class Argument {};

class Observer {
public:
  // Called by the observed object, whenever
  // the observed object is changed:
  virtual void update(Observable* o, Argument* arg) = 0;
  virtual ~Observer() {}
};
#endif // OBSERVER_H ///:~
  • 类Observer是只有一个成员函数update()的“接口”类。当正在被观察的对象认为到了更新其所有观察者的时机时,它将调用此函数。
  • “被观察对象”的类型是Observable的类型:
#ifndef OBSERVABLE_H
#define OBSERVABLE_H
#include 
#include "Observer.h"

class Observable {
  bool changed;
  std::set<Observer*> observers;
protected:
  virtual void setChanged() { changed = true; }
  virtual void clearChanged() { changed = false; }
public:
  virtual void addObserver(Observer& o) {
    observers.insert(&o);
  }
  virtual void deleteObserver(Observer& o) {
    observers.erase(&o);
  }
  virtual void deleteObservers() {
    observers.clear();
  }
  virtual int countObservers() {
    return observers.size();
  }
  virtual bool hasChanged() { return changed; }
  // If this object has changed, notify all
  // of its observers:
  virtual void notifyObservers(Argument* arg = 0) {
    if(!hasChanged()) return;
    clearChanged(); // Not "changed" anymore
    std::set<Observer*>::iterator it;
    for(it = observers.begin();it != observers.end(); it++)
      (*it)->update(this, arg);
  }
  virtual ~Observable() {}
};
#endif // OBSERVABLE_H ///:~
  • 观察者模式举例:
#include 
#include 
#include 
#include 
#include "Observable.h"
using namespace std;

class Flower {
  bool isOpen;
public:
  Flower() : isOpen(false),
    openNotifier(this), closeNotifier(this) {}
  void open() { // Opens its petals
    isOpen = true;
    openNotifier.notifyObservers();
    closeNotifier.open();
  }
  void close() { // Closes its petals
    isOpen = false;
    closeNotifier.notifyObservers();
    openNotifier.close();
  }
  // Using the "inner class" idiom:
  class OpenNotifier;
  friend class Flower::OpenNotifier;
  class OpenNotifier : public Observable {
    Flower* parent;
    bool alreadyOpen;
  public:
    OpenNotifier(Flower* f) : parent(f),
      alreadyOpen(false) {}
    void notifyObservers(Argument* arg = 0) {
      if(parent->isOpen && !alreadyOpen) {
        setChanged();
        Observable::notifyObservers();
        alreadyOpen = true;
      }
    }
    void close() { alreadyOpen = false; }
  } openNotifier;
  class CloseNotifier;
  friend class Flower::CloseNotifier;
  class CloseNotifier : public Observable {
    Flower* parent;
    bool alreadyClosed;
  public:
    CloseNotifier(Flower* f) : parent(f),
      alreadyClosed(false) {}
    void notifyObservers(Argument* arg = 0) {
      if(!parent->isOpen && !alreadyClosed) {
        setChanged();
        Observable::notifyObservers();
        alreadyClosed = true;
      }
    }
    void open() { alreadyClosed = false; }
  } closeNotifier;
};

class Bee {
  string name;
  // An "inner class" for observing openings:
  class OpenObserver;
  friend class Bee::OpenObserver;
  class OpenObserver : public Observer {
    Bee* parent;
  public:
    OpenObserver(Bee* b) : parent(b) {}
    void update(Observable*, Argument *) {
      cout << "Bee " << parent->name
        << "'s breakfast time!" << endl;
    }
  } openObsrv;
  // Another "inner class" for closings:
  class CloseObserver;
  friend class Bee::CloseObserver;
  class CloseObserver : public Observer {
    Bee* parent;
  public:
    CloseObserver(Bee* b) : parent(b) {}
    void update(Observable*, Argument *) {
      cout << "Bee " << parent->name
        << "'s bed time!" << endl;
    }
  } closeObsrv;
public:
  Bee(string nm) : name(nm),
    openObsrv(this), closeObsrv(this) {}
  Observer& openObserver() { return openObsrv; }
  Observer& closeObserver() { return closeObsrv;}
};

class Hummingbird {
  string name;
  class OpenObserver;
  friend class Hummingbird::OpenObserver;
  class OpenObserver : public Observer {
    Hummingbird* parent;
  public:
    OpenObserver(Hummingbird* h) : parent(h) {}
    void update(Observable*, Argument *) {
      cout << "Hummingbird " << parent->name
        << "'s breakfast time!" << endl;
    }
  } openObsrv;
  class CloseObserver;
  friend class Hummingbird::CloseObserver;
  class CloseObserver : public Observer {
    Hummingbird* parent;
  public:
    CloseObserver(Hummingbird* h) : parent(h) {}
    void update(Observable*, Argument *) {
      cout << "Hummingbird " << parent->name
        << "'s bed time!" << endl;
    }
  } closeObsrv;
public:
  Hummingbird(string nm) : name(nm),
    openObsrv(this), closeObsrv(this) {}
  Observer& openObserver() { return openObsrv; }
  Observer& closeObserver() { return closeObsrv;}
};

int main() {
  Flower f;
  Bee ba("A"), bb("B");
  Hummingbird ha("A"), hb("B");
  f.openNotifier.addObserver(ha.openObserver());
  f.openNotifier.addObserver(hb.openObserver());
  f.openNotifier.addObserver(ba.openObserver());
  f.openNotifier.addObserver(bb.openObserver());
  f.closeNotifier.addObserver(ha.closeObserver());
  f.closeNotifier.addObserver(hb.closeObserver());
  f.closeNotifier.addObserver(ba.closeObserver());
  f.closeNotifier.addObserver(bb.closeObserver());
  // Hummingbird B decides to sleep in:
  f.openNotifier.deleteObserver(hb.openObserver());
  // Something changes that interests observers:
  f.open();
  f.open(); // It's already open, no change.
  // Bee A doesn't want to go to bed:
  f.closeNotifier.deleteObserver(
    ba.closeObserver());
  f.close();
  f.close(); // It's already closed; no change
  f.openNotifier.deleteObservers();
  f.open();
  f.close();
} ///:~
  • 在这里,令人感兴趣的事件是Flower的打开或关闭。由于内部类方法的使用,这两个事件成为可以独立进行观察的现象。
  • 在Bee和Hummingbird中内部类方法也很便利地定义了多种Observer,因为这两个类都需要独立观察Flower的打开与关闭。
  • 在main()中,可以看到观察者模式的主要有益之处:以Observable动态地注册和注销Observer获得在程序运行时改变行为的能力。这个灵活性是以显著增加代码的代价而达到的——读者可能经常看到在设计模式中的这种折衷:增加某处的复杂性以换取另一处的灵活性的提升和(或)复杂性的降低。

16.小结

  • 正如其他任何抽象的特点,设计模式的特点就是为了使工作更加容易。系统中总是有一些东西在变化——这可能是在软件项目生命周期中代码的变化,或许是在某个程序执行的生命周期期间某些对象的变化。找出变化的东西,利用设计模式封装这些变化,并使这些变化能够得到控制。

你可能感兴趣的:(设计模式,学习)