从0开始搭建深度学习多GPU服务器 Ubuntu20.04 Sever + Docker
文章目录
- 背景介绍
- 操作系统
- SSH登录客户端
-
- 一些命令查看系统信息
- 安装ZFS
-
-
- 1. 安装和配置 zfs
- 2. 创建zfs pool
-
- 禁止Ubuntu内核更新
- 安装显卡驱动
- 下载及安装CUDA
- 安装Docker
- 安装Nvidia-Docker2
- Docker 管理面板Portainer
- 创建容器
- 最终验证
- 服务器意外重启, 如何手动启动docker和container
- 如何在服务器和容器间传输数据(已有数据卷和容器情况下)
- 如何将Windows文件上传到Ubuntu20.04服务器上
背景介绍
机缘巧合手里拿到了一台工作站,所以终于可以搞一台自己的深度学习服务器了。
CPU: Intel® Xeon® CPU E5-1620 v4 @ 3.50GHz
RAM: 64G
GPU: Quadro M4000 X2 (条件有限,看机会更新一下)
操作系统
Ubuntu 20.04 服务器版 官网下载
安装教程参考 https://www.a5idc.net/helpview_906.html
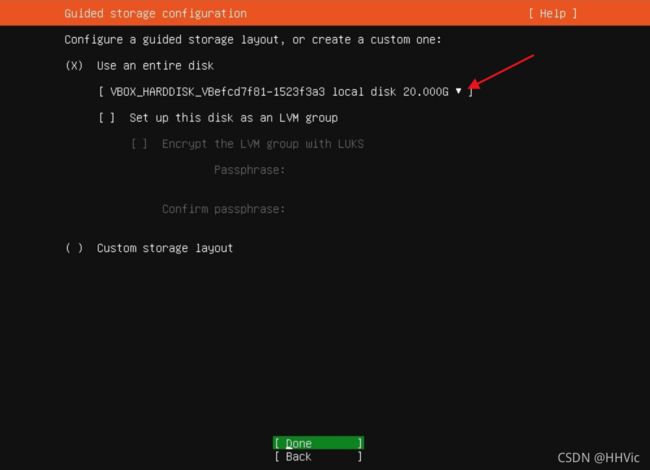
其中安装硬盘部分,我有三个硬盘,在箭头处可以选择想要的安装盘。没有勾选LVM,准备自己安装ZFS。
后面还有一个SSH的选项, 需要选择。
其余都按照教程操作即可。
SSH登录客户端
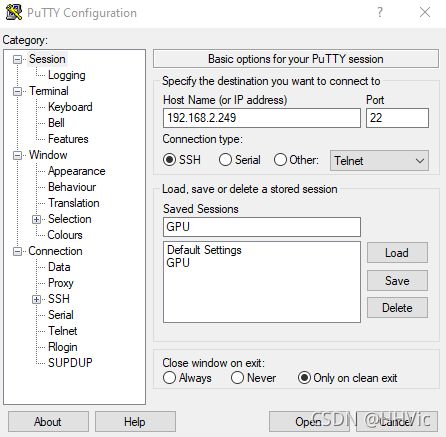
Putty 官网下载
通过本机登录后获得的IP地址,通过Putty即可实现远程登录
login as: gpu
gpu@192.168.2.249's password:
Welcome to Ubuntu 20.04.3 LTS (GNU/Linux 5.4.0-84-generic x86_64)
* Documentation: https://help.ubuntu.com
* Management: https://landscape.canonical.com
* Support: https://ubuntu.com/advantage
System information as of Sat 11 Sep 2021 12:25:53 PM UTC
System load: 1.58 Temperature: 45.0 C
Usage of /: 4.4% of 233.24GB Processes: 205
Memory usage: 0% Users logged in: 0
Swap usage: 0% IPv4 address for eno1: 192.168.2.249
4 updates can be applied immediately.
To see these additional updates run: apt list --upgradable
Last login: Sat Sep 11 12:19:40 2021 from 192.168.2.248
To run a command as administrator (user "root"), use "sudo " .
See "man sudo_root" for details.
一些命令查看系统信息
参考
查看cpu信息 lscpu
查看显卡型号 1)lspci | grep -i nvidia 2)nvidia-smi -L
查看整个系统的硬件信息:lshw
其中nvidia-smi 命令提示,证明显卡驱动并没有安装,这个稍后再说。
gpu@gpu-workstation:~$ nvidia-smi

Command 'nvidia-smi' not found, but can be installed with:

sudo apt install nvidia-340               # version 340.108-0ubuntu5.20.04.2, or
sudo apt install nvidia-utils-390         # version 390.144-0ubuntu0.20.04.1
sudo apt install nvidia-utils-450-server  # version 450.142.00-0ubuntu0.20.04.1
sudo apt install nvidia-utils-460         # version 460.91.03-0ubuntu0.20.04.1
sudo apt install nvidia-utils-470         # version 470.63.01-0ubuntu0.20.04.2
sudo apt install nvidia-utils-470-server  # version 470.57.02-0ubuntu0.20.04.4
sudo apt install nvidia-utils-435         # version 435.21-0ubuntu7
sudo apt install nvidia-utils-440         # version 440.82+really.440.64-0ubuntu6
sudo apt install nvidia-utils-418-server  # version 418.211.00-0ubuntu0.20.04.1
sudo apt install nvidia-utils-460-server  # version 460.91.03-0ubuntu0.20.04.1
由于Server系统与桌面系统不一样,没有GUI桌面系统,所以先要了解系统的文件系统。
- 由于我在先前装的桌面版系统中已经设置了zfs,所以sda1和sdb1显示zfs_member,稍后我们再重新创建一次。
命令lsblk -f 查看
gpu@gpu-workstation:~$ lsblk -f
NAME   FSTYPE     LABEL  UUID                                 FSAVAIL FSUSE% MOUNTPOINT
loop0  squashfs                                                     0   100% /snap/core18/2128
loop1  squashfs                                                     0   100% /snap/snapd/12704
loop2  squashfs                                                     0   100% /snap/lxd/21029
sda
├─sda1 zfs_member mypool 10330058221601942197
└─sda9
sdb
├─sdb1 zfs_member mypool 10330058221601942197
└─sdb9
sdc
├─sdc1 vfat              CA09-BD3E                             505.8M     1% /boot/efi
└─sdc2 ext4              d78d2ab0-ada3-469f-9655-35eb10b95497    211G     4% /
安装ZFS
参考
上面参考帮助很大,但有很多命令无法执行,下面已经过在Ubuntu 20.04 Server上测试过。
ZFS简介参考,其中介绍了z池,z集,z卷 https://bbs.huaweicloud.com/blogs/140905
为什么选择ZFS
ZFS 很优秀。这是一个真正现代的文件系统,内置的功能对于处理大量的数据很有意义。
如今,假设您正在考虑将 ZFS 用于您的超快速 NVMe SSD,这可能不是一个最佳选择。 它比别的文件系统要慢。只是。这全然没有问题。 它旨在存储大量的数据并保持安全。
ZFS 消除了建立传统 RAID 阵列(LCTT 译注:独立磁盘冗余阵列)的需要。
相反。您能够创建 ZFS 池,甚至能够随时将驱动器加入到这些池中。
ZFS 池的行为操作与 RAID 相同,但功能内置于文件系统中。
ZFS 也能够替代 LVM (LCTT 译注:逻辑盘卷管理),使您能够动态地进行分区和管理分区,而无需处理底层的细节,也不必操心相关的风险。
这也是一个 CoW (LCTT 译注:写时复制)文件系统。 这里不会提及太多的技术性,这意味着 ZFS 能够保护您的数据免受逐渐损坏的影响。
ZFS 会创建文件的校验和,并同意您将这些文件回滚到曾经的工作版本号。
1. 安装和配置 zfs
$ sudo apt install zfsutils-linux
gpu@gpu-workstation:~$ sudo apt install zfsutils-linux
Reading package lists... Done
Building dependency tree
Reading state information... Done
The following additional packages will be installed:
  libnvpair1linux libuutil1linux libzfs2linux libzpool2linux zfs-zed
Suggested packages:
  nfs-kernel-server samba-common-bin zfs-initramfs | zfs-dracut
The following NEW packages will be installed:
  libnvpair1linux libuutil1linux libzfs2linux libzpool2linux zfs-zed zfsutils-linux
0 upgraded, 6 newly installed, 0 to remove and 4 not upgraded.
Need to get 1,522 kB of archives.
After this operation, 5,407 kB of additional disk space will be used.
Do you want to continue? [Y/n] y
为了验证安装完成:
$ which zfs
gpu@gpu-workstation:~$ which zfs
/usr/sbin/zfs
创建 ZFS storage pool
首先列出目前所有的硬盘信息
$ sudo fdisk -l
gpu@gpu-workstation:~$ sudo fdisk -l
Disk /dev/loop0: 55.45 MiB, 58130432 bytes, 113536 sectors
Units: sectors of 1 * 512 = 512 bytes
Sector size (logical/physical): 512 bytes / 512 bytes
I/O size (minimum/optimal): 512 bytes / 512 bytes


Disk /dev/loop1: 32.3 MiB, 33865728 bytes, 66144 sectors
Units: sectors of 1 * 512 = 512 bytes
Sector size (logical/physical): 512 bytes / 512 bytes
I/O size (minimum/optimal): 512 bytes / 512 bytes


Disk /dev/loop2: 70.32 MiB, 73728000 bytes, 144000 sectors
Units: sectors of 1 * 512 = 512 bytes
Sector size (logical/physical): 512 bytes / 512 bytes
I/O size (minimum/optimal): 512 bytes / 512 bytes


Disk /dev/sdb: 931.53 GiB, 1000204886016 bytes, 1953525168 sectors
Disk model: WDC WD10EZEX-60W
Units: sectors of 1 * 512 = 512 bytes
Sector size (logical/physical): 512 bytes / 4096 bytes
I/O size (minimum/optimal): 4096 bytes / 4096 bytes
Disklabel type: gpt
Disk identifier: 11C84C56-4A14-5A46-8E41-361203F01D5F

Device          Start        End    Sectors   Size Type
/dev/sdb1        2048 1953507327 1953505280 931.5G Solaris /usr & Apple ZFS
/dev/sdb9  1953507328 1953523711      16384     8M Solaris reserved 1


Disk /dev/sda: 931.53 GiB, 1000204886016 bytes, 1953525168 sectors
Disk model: WDC WD10EZEX-60W
Units: sectors of 1 * 512 = 512 bytes
Sector size (logical/physical): 512 bytes / 4096 bytes
I/O size (minimum/optimal): 4096 bytes / 4096 bytes
Disklabel type: gpt
Disk identifier: 25E6B234-88A3-DA4D-A80D-A69CCE8C6797

Device          Start        End    Sectors   Size Type
/dev/sda1        2048 1953507327 1953505280 931.5G Solaris /usr & Apple ZFS
/dev/sda9  1953507328 1953523711      16384     8M Solaris reserved 1


Disk /dev/sdc: 238.49 GiB, 256060514304 bytes, 500118192 sectors
Disk model: SanDisk SD8SBAT-
Units: sectors of 1 * 512 = 512 bytes
Sector size (logical/physical): 512 bytes / 4096 bytes
I/O size (minimum/optimal): 4096 bytes / 4096 bytes
Disklabel type: gpt
Disk identifier: 3B0DBACB-9EA5-405C-9D79-9E10E230ABAE

Device       Start       End   Sectors  Size Type
/dev/sdc1     2048   1050623   1048576  512M EFI System
/dev/sdc2  1050624 500115455 499064832  238G Linux filesystem
2. 创建zfs pool
$ sudo zpool create mypool /dev/sda /dev/sdb
由于我之前创建过mypool,所以需要加-f参数
gpu@gpu-workstation:~$ sudo zpool create mypool /dev/sda /dev/sdb
invalid vdev specification
use '-f' to override the following errors:
/dev/sda1 is part of potentially active pool 'mypool'
/dev/sdb1 is part of potentially active pool 'mypool'
gpu@gpu-workstation:~$ sudo zpool create mypool /dev/sda /dev/sdb -f
查看目前硬盘文件结构,可以看到mypool已经加入到 / 根目录下
$ df -h
gpu@gpu-workstation:~$ df -h
Filesystem      Size  Used Avail Use% Mounted on
udev             24G     0   24G   0% /dev
tmpfs           4.7G  1.8M  4.7G   1% /run
/dev/sdc2       234G   11G  212G   5% /
tmpfs            24G     0   24G   0% /dev/shm
tmpfs           5.0M     0  5.0M   0% /run/lock
tmpfs            24G     0   24G   0% /sys/fs/cgroup
/dev/loop0       56M   56M     0 100% /snap/core18/2128
/dev/sdc1       511M  5.3M  506M   2% /boot/efi
/dev/loop1       33M   33M     0 100% /snap/snapd/12704
/dev/loop2       71M   71M     0 100% /snap/lxd/21029
tmpfs           4.7G     0  4.7G   0% /run/user/1000
mypool          1.8T  128K  1.8T   1% /mypool
下面是一些zfs命令,以备将来使用。
查看zpool状态 sudo zpool status
更新ZFS时,zpool也需要更新 sudo zpool upgrade mypool
如果有多个zpool,需要更新全部时 sudo zpool upgrade -a
添加新硬盘时 sudo zpool add mypool /dev/sdx
禁止Ubuntu内核更新
查看已安装的内核
sudo dpkg --get-selections | grep linux
gpu@gpu-workstation:~$ sudo dpkg --get-selections | grep linux
console-setup-linux                             install
libnvpair1linux                                 install
libselinux1:amd64                               install
libuutil1linux                                  install
libzfs2linux                                    install
libzpool2linux                                  install
linux-base                                      install
linux-firmware                                  install
linux-generic                                   install
linux-headers-5.4.0-84                          install
linux-headers-5.4.0-84-generic                  install
linux-headers-generic                           install
linux-image-5.4.0-84-generic                    install
linux-image-generic                             install
linux-modules-5.4.0-84-generic                  install
linux-modules-extra-5.4.0-84-generic            install
util-linux                                      install
zfsutils-linux                                  install
禁止更新内核 (找到linux-image-x.xx.x-xx-generic)
sudo apt-mark hold linux-image-5.4.0-84-generic
sudo apt-mark hold linux-headers-5.4.0-84-generic
sudo apt-mark hold linux-modules-5.4.0-84-generic
sudo apt-mark hold linux-modules-extra-5.4.0-84-generic
gpu@gpu-workstation:~$ sudo apt-mark hold linux-image-5.4.0-84-generic
linux-image-5.4.0-84-generic set on hold.
以后如需要恢复更新
sudo apt-mark unhold linux-image-5.4.0-84-generic
sudo apt-mark unhold linux-headers-5.4.0-84-generic
sudo apt-mark unhold linux-modules-5.4.0-84-generic
sudo apt-mark unhold linux-modules-extra-5.4.0-84-generic
安装显卡驱动
如果有旧驱动,需要卸载
sudo apt-get purge nvidia*
禁用nouveau
sudo vim /etc/modprobe.d/blacklist-nouveau.conf
内容写上
blacklist nouveau
options nouveau modeset=0
保存退出vim
按ESC键 跳到命令模式,然后输入:q(不保存)或者:wq(保存) 退出。
更新
sudo update-initramfs -u
gpu@gpu-workstation:~$ sudo update-initramfs -u
update-initramfs: Generating /boot/initrd.img-5.4.0-84-generic
由于Cuda会附带显卡驱动,所以我直接下载了Cuda。
下载及安装CUDA
官网下载
由于Tensorflow等兼容性,我选择了CUDA 11.2
wget https://developer.download.nvidia.com/compute/cuda/11.2.0/local_installers/cuda_11.2.0_460.27.04_linux.run
给驱动run文件赋予执行权限:
sudo chmod a+x cuda_11.2.0_460.27.04_linux.run
Note:由于直接安装可能会提示如下错误,所以需要安装GCC, make
报错提示 unable to find the development tool cc in your path

安装GCC编译器
sudo apt-get install gcc
安装make命令行工具
sudo apt-get install ubuntu-make
sudo apt-get install make
报错提示:可以忽略
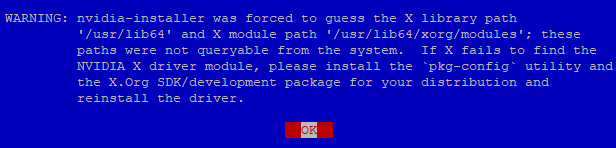
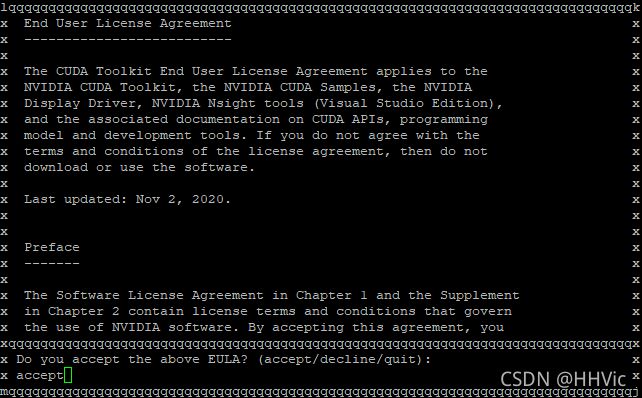
安装Cuda (如果提示安装失败,可以重启服务器再次尝试)
sudo sh cuda_11.2.0_460.27.04_linux.run

输入accept 接受协议
默认勾选460.27的驱动

gpu@gpu-workstation:~$ sudo sh cuda_11.2.0_460.27.04_linux.run
^[[B^[[A===========
= Summary =
===========

Driver:   Installed
Toolkit:  Installed in /usr/local/cuda-11.2/
Samples:  Installed in /home/gpu/, but missing recommended libraries

Please make sure that
 -   PATH includes /usr/local/cuda-11.2/bin
 -   LD_LIBRARY_PATH includes /usr/local/cuda-11.2/lib64, or, add /usr/local/cuda-11.2/lib64 to /etc/ld.so.conf and run ldconfig as root

To uninstall the CUDA Toolkit, run cuda-uninstaller in /usr/local/cuda-11.2/bin
To uninstall the NVIDIA Driver, run nvidia-uninstall
Logfile is /var/log/cuda-installer.log
gpu@gpu-workstation:~$ sudo sh cuda_11.2.0_460.27.04_linux.run
验证:
nvidia-smi

安装Docker
和官网教程一致,主要是改为了国内源改善安装速度
通过https,允许apt使用repository安装软件包
sudo apt-get install -y \
       apt-transport-https \
       ca-certificates \
       curl \
       software-properties-common
gpu@gpu-workstation:~$ sudo apt-get install -y \
>        apt-transport-https \
>        ca-certificates \
>        curl \
>        software-properties-common
[sudo] password for gpu:
Reading package lists... Done
Building dependency tree
Reading state information... Done
ca-certificates is already the newest version (20210119~20.04.1).
ca-certificates set to manually installed.
curl is already the newest version (7.68.0-1ubuntu2.6).
curl set to manually installed.
software-properties-common is already the newest version (0.98.9.5).
software-properties-common set to manually installed.
The following NEW packages will be installed:
  apt-transport-https
0 upgraded, 1 newly installed, 0 to remove and 4 not upgraded.
Need to get 4,680 B of archives.
After this operation, 162 kB of additional disk space will be used.
Get:1 http://us.archive.ubuntu.com/ubuntu focal-updates/universe amd64 apt-transport-https all 2.0.6 [4,680 B]
Fetched 4,680 B in 1s (3,665 B/s)
Selecting previously unselected package apt-transport-https.
(Reading database ... 76132 files and directories currently installed.)
Preparing to unpack .../apt-transport-https_2.0.6_all.deb ...
Unpacking apt-transport-https (2.0.6) ...
Setting up apt-transport-https (2.0.6) ...
添加Docker官方GPG key
curl -fsSL https://mirrors.aliyun.com/docker-ce/linux/ubuntu/gpg | sudo apt-key add -
gpu@gpu-workstation:~$ curl -fsSL https://mirrors.aliyun.com/docker-ce/linux/ubuntu/gpg | sudo apt-key add -
OK
验证key的指纹
sudo apt-key fingerprint 0EBFCD88
gpu@gpu-workstation:~$ sudo apt-key fingerprint 0EBFCD88
pub   rsa4096 2017-02-22 [SCEA]
      9DC8 5822 9FC7 DD38 854A  E2D8 8D81 803C 0EBF CD88
uid           [ unknown] Docker Release (CE deb) <docker@docker.com>
sub   rsa4096 2017-02-22 [S]
添加稳定版repository
sudo add-apt-repository \
   "deb [arch=amd64] https://mirrors.aliyun.com/docker-ce/linux/ubuntu \
   $(lsb_release -cs) \
   stable"
gpu@gpu-workstation:~$ sudo add-apt-repository \
>    "deb [arch=amd64] https://mirrors.aliyun.com/docker-ce/linux/ubuntu \
>    $(lsb_release -cs) \
>    stable"
Get:1 https://mirrors.aliyun.com/docker-ce/linux/ubuntu focal InRelease [52.1 kB]
Get:2 https://mirrors.aliyun.com/docker-ce/linux/ubuntu focal/stable amd64 Packages [10.7 kB]
Hit:3 http://us.archive.ubuntu.com/ubuntu focal InRelease
Get:4 http://us.archive.ubuntu.com/ubuntu focal-updates InRelease [114 kB]
Get:5 http://us.archive.ubuntu.com/ubuntu focal-backports InRelease [101 kB]
Get:6 http://us.archive.ubuntu.com/ubuntu focal-security InRelease [114 kB]
Get:7 http://us.archive.ubuntu.com/ubuntu focal-updates/main amd64 Packages [1,205 kB]
Get:8 http://us.archive.ubuntu.com/ubuntu focal-updates/universe amd64 Packages [855 kB]
Fetched 2,451 kB in 5s (544 kB/s)
Reading package lists... Done
更新apt包索引
sudo apt-get update
安装最新版本的Docker CE
sudo apt-get install -y docker-ce
验证Docker CE正确安装(可选,之后更换存储位置后建议将默认位置/var/lib/docker删除)
sudo docker run hello-world
gpu@gpu-workstation:~$ sudo docker run hello-world
Unable to find image 'hello-world:latest' locally
latest: Pulling from library/hello-world
b8dfde127a29: Pull complete
Digest: sha256:7d91b69e04a9029b99f3585aaaccae2baa80bcf318f4a5d2165a9898cd2dc0a1
Status: Downloaded newer image for hello-world:latest

Hello from Docker!
This message shows that your installation appears to be working correctly.

To generate this message, Docker took the following steps:
 1. The Docker client contacted the Docker daemon.
 2. The Docker daemon pulled the "hello-world" image from the Docker Hub.
    (amd64)
 3. The Docker daemon created a new container from that image which runs the
    executable that produces the output you are currently reading.
 4. The Docker daemon streamed that output to the Docker client, which sent it
    to your terminal.

To try something more ambitious, you can run an Ubuntu container with:
 $ docker run -it ubuntu bash

Share images, automate workflows, and more with a free Docker ID:
 https://hub.docker.com/

For more examples and ideas, visit:
 https://docs.docker.com/get-started/
之后不要急着配置Docker,因为安装nvidia-docker会覆盖daemon.json。
安装Nvidia-Docker2
为什么要安装这个?
Docker 本身是不支持容器内访问 NVIDIA GPU 资源的。早期解决这个问题的办法是在容器内安装 NVIDIA 显卡驱动,然后映射与 NVIDIA 显卡相关的设备到容器(Linux 哲学:硬件即文件,所以很容易映射)。这种解决办法很脆弱,因为这样做之后就要求容器内的显卡驱动与主机显卡硬件型号完全吻合,否则即使把显卡资源映射到容器也无法使用!所以,使用这种方法,容器显然无法再做到平台无关了。
为了解决这些问题,nvidia-docker 应运而生。nvidia-docker 是专门为需要访问显卡资源的容器量身定制的,它对原始的 Docker 命令作了封装,只要使用 nvidia-docker run 命令运行容器,容器就可以访问主机显卡设备(只要主机安装了显卡驱动)。nvidia-docker 的使用规则和 Docker 是一致的,只需要把命令里的“docker”替换为“nvidia-docker”就可以了。
添加repositories
curl -s -L https://nvidia.github.io/nvidia-docker/gpgkey | \
  sudo apt-key add -
curl -s -L https://nvidia.github.io/nvidia-docker/ubuntu16.04/amd64/nvidia-docker.list | \
  sudo tee /etc/apt/sources.list.d/nvidia-docker.list
sudo apt-get update
安装nvidia-docker2并重新载入daemon.json
sudo apt-get install -y nvidia-docker2
加入docker组,以允许非root用户免sudo执行docker命令
sudo gpasswd -a 用户名 docker
如果不重启并重连ssh客户端的话,需要手动重启服务并刷新docker组成员
sudo service docker restart
newgrp - docker
Docker换源,换存储路径,限制容器日志大小
备份daemon.json
sudo cp /etc/docker/daemon.json /etc/docker/daemon.json.bak
修改daemon.json
sudo vim /etc/docker/daemon.json
安装完nvidia-docker后默认应该是这样的配置
{
    "runtimes": {
        "nvidia": {
            "path": "nvidia-container-runtime",
            "runtimeArgs": []
        }
    }
}
修改默认运行时为nvidia-docker,添加国内源,修改存储位置为/mypool/docker,限制日志大小后daemon.json为
{
    "default-runtime": "nvidia",
    "runtimes": {
        "nvidia": {
            "path": "nvidia-container-runtime",
            "runtimeArgs": []
        }
    },
    "registry-mirrors":[
        "https://kfwkfulq.mirror.aliyuncs.com",
        "https://2lqq34jg.mirror.aliyuncs.com",
        "https://pee6w651.mirror.aliyuncs.com",
        "https://registry.docker-cn.com",
        "http://hub-mirror.c.163.com"
    ],
    "data-root": "/home/docker",
    "log-opts": { "max-size": "50m", "max-file": "1"}
}
保存退出,并在/mypool下建立docker文件夹
cd /mypool
sudo mkdir docker
接下来应该重启电脑,如果不重启电脑的话通过docker info查看信息,会发现最后Root dir没有变化。
gpu@gpu-workstation:~$ docker info
Client:
 Context:    default
 Debug Mode: false
 Plugins:
  app: Docker App (Docker Inc., v0.9.1-beta3)
  buildx: Build with BuildKit (Docker Inc., v0.6.1-docker)
  scan: Docker Scan (Docker Inc., v0.8.0)

Server:
 Containers: 1
  Running: 0
  Paused: 0
  Stopped: 1
 Images: 1
 Server Version: 20.10.8
 Storage Driver: overlay2
  Backing Filesystem: extfs
  Supports d_type: true
  Native Overlay Diff: true
  userxattr: false
 Logging Driver: json-file
 Cgroup Driver: cgroupfs
 Cgroup Version: 1
 Plugins:
  Volume: local
  Network: bridge host ipvlan macvlan null overlay
  Log: awslogs fluentd gcplogs gelf journald json-file local logentries splunk syslog
 Swarm: inactive
 Runtimes: io.containerd.runc.v2 io.containerd.runtime.v1.linux nvidia runc
 Default Runtime: runc
 Init Binary: docker-init
 containerd version: e25210fe30a0a703442421b0f60afac609f950a3
 runc version: v1.0.1-0-g4144b63
 init version: de40ad0
 Security Options:
  apparmor
  seccomp
   Profile: default
 Kernel Version: 5.4.0-84-generic
 Operating System: Ubuntu 20.04.3 LTS
 OSType: linux
 Architecture: x86_64
 CPUs: 8
 Total Memory: 46.99GiB
 Name: gpu-workstation
 ID: QDTW:AJUA:LVTV:IQTN:BCN2:7RPU:XKSO:AMPW:TAWG:5DS6:JMZH:46YE
 Docker Root Dir: /var/lib/docker
 Debug Mode: false
 Registry: https://index.docker.io/v1/
 Labels:
 Experimental: false
 Insecure Registries:
  127.0.0.0/8
 Live Restore Enabled: false

WARNING: No swap limit support
gpu@gpu-workstation:~$
本来想尝试通过重启服务的方式来刷新,结果报错如下:
gpu@gpu-workstation:~$ sudo service docker restart
Job for docker.service failed because the control process exited with error code.
See "systemctl status docker.service" and "journalctl -xe" for details.
gpu@gpu-workstation:~$ systemctl status docker.service
● docker.service - Docker Application Container Engine
     Loaded: loaded (/lib/systemd/system/docker.service; enabled; vendor preset: enabled)
     Active: failed (Result: exit-code) since Sun 2021-09-12 15:53:06 UTC; 7s ago
TriggeredBy: ● docker.socket
       Docs: https://docs.docker.com
    Process: 21264 ExecStart=/usr/bin/dockerd -H fd:// --containerd=/run/containerd/containerd.sock (code=exited, status=1/FAILURE)
   Main PID: 21264 (code=exited, status=1/FAILURE)

Sep 12 15:53:06 gpu-workstation systemd[1]: docker.service: Scheduled restart job, restart counter is at 3.
Sep 12 15:53:06 gpu-workstation systemd[1]: Stopped Docker Application Container Engine.
Sep 12 15:53:06 gpu-workstation systemd[1]: docker.service: Start request repeated too quickly.
Sep 12 15:53:06 gpu-workstation systemd[1]: docker.service: Failed with result 'exit-code'.
Sep 12 15:53:06 gpu-workstation systemd[1]: Failed to start Docker Application Container Engine.
gpu@gpu-workstation:~$ journalct1 -xe

Command 'journalct1' not found, did you mean:

  command 'journalctl' from deb systemd (245.4-4ubuntu3.11)

Try: sudo apt install <deb name>
通过debug命令发现还是daemon.json文件有问题。原来是一个符号变成了中文,修改后成功
sudo dockerd --debug
gpu@gpu-workstation:~$ sudo dockerd --debug
unable to configure the Docker daemon with file /etc/docker/daemon.json: invalid character 'â' looking for beginning of object key string
再运行dock info发现Root dir已经更改。
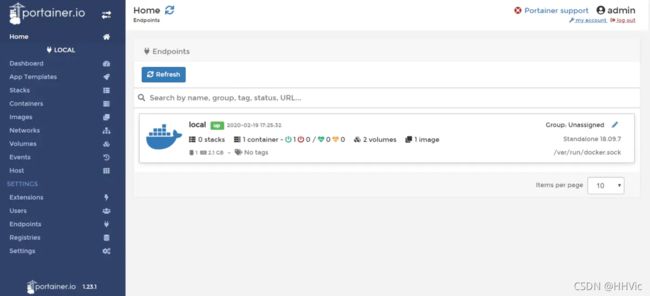
Docker 管理面板Portainer
搜索 portainer
docker search portainer

拉取portainer
docker pull portainer/portainer
创建portainer容器并启动
docker run -d --name portainerUI -p 8000:9000 -v /var/run/docker.sock:/var/run/docker.sock portainer/portainer
访问portainer界面
http://192.168.2.108:8000/#/home
初始化设置密码,首次登陆时

创建容器
参考
从Docker Hub上下载一个深度学习镜像, 也是最有名的一个
https://hub.docker.com/r/ufoym/deepo/
下载镜像
docker pull ufoym/deepo
确认GPU
nvidia-docker run --rm ufoym/deepo nvidia-smi
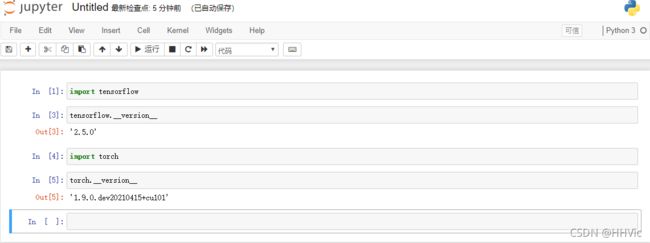
创建容器 (带Jupyter Notebook)
nvidia-docker run -it -p 8888:8888 ufoym/deepo:latest jupyter notebook --no-browser --ip=0.0.0.0 --allow-root --NotebookApp.token= --notebook-dir=’/home’
如果容器创建有误,可以通过下面方法删除
列出所有容器ID
docker ps -aq
gpu@gpu-workstation:/mypool$ docker ps -aq
e27716f33626
停用容器
docker stop e2771
删除容器
docker rm e2771
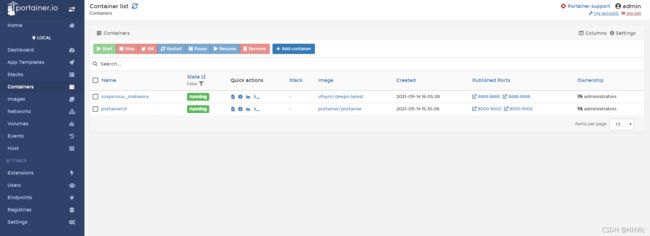
最终验证
打开局域网中任意其他机器
输入网址: http://192.168.2.108:8888
同时Portainer可以看到两个容器运行。
服务器意外重启, 如何手动启动docker和container
如果需要重启服务器,最好先停止容器,以防发生意外
查看容器,并停止
docker ps -aq
docker stop xxxx
重启Docker服务
sudo service docker restart
查看容器状态,都是Exited
docker ps -a
gpu@gpu-workstation:~$ docker ps -a
CONTAINER ID   IMAGE                 COMMAND                  CREATED          STATUS                      PORTS                NAMES
0c35d12ddba5   portainer/portainer   "/portainer"             10 minutes ago   Exited (2) 10 minutes ago                        keen_sanderson
3b546a15bcad   ufoym/deepo:latest    "cal"                    11 minutes ago   Created                     6006/tcp, 8888/tcp   trusting_brown
33032799dcce   ufoym/deepo:latest    "jupyter notebook --…"   2 hours ago      Exited (0) 16 minutes ago                        suspicious_mahavira
8d1316387bea   portainer/portainer   "/portainer"             2 hours ago      Exited (2) 16 minutes ago                        portainerUI
使用命令逐个重启
docker ps -aq | xargs -I {} docker start {}
如果还有问题,使用功能命令cat /proc/mounts | grep “mapper/docker” | awk ‘{print $2}’ 查看docker占用的挂载点,查看,然后手动umount卸载占用的挂载点,再次启动。
如何在服务器和容器间传输数据(已有数据卷和容器情况下)
理论参考
创建一个数据卷并查看
docker volume create dl-vol
docker volume ls
gpu@gpu-workstation:~$ docker volume ls
DRIVER    VOLUME NAME
local     cf67130325715b6e1917f18179067e4c2a43bf4fc30b9c8eaf1722a217475ba2
local     dl-vol
在主机里使用以下命令可以查看指定 数据卷 的信息
docker volume inspect dl-vol
gpu@gpu-workstation:~$ docker volume inspect dl-vol
[
    {
        "CreatedAt": "2021-09-14T08:29:29Z",
        "Driver": "local",
        "Labels": {},
        "Mountpoint": "/mypool/docker/volumes/dl-vol/_data",
        "Name": "dl-vol",
        "Options": {},
        "Scope": "local"
    }
]
查看原来的容器ID
docker ps -a
gpu@gpu-workstation:~$ docker ps -a
CONTAINER ID   IMAGE                 COMMAND                  CREATED          STATUS          PORTS                                                 NAMES
0c35d12ddba5   portainer/portainer   "/portainer"             11 minutes ago   Up 23 seconds   9000/tcp                                              keen_sanderson
3b546a15bcad   ufoym/deepo:latest    "cal"                    11 minutes ago   Created         6006/tcp, 8888/tcp                                    trusting_brown
33032799dcce   ufoym/deepo:latest    "jupyter notebook --…"   2 hours ago      Up 6 seconds    6006/tcp, 0.0.0.0:8888->8888/tcp, :::8888->8888/tcp   suspicious_mahavira
8d1316387bea   portainer/portainer   "/portainer"             2 hours ago      Up 6 seconds    0.0.0.0:8000->9000/tcp, :::8000->9000/tcp             portainerUI
提交现有容器为新镜像
docker commit 33032799dcce lab_vm
重新运行
docker run --name lab_vm -v dl-vol:/home/common-dir -p 8889:8888 -d lab_vm
访问地址确认新容器正常工作
http://192.168.2.108:8889/tree?
查看数据卷dl-vol具体位置
docker volume inspect dl-vol
gpu@gpu-workstation:~$ docker volume inspect dl-vol
[
    {
        "CreatedAt": "2021-09-14T10:02:35Z",
        "Driver": "local",
        "Labels": {},
        "Mountpoint": "/mypool/docker/volumes/dl-vol/_data",
        "Name": "dl-vol",
        "Options": {},
        "Scope": "local"
    }
]
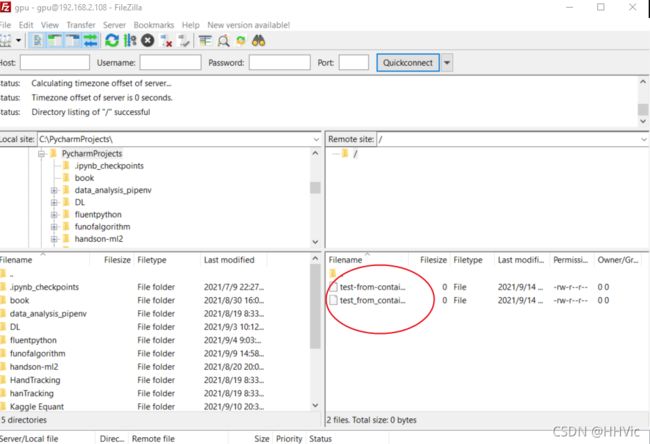
上面的命令中已经将容器挂载到上面的数据卷,路径为 /home/common-dir
cd /home/common-dir 进入此文件夹后运行下面命令创建测试文件
touch test-from-container

回到主机中检查,确认mount成功。
gpu@gpu-workstation:/mypool/docker/volumes/dl-vol/_data$ ls
test-from-container  test_from_container
如何将Windows文件上传到Ubuntu20.04服务器上
参考
内容基本一样,我就不赘述了。
local_root=/home/[用户目录]/ftp
注意:设置local_root时必须要先保证设置的这个目录
注意:这里的用户目录,每个人的不一样,这个ftp目录需要在用户目录下创建
上面的设置每个人会不太一样,我自己这里改为 local_root=/mypool/docker/volumes/dl-vol/_data
Note: 按照上述文档, 无法上传文件, 参考另外一篇文章
需要更改ftp文件夹权限
sudo chmod -R 777 /mypool/docker/volumes/dl-vol/_data
至此完成。
哦, 对了,为了以后方便,还要打包镜像,生成自己的docker文件,这个就等后面再说吧。
搞了两天心力交瘁,休息一下。