【网络代理】(三)Docker+Haproxy 搭建四层代理
目录
1.1 创建 web 服务器镜像
1.2 启动 web 服务器容器
2.1 编写 haproxy 配置文件
2.2 拉取 haproxy 镜像
2.3 启动 haproxy 容器
3.1 访问 8000 端口
3.2 查看 web 服务器容器日志
附录:haproxy 仪表板
1.1 创建 web 服务器镜像
编写一个 Dockerfile,安装 python3 以及可能需要使用到的工具,作为 web 服务器镜像。Dockerfile 内容如下:
FROM ubuntu:22.04

RUN apt-get update
RUN apt-get install -y iperf3 iproute2 iptables vim python3
创建名为 ready 的镜像:
docker build -f ./Dockerfile -t ready .1.2 启动 web 服务器容器
使用以下命令启动三个 web 服务器容器,分别为 web01、web02、web03:
docker run -d --name=web01 ready python3 -m http.server 8000
docker run -d --name=web02 ready python3 -m http.server 8000
docker run -d --name=web02 ready python3 -m http.server 8000
使用以下命令查看 web 服务器容器的 ip 地址,为了之后填写配置文件:
docker inspect web01
docker inspect web02
docker inspect web03
如下图所示:
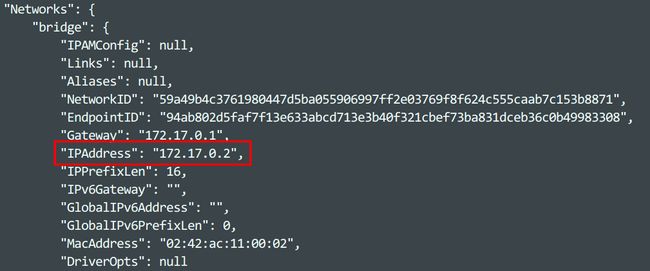
从而分别得到 ip 地址为:172.17.0.2、172.17.0.3、172.17.0.4 。
2.1 编写 haproxy 配置文件
由于 haproxy 容器里面并没有自动编写配置文件,因此我们需要自己创建一个配置文件,启动容器时再将我们的配置文件挂载到 haproxy 容器上。
首先创建目录和配置文件:
mkdir /home/envoutante/haproxy
vim haproxy.cfg
配置文件内容如下:
#----------------
# Global settings
#----------------
global
log 127.0.0.1 local2
maxconn 4000
daemon
defaults
mode http
log global
option httplog
option dontlognull
option http-server-close
option forwardfor except 127.0.0.0/8
option redispatch
retries 3
timeout http-request 10s
timeout queue 1m
timeout connect 10s
timeout client 1m
timeout server 1m
timeout http-keep-alive 10s
timeout check 10s
maxconn 500
#-------------
#Stats monitor
#-------------
frontend stats_monitor
bind *:8404
stats enable
stats uri /stats
stats refresh 5s
#--------------------
#Application frontend
#--------------------
frontend myfrontend
bind :8000
default_backend webservers
#--------------------
backend webservers
#负载均衡算法#
balance roundrobin
mode http
server web01 172.17.0.2:8080 check weight 1
server web02 172.17.0.3:8080 check weight 2
server web03 172.17.0.4:8080 check weight 3
#map_end#
说明:
- 第一个前端 stats_monitor 监听端口 8404,并启用 HAProxy Stats 仪表板。该仪表板显示负载均衡器的实时统计信息。
- 第二个前端 myfrontend 监听端口 8000,并将请求分派到 web 服务器后端中列出的三个 web 应用程序之一。
- 后端 webservers 采用负载均衡算法,需要根据刚才创建的三个 web 服务器容器的信息来填写服务器名称和服务器的 ip 地址。
2.2 拉取 haproxy 镜像
使用命令:
docker image pull haproxy2.3 启动 haproxy 容器
sudo docker run -d --name haproxy \
   -v /home/envoutante/haproxy:/usr/local/etc/haproxy \
   -p 8000:8000 -p 8404:8404 haproxy
说明:使用 -v 参数将包含配置文件的目录挂载到容器的 /usr/local/etc/haproxy 目录下;使用 -p 参数将容器端口 8000 映射到主机上的相同端口,同时也为 HAProxy Stats 页面映射到了端口 8404 。
3.1 访问 8000 端口
在浏览器中输入以下网址:
http://localhost:8000如下图所示:
3.2 查看 web 服务器容器日志
使用以下命令查看 web 服务器容器日志:
docker logs -f web01
docker logs -f web02
docker logs -f web03
结果如下图所示:
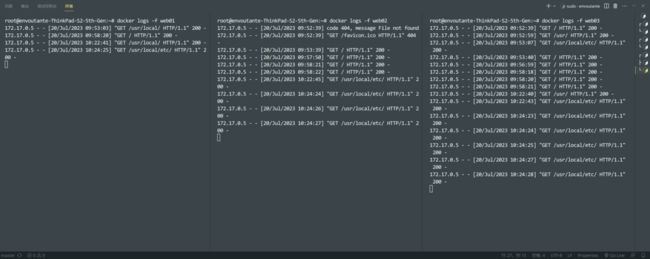
可见 web01 到 web03 所承担的访问量呈递增趋势,符合我们设置的权重 1、2、3,实验结果与预期相符。
附录:haproxy 仪表板

参考博客:如何优雅的在 Docker 中运行高性能负载均衡器 HAProxy - 知乎