Android自定义控件(七) Android仿微信支付密码输入框
前言
早上在使用微信支付买东西时候注意到了支付的密码输入框,Android使用自定义方式来实现下。
说明
1、实现效果
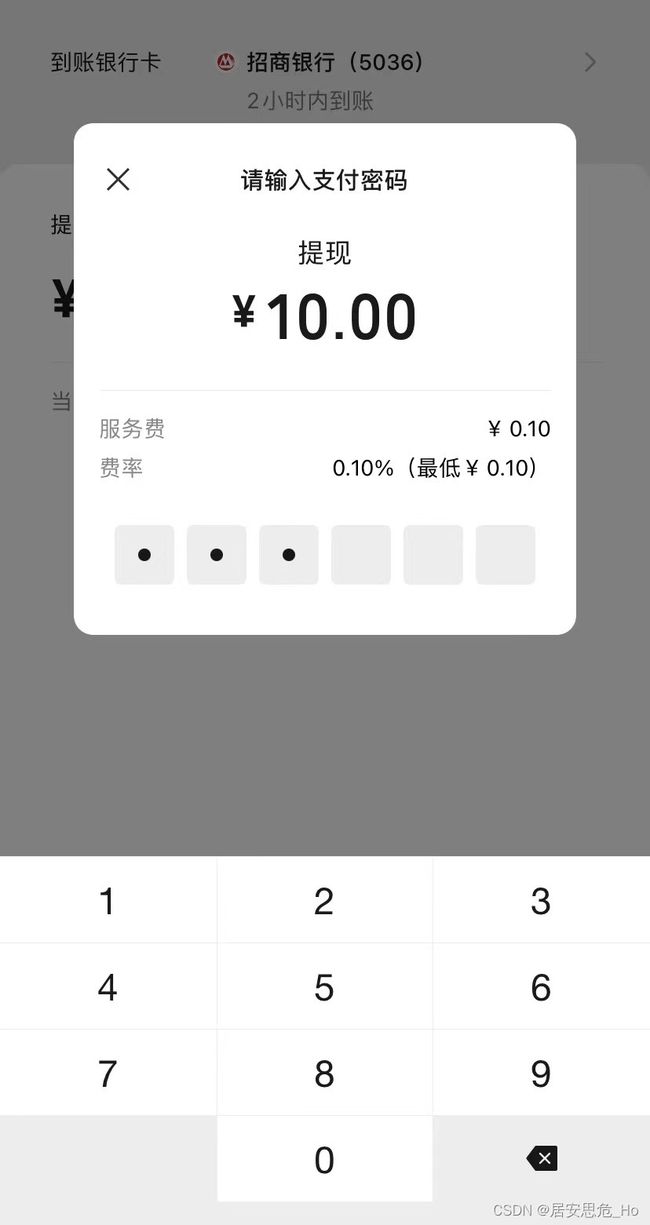
2、绘制分析
从图上可以看出,主要有以下几个元素以及事件:
- 绘制圆角矩形
drawRoundRect - 绘制黑色小圆点
drawCircle - 键盘自动调起
- 处理输入和回删事件
- 输入完成后事件回调
3、实现步骤
1、首先绘制圆角矩形 & 黑色密码小圆
这里的绘制没什么难度,将圆角矩形框的宽和高度根据设计图上的尺寸定义好,找到每个圆角矩形之间的距离,密码小圆之间的距离的规律即可。
/**
 * 密码输入框
 */
class PasswordFieldView(context:Context,attributeSet: AttributeSet): View(context,attributeSet) {


    /**
     * 圆角矩形之间的距离
     */
    private var rRectMargin = 48f

    /**
     * 圆角矩形宽
     */
    private var rRectW = 96f

    /**
     * 圆角矩形高
     */
    private var rRectH = 96f

    /**
     * 圆角矩形圆角
     */
    private var rRoundRadius = 8f

    /**
     * 密码小圆半径
     */
    private var circleRadius = 10f

    /**
     * 密码集合
     */
    private var pws:ArrayList<String> = ArrayList()

    /**
     * 圆角矩形画笔
     */
    private var rRectPaint = Paint().apply {
        isDither = true
        isAntiAlias = true
        strokeWidth = 2f
        style = Paint.Style.STROKE
        color = context.getColor(R.color.color_99)
    }

    /**
     * 圆形密码画笔
     */
    private var pwCirclePaint = Paint().apply {
        isDither = true
        isAntiAlias = true
        strokeWidth = 20f
        style = Paint.Style.FILL
        color = context.getColor(R.color.color_33)
    }

    override fun onDraw(canvas: Canvas) {
        super.onDraw(canvas)
        canvas.apply {
            drawRoundRect(this)
            drawPwPoint(this)
        }
    }

  /**
     * 绘制roundRect
     */
    private fun drawRoundRect(canvas: Canvas) {
        for (i in 0 until 6){
            val rect = RectF(rRectW * i + rRectMargin * i + 2f ,2f,rRectW * i  + rRectMargin * i + rRectW,rRectH + 2f)
            canvas.drawRoundRect(rect,rRoundRadius,rRoundRadius,rRectPaint)
        }
    }

    /**
     * 绘制圆点
     */
    private fun drawPwPoint(canvas: Canvas) {
        for (i in pws.indices){
            canvas.drawCircle(rRectW * (i + 0.5f)  + rRectMargin * i,rRectH / 2f,circleRadius,pwCirclePaint)
        }
    }

    /**
     * 刷新password
     */
    fun setPassword(pws:ArrayList<String>){
        this.pws = pws
        invalidate()
    }

}
2、键盘自动调起 & 处理输入和回删事件
这里思考下,如何才能主动调起软键盘呢?在Android中,我们知道常用的就是EditText有焦点时候可以主动调起软键盘,我们可以利用这一点来实现这个功能,下面就需要用到自定义ViewGroup,只要在我们的密码框上覆盖一个透明的EditText即可,输入框的输入事件和密码输入框的绘制联动即可,下面自定义写下ViewGroup。
首先定义布局文件,如上述,在密码框上覆盖一个透明的EditText, inputType设置类型numberPassword ,监听输入来刷新密码框的绘制。
<FrameLayout xmlns:android="http://schemas.android.com/apk/res/android"
    android:layout_width="match_parent"
    android:layout_height="wrap_content">

    <com.xn.setting.widget.password.PasswordFieldView
        android:id="@+id/pwView"
        android:layout_width="@dimen/px_828"
        android:layout_height="@dimen/px_102" />

    <androidx.appcompat.widget.AppCompatEditText
        android:id="@+id/pwEdit"
        android:layout_width="@dimen/px_816"
        android:layout_height="@dimen/px_102"
        android:alpha="0"
        android:focusable="true"
        android:focusableInTouchMode="true"
        android:inputType="numberPassword" />

FrameLayout>
/**
 * 密码输入框组合View
 */
class PasswordGroupLayout(context: Context, attributeSet: AttributeSet) : FrameLayout(context, attributeSet) {

    /**
     * 密码文字
     */
    private var pwText:String = ""

    private lateinit var listener:(pw:String) -> Unit
    private var pws:ArrayList<String> = ArrayList()
    private var mBinding: LayoutPasswordGroupBinding

    init {
        mBinding = LayoutPasswordGroupBinding.inflate(LayoutInflater.from(context), this, true)
        bindListener()
    }

	/**
     * EditText内容监听
     */
    private fun bindListener() {

        mBinding.pwEdit.apply {
            requestFocus()
            //调起软键盘
            DeviceUtils.showInputMethod(context,this)
            addTextChangedListener(object : TextWatcher {
                override fun beforeTextChanged(s: CharSequence?, start: Int, count: Int, after: Int) {

                }
                override fun onTextChanged(s: CharSequence?, start: Int, before: Int, count: Int) {
                    //输入操作
                    if(count == 1){
                        if(pws.size < 6){
                            pws.add(s!![start].toString())
                            mBinding.pwView.setPassword(pws)
                        }
                    }
                    //删除操作
                    if(before == 1){
                        if(pws.isNotEmpty()){
                            pws.removeAt(pws.size -1)
                            mBinding.pwView.setPassword(pws)
                        }
                    }
                    generatePwText()
                }

                override fun afterTextChanged(s: Editable?) {

                }
            })
        }
    }

    /**
     * 生成密码
     */
    private fun generatePwText() {
        pwText = ""
        pws.forEach { pwText += it }
        listener.invoke(pwText)
    }

    /**
     * 密码保存回调
     */
    fun setPwSaveListener(l:(pw:String) -> Unit){
        this.listener = l
    }
调起软键盘方法
	object DeviceUtils{
	    /**
	     * 调起软键盘
	     */
	    fun showInputMethod(c:Context,v: View){
	        v.apply {
	            isFocusable = true
	            isFocusableInTouchMode = true
	            requestFocus()
	            val imm = c.getSystemService(Context.INPUT_METHOD_SERVICE) as InputMethodManager
	            imm.showSoftInput(this,0)
	        }
	    }
	}
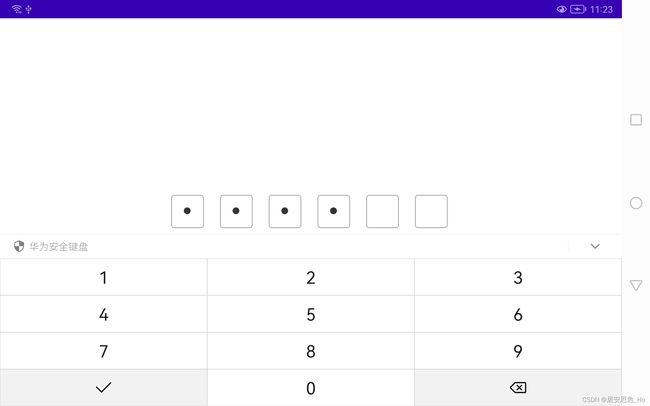
OK,我们来看下实现的效果,和微信支付的密码框功能基本一致。
总结
END~