谷粒商城项目笔记总结(1/2)
文章目录
-
- 商城项目 - 基础篇
-
- 1. 环境搭建
- 2. MyBatis-plus
-
- 引入MyBatis-plus的步骤
- 3. SpringCloud Alibaba
-
- Nacos注册中心
- Nacos配置中心
- Fegin 声明式远程调用
- Gateway API网关
- 4. 商品业务 - 三级分类
-
- 逻辑删除
- JSR303
- 统一异常处理
- 前后端分离项目跨域问题
- 5. 商品业务 - 品牌管理
-
- 文件存储
- OSS 阿里云对象存储
- 6. 业务基础概念
-
- SPU和SKU
- 基础属性【规格参数】与销售属性
- Object划分
- 采购的简要流程
- 商城项目 - 高级篇(上)
-
- 1. Elasticsearch全文检索
-
- 介绍与安装
- 检索学习
- elasticsearch-Rest-Client
- 2. 商城业务 - 商品上架
- 3. 商城业务 - 首页
-
- thymeleaf模板引擎
- Nginx
- 4. 压力测试
-
- JMeter
- JVM
- 模拟线上应用内存崩溃宕机
- 5. 缓存
-
- Redis
- 高并发下缓存失效问题
- 6. 锁机制
-
- 本地锁
- redis分布式锁
- Redisson分布式锁
- 缓存和数据库一致性
- Spring Cache
- 7. 商城业务 - 检索服务
- 8. 商城业务 - 商品详情
-
- 多线程
- CompletableFuture 异步编排
商城项目 - 基础篇
1. 环境搭建
https://blog.csdn.net/weixin_45606067/article/details/109629397
2. MyBatis-plus
引入MyBatis-plus的步骤
- 引入 mybatis-plus-boot-starter 依赖
- 在application.yml 中配置数据源
- 在主启动类上使用
@MapperScan注解,扫描dao包 - 告诉Mybatis-plus,sql映射文件的位置
3. SpringCloud Alibaba
Nacos注册中心
- 引入spring-cloud-starter-alibaba-nacos-discovery 依赖;
- 配置 Nacos Server 地址;
- 主启动类上使用
@EnableDiscoveryClient开启服务注册发现功能; - 每个服务都应该写上自己的名字和端口。
Nacos配置中心
基础配置如下:
- 引入spring-cloud-starter-alibaba-nacos-config依赖;
- 创建bootstrap.properties配置文件,包括
spring.application.name和spring.cloud.nacos.config.server-addr - 在配置中心中添加数据集(gulimall-coupon.properties);
默认规则:应用名.properties - 在应用名.properties 中添加任何配置信息;
- 动态获取配置:添加
@RefreshScope注解 动态刷新配置,@Value("${}")注解 获取到配置。
注意:如果配置中心和当前应用的配置中心中都配置了相同的项,优先使用配置中心的配置。
细节配置如下:
-
命名空间
默认:public(保留空间):默认新增的所有配置都在public空闲下。
1)(dev)开发、(test)测试、(pro)生产:利用命名空间来做环境隔离。
注意:在bootstrap.properties中配置上需要使用那个命名空间;
spring.cloud.nacos.config.namespace=43e4b62f-d65b-4295-bf06-8be264de464b
2)每个微服务之间相互隔离,每个微服务都创建自己的命名空间,只加载自己命名空间下的所有配置。 -
配置集:所有的配置集合。
-
配置集ID:类似于文件名。
-
配置分组
默认所有的配置集都属于:DEFAULT_GROUP
我们可以给每个微服务创建自己的命名空间,使用配置分租区分环境。
Fegin 声明式远程调用
- 引入spring-cloud-starter-openfeign依赖;
<dependency>
  <groupId>org.springframework.cloudgroupId>
  <artifactId>spring-cloud-starter-openfeignartifactId>
dependency>
- 编写接口,并使用@FeignClient注解 告诉远程服务的名称;
- 主启动类上使用@EnableFeignClients注解 开启远程调用功能。
注意如下:
- 远程接口类中路径必须是全路径;
- 传递的参数注解必须写全。
- 只要json数据模型是兼容的。双方服务无需使用同一个to对象
Gateway API网关
- 引入spring-cloud-starter-gateway依赖;
<dependency>
  <groupId>org.springframework.cloudgroupId>
  <artifactId>spring-cloud-starter-gatewayartifactId>
dependency>
- 在配置文件中配置gateway路由规则。
4. 商品业务 - 三级分类
逻辑删除
- 配置全局的逻辑删除规则
- 配置逻辑删除的组件Bean
- 给Bean加上逻辑删除注解
@TableLogic
JSR303
- 给Bean添加校验注解:
javax.validation.constraints,并定义自己的message提示 - 开启校验功能
@Valid
效果:校验错误以后会有默认的响应; - 给校验的Bean后紧跟一个
BindingResult,就可以获取到验证的结果。 - 分组校验(多场景复杂校验)
(1) @NotBlank(message = “品牌名必须提交”, groups = {UpdateGroup.class,AddGroup.class})
给校验注解上标注什么情况下需要进行校验
(2) @Validated({AddGroup.class})
(3) 默认没有指定分组的校验注解@NotBlank,在分组校验情况下不会生效,只有在@Validated生效; - 自定义校验
(1) 编写一个自定义的校验注解
(2) 编写一个自定义的校验器
(3) 关联自定义的校验器和自定义的校验注解
@Documented
@Constraint(validatedBy = { ListValueConstraintValidator.class【可以指定多个不同的校验器,适配不同类型的校验器】 })
@Target({ METHOD, FIELD, ANNOTATION_TYPE, CONSTRUCTOR, PARAMETER, TYPE_USE })
@Retention(RUNTIME)
public @interface ListValue {
统一异常处理
- 编写异常处理类,使用
@RestControllerAdvice - 使用
@ExceptionHandler标注方法可以处理异常。
前后端分离项目跨域问题
跨域:指的是浏览器不能执行其他网站的脚本。它是由浏览器的同源策略造成的,是 浏览器对javascript施加的安全限制。
方式一:使用nginx部署为同一域
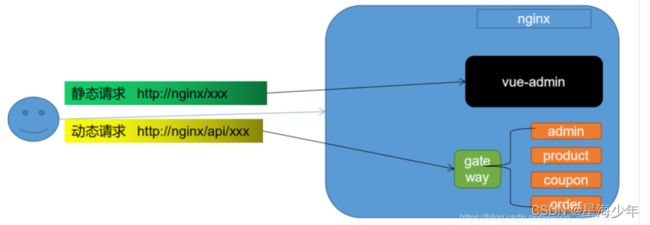
方式二:配置当次请求允许跨域
gateway网关模块进行配置如下代码:
package com.kuang.gulimall.gateway.config;

import org.springframework.context.annotation.Bean;
import org.springframework.context.annotation.Configuration;
import org.springframework.web.cors.CorsConfiguration;
import org.springframework.web.cors.reactive.CorsConfigurationSource;
import org.springframework.web.cors.reactive.CorsWebFilter;
import org.springframework.web.cors.reactive.UrlBasedCorsConfigurationSource;

@Configuration
public class GulimallCorsConfiguration {

    @Bean
    public CorsWebFilter corsWebFilter(){
        UrlBasedCorsConfigurationSource source=new UrlBasedCorsConfigurationSource();
        CorsConfiguration corsConfiguration = new CorsConfiguration();
        //允许那些头可以跨域
        corsConfiguration.addAllowedHeader("*");
        //允许那些方式可以跨域
        corsConfiguration.addAllowedMethod("*");
        //允许那个请求来源
        corsConfiguration.addAllowedOrigin("*");
        //是否允许携带cookie进行跨域
        corsConfiguration.setAllowCredentials(true);

        source.registerCorsConfiguration("/**",corsConfiguration);
        return new CorsWebFilter(source);
    }
}
5. 商品业务 - 品牌管理
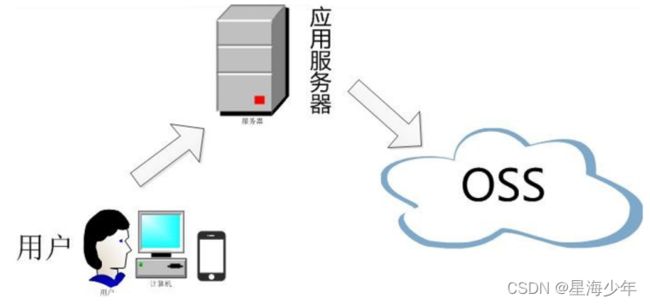
文件存储
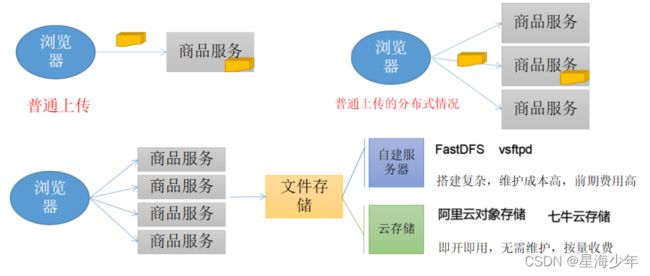
OSS 阿里云对象存储
普通上传方式
服务端签名后直传

- 引入oss-starter依赖
<dependency>
   <groupId>com.alibaba.cloudgroupId>
   <artifactId>spring-cloud-starter-alicloud-ossartifactId>
dependency>
- 配置key,endpoint相关信息
spring:
  cloud:
    alicloud:
      access-key: LTAI5tAAoGLQjwxzdxnTjioC
      secret-key: 8CNjhNrk03HcxV1mlVkfuBStROb6IT
      oss:
        endpoint: oss-cn-beijing.aliyuncs.com
        bucket: gulimall-hello-2021
- 使用 OSSClient 进行相关操作即可
6. 业务基础概念
SPU和SKU
SPU:Standard Product Unit (标准化产品单元)
是商品信息聚合的最小单位,是一组可复用、易检索的标准化信息的集合,该集合描述了一个产品的特性。
SKU:Stock Keeping Unit (库存量单位)
即库存进出计量的基本单元,可以是以件,盒,托盘等为单位。SKU这是对于大型连锁超市
DC (配送中心)物流管理的一个必要的方法。现在已经被引申为产品统一编号的简称,每种产品均对应有唯一的SKU号。
基础属性【规格参数】与销售属性
每个分类下得商品共享规格参数,与销售属性。知识有些商品不一定要用这个分类下全部得属性:
- 属性是以三级分类组织起来的
- 规格参数中有些是可以提供检索的
- 规格参数也是基本属性,他们具有自己的分组
- 属性的分组也是以三级分类组织起来的
- 属性名确定的,但是值是每一个商品不同来决定的
属性分组-规格参数-销售属性-三级关系图如下:

Object划分
- PO:持久对象;就是对应数据库中某个表中的一条记录,多个记录可以用PO的集合。PO中应该不包含任何对数据库的操作。
- DO:领域对象;就是从现实世界中抽取出来的有形或无形的业务实体。
- TO:数据传输对象;不同的应用程序之间传输的对象。
- DTO:数据传输对象;目的就是为了EJB的分布式应用提供粗粒度的数据实体。以减少分布式调用的次数。从而提高分布式调用的性能和降低网络负载,但在这里,泛指用于展示层与服务层之间的数据传递对象。
- VO:值对象;通常用于业务层之间的数据传递,和PO一样也是仅仅包含数据而已。但应是抽象出的业务对象,可以和表对应,也可以不,这根据业务的需要。用new关键字创建,由GC回收的。
View Ojbect对象 目的:接收页面传递来的数据,封装对象。将业务处理完成的对象,封装成页面想要的数据。 - BO:业务对象;从业务模型的角度看,见UML元件领域模型中的领域对象。封装业务逻辑的java对象,通过调用DAO方法,结合PO,VO进行业务操作。
- POJO:简单无规则java对象;就是DO/DTO/BO/VO的统称。
- DAO:数据访问对象;负责持久层的操作,配合VO,提供数据库的CRCD操作。
采购的简要流程

商城项目 - 高级篇(上)
1. Elasticsearch全文检索
介绍与安装
官网地址:https://www.elastic.co/guide/en/elasticsearch/reference/current/index.html
环境安装:https://blog.csdn.net/weixin_45606067/article/details/109629397
检索学习
入门检索学习:https://blog.csdn.net/weixin_45606067/article/details/110818401
进阶检索学习:
商城项目应用场景:
- 前端的名字、属性值的检索
- 日志的检索
elasticsearch-Rest-Client
1)9300: TCP
- spring-data-elasticsearch:transport-api.jar;
- springboot版本不同,ransport-api.jar不同,不能适配es版本。
- 7.x已经不建议使用,8以后就要废弃。
2)9200: HTTP
-
JestClient: 非官方,更新慢;
-
RestTemplate:模拟HTTP请求,ES很多操作需要自己封装,麻烦;
-
HttpClient:同上;
-
Elasticsearch-Rest-Client:官方RestClient,封装了ES操作,API层次分明,上手简单;
最终选择Elasticsearch-Rest-Client(elasticsearch-rest-high-level-client);
https://www.elastic.co/guide/en/elasticsearch/client/java-rest/current/java-rest-high.html
2. 商城业务 - 商品上架
上架的商品才可以在网站中展示,上架的商品需要可以被检索。
① 上架是将后台的商品放在es中可以提供检索和查询功能:
1) hasStock: 代表是否有库存。 默认上架的商品都有库存。 如果库存无货的时候才需要更新一下 es
2) 库存补上以后, 也需要重新更新一下 es
3) hotScore:代表热度值。我们只模拟使用点击率更新热度。 点击率增加到一定程度才更新热度值。
4) 下架就是从 es 中移除检索项, 以及修改 mysql 状态。
② 商品上架步骤:
1)先在es中按照之前的mapping信息,建立 gulimall_product 索引。
2)点击上架,查询出所有sku的信息,保存到es中;
3)es保存成功后返回,更新数据的上架状态信息。
创建商品在es中索引格式
PUT gulimall_product
{
  "mappings": {
    "properties": {
      "skuId": {
        "type": "long"
      },
      "spuId": {
        "type": "keyword"
      },
      "skuTitle": {
        "type": "text",
        "analyzer": "ik_smart"
      },
      "skuPrice": {
        "type": "keyword"
      },
      "skuImg": {
        "type": "keyword"
      },
      "saleCount": {
        "type": "long"
      },
      "hasStock": {
        "type": "boolean"
      },
      "hotScore": {
        "type": "long"
      },
      "brandId": {
        "type": "long"
      },
      "catalogId": {
        "type": "long"
      },
      "brandName": {
        "type": "keyword"
      },
      "brandImg": {
        "type": "keyword"
      },
      "catalogName": {
        "type": "keyword"
      },
      "attrs": {
        "type": "nested",
        "properties": {
          "attrId": {
            "type": "long"
          },
          "attrName": {
            "type": "keyword"
          },
          "attrValue": {
            "type": "keyword"
          }
        }
      }
    }
  }
}
商品上架接口参照:/product/spuinfo/{spuId}/up。调试通过debug断点测试。
步骤:
1. 查询当前spuid对应的所有sku信息;遍历得到skuId的集合
2. 查询当前sku所有 可以被用来检索的规格属性;遍历得到attrId的集合
3. 在指定的attrId集合中,挑出检索的属性
4. 将被用来检索的规格属性的数据遍历放入检索对象中
5. 发送远程调用,去库存系统根据skuId集合查询是否有库存
6. 封装每个sku的信息
	6.1 组装需要的数据
	6.2 设置库存信息
	6.3 设置热度评分
	6.4 查询并设置品牌的名字和图片信息
	6.5 查询并设置分类的名字和图片信息
	6.6 设置检索属性
7. 将数据发送给es进行保存,gulimall-search服务
8. 修改数据库中当前spu的状态
3. 商城业务 - 首页
thymeleaf模板引擎
官网地址:
https://www.thymeleaf.org/documentation.html
使用步骤:
- 引入thymeleaf-starter
- 关闭缓存
- 静态资源都放在static文件夹下就可以按照路径直接访问
- 页面放在templates下直接访问(SpringBoot访问项目的时候,默认会访问index)
- 页面修改不重启服务器实时更新
引入dev-tools依赖
修改完页面 使用ctrl + F9重新自动编译页面,代码配置需要重启。
渲染一级分类 接口:/index.html
渲染二级和三级分类 接口:/index/catalog.json
由于静态资源放在项目中的static 文件夹下,过于消耗资源,所以我们将项目中所有的静态资源放在服务器中保存,为此引入nginx。
Nginx
官网地址:http://nginx.org/en/docs/
修改本机 hosts(C:\Windows\System32\drivers\etc\hosts)文件,配置域名如下:

nginx监听的是虚拟机的80端口,访问gulimall.com此时就会访问到nginx的index页面。
1、搭建域名访问地址进行反向代理(gulimall.conf配置文件)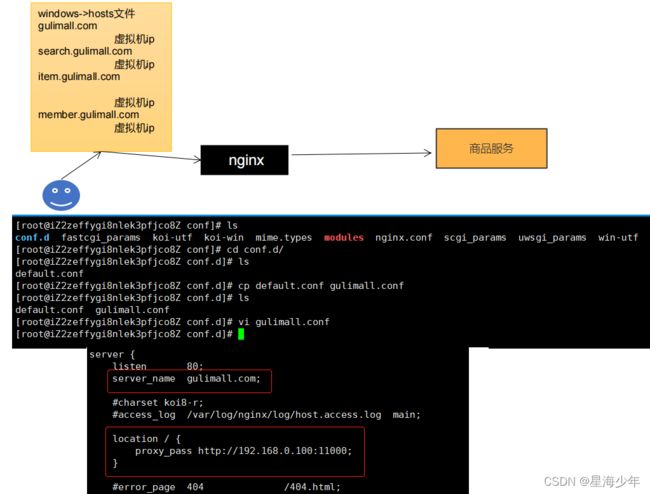
原理:浏览器访问gulimall.com,windows中的hosts文件中指明了gulimall.com映射的是虚拟机IP,因此gulimall.com就会来到虚拟机,来到虚拟机之后,虚拟机的nginx又监听了80端口,而且域名是gulimall.com的请求,nginx就会帮我们代理到windows本机上的服务地址。
2、负载均衡
gulimall.com会来到虚拟机中的nginx,由nginx再代理给我们的商品服务,但是商品服务可能是一个集群环境,多台服务器,而且有上线和下线,如果我们直接使用nginx代理我们的商品服务,那么就需要nginx负载均衡到商品服务中,而且商品服务的机器上下线也是动态的,那么就需要经常修改配置,因此我们希望nginx将请求交给网关,由网关通过nacos服务注册中心,获取上线的商品服务,由网关负载均衡到商品服务。
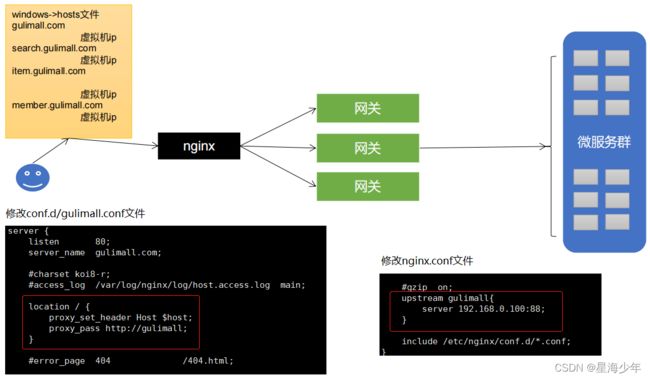
3、nginx动静分离(压测优化)
- 以后将所有项目的静态资源都应该放在nginx里面
/mydata/nginx/html/static - 规则:/static/**所有请求都由 nginx直接返回
修改conf.d/gulimall.conf文件

4. 压力测试
JMeter
JMeter的下载和使用:https://blog.csdn.net/weixin_45606067/article/details/121248621
JVM
1. jvm内存模型

- 程序计数器 Program Counter Register
- 记录的是正在执行的虚拟机字节码指令的地址,
- 此内存区域是唯一一个在Java虚拟机规范中没有规定任何Out OfMemoryError的区域。
- 虚拟机 VM Stack
- 描述的是 JAVA 方法执行的内存模型,每个方法在执行的时候都会创建一个栈帧, 用于存储局部变量表,操作数栈,动态链接,方法接口等信息
- 局部变量表存储了编译期可知的各种基本数据类型、对象引用
- 线程请求的栈深度不够会报 StackOverflowError 异常
- 栈动态扩展的容量不够会报 OutOfMemoryError 异常
- 虚拟机栈是线程隔离的,即每个线程都有自己独立的虚拟机栈
- 本地方法 Native Stack
- 本地方法栈类似于虚拟机栈,只不过本地方法栈使用的是本地方法。
- 堆 Heap
- 几乎所有的对象实例都在堆上分配内存。
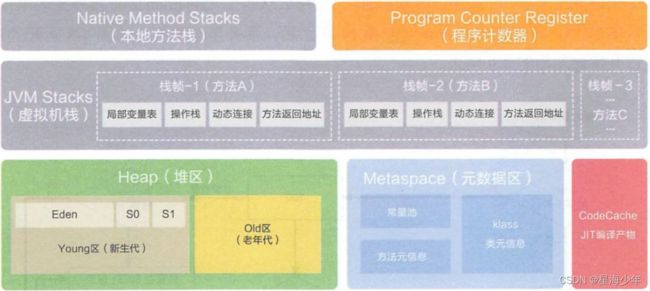
- 几乎所有的对象实例都在堆上分配内存。
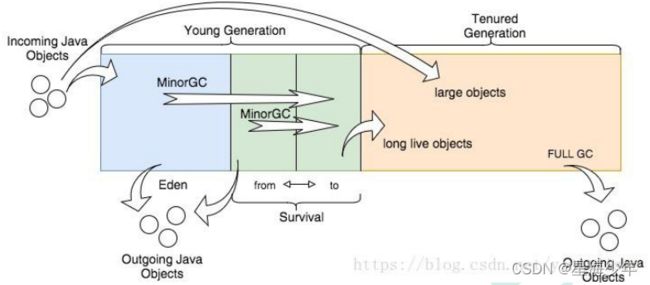
2. 堆
所有的对象实例以及数组都要在堆上分配。堆是垃圾收集器管理的主要区域,也称为 GC堆,也就是我们最多考虑的地方。
堆可以细分为:
- 新生代
- Eden 空间
- From Survivor 空间
- To Survivor 空间
- 老年代
- 永久代/元空间
- Java8 以前永久代,受 jvm 管理,java8 以后元空间,直接使用物理内存。因此, 默认情况下,元空间的大小仅受本地内存限制。
垃圾回收
从 Java8 开始,HotSpot 已经完全将永久代(Permanent Generation)移除,取而代之的是一 个新的区域—元空间(MetaSpace)
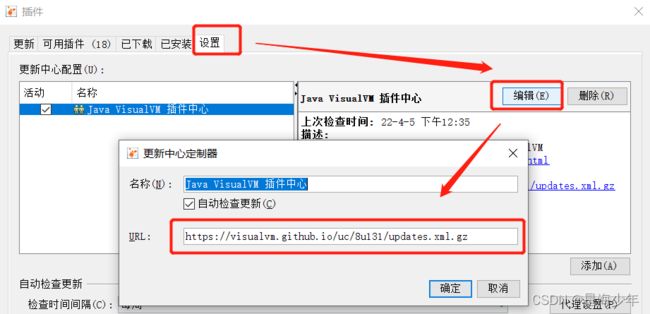
3. 项目如何监听JVM
Jdk 的两个小工具 jconsole、jvisualvm(升级版的 jconsole);通过命令行启动,可监控本地和 远程应用。远程应用需要配置。
安装官方gc插件
- cmd启动 jvisualvm
- 工具 -> 插件

如果在检验更新版本时 出现503错误,解决方法如下:
打开网址 https://visualvm.github.io/pluginscenters.html
cmd 查看自己的 jdk,复制下面查询出来的链接。并重新设置上即可
4. 项目检测指标

中间件越多,性能损失越大,大多数都损失在网络交互上。
简单优化
- DB(Mysql优化:关闭日志,加索引等)
- 模板的渲染速度(关闭 thymeleaf缓存)
- 静态资源(存放在nginx中)
模拟线上应用内存崩溃宕机
① 开启模板引擎缓存
② nginx静态资源和动态资源(thymeleaf)分离
③ 开启 jvisualvm监测 visual gc情况
④ 先使用50个线程来进行压测:
可以看到吞吐量可以达到8左右,仍然很低
同过观察可以发现,老年代和伊甸园区经常爆满,频繁的垃圾回收,垃圾回收太浪费时间了
⑤ 改用200个线程压力测试:
可以看到老年代已满,内存溢出,服务已经崩溃
继续简单优化
- 业务(项目中获取三级分类菜单)的优化
5. 缓存
为了系统性能的提升,我们一般都会将部分数据放入缓存中,加速访问。而db承担数据罗盘工作。
那些数据适合放入缓存?
- 即时性、数据一致性要求不高的
- 访问量大且更新频率不高的数据(读多,写少)
Redis
项目整合redis步骤:
- 引入
data-redis-starter - 简单配置redis的host信息
- 使用springboot自动配置好的
StringRedisTemplate来操作redis
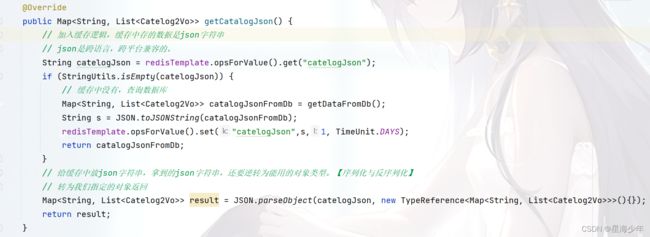
以项目中查询二级分类和三级分类为例(/index/catalog.json 接口)的原理:
- 从redis中查询数据,如果有则直接返回给客户端
- 如果没有则查询数据库,在将查询到的数据放入缓存中,并返回结果给客户端。
注意:缓存中存的数据是json字符串,因为json是跨语言,跨平台兼容的。我们拿到json字符串后,还要逆转为能用的对象类型。【序列化与反序列化】
上述代码 通过压力测试 产生的问题:堆外内存溢出:outOfDirectMemoryError
产生原因:
1)SpringBoot2.0 以后默认使用 lettuce 作为操作 redis 的客户端。它使用 netty 进行网络通信。
2)lettuce 的bug导致 netty 堆外内存溢出。VM Option = -Xmx300m;netty 如果没有指定堆外内存,默认使用 -Xmx300m
解决方案:不能使用 -Dio.netty.maxDirectMemory 只去调大堆外内存。
1)升级 lettuce 客户端
2)切换使用 jedis

说明:lettuce、jedis操作redis的底层客户端。Spring再次封装redisTemplate。
高并发下缓存失效问题
1. 缓存穿透
是指查询一个一定不存在的数据,由于缓存是不命中,将去查询数据库,但是数据库也无此纪录,我们没有将这次查询的null写入缓存,这将导致这个不存在的数据每次请求都要存储层去查询,失去了缓存的意义。
风险:利用不存在的数据进行攻击,数据库瞬时压力增大,最终导致崩溃。
解决:null结果缓存,并加入短暂过期时间。
2. 缓存雪崩
是指在我们设置缓存时key采用了相同的过期时间,导致缓存在某一时刻同时失效,请求全部转发到DB,DB瞬时压力过重雪崩。
解决:原有的失效时间基础上增加一个随机值,比如1-5分钟随机,这样每一个缓存的过期时间的重复率就会降低,就很难引引发集体失效的事件。
如果缓存数据库是分布式部署,将热点数据均匀分布在不同缓存数据库中。设置热点数据永远不过期。
出现雪崩:降级 熔断。
事前:尽量保证整个 redis 集群的高可用性,发现机器宕机尽快补上。选择合适的内存淘汰策略。
事中:本地ehcache缓存 + hystrix限流&降级,避免MySQL崩掉
事后:利用 redis 持久化机制保存的数据尽快恢复缓存
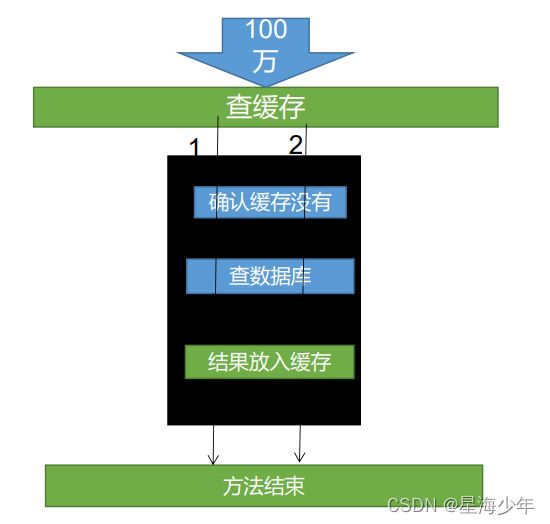
3. 缓存击穿
对于一些设置了过期时间的key,如果这些key可能会在某些时间点被超高并发的访问,是一种非常 “热点” 数据。
如果这个key在大量请求同时进来前面正好失效,那么所有对这个key的数据都落到db,我们称为 缓存击穿。
解决:加锁。常用的做法是使用 mutex。
大量并发只让一个去查,其他人等待,查到后释放锁,其他人获取到锁,先去查缓存,就会有数据,不用去db查询。
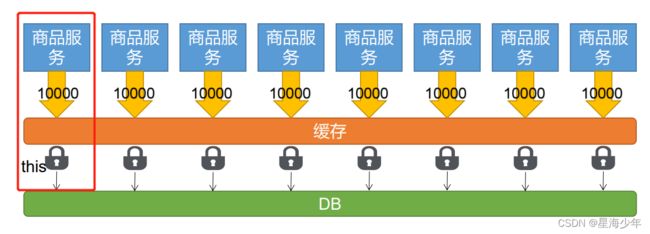
6. 锁机制
为了解决缓存击穿问题。以项目中查询二级分类和三级分类为例。
本地锁
加锁:只要是同一把锁,就能锁住需要这个锁的所有线程。
synchronized (this) :springboot所有的组件在容器中都是单例的。
本地锁:synchronized,JUC(Lock)只能锁住当前进程;
在分布式情况下,想要锁住所有,必须使用分布式锁。

锁时序问题:之前的逻辑是查缓存没有,然后去竞争锁查数据库,这样就造成多次查数据库。
解决方法:竞争到锁后,再次确认缓存中没有,再去查数据库,查询后的结果直接放入缓存。
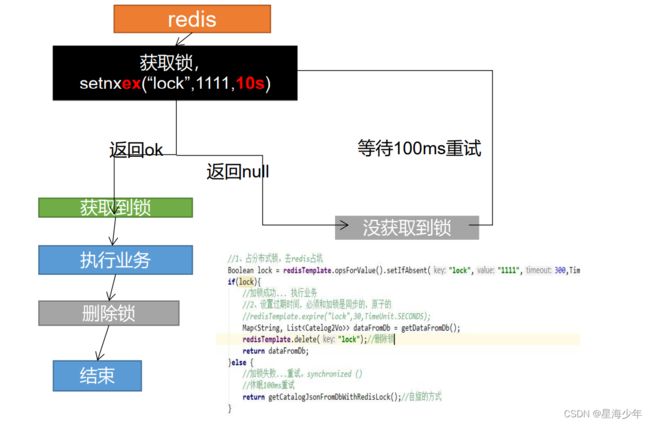
redis分布式锁
idea 如何复制微服务:
右键点击服务,copy configuration
在program arguments: --server.port=10003
本地锁,只能锁住当前进程,所以我们需要分布式锁。
分布式基本原理:我们可以同时去一个地方“占坑”,如果占到,就执行逻辑。否则就必须等待,直到释放锁。
“占坑”可以去redis,可以去数据库,可以去任何大家都能访问的地方。等待可以自旋的方式。
-
分布式锁演进 - 阶段一

问题:setnx占好了位,业务代码异常或者程序在页面过程中宕机。没有执行删除锁逻辑,这就造成了死锁。
解决:设置锁的过期时间,即使没有删除,也会自动删除。 -
分布式锁演进 - 阶段二

问题:setnx设置好,正好去设置过期时间,宕机。又死锁了。
解决:设置过期时间和占位必须是原子的。redis支持使用setnx ex命令。
- 分布式锁演进 - 阶段三
问题:删除锁直接删除??
如果由于业务时间很长,锁自己过期了,我们直接删除,有可能把别人正在持有的锁删除了。
解决:占锁的时候,值指定为uuid,每个人匹配是自己的锁才删除。
- 分布式锁演进 - 阶段四
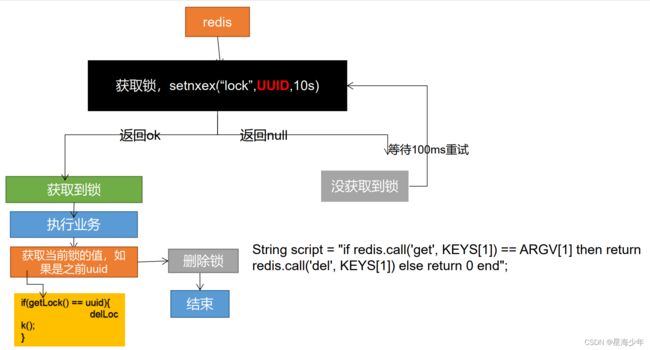
问题:如果正好判断是当前值,正要删除锁的时候,锁已经过期,别人已经设置到了新的值。那么我们删除的是别人的锁。
解决:删除锁必须保证原子性。使用redis+Lua脚本完成。
官网说明:http://redis.cn/commands/set.html
- 分布式锁演进 - 最终

保证加锁【占位+过期时间】和删除锁【判断+删除】的原子性。更难的事情,锁的自动续期。
改造redis锁的最终代码如下:

上面的 lua 脚本写法每次用分布式锁时都比较麻烦,官网推荐我们可以采用 redisson 框架。
https://redis.io/docs/reference/patterns/distributed-locks/
Redisson分布式锁
官网:https://github.com/redisson/redisson/wiki/1.-%E6%A6%82%E8%BF%B0
Redisson是一个在Redis的基础上实现的Java驻内存数据网格。它不仅提供了一系列的分布式的Java常用对象,还提供了许多分布式服务。其中包括(BitSet, Set, Multimap, SortedSet, Map, List, Queue, BlockingQueue, Deque, BlockingDeque, Semaphore, Lock, AtomicLong, CountDownLatch, Publish / Subscribe, Bloom filter, Remote service, Spring cache, Executor service, Live Object service, Scheduler service) Redisson提供了使用Redis的最简单和最便捷的方法。Redisson的宗旨是促进使用者对Redis的关注分离),从而让使用者能够将精力更集中地放在处理业务逻辑上。
1、项目整合redisson步骤:
- 引入redisson原生依赖
- 编写配置类【参照官网 2.-配置方法】
2、锁的说明:【参照官网 8. 分布式锁和同步器】
整体知识点可参照
JUC,进行学习
(1)可重入锁(Reentrant Lock)
基于Redis的 Redisson 分布式可重入锁 RLock Java 对象实现了java.util.concurrent.locks.Lock接口。同时还提供了异步(Async)、反射式(Reactive)和RxJava2标准的接口。
锁的续期:大家都知道,如果负责储存这个分布式锁的Redisson节点宕机以后,而且这个锁正好处于锁住的状态时,这个锁会出现锁死的状态。为了避免这种情况的发生,Redisson内部提供了一个监控锁的看门狗,它的作用是在Redisson实例被关闭前,不断的延长锁的有效期。默认情况下,看门狗的检查锁的超时时间是30秒钟(每到20s就会自动续借成30s,是1/3的关系),也可以通过修改Config.lockWatchdogTimeout来另行指定。
@ResponseBody
@GetMapping("/hello")
 public String hello() {
     //获取一把锁,只要锁的名字相同,就是同一把锁
     RLock lock = redisson.getLock("my-lock");
     //加锁
     lock.lock();//阻塞式等待,默认加的锁都是30s的时间
     //1)锁的自动续期,如果业务超长,运行期间自动给锁续上新的30s。不用担心业务时间长,锁自动过期被删除。
     //2)加锁的业务只要运行完成,就不会给当前锁续期,即使不手动解锁,锁默认在30s之后自动删除。

//   lock.lock(10, TimeUnit.SECONDS);//10s自动解锁,自动解锁时间一定要大于业务执行时间。
     //问题:lock.lock(10, TimeUnit.SECONDS);在锁时间到了以后,不会自动续期。
     //1. 如果我们传递了超时时间,就发送给redis执行脚本,进行占锁,默认超时就是我们指定的时间
     //2. 如果我们未指定超时时间,就使用30 * 1000【lockWatchdogTimeout看门狗的默认时间】
     //    只要占锁成功,就会启动一个定时任务【重新给锁设置过期时间,新的过期时间就是看门狗的默认时间】
     //    internalLockLeaseTime【看门狗的的时间】 / 3 ,也就是10s。每隔10s都会自动再次续期,续成30s

     //最佳实战:lock.lock(30, TimeUnit.SECONDS);省掉了整个续期操作,手动操作。将解锁时间设大一些 为30s
     try {
         System.out.println("加锁成功,指定业务代码...." + Thread.currentThread().getId());
         Thread.sleep(30000);
     } catch (Exception e) {

     } finally {
         //解锁  假设解锁代码没有运行,redisson会不会出现死锁。 结果是不会。
         System.out.println("释放锁..." + Thread.currentThread().getId() );
         lock.unlock();
     }
     return "hello";
 }
(2)读写锁(ReadWriteLock)
基于Redis的Redisson分布式可重入读写锁RReadWriteLock Java对象实现了java.util.concurrent.locks.ReadWriteLock接口。其中读锁和写锁都继承了RLock接口。
@ResponseBody
@GetMapping("/write")
public String writeValue() {
    RReadWriteLock lock = redisson.getReadWriteLock("wr-lock");
    String s = "";
    RLock rLock = lock.writeLock();//改数据加写锁
    try {
        rLock.lock();
        System.out.println("写锁加锁成功..." + Thread.currentThread().getId());
        s = UUID.randomUUID().toString();
        Thread.sleep(30000);
        redisTemplate.opsForValue().set("writeValue",s);
    } catch (InterruptedException e) {
        e.printStackTrace();
    } finally {
        rLock.unlock();
        System.out.println("写锁释放成功..." + Thread.currentThread().getId());
    }
    return s;
}

@ResponseBody
@GetMapping("/read")
public String readValue() {
    RReadWriteLock lock = redisson.getReadWriteLock("wr-lock");
    String s = "";
    RLock rLock = lock.readLock();//读数据加读锁
    try {
        rLock.lock();
        System.out.println("读锁加锁成功..." + Thread.currentThread().getId());
        Thread.sleep(30000);
        s = redisTemplate.opsForValue().get("writeValue");
    } catch (Exception e) {
        e.printStackTrace();
    } finally {
        rLock.unlock();
        System.out.println("读锁释放成功..." + Thread.currentThread().getId());
    }
    return s;
}
- 保证一定能读到最新数据,修改期间,写锁是一个排他锁(互斥锁 / 独享锁),读锁是一个共享锁
- 写锁没有释放 读锁就必须等待
- 读 + 读:相当于无锁,并发读只会在redis中记录好所有当前的读锁,他们都会同时加锁成功
- 写 + 读:等待写锁释放
- 写 + 写:阻塞方式
- 读 + 写:有读锁,写锁也需要等待
- 总结:只要有写锁的存在,都必须要等待。
(3)信号量(Semaphore)
基于Redis的Redisson的分布式信号量(Semaphore)Java对象RSemaphore采用了与 java.util.concurrent.Semaphore相似的接口和用法。同时还提供了异步(Async)、反射式(Reactive)和RxJava2标准的接口。
/**
 * 举例:车库停车 3个车位
 */
@ResponseBody
@GetMapping("/park")
public String park() throws InterruptedException {
    RSemaphore park = redisson.getSemaphore("park");
    park.acquire();//获取一个信号

    //信号量 可以用于分布式限流。
//        boolean b = park.tryAcquire();
//        if (b){
//            //执行业务
//        } else {
//            return "error";
//        }

    return "停车...";
}

@ResponseBody
@GetMapping("/go")
public String go() {
    RSemaphore park = redisson.getSemaphore("park");
    park.release();//释放一个信号
    return "开走...";
}
信号量为存储在redis中的一个数字,当这个数字大于0时,即可以调用 release() 方法增加数量,也可以调用 acquire() 方法减少数量,但是当调用 release()之后小于0的话方法就会阻塞,直到数字大于0
(4)闭锁(CountDownLatch)
基于Redisson的Redisson分布式闭锁(CountDownLatch)Java对象RCountDownLatch采用了与 java.util.concurrent.CountDownLatch相似的接口和用法。
/**
 * 举例:放假锁门
 * 5个班全部走完,我们就可以锁门
 */
@ResponseBody
@GetMapping("/lockDoor")
public String lockDoor() throws InterruptedException {
    RCountDownLatch latch = redisson.getCountDownLatch("door");
    latch.trySetCount(5);
    latch.await();
    return "放假了...";
}

@ResponseBody
@GetMapping("/gogogo/{id}")
public String gogogo(@PathVariable("id") Long id) {
    RCountDownLatch latch = redisson.getCountDownLatch("door");
    latch.countDown();//计数减一
    return id + "班的人都走了...";
}
改造redisson锁的最终代码如下:

缓存和数据库一致性
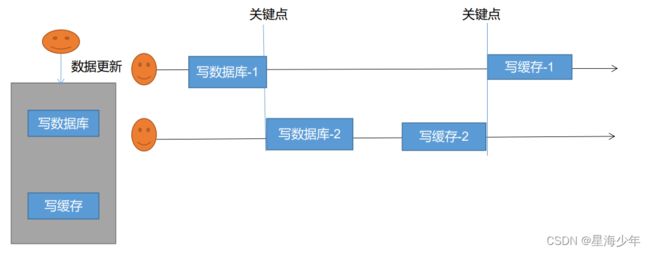
缓存里面的数据如何和数据库中数据保持一致
- 双写模式:写数据库后,更新缓存。
- 出现问题:由于卡顿等原因,导致写缓存2在最前,写缓存1在后面,就出现数据不一致。【脏数据问题】
- 解决方案:① 整个操作加锁。将写数据库和写缓存这段逻辑加锁,同时只有一个线程可以操作。
- 解决方案:②看业务允不允许数据暂时不一致问题,如果允许,可以不管这个缓存不一致的事情,将数据放入缓存的时候,设置缓存过期时间,只要数据过期了,就会重新从数据库中加载数据。
- 失效模式:写数据库后,删除缓存。
- 一个线程先写数据库db-1,然后删除缓存;另一个线程接着写数据库db-2,还没来得写,第三个线程就读取了数据库db-1,并更新了缓存,因此数据库中存放的是db-2,而缓存中存放的是db-1。【脏数据问题】
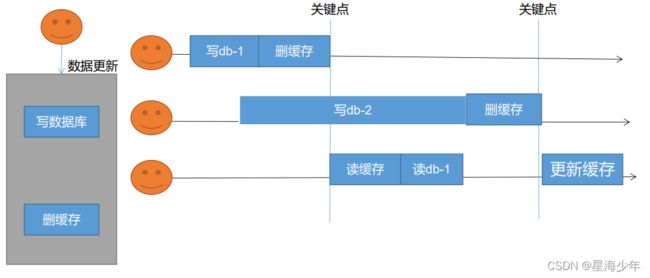
- 一个线程先写数据库db-1,然后删除缓存;另一个线程接着写数据库db-2,还没来得写,第三个线程就读取了数据库db-1,并更新了缓存,因此数据库中存放的是db-2,而缓存中存放的是db-1。【脏数据问题】
解决方案:
- 无论是双写模式还是失效模式,都会存在缓存不一致的问题。即多个实例同时更新会出事,怎么办?
- 如果是用户维度数据(订单数据,用户数据),这种并发几率非常小,不用考虑这个问题,缓存数据加上过期时间,每隔一段时间触发读的主动更新即可。
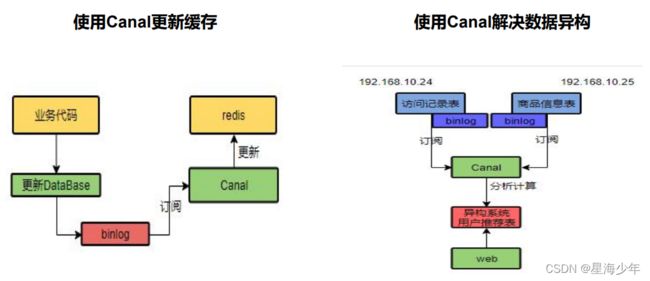
- 如果是菜单,商品介绍等基础数据,也可以去使用canal订阅binlog方式。
- 缓存数据 + 过期时间 也足够解决大部分业务对缓存的要求。
- 通过加锁保证并发读写,写写的时候按顺序排好队,读读无所谓。所以适合使用读写锁。(业务不关系脏数据,允许临时脏数据可忽略)
总结:
- 我们能放入缓存的数据本就不应该是实时性、一致性要求超高的。缓存的所有数据都有过期时间,数据过期下一次查询出发主动更新。
- 读写数据的时候,加上分布式读写锁。
- 遇到实时性、一致性要求高的数据,就应该查数据库,即使慢点。
Spring Cache
每次都那样写缓存太麻烦了,spring从3.1开始定义了Cache、CacheManager接口来统一不同的缓存技术。并支持使用JCache(JSR-107)注解简化我们的开发
Cache接口的实现包括RedisCache、EhCacheCache、ConcurrentMapCache等。
每次调用需要缓存功能的方法时,spring会检查指定参数的指定的目标方法是否已经被调用过;如果有就直接从缓存中获取方法调用后的结果,如果没有就调用方法并缓存结果后返回给用户。下次调用直接从缓存中获取。
项目整合cache步骤:
- 引入spring-boot-starter-cache、spring-boot-starter-redis依赖
- 开启缓存功能:@EnableCaching
- 编写配置文件
spring.cache.type=redis
# 过期时间。毫秒为单位,设置为1小时
spring.cache.redis.time-to-live=3600000
# key的前缀,如果指定了前缀就用我们指定的前缀,如果没有就默认使用缓存的名字作为前缀
#spring.cache.redis.key-prefix=CACHE_
# 是否使用前缀
spring.cache.redis.use-key-prefix=true
# 是否缓存空值。防止缓存穿透。
spring.cache.redis.cache-null-values=true
缓存注解的说明:
- @Cacheable:触发将数据保存到缓存的操作
- @CacheEvict:触发将数据从缓存中删除的操作
- @CachePut:不影响方法执行更新缓存
- @Caching:组合以上多个操作
- @CacheConfig:在类级别共享缓存的相同配置
原理说明:【源码分析】
- CacheAutoConfiguration -> RedisCacheConfiguration ->
- 自动配置了缓存管理器RedisCacheManager -> 初始化所有的缓存 -> 每个缓存解决使用什么配置
- -> 如果redisCacheConfiguration有就用已有的,没有就用默认配置
- -> 想改缓存的配置,只需要给容器中放一个RedisCacheConfiguration即可
- -> 就会应用到当前 RedisCacheManager管理的所有缓存分区中
获取菜单代码进行修改:
 /**
 * 更新本表及关联表,保证冗余字段的数据一致性
 * @CacheEvict:失效模式
 * 1. 同时进行多种缓存操作:@Caching
 * 2. 指定删除某个分区下的所有数据:@CacheEvict(value = "category",allEntries = true)
 * 3. 存储同一个类型的数据,都可以指定成同一个分区。分区名默认就是缓存的前缀。
 */
//    @Caching(evict = {
//        @CacheEvict(value = "category",key = "'getLevel1Categorys'"),
//        @CacheEvict(value = "category",key = "'getCatalogJson'")
//    })
@CacheEvict(value = "category",allEntries = true)//失效模式
//    @CachePut()//双写模式
@Transactional
@Override
public void updateCascade(CategoryEntity category) {
    this.updateById(category);
    if (!StringUtils.isEmpty(category.getName())) {
        // 同步更新其他关联表中的数据
        categoryBrandRelationService.updateCategory(category.getCatId(),category.getName());
        // TODO 更新其他关联表
    }
}

/**
 * 查询所有一级分类
 * 1. 每一个需要缓存的数据我们都来指定要放到那个名字的缓存。【缓存的分区(按照业务划分)】
 * 2. @Cacheable({"category"}):表示当前方法的结果需要缓存,如果缓存中有,方法不用调用。如果缓存中没有,会调用方法,并将方法的结果放入缓存。
 * 3. 默认行为
 *      1)如果缓存中有,方法不用调用
 *      2)key默认自动生成:缓存的名字::SimpleKey [](自动生成key的值)
 *      3)缓存的value的值:默认使用jdk序列换机制。将序列化后的数据存到redis。
 *      4)默认ttl时间是-1。
 * 4. 自定义
 *      1)指定生成缓存使用的key: key属性指定,接收一个SpEL表达式
 *          SpEL语法详细:https://docs.spring.io/spring-framework/docs/5.3.19-SNAPSHOT/reference/html/integration.html#cache
 *      2)指定缓存数据的存活时间: 配置文件中修改ttl
 *      3)将数据保存为json格式:
 *          查看源码,自定义RedisCacheConfiguration配置类进行修改
 */
@Cacheable(value = {"category"},key = "#root.method.name")
@Override
public List<CategoryEntity> getLevel1Categorys() {
    System.out.println("getLevel1Categorys....");
    List<CategoryEntity> categoryEntities = baseMapper.selectList(new QueryWrapper<CategoryEntity>().eq("parent_cid", 0));
    return categoryEntities;
}

@Cacheable(value = {"category"},key = "#root.methodName")
@Override
public Map<String, List<Catelog2Vo>> getCatalogJson(){
    System.out.println("查询了数据库.....");
    List<CategoryEntity> selectList = baseMapper.selectList(null);
    // 查询所有一级分类
    List<CategoryEntity> level1Categorys = getParent_cid(selectList,0L);
    // 封装数据
    Map<String, List<Catelog2Vo>> listMap = level1Categorys.stream().collect(Collectors.toMap(k -> k.getCatId().toString(), v -> {
        // 每一个一级分类,查到这个一级分类的二级分类
        List<CategoryEntity> level2Catelog = getParent_cid(selectList,v.getCatId());
        // 封装上面的结果集
        List<Catelog2Vo> catelog2Vos = null;
        if (level2Catelog != null) {
            catelog2Vos = level2Catelog.stream().map(l2 -> {
                Catelog2Vo catelog2Vo = new Catelog2Vo(v.getCatId().toString(), null, l2.getCatId().toString(), l2.getName());

                // 找到当前二级分类的三级分类封装成vo
                List<CategoryEntity> level3Catelog = getParent_cid(selectList,l2.getCatId());
                if (level3Catelog != null) {
                    List<Catelog2Vo.catelog3Vo> collect = level3Catelog.stream().map(l3 -> {
                        // 封装成指定格式
                        Catelog2Vo.catelog3Vo catelog3Vo = new Catelog2Vo.catelog3Vo(l2.getCatId().toString(), l3.getCatId().toString(), l3.getName());
                        return catelog3Vo;
                    }).collect(Collectors.toList());
                    catelog2Vo.setCatalog3List(collect);
                }
                return catelog2Vo;
            }).collect(Collectors.toList());
        }
        return catelog2Vos;
    }));
    return listMap;
}
默认使用jdk进行序列化(可读性差),默认ttl为-1永不过期,自定义序列化方式需要编写配置类
@EnableConfigurationProperties(CacheProperties.class)
@Configuration
@EnableCaching//开启缓存
public class MyCacheConfig {

    /**
     * 配置文件中的东西没有用上,不生效。
     * 1. 原来和配置文件绑定的配置类是这样的:
     *      @ConfigurationProperties(prefix = "spring.cache")
     *      public class CacheProperties {
     * 2. 要让他生效
     *      @EnableConfigurationProperties(CacheProperties.class)
     */
    @Bean
    RedisCacheConfiguration redisCacheConfiguration(CacheProperties cacheProperties) {
        RedisCacheConfiguration config = RedisCacheConfiguration.defaultCacheConfig();
        config = config.serializeKeysWith(RedisSerializationContext.SerializationPair.fromSerializer(new StringRedisSerializer()));
        config = config.serializeValuesWith(RedisSerializationContext.SerializationPair.fromSerializer(new GenericFastJsonRedisSerializer()));

        // 将配置文件中的所有配置都生效
        CacheProperties.Redis redisProperties = cacheProperties.getRedis();
        if (redisProperties.getTimeToLive() != null) {
            config = config.entryTtl(redisProperties.getTimeToLive());
        }
        if (redisProperties.getKeyPrefix() != null) {
            config = config.prefixKeysWith(redisProperties.getKeyPrefix());
        }
        if (!redisProperties.isCacheNullValues()) {
            config = config.disableCachingNullValues();
        }
        if (!redisProperties.isUseKeyPrefix()) {
            config = config.disableKeyPrefix();
        }
        return config;
    }
}
SpringCache原理与不足:
1)读模式
- 缓存穿透:查询一个null数据。解决方案:缓存空数据,可通过
spring.cache.redis.cache-null-values=true - 缓存击穿:大量并发进来同时查询一个正好过期的数据。解决方案:加锁 ? 默认是无加锁的。
- 使用
sync = true来解决击穿问题
- 使用
- 缓存雪崩:大量的key同时过期。解决:加随机时间。可通过
spring.cache.redis.time-to-live=3600000
2)写模式:(缓存与数据库一致)
- 读写加锁。【适用于读多写少】
- 引入Canal,感知到MySQL的更新去更新Redis
- 读多写多,直接去数据库查询就行。
3)总结:
- 常规数据(读多写少,即时性,一致性要求不高的数据,完全可以使用Spring-Cache)
- 写模式(只要缓存的数据有过期时间就足够了)
- 特殊数据:特殊设计
7. 商城业务 - 检索服务
除了在检索页面通过 三级分类catelog3Id 和检索关键字keyword 进行检索商品外,还有其他的检索条件进行检索。
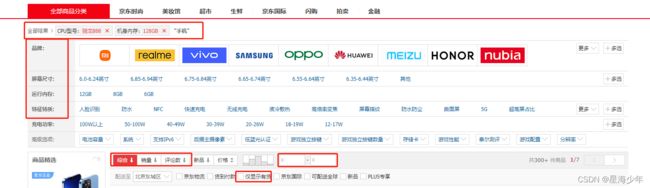
keyword=华为&catalog3Id=225&attrs=1_NOH-AL00/NOH-AL10&attrs=2_2010&sort=saleCount_desc&hasStock=1&brandId=2
接口可以通过postman进行单独测试:

发送请求查看 控制台中 构建的DSL语句 在 kibana 中进行验证。
检索页完成的功能:
① 商品
② 品牌、分类、属性
③ 排序、价格区间、是否显示有货
④ 分页
⑤ 面包屑导航
⑥ 条件筛选联动
8. 商城业务 - 商品详情
多线程
1、初始化线程的 4 种方式
- 继承Thread
- 实现Runnable接口
- 实现Callable接口 + FutureTask(可以拿到返回结果。可以处理异常)
- 线程池
public class ThreadTest {

    public static ExecutorService service = Executors.newFixedThreadPool(10);

    public static void main(String[] args) throws ExecutionException, InterruptedException {
        //1、继承Thread
        Thread01 thread01 = new Thread01();
        thread01.start();

        //2、实现Runnable接口
        Runnable01 runnable01 = new Runnable01();
        new Thread(runnable01).start();

        //3、实现Callable接口 + FutureTask
        FutureTask<Integer> futureTask = new FutureTask<>(new Callable01());
        new Thread(futureTask).start();
        Integer integer = futureTask.get();//阻塞等待整个线程执行完成,获取返回结果

        //4、线程池
        //我们以后业务代码里面,以上三种启动线程的方式都不用。【将所有的多线程异步任务都交给线程池执行】
        //当前系统中池只有一两个,每个异步任务,提交给线程池让他自己去执行就行
        service.execute(new Runnable01());

		//原生的线程池
        ThreadPoolExecutor executor = new ThreadPoolExecutor(5,
                200,
                10,
                TimeUnit.SECONDS,
                new LinkedBlockingDeque<>(10000),
                Executors.defaultThreadFactory(),
                new ThreadPoolExecutor.AbortPolicy());
    }

    public static class Thread01 extends Thread {
        @Override
        public void run() {
            System.out.println("当前线程:"+Thread.currentThread().getId());
            int i = 10 /2;
            System.out.println("运行结果:" + i);
        }
    }

    public static class Runnable01 implements Runnable {
        @Override
        public void run() {
            System.out.println("当前线程:"+Thread.currentThread().getId());
            int i = 10 /2;
            System.out.println("运行结果:" + i);
        }
    }

    public static class Callable01 implements Callable<Integer> {
        @Override
        public Integer call() throws Exception {
            System.out.println("当前线程:"+Thread.currentThread().getId());
            int i = 10 /2;
            System.out.println("运行结果:" + i);
            return i;
        }
    }
}
总结:方式 1 和方式 2 不能得到返回值,方式3 可以得到返回值。
方式 1 和方式 2 和方式 3 不利于控制服务器中的线程资源。会导致服务器资源耗尽。
方式四 可以控制资源,比较稳定,也可以获取执行结果, 并捕获异常。
2、开发中为什么使用线程池?
降低资源的消耗: 通过重复利用已经创建好的线程降低线程的创建和销毁带来的损耗。
提高响应速度:因为线程池中的线程数没有超过线程池的最大上限时, 有的线程处于等待分配任务的状态, 当任务来时无需创建新的线程就能执行。
提高线程的可管理性:线程池会根据当前系统特点对池内的线程进行优化处理, 减少创建和销毁线程带来的系统开销。 无限的创建和销毁线程不仅消耗系统资源, 还降低系统的稳定性, 使用线程池进行统一分配 。
3、常见的 4 种线程池
- newCachedThreadPool :创建一个可缓存线程池, 如果线程池长度超过处理需要, 可灵活回收空闲线程, 若无可回收, 则新建线程。
- newFixedThreadPool:创建一个定长线程池, 可控制线程最大并发数, 超出的线程会在队列中等待。
- newScheduledThreadPool:创建一个定长线程池, 支持定时及周期性任务执行。
- newSingleThreadExecutor:创建一个单线程化的线程池, 它只会用唯一的工作线程来执行任务, 保证所有任务按照指定顺序(FIFO, LIFO, 优先级)执行
4、线程池的七大参数说明
- int corePoolSize:核心线程数[一直存在 除非设置allowCoreThreadTimeOut];线程池创建好以后就准备就绪的线程数量,就等待来接受异步任务去执行。
- int maximumPoolSize:最大线程数量;控制资源并发
- long keepAliveTime:存活时间;如果当前的线程数量大于核心数量。 释放空闲的线程(keepAliveTime-corePoolSize)。只要线程空闲大于指定的keepAliveTime。
- TimeUnit unit:时间单位;
- BlockingQueue workQueue:阻塞队列;如果任务有很多,就会将目前多的任务放在队列里面。只要有线程空闲,就会去队列里面取出新的任务继续执行。
- ThreadFactory threadFactory:线程的创建工厂;
- RejectedExecutionHandler handler:如果队列满了,按照我们指定的拒绝策略拒绝执行任务。
5、线程池工作顺序
- 1)线程池创建,准备好 core 数量的核心线程,准备接受任务
- 2)新的任务进来,用 core 准备好的空闲线程执行。
- (1) core 满了,就将再进来的任务放入阻塞队列中。空闲的 core 就会自己去阻塞队 列获取任务执行
- (2) 阻塞队列满了,就直接开新线程执行,最大只能开到 max 指定的数量
- (3) max 都执行好了。Max-core 数量空闲的线程会在 keepAliveTime 指定的时间后自 动销毁。最终保持到 core 大小
- (4) 如果线程数开到了 max 的数量,还有新任务进来,就会使用 reject 指定的拒绝策 略进行处理
- 3)所有的线程创建都是由指定的 factory 创建的。
面试: 一个线程池 core 7; max 20 ,queue:50,100 并发进来怎么分配的;
解决:先有 7 个能直接得到执行,接下来 50 个进入队列排队,在多开 13 个继续执行。现在 70 个 被安排上了。剩下 30 个默认拒绝策略。
如果不想抛弃还要执行,可以使用 CallerRunsPolicy 同步方式执行。
CompletableFuture 异步编排
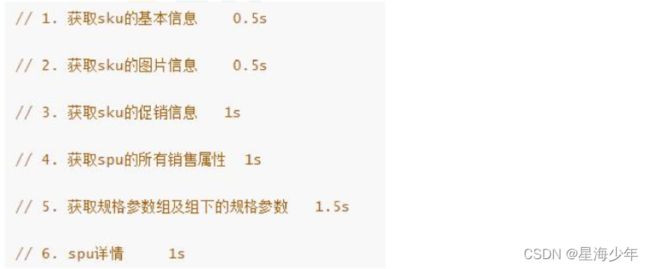
业务场景:查询商品详情页的逻辑比较复杂, 有些数据还需要远程调用, 必然需要花费更多的时间。
假如商品详情页的每个查询, 需要如下标注的时间才能完成 ,那么, 用户需要 5.5s 后才能看到商品详情页的内容。 很显然是不能接受的。如果有多个线程同时完成这 6 步操作, 也许只需要 1.5s 即可完成响应。
在 Java 8 中, 新增加了一个包含 50 个方法左右的类: CompletableFuture, 提供了非常强大的Future 的扩展功能, 可以帮助我们简化异步编程的复杂性, 提供了函数式编程的能力, 可以通过回调的方式处理计算结果, 并且提供了转换和组合 CompletableFuture 的方法。CompletableFuture 类实现了 Future 接口, 所以你还是可以像以前一样通过get方法阻塞或者轮询的方式获得结果, 但是这种方式不推荐使用。
CompletableFuture 和 FutureTask 同属于 Future 接口的实现类, 都可以获取线程的执行结果。
1、四个静态方法来创建一个异步操作
runXxxx 都是没有返回结果的, supplyXxx 都是可以获取返回结果的;Executor 可以传入自定义的线程池, 否则就用默认的线程池 。

public class ThreadTest {
    public static ExecutorService executor = Executors.newFixedThreadPool(10);
    public static void main(String[] args) throws ExecutionException, InterruptedException {
        CompletableFuture<Void> future = CompletableFuture.runAsync(() -> {
            System.out.println("当前线程:" + Thread.currentThread().getId());
            int i = 10 / 2;
            System.out.println("运行结果:" + i);
        }, executor);
    }
}
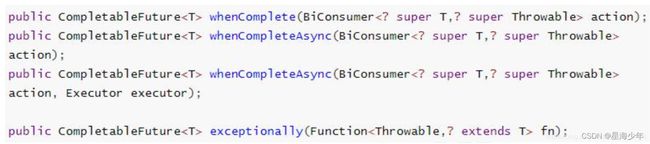
2、计算完成时的回调方法:方法完成后的感知
public class CompletableFutureTest {
    public static ExecutorService service = Executors.newFixedThreadPool(10);
    public static void main(String[] args) throws ExecutionException, InterruptedException {
    	CompletableFuture<Integer> future = CompletableFuture.supplyAsync(() -> {
            System.out.println("当前线程:" + Thread.currentThread().getId());
            int i = 10 / 0;
            System.out.println("运行结果:" + i);
            return i;
        }, service).whenComplete((res,exception) -> {
            //虽然能得到异常信息,但是没法修改返回数据。
            System.out.println("异步任务成功完成了...结果是:" + res + ";异常是" + exception);
        }).exceptionally(throwable -> {
            //可以感知异常,同时返回默认值。
            return 10;
        });
    }
}
3、handle方法完成后的处理

public class CompletableFutureTest {
    public static ExecutorService service = Executors.newFixedThreadPool(10);
    public static void main(String[] args) throws ExecutionException, InterruptedException {
    	CompletableFuture<Integer> future = CompletableFuture.supplyAsync(() -> {
            System.out.println("当前线程:" + Thread.currentThread().getId());
            int i = 10 / 4;
            System.out.println("运行结果:" + i);
            return i;
        }, service).handle((res,thr) -> {
            if (res != null) {
                return res*2;
            }
            if (thr != null) {
                return 0;
            }
            return 1;
        });
        Integer integer = future.get();//得到返回值
    }
}
4、线程串行化方法
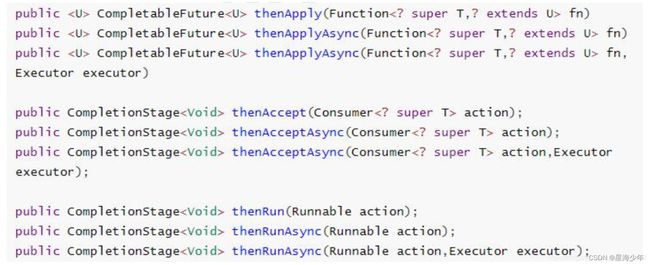
/**
 * 1.thenRunAsync:不能获取到上一步的执行结果,无返回值
 * .thenRunAsync(() -> {
 *             System.out.println("任务2启动了...");
 *         }, service);
 * 2.thenAcceptAsync:能接受上一步结果,但没有返回值
 * .thenAcceptAsync(res -> {
 *             System.out.println("任务2启动了..." + res);
 *         }, service);
 * 3.thenApplyAsync:能接受上一步结果,有返回值
 * .thenApplyAsync(res -> {
 *             System.out.println("任务2启动了..." + res);
 *             return "hello" + res;
 *         }, service);
 */
public class CompletableFutureTest {
    public static ExecutorService service = Executors.newFixedThreadPool(10);
    public static void main(String[] args) throws ExecutionException, InterruptedException {
    	CompletableFuture<String> future = CompletableFuture.supplyAsync(() -> {
            System.out.println("当前线程:" + Thread.currentThread().getId());
            int i = 10 / 4;
            System.out.println("运行结果:" + i);
            return i;
        }, service).thenApplyAsync(res -> {
            System.out.println("任务2启动了..." + res);
            return "hello" + res;
        }, service);
    }
}
5、两任务组合 - 都要完成
public class CompletableFutureTest {
    public static ExecutorService service = Executors.newFixedThreadPool(10);
    public static void main(String[] args) throws ExecutionException, InterruptedException {
    	CompletableFuture<Object> future1 = CompletableFuture.supplyAsync(() -> {
            System.out.println("任务1线程:" + Thread.currentThread().getId());
            int i = 10 / 2;
            System.out.println("任务1结束:" + i);
            return i;
        }, service);
        CompletableFuture<Object> future2 = CompletableFuture.supplyAsync(() -> {
            System.out.println("任务2线程:" + Thread.currentThread().getId());
            try {
                Thread.sleep(3000);
                System.out.println("任务2结束...");
            } catch (InterruptedException e) {
                e.printStackTrace();
            }
            return "hello";
        }, service);
        //不能感知到前两个结果,无返回值
        future1.runAfterBothAsync(future2,() -> {
            System.out.println("任务3开始...");
        },service);
        //能感知到前两个结果,无返回值
        future1.thenAcceptBothAsync(future2,(f1,f2) -> {
            System.out.println("任务3开始..." + f1 + "->" + f2);
        },service);
        //能感知到前两个结果,有返回值
        CompletableFuture<String> future = future1.thenCombineAsync(future2, (f1, f2) -> {
            return f1 + ": " + f2 + "-> haha";
        }, service);
        System.out.println("future = " + future.get());
    }
}
6、两任务组合 - 一个完成
public class CompletableFutureTest {
    public static ExecutorService service = Executors.newFixedThreadPool(10);

    public static void main(String[] args) throws ExecutionException, InterruptedException {
   		CompletableFuture<Object> future1 = CompletableFuture.supplyAsync(() -> {
            System.out.println("任务1线程:" + Thread.currentThread().getId());
            int i = 10 / 2;
            System.out.println("任务1结束:" + i);
            return i;
        }, service);
        CompletableFuture<Object> future2 = CompletableFuture.supplyAsync(() -> {
            System.out.println("任务2线程:" + Thread.currentThread().getId());
            try {
                Thread.sleep(3000);
                System.out.println("任务2结束...");
            } catch (InterruptedException e) {
                e.printStackTrace();
            }
            return "hello";
        }, service);
    	//不感知结果,自己无返回值
        future1.runAfterEitherAsync(future2,() -> {
            System.out.println("任务3开始...");
        }, service);
        //感知结果,自己无返回值
        future1.acceptEitherAsync(future2,(res) -> {
            System.out.println("任务3开始..." + res);
        },service);
        //感知结果,自己有返回值
        CompletableFuture<String> future = future1.applyToEitherAsync(future2, (res) -> {
            return res.toString() + " -> haha";
        }, service);
        System.out.println("future = " + future.get());
    }
}
7、多任务组合
public class CompletableFutureTest {
    public static ExecutorService service = Executors.newFixedThreadPool(10);
    public static void main(String[] args) throws ExecutionException, InterruptedException {
    	CompletableFuture<String> futureImg = CompletableFuture.supplyAsync(() -> {
            System.out.println("查询商品图片信息");
            return "hello.jpg";
        },service);
        CompletableFuture<String> futureAttr = CompletableFuture.supplyAsync(() -> {
            try {
                Thread.sleep(3000);
                System.out.println("查询商品的属性");
            } catch (InterruptedException e) {
                e.printStackTrace();
            }
            return "黑色256g";
        },service);
        CompletableFuture<String> futureDesc = CompletableFuture.supplyAsync(() -> {
            System.out.println("查询商品介绍");
            return "华为";
        },service);

        //等待所有任务完成
        CompletableFuture<Void> future = CompletableFuture.allOf(futureImg, futureAttr, futureDesc);
        future.get();
        System.out.println(futureImg.get() + "->" + futureAttr.get() + "->" + futureDesc.get());

        //只有一个任务完成
        CompletableFuture<Object> future = CompletableFuture.anyOf(futureImg, futureAttr, futureDesc);
        future.get();
        System.out.println(future.get());
    }
}
如果有收获!!! 希望老铁们来个三连,点赞、收藏、转发。
创作不易,别忘点个赞,可以让更多的人看到这篇文章,顺便鼓励我写出更好的博客